Hair Trends
26 Best Hiking Hairstyles That Survive the Trail and Look Good in Photos
You know the drill. You spend twenty minutes on your hair before a hike, and forty-five minutes in, the wind has turned your carefully styled waves into a frizz ball tangled around your neck. Sweat makes it worse. A headlamp strap makes it worse still. By the time you reach the summit, your hair looks like you slept in a bush, and your trail photos confirm it.
Hiking hair is its own category because the demands are different from everyday styling. You need something that stays put through elevation changes, wind, humidity, and sweat. It has to survive a backpack strap rubbing against the back of your head for hours. It needs to look decent in the photos you will actually want to keep from the trip. And ideally, it should take under ten minutes because nobody wants to stand at a trailhead mirror at 6 a.m. We rounded up twenty-six hiking hairstyles that check every one of those boxes.
Why Most Hairstyles Fail on the Trail
The problem is not that your hair is uncooperative. The problem is that most hairstyles are designed for controlled environments: a room with still air, a predictable temperature, and no one brushing past you with a forty-pound pack. The trail throws all of that out.
Wind is the biggest culprit. Any loose section of hair becomes a sail in a gust, pulling pins out and creating tangles that take twice as long to undo as they did to create. Humidity swells the hair cuticle, which means styles that looked sleek at the car look puffy and frizzy twenty minutes into the hike. Sweat loosens elastics and makes bobby pins slide. And the friction from backpack straps against the back of your head will grind any low style into a flattened mess within the first mile.
The fix? Styles that contain all the hair, use mechanical tension rather than product to stay in place, and sit in areas the backpack straps do not touch. Braids, high buns, headband-secured styles, and anything with multiple anchor points outperform single-elastic ponytails every time.
The Gear That Actually Helps
You do not need a full styling kit in your pack, but a few items make a measurable difference in how your hair holds up over several hours.
Strong-hold hairspray: Apply before you leave the car, not at the trailhead. Give it ten minutes to set while you adjust your pack and check your map. A flexible-hold spray like Kenra Volume Spray 25 survives humidity better than maximum-hold formulas, which tend to flake when mixed with sweat.
Silk or satin scrunchies: Cotton scrunchies absorb sweat and stretch out by mid-hike. Satin scrunchies maintain their grip and do not leave the dented texture that cheap elastics create. They also cause less breakage when you pull them out after the hike.
Bobby pins with silicone tips: Standard metal bobby pins slide out of hair that has any moisture in it. Silicone-tipped pins grip even on damp hair and do not corrode from sweat exposure. Bring four more than you think you need.
The essential item? A buff or bandana. Even if you do not wear it as a hairstyle, it becomes an emergency fix when wind or rain destroys your style mid-hike. Fold it into a headband and your hair problems disappear for the rest of the trail.
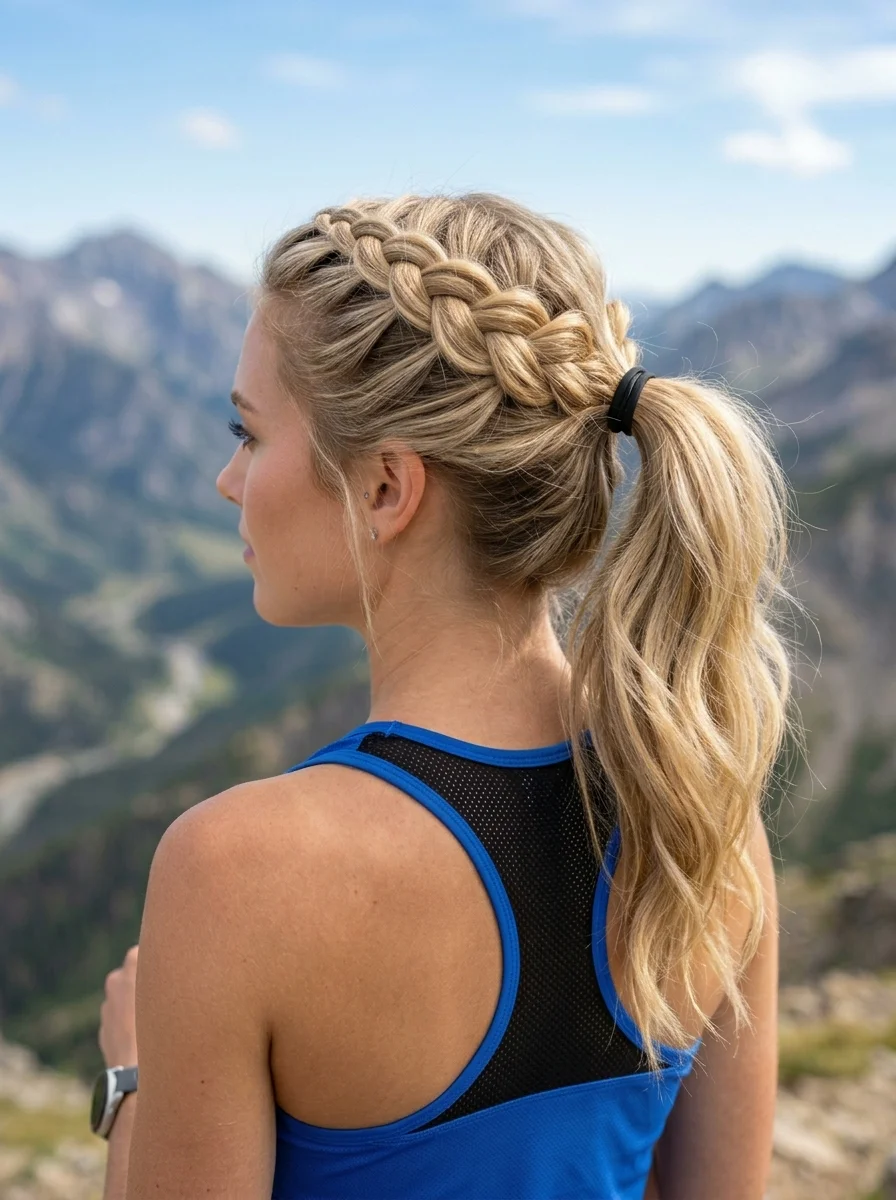
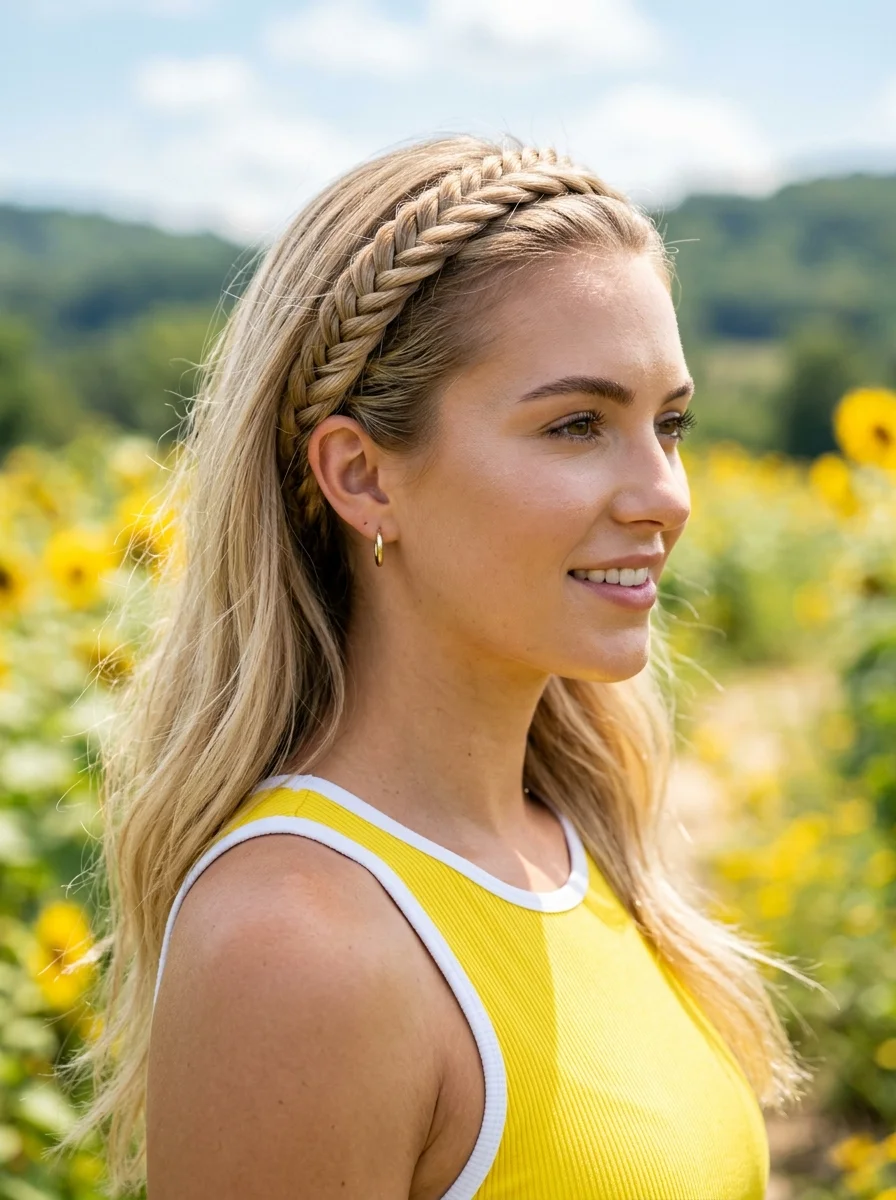
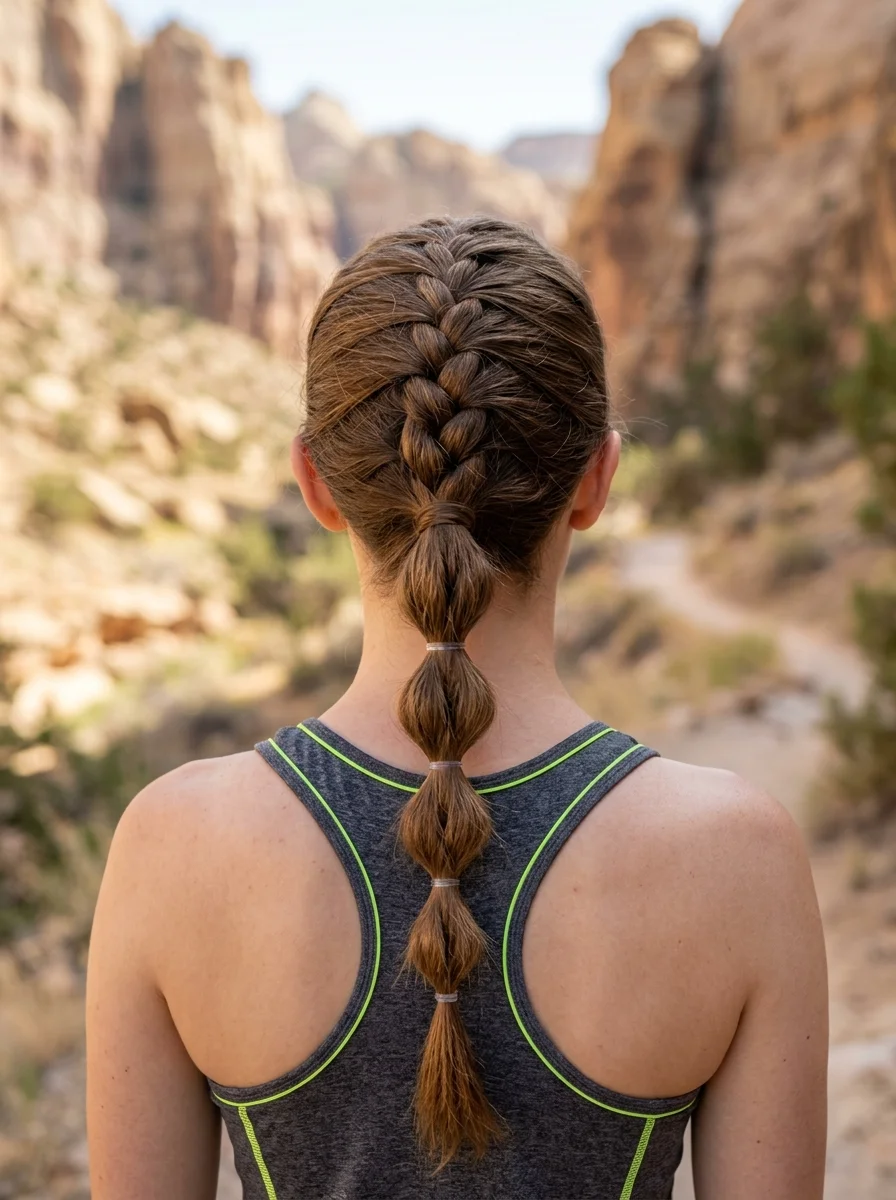
1.Double Dutch Braids into Bubble Ponytail
The overview: Two Dutch braids start at the front hairline and run parallel along the top of the head, merging at the back into a single bubble ponytail with three to four evenly spaced sections. This is the hiking equivalent of a multitool: every element serves a function. The braids lock down the front and sides where wind causes the most havoc. The bubble ponytail keeps the length contained without the stiffness of a regular ponytail. And the bubbles themselves add visual interest that makes the style look more polished than a basic braid.
The Dutch braid technique (crossing strands under rather than over) creates a raised, three-dimensional braid that sits on top of the head rather than blending into it. This means the braid structure stays visible even after hours of movement, which is why this style photographs so well on the trail.
Why this look is popular: It solves the two biggest hiking hair problems simultaneously: hair in your face and hair tangling in the wind. The bubble ponytail also survives being stuffed under a hat or helmet without losing its shape, which makes it the go-to for climbers and cyclists as well.
Where this look is suitable: Full-day hikes, windy ridgelines, any trail with significant elevation change. Also works for trail running and mountain biking.
Step by step:
- Part down the center. Use a rat-tail comb or your finger to create a clean part from forehead to nape. This determines the symmetry of both braids.
- Start the first Dutch braid. Take a section at the front left hairline. Divide into three strands. Cross the outer strands under the middle strand, adding small sections from each side as you braid backward along the head.
- Maintain consistent tension. Each new section should be pulled snugly against the scalp. If the braid feels loose at any point, undo the last two crosses and redo them tighter.
- Braid to the nape. Once you have incorporated all the hair on the left side, continue the Dutch braid to the nape. Secure with a small elastic. Repeat on the right side.
- Merge into a single ponytail. Remove both small elastics and gather both braids plus any remaining hair into one low ponytail at the nape. Secure with a strong elastic.
- Create the bubbles. Place an elastic 2-3 inches below the base. Gently pull the section between the elastics outward to create a rounded bubble shape. Repeat down the length, spacing each bubble evenly.
- Set with spray. Mist the braids and bubbles with a flexible-hold hairspray. Focus on the hairline where flyaways tend to escape first.
Tips and tricks: For extra hold on very long hair, braid the final few inches of the ponytail instead of leaving a loose tassel. The braid end grips the last elastic better than straight hair does. Silicone-tipped bobby pins along the braid edges keep any shorter layers from poking out.
20 Stunning Half Up Half Down Hairstyles for Prom Night 2026 💃✨
2.Low Braid with Athletic Headband
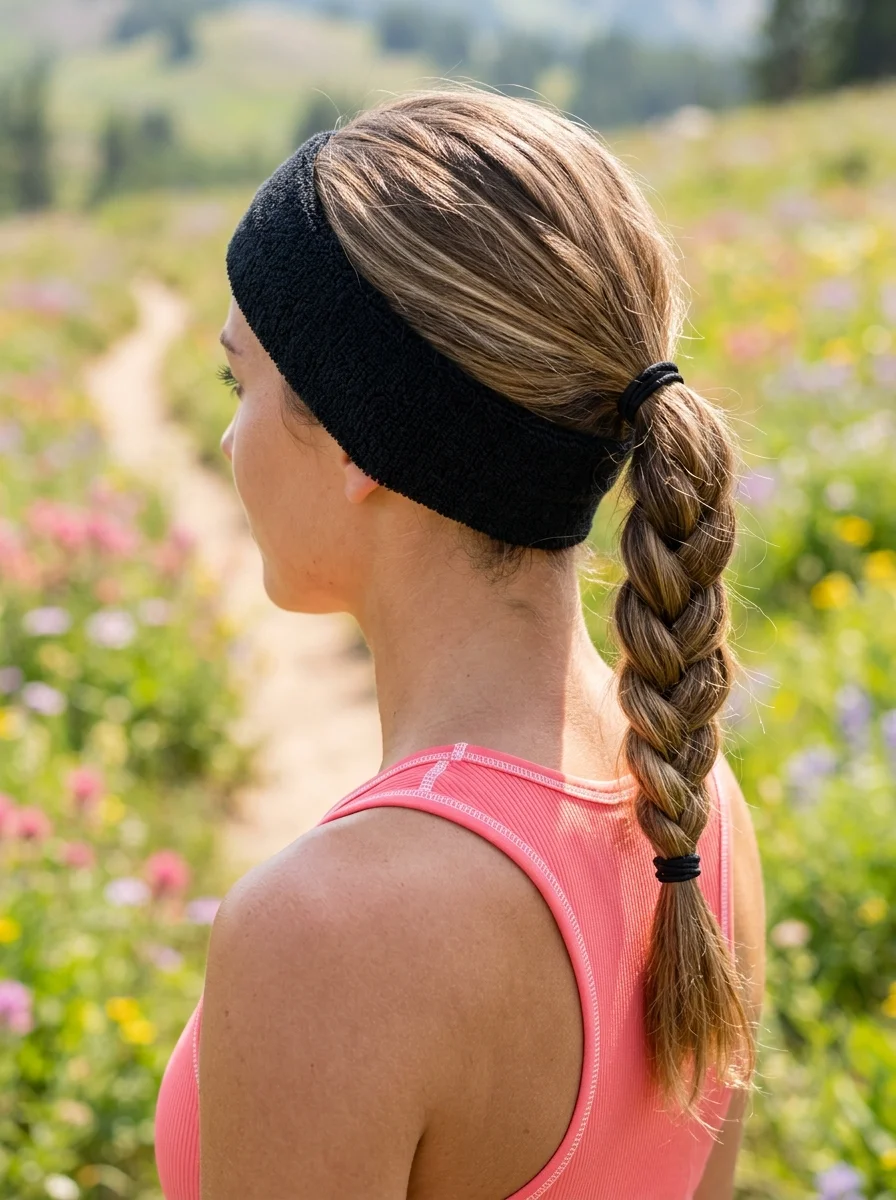
The overview: A straightforward three-strand braid gathered at the nape, with a wide black athletic headband keeping the front and sides slicked back. This is the no-nonsense option for people who want to think about the trail, not their hair. The headband absorbs forehead sweat and prevents the front pieces that always seem to escape a ponytail from plastering themselves to your face on a steep climb.
What makes this more than just throwing on a headband is the braid itself. A regular ponytail bounces and swings with every step, creating friction against your neck and pack straps. A braid lies flat and stays put, which means less tangling, less frizz, and less adjusting throughout the day.
Why this look is popular: It takes under five minutes, requires zero bobby pins, and works on hair that has not been washed in two days. The headband handles the sweat problem that most trail styles ignore entirely.
Where this look is suitable: Hot-weather hikes, high-output trails where you will be sweating heavily, and any situation where function completely outweighs form.
Step by step:
- Slide on the headband first. Push it back about one inch from your hairline. This prevents the band from sliding backward as you sweat.
- Gather at the nape. Brush all hair back and collect it low at the nape. The headband has already handled the front sections.
- Braid with even tension. Divide the gathered hair into three equal sections. Braid tightly, crossing outer strands over the middle. Keep the braid close to the neck.
- Secure both ends. Tie the top of the braid with an elastic at the nape, and tie the bottom about two inches from the ends. Two anchor points prevent the braid from loosening.
- Adjust the headband. Push it to your preferred position. For maximum sweat absorption, keep it slightly forward. For a cleaner look, push it back to expose more hairline.
Tips and tricks: Terry cloth headbands absorb more moisture than synthetic moisture-wicking ones, but they get heavy when saturated. For all-day hikes, bring a spare headband in a ziplock bag and swap them at lunch.
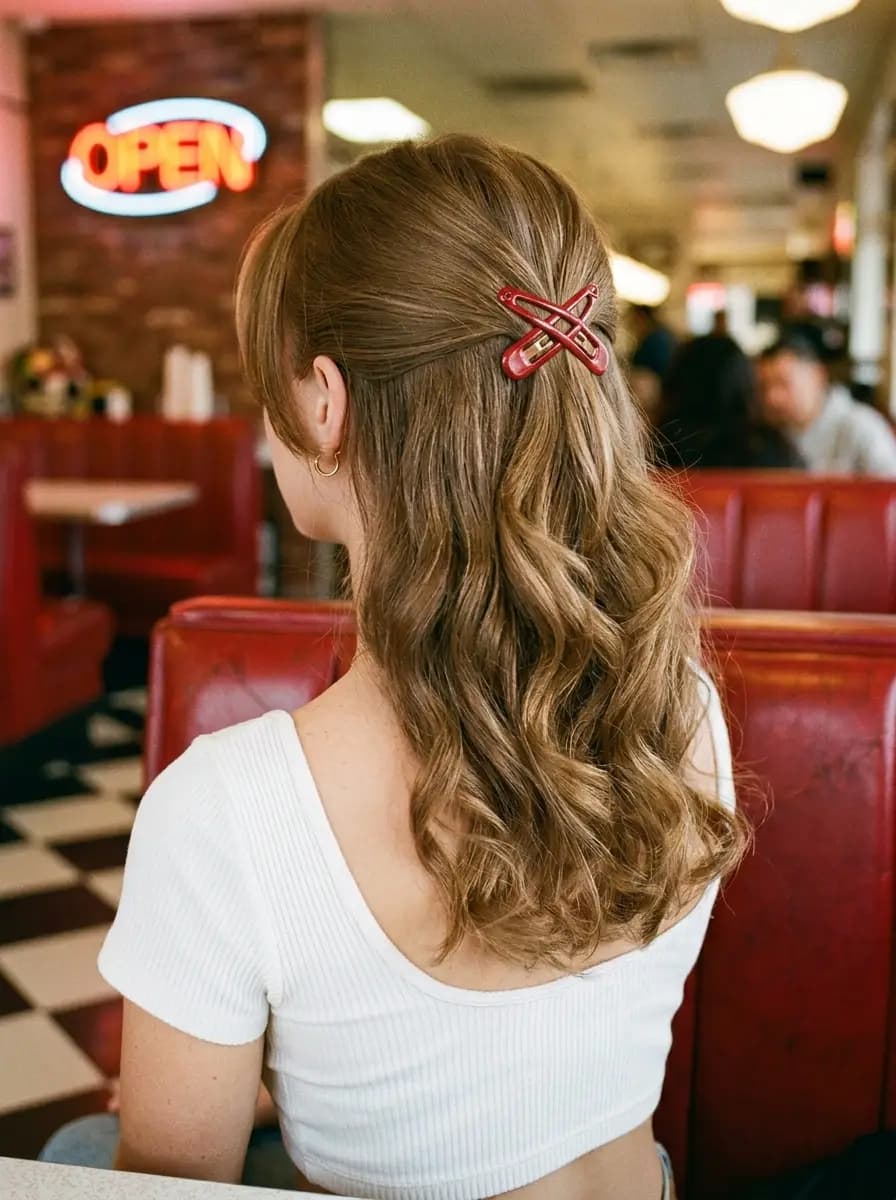
3.Braided Headband with Hair Down
The overview: A small accent braid created from a section of hair near the part, draped across the top of the head like a natural headband. The remaining hair hangs loose. This is the closest thing on this list to a style that looks like you did not try, even though the braid keeps hair off your face more effectively than an actual headband.
The technique borrows from boho and cottagecore aesthetics, but the function is purely practical. The braid creates a physical barrier across the crown that prevents wind from lifting hair forward into your eyes. Unlike a fabric headband, it does not slip when you sweat, and it does not give you a headache after three hours of compression against your skull.
Why this look is popular: It works on hair that is too short for most updos and too long to stay behind the ears naturally. The braid also adds a decorative element that makes a simple down style feel intentional.
Where this look is suitable: Moderate-weather day hikes, casual nature walks, and any trail where you want to look presentable in photos without committing to a full updo.
Step by step:
- Part to one side. A deep side part gives the braid more hair to work with and creates an asymmetrical, more modern look.
- Section the braid. Take a 2-inch-wide section from the heavier side of the part, starting just behind the ear. This section will become the headband braid.
- Braid the section. Create a standard three-strand braid. Braid tightly from root to tip, since this braid needs to hold its position across the head without loosening.
- Drape across the crown. Pull the braid up and over the top of your head, positioning it about two inches back from the hairline.
- Pin behind the opposite ear. Tuck the braid end behind the opposite ear and secure with two bobby pins pushed in opposite directions for a locking grip.
- Release the remaining hair. Let the rest of your hair fall naturally. If it has been clipped up during braiding, shake it out and arrange it.
Tips and tricks: If the braid keeps slipping, apply a small amount of texturizing spray to the section before braiding. The added grip makes a significant difference on fine or silky hair. For a more visible headband effect, pancake the braid gently by pulling the outer loops wider before draping it across.

35 Fun Birthday Nail Designs for 2026 🎂
4.Scarf-Wrapped Low Bun
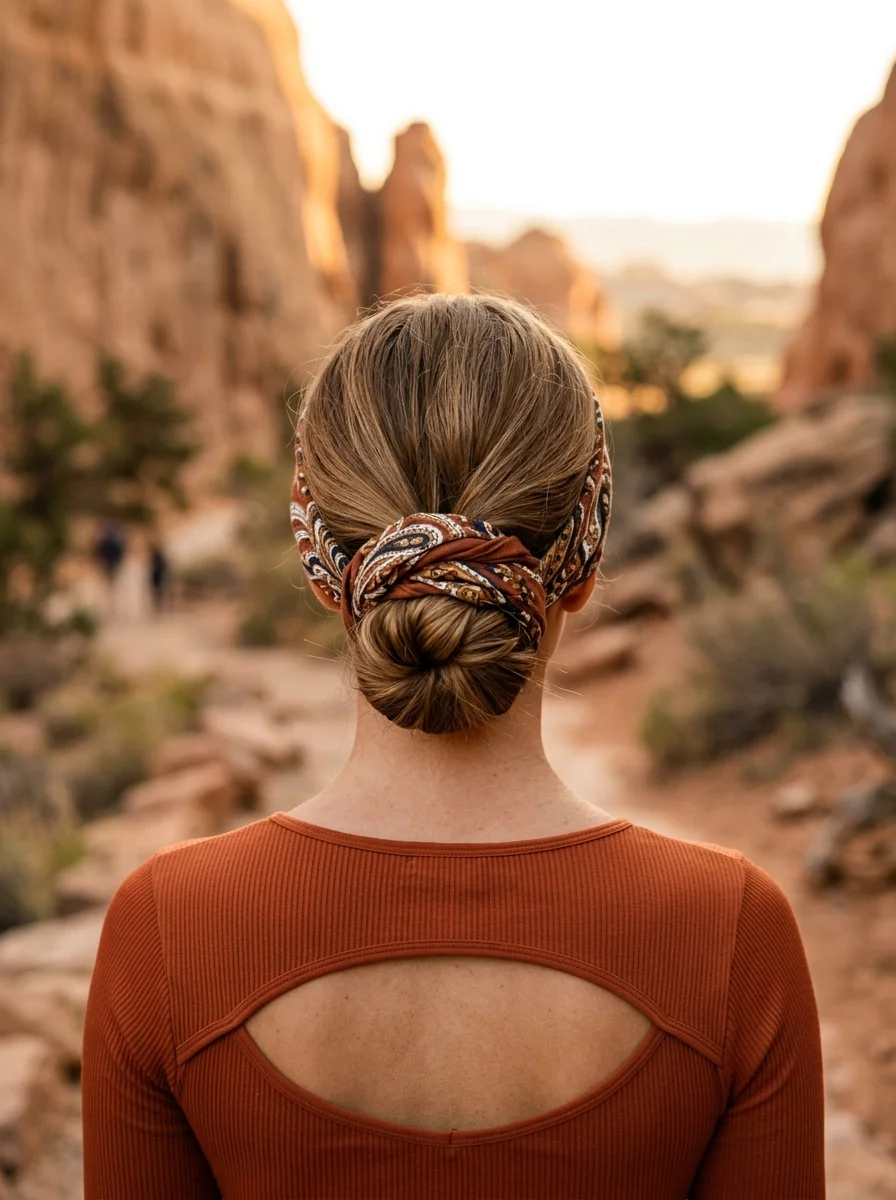
The overview: A smooth low bun at the nape, wrapped with a printed scarf in rust, navy, and cream tones. The scarf does double duty here: it secures the bun more firmly than bobby pins alone, and it adds a pop of color that turns a basic bun into a deliberate style choice. The compact shape means nothing catches on branches, and the low position sits below where a backpack strap crosses the back of your head.
The scarf material matters. A cotton or linen scarf absorbs sweat from the nape area and prevents the dampness that makes a low bun go flat by midday. Silk scarves look prettier but slip on sweaty hair, so save those for the post-hike brunch.
Why this look is popular: It photographs exceptionally well from behind, which is the angle most trail photos are taken by hiking partners. The scarf creates a focal point that elevates a simple bun into something worth posting.
Where this look is suitable: Scenic hikes with photo opportunities, moderate trails, desert hikes where the scarf doubles as sun protection for the nape.
Step by step:
- Gather at the nape. Brush hair back smoothly and collect it into a low ponytail. Secure with an elastic.
- Twist into a bun. Twist the ponytail and coil it around the elastic base. Tuck the ends underneath and pin with bobby pins.
- Fold the scarf. Take a square scarf and fold it diagonally, then fold the long edge into a band about 2 inches wide.
- Wrap the bun base. Center the scarf at the front of the bun. Bring both ends around to the back, cross them under the bun, and bring them to the front again. Tie in a knot or bow at the top of the bun.
- Tuck the tails. Either let the scarf tails hang alongside the bun for a relaxed look, or tuck them under the wrapped section for a cleaner silhouette.
Tips and tricks: Choose a scarf with a pattern that hides dirt. Light solid colors show every speck of trail dust by the end of the day. Paisley, floral, or abstract prints are more forgiving.
5.Tousled Bob with Bobby Pin Cluster
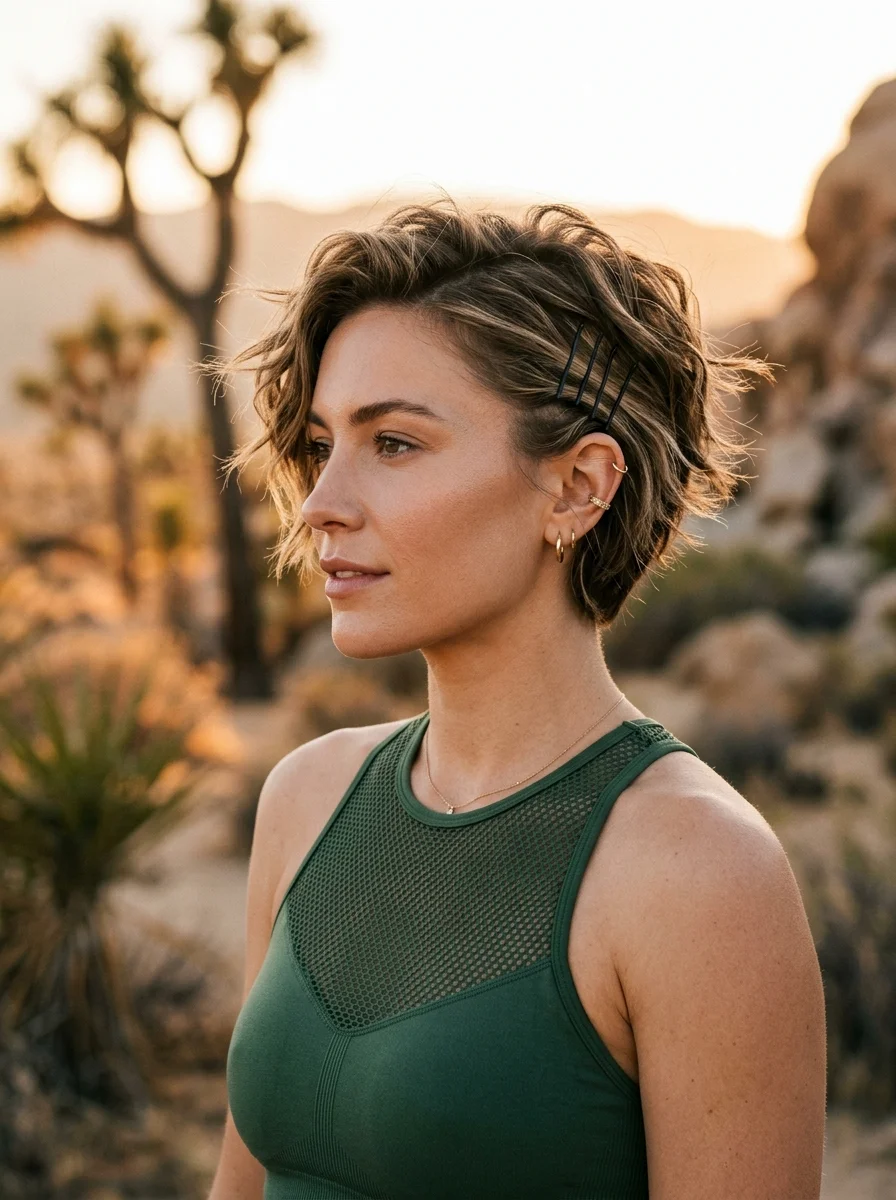
The overview: For short hair that cannot be braided into a ponytail or gathered into a bun, the answer is strategic pinning. A chin-length bob gets styled with piecey texture and multiple bobby pins clustered on one side in a parallel or criss-cross pattern. The pins serve a dual purpose: they hold the shorter layers back from the face, and the visible arrangement creates a decorative detail that makes the style look intentional rather than like you gave up.
This is the only style on this list that works exclusively on short hair, and it solves a problem that short-haired hikers face constantly: there is not enough length to tie anything, so the hair just blows around. The bobby pin cluster pins down the side that catches the most wind while leaving the other side loose for movement.
Why this look is popular: Short-haired hikers rarely see themselves represented in trail hairstyle guides. This style acknowledges that not everyone has long hair to braid and provides a real solution that does not involve a headband.
Where this look is suitable: Any trail, any weather. The bobby pins are secure enough for scrambling and the style holds up through wind without looking destroyed by the time you reach the viewpoint.
Step by step:
- Add texture. Work a texturizing spray or sea salt spray through dry hair. Scrunch with your fingers to create piecey, defined separation.
- Choose the pin side. Pick the side that faces the prevailing wind, or the side that has layers that tend to fall into your face.
- Cluster the pins. Take four to six bobby pins and slide them into the hair above and behind the ear in a parallel or criss-cross pattern. The pins should catch the shorter layers and hold them flat against the head.
- Arrange the opposite side. Tuck the other side behind the ear or let it fall naturally. The asymmetry between the pinned side and the loose side is what makes this look like a style choice.
- Set with spray. A light mist of medium-hold spray keeps the texture intact without making the hair crunchy.
Tips and tricks: Match your bobby pin color to your hair for a subtle look, or use contrasting metallic pins (gold on dark hair, black on blonde) to turn the pins into a deliberate accessory. Bring two extra pins in your pocket; the vibration of a bumpy trail can work one loose by afternoon.

28 Best Camping Hairstyles for Women That Actually Hold Up Outdoors 2026
6.Braided Crown to Bubble Ponytail
The overview: A single braid runs along the crown of the head from one side to the other, then transitions into a long bubble ponytail down the back. This variation on the double-braid bubble ponytail uses only one braid across the top, which makes it faster to execute and slightly softer in appearance. The braid keeps the crown hair controlled while the bubbles add volume and visual interest to the ponytail itself.
The braid-to-ponytail transition is the technical crux. Stop braiding once you reach the center back of the head, gather all remaining hair, and secure everything with a single elastic before starting the bubble sections. If you try to braid all the way to the ends before creating bubbles, the braid and the bubbles will fight each other for volume and the result looks lumpy.
Why this look is popular: It gives you the security of braids on top where wind hits hardest, combined with the movement and personality of a bubble ponytail. The single braid also takes about half the time of the double-braid version.
Where this look is suitable: Day hikes, coastal trails, any setting where you want the hairstyle to feel playful rather than purely functional.
Step by step:
- Start above one ear. Take a section of hair above the ear and divide it into three strands.
- Braid across the crown. Create a Dutch braid that travels along the top of the head, adding hair from both sides as you go. Stop when you reach the center back.
- Gather everything. Combine the braid tail with all remaining loose hair into a single ponytail. Secure with a strong elastic at the mid-head height.
- Create the bubbles. Place elastics every 2-3 inches down the ponytail. Pull each section outward gently to form rounded bubbles.
- Adjust volume. Pull some bubbles wider than others for a more organic, less uniform look. Perfectly symmetrical bubbles can read as costume-like.
Tips and tricks: If your hair is thick, pancake the crown braid by pulling the outer loops wider before transitioning to the ponytail. This creates a more substantial braid that does not disappear under the bubble sections.
7.High Bun with Bandana
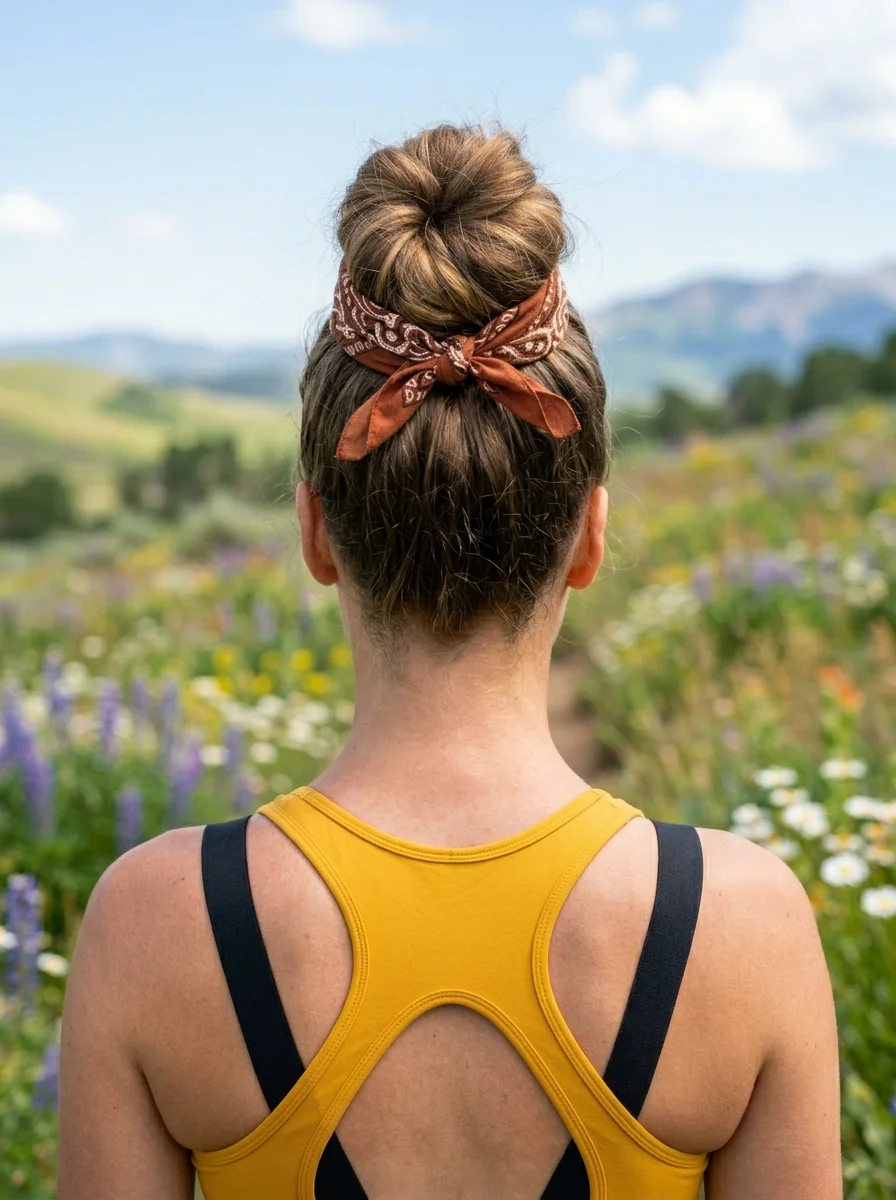
The overview: A round, compact bun positioned at the crown, secured with a burnt orange paisley bandana wrapped around the base and tied in front. The bandana adds a rustic, outdoorsy aesthetic that fits the hiking context perfectly, but its real value is functional: it covers the elastic, absorbs sweat from the crown, and adds a layer of friction that prevents the bun from loosening over hours of movement.
The high bun position is critical for hiking. Anything lower than the crown creates a pressure point where the backpack's headrest strap crosses the back of the skull. A bun at or above the crown sits above that strap line entirely, which means no discomfort and no flattened bun by the time you reach camp.
Why this look is popular: The bandana-and-bun combination is the most recognizable hiking hairstyle for a reason. It works. The bandana can be removed and used as a sweat wipe, a pot holder, or an improvised Band-Aid if the trail gets rough.
Where this look is suitable: Any hike, any weather, any difficulty level. This is the default hiking hairstyle for a reason.
Step by step:
- Gather high. Flip your head forward and brush all hair toward the crown. The higher the ponytail base, the less interference with your pack.
- Secure the ponytail. Use a strong elastic. Wrap it three times for maximum grip. The ponytail should feel firm but not painfully tight.
- Twist and coil. Twist the ponytail into a rope, then coil it around the elastic base. Tuck the ends under the coil.
- Pin if needed. If the bun feels loose, add two to three bobby pins around the perimeter. Push them inward toward the center of the bun.
- Wrap the bandana. Fold the bandana into a 2-inch band. Center it at the back of the bun, bring the ends forward, and tie in a knot at the front of the bun base.
Tips and tricks: Do not wash your bandana in scented detergent before a hike. The fragrance attracts bees and wasps. Wash it in unscented detergent or simply rinse it in plain water.

26 Stunning Sunflower Floral Nails for Spring & Summer 2026 🌻
8.Side Dutch Braid into Ponytail
The overview: A single Dutch braid runs along one side of the head from the front hairline, sweeping back to join a mid-height ponytail with natural wave. The asymmetry of the braid on one side creates visual interest while the ponytail on the other side keeps the style balanced. This is a strong option for people who find symmetrical braids tedious to execute but still want the security of a braid along the hairline.
The braid handles the problem area: the front section of hair that catches wind and falls into your eyes on exposed ridgelines. By braiding only that section, you keep the face clear without committing to a full-head braid that takes twice as long.
Why this look is popular: It looks more polished than a basic ponytail but takes only a few minutes more to create. The side braid also adds texture that catches light differently than the ponytail, making it more visually dynamic in photos.
Where this look is suitable: Mountain hikes with wind exposure, rocky scrambles where loose hair catches on rock edges, and any trail where you want to look pulled together at the summit.
Step by step:
- Choose the braid side. Pick the side with more volume or where your natural part falls.
- Start the Dutch braid. Take a section at the temple and begin Dutch braiding (crossing strands under) backward along the hairline.
- Add sections from the hairline only. Pick up new hair only from the front hairline side, not from the crown. This keeps the braid sitting along the edge rather than running through the middle of the head.
- Stop behind the ear. Once the braid reaches behind the ear, stop adding new hair. Braid the remaining tail for another inch and secure with a small elastic.
- Gather the ponytail. Collect all hair, including the braid tail, into a mid-height ponytail. Secure with an elastic.
- Conceal the elastic. Wrap a thin strand from the underside of the ponytail around the elastic and pin underneath.
Tips and tricks: For wavy or curly hair, let the ponytail air-dry into its natural texture rather than blow-drying it straight. The contrast between the structured braid and the organic wave pattern is what makes this style work.
9.Low Bun with Tortoiseshell Claw Clip
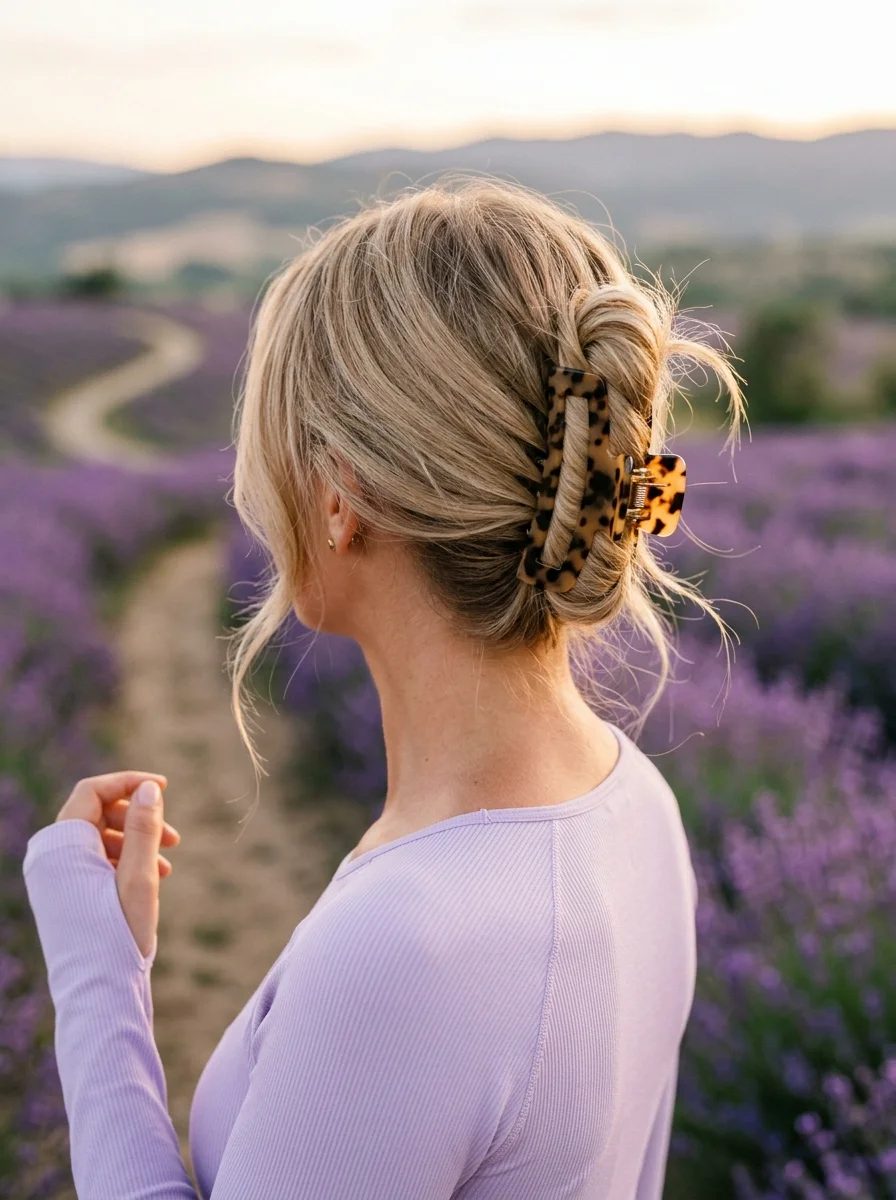
The overview: A loosely twisted bun at the nape, clamped in place with a large tortoiseshell claw clip. Face-framing pieces are left soft around the temples and ears. This style occupies the middle ground between a fully secured updo and a deliberately undone look. The claw clip does the structural work, holding the twisted hair more securely than bobby pins alone while adding a polished, retro-inspired detail.
The claw clip comeback has been building for two years, and hiking is where it makes the most practical sense. A single clip replaces four to six bobby pins, takes three seconds to remove, and does not create the scalp tension that pins can cause after hours of wear. The tortoiseshell pattern is particularly useful on the trail because it camouflages dust and small debris that would show on a solid-color clip.
Why this look is popular: It is the fastest style on this list. From loose hair to finished style in under two minutes. The clip also creates a more forgiving hold than elastics, which means less breakage when you pull it out at the end of the day.
Where this look is suitable: Moderate trails, scenic day hikes, any situation where you want to look styled without investing time. Less suitable for intense scrambling where the clip could catch on rock.
Step by step:
- Gather loosely. Collect all hair at the nape with your hands. Do not brush it smooth; the slight messiness is part of the look.
- Twist upward. Twist the gathered hair into a loose rope, then fold it upward against the back of your head.
- Clamp the clip. Open the claw clip and clamp it over the folded twist. The clip should grab both the twisted hair and some of the underlying hair at the scalp for a secure hold.
- Release face-framers. Pull two or three soft pieces from around the temples and ears. Let them fall naturally.
- Adjust the clip. If the clip feels loose, close it more tightly or reposition it to catch more scalp hair.
Tips and tricks: Invest in a clip with strong spring tension and teeth that interlock. Cheap claw clips lose their grip within an hour. The Scunci Claw clip and similar spring-loaded designs hold through wind and moderate activity.
20 Stunning Mother of the Bride Hairstyle Ideas for 2026 💍
10.Space Buns
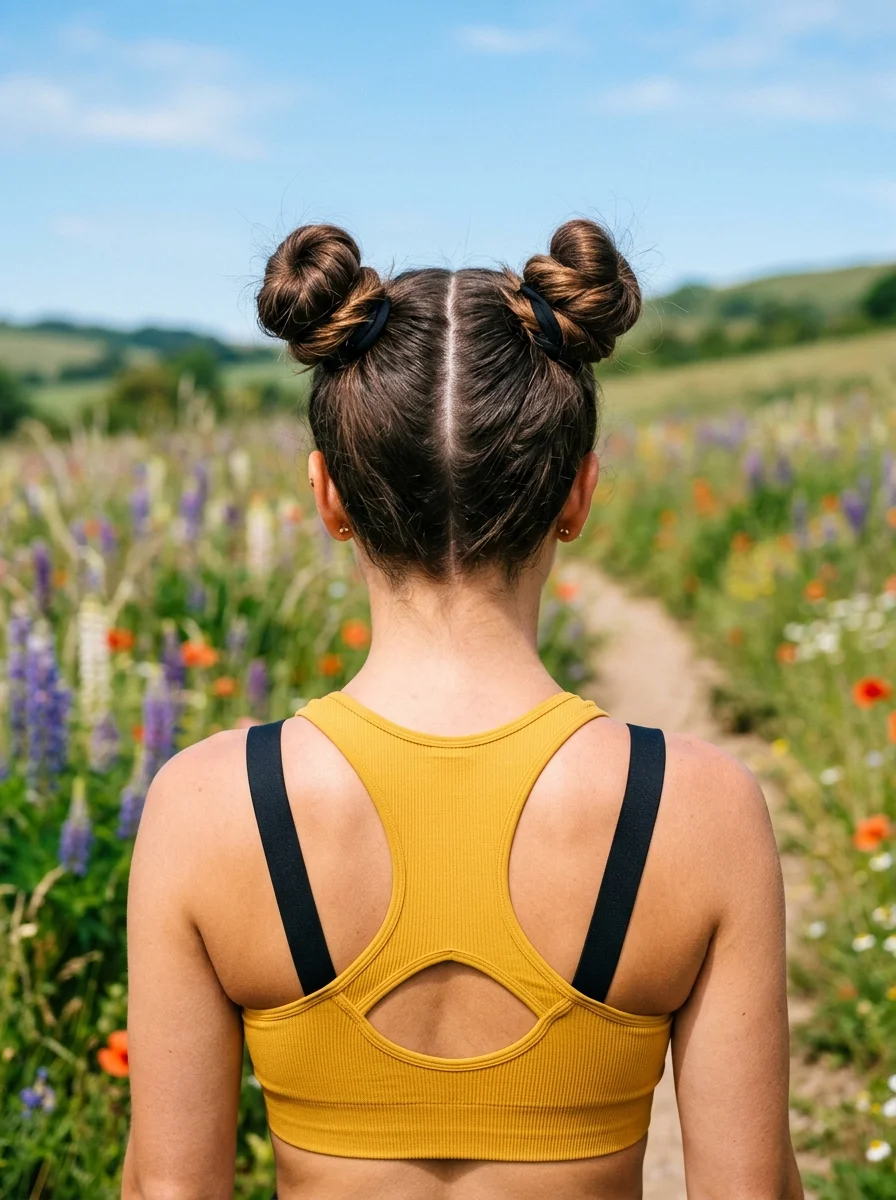
The overview: Two compact twisted buns positioned high on either side of a clean center part. Space buns distribute the weight of your hair evenly across both sides of the head, which prevents the pulling headaches that a single tight topknot can cause over several hours. The double-bun structure also sits above the backpack strap line, keeping everything comfortable on long approaches.
The symmetrical placement creates a playful silhouette that reads as intentional and fun in trail photos. The center part adds structure and prevents the style from looking like two random lumps. This is a genuinely practical style that happens to look good, rather than a decorative style that barely functions.
Why this look is popular: They survive wind better than any single-bun style because the lower profile of two smaller buns creates less surface area for gusts to catch. They also stay in place through running, jumping, and scrambling without requiring adjustment.
Where this look is suitable: Active hikes, trail runs, festivals that involve hiking, any outdoor adventure where you want to look like you are having fun.
Step by step:
- Part precisely. Use a comb to draw a clean center part from forehead to nape. Check the part from the front and both sides to confirm it is straight.
- Create two high ponytails. Gather each half at the crown, positioned above and slightly behind each ear. Secure with strong elastics. Both should sit at the same height.
- Twist and coil each bun. Take one ponytail, twist it tightly, and coil around the elastic base. Pin with three bobby pins. Repeat on the other side.
- Match the sizes. Compare both buns in a mirror or use your phone camera. If one is noticeably larger, pull sections of the smaller bun outward to balance them.
- Secure for activity. Add an extra bobby pin to each bun's underside and mist with strong-hold hairspray.
Tips and tricks: For curly or coily hair, the buns will naturally be larger and more textured. Embrace the asymmetry rather than trying to make them perfectly identical. Slight differences read as organic rather than messy.
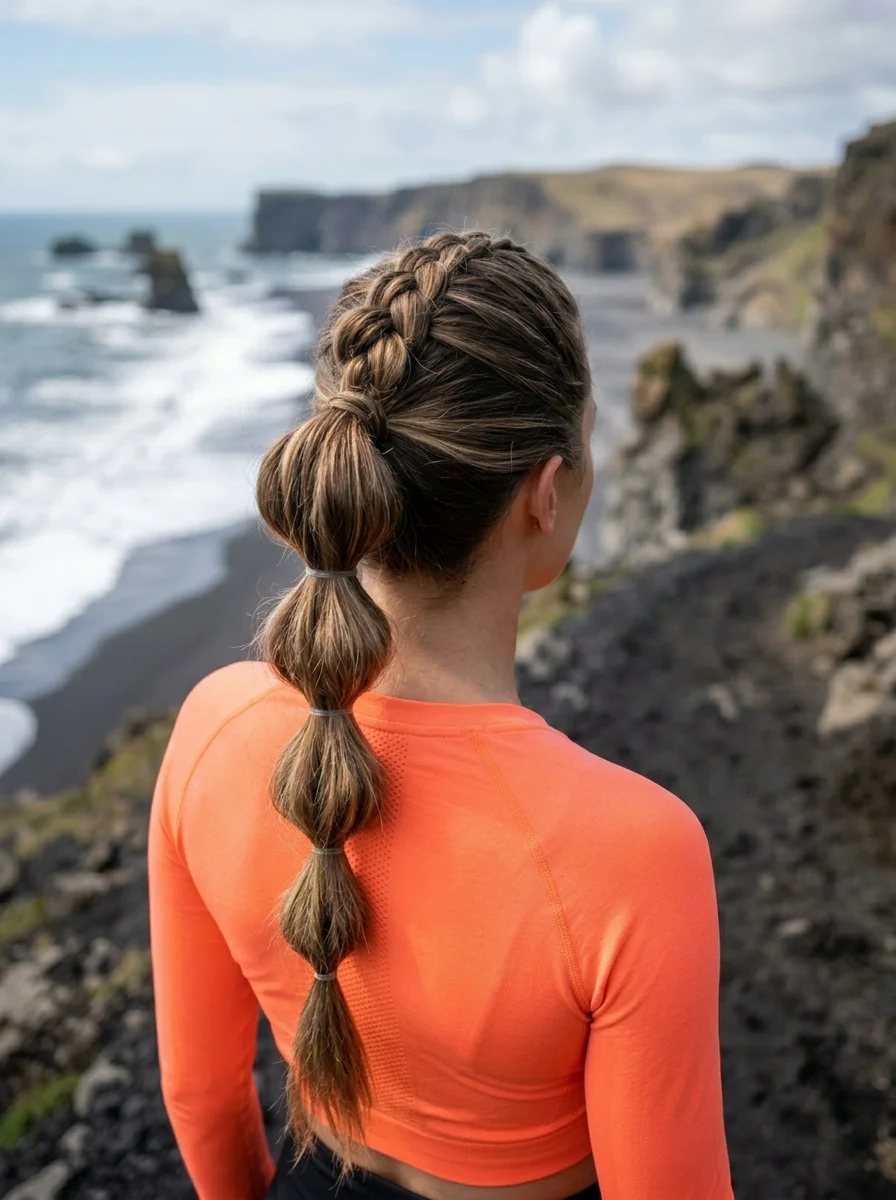
11.French Braid to Bubble Ponytail
The overview: A French braid starts at the crown and runs down the center of the head, transitioning into a bubble ponytail with four evenly spaced sections. This differs from the double-Dutch version in both technique and visual effect. The French braid (crossing strands over) lies flatter against the head, creating a smoother silhouette that works better under hats and helmets. The single braid also takes half the time to execute.
The French braid handles the crown area where most updos develop loose flyaways by mid-hike. By incorporating the crown hair into a braid structure, you eliminate the frizz zone that sits directly above where your pack's headrest rubs. The bubble ponytail below adds movement and keeps the length from tangling against your back.
Why this look is popular: It works across all hair textures. Straight hair creates a sleek, polished result. Wavy hair adds natural texture to the bubbles. Curly hair produces fuller, more voluminous bubbles that hold their shape without pancaking.
Where this look is suitable: Full-day hikes, any trail difficulty. Also works well for climbing and cycling where a helmet sits on top of the head.
Step by step:
- Section the crown. Take a triangular section from the front hairline, about 3 inches wide.
- Begin the French braid. Cross strands over each other, adding small sections from both sides as you braid backward along the center of the head.
- Stop at the crown. Once you have incorporated hair from both temples and the braid reaches the crown, stop adding new sections.
- Continue as a standard braid. Braid the remaining tail for another 2-3 inches, then gather all remaining hair into a single ponytail and secure with an elastic.
- Create the bubbles. Place elastics every 2-3 inches down the ponytail. Pull each section outward to form rounded bubbles.
Tips and tricks: Keep the braid tension consistent. A loose French braid at the crown slides backward by midday, creating a gap at the hairline. If the braid feels loose at any point, undo the last two crosses and redo them tighter.

27 Elegant Wedding Guest Nail Designs for Family in 2026 💍
12.Half-Up Style with Tortoiseshell Claw Clip
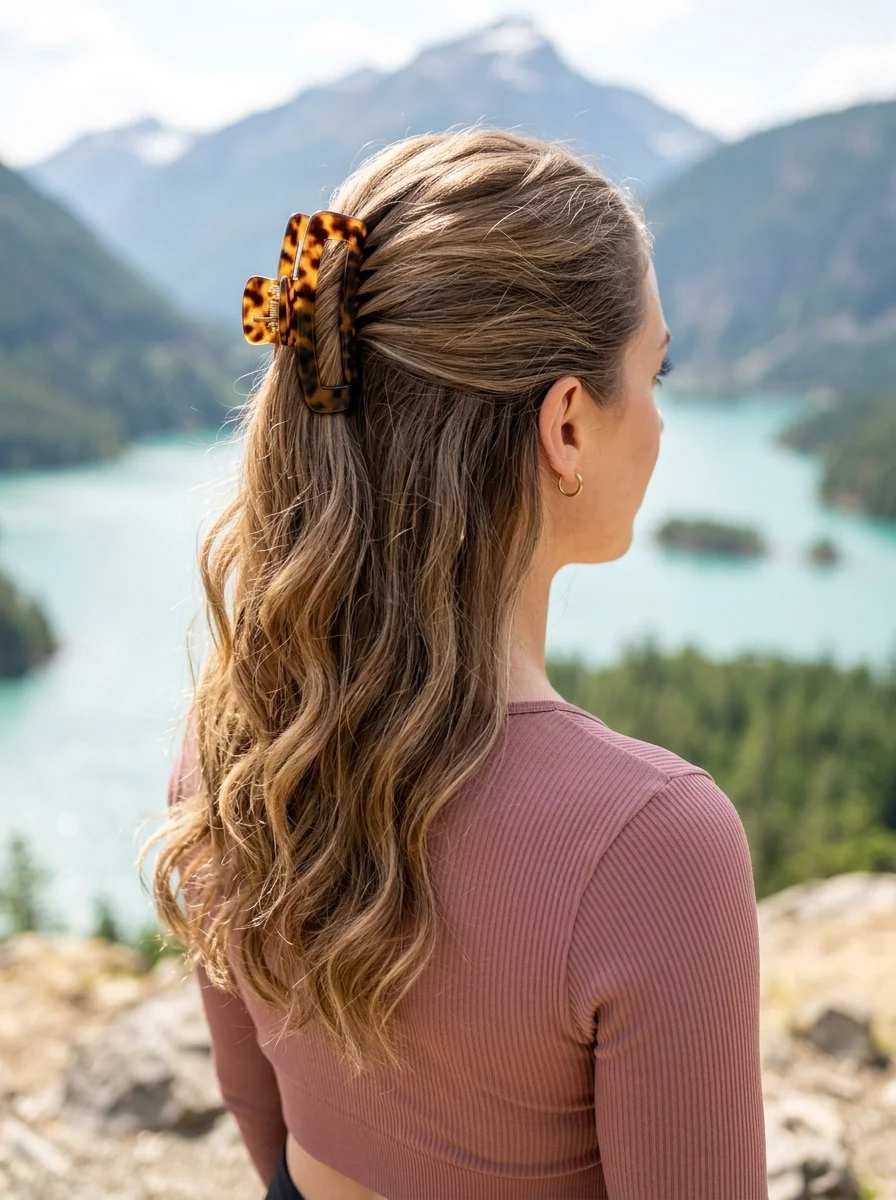
The overview: The top section of wavy hair is pulled back and secured with a large tortoiseshell claw clip at the back of the head, while the lower half flows freely in natural waves. This half-up approach solves the core hiking dilemma for people who want their hair down but cannot tolerate it in their face for hours. The clip holds the crown and temple sections back, while the loose hair below adds movement and keeps the style from looking too utilitarian.
The tortoiseshell pattern on the clip is not just aesthetic. The mottled brown and amber tones blend with most hair colors, which means the clip looks like a natural extension of the hair rather than a stark accessory sitting on top of it. On the trail, this subtlety matters because it lets the landscape be the focal point of your photos, not a bright plastic clip.
Why this look is popular: It gives you the best of both worlds: the face-clearing function of an updo with the visual appeal of hair worn down. The loose sections also help regulate temperature by allowing air circulation at the neck, which matters on warm-weather hikes.
Where this look is suitable: Moderate day hikes, scenic trails, spring and fall hikes where the weather is mild enough for hair to be partially down.
Step by step:
- Section from temple to temple. Draw a line from the top of one ear across the crown to the top of the other ear. Clip the lower section out of the way.
- Smooth the top section. Brush it backward, gathering it at the back of the head. You can keep it loose for volume or pull it tighter for a sleeker look.
- Twist once. Give the gathered section a single twist to create a base for the clip to grip.
- Clamp the clip. Open the claw clip and secure it over the twist, making sure the teeth grab both the twisted hair and the underlying hair at the scalp.
- Release the lower section. Unclip the bottom half and let it fall naturally. Arrange it with your fingers.
Tips and tricks: If your hair is thick, use a clip with extra-wide teeth and strong spring tension. Standard claw clips cannot handle dense hair and will pop open on a steep climb. Look for clips labeled "jumbo" or "strong grip."
13.Half-Up Fishtail Braid
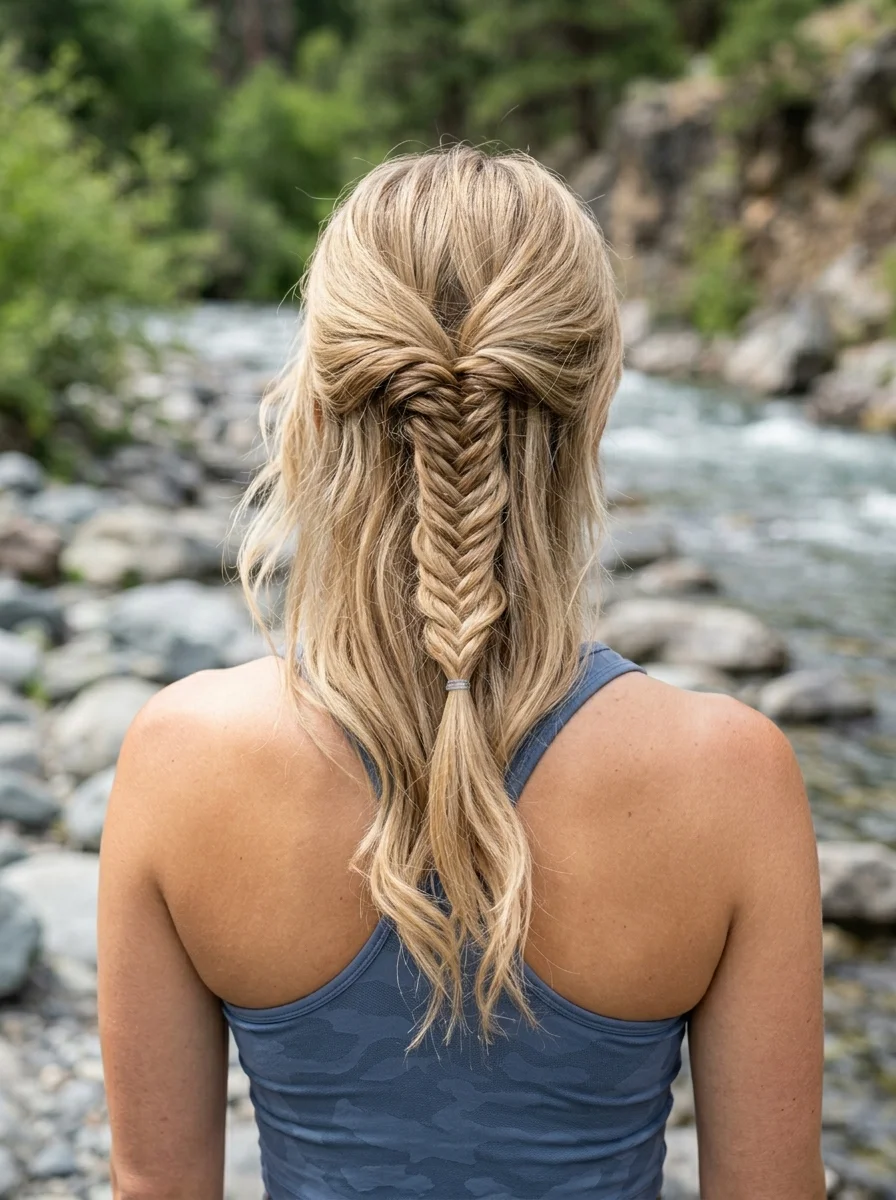
The overview: The top section of long, wavy hair is gathered into a single fishtail braid that hangs down the center back, while the remaining hair falls in loose, beachy waves on either side. The fishtail braid uses only two sections rather than three, creating a tighter, more intricate-looking pattern that reads as more polished than a standard braid. Against the loose waves below, the contrast in texture is what makes this style visually interesting.
The fishtail is slower to execute than a three-strand braid, but it holds better. The two-section structure creates more surface contact between the strands, which means more friction and less slippage over hours of movement. For a hiking hairstyle, that added security justifies the extra two minutes it takes to create.
Why this look is popular: It works on second-day hair without looking unwashed. The fishtail pattern actually improves with a day of natural oil buildup because the added grip makes the braid tighter and more defined. Freshly washed hair can be too slippery for a clean fishtail.
Where this look is suitable: Coastal hikes, beach-adjacent trails, any outdoor setting where a relaxed, bohemian aesthetic matches the environment.
Step by step:
- Section the top half. Gather hair from temple to temple, leaving the bottom half loose.
- Divide into two sections. Split the gathered top section into two equal halves.
- Begin the fishtail. Take a small piece from the outer edge of the left section and cross it over to join the right section. Then take a small piece from the outer edge of the right section and cross it to the left. Repeat.
- Maintain consistent piece size. Keep each crossed piece about the same width. Smaller pieces create a more intricate pattern; larger pieces create a chunkier look.
- Braid to desired length. Continue until you reach the ends or until the braid reaches the level of your shoulder blades. Secure with a small clear elastic.
- Pancake gently. Pull the outer edges of the braid slightly to widen it and create a fuller appearance.
Tips and tricks: Pull out a few face-framing pieces before you start braiding. Once the fishtail is complete, these pieces soften the look and prevent the half-up style from pulling too tightly against the forehead.

21 Hot Summer Buns Hairstyle Ideas for 2026 ☀️🔥
14.Low Twisted Bun with Blush Claw Clip
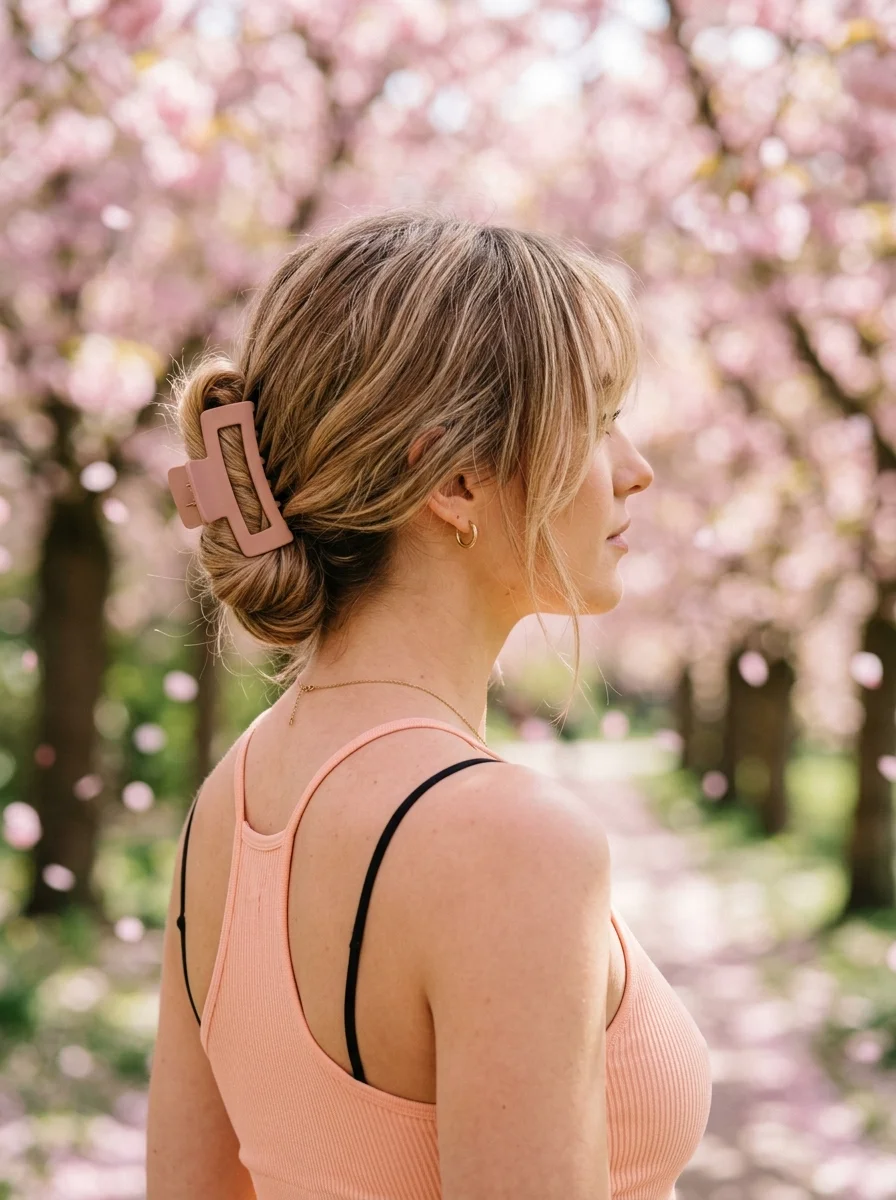
The overview: A low twisted bun at the nape, secured with a matte blush rectangular claw clip. Loose bangs and face-framing pieces are left out around the face for a soft, romantic look. This is the more feminine version of the tortoiseshell clip bun, and the blush color adds warmth that complements most skin tones, especially in golden-hour trail photos.
The matte finish on the clip is a detail worth noting. Glossy clips catch sunlight and create a distracting bright spot in photos. Matte clips absorb light, which means they look consistent in both direct sun and shade. If trail photography is a priority, matte accessories are always the better choice.
Why this look is popular: The blush color has become the It shade for hair accessories in 2026. It reads as sophisticated without being formal, and it pairs well with earth-toned hiking clothes (olive, tan, rust, cream) that most trail wardrobes consist of.
Where this look is suitable: Easy to moderate day hikes, scenic overlooks, golden-hour photo spots. The style is secure enough for most trails but not designed for intense scrambling.
Step by step:
- Leave face-framers out. Before gathering your hair, pull out two to three pieces around the temples and ears. These stay loose throughout.
- Gather low. Collect the remaining hair at the nape. Do not pull it tight; a slightly loose gather creates the softness this style depends on.
- Twist and fold. Twist the gathered hair into a rope, then fold it upward against the back of your head.
- Clamp with the clip. Position the blush clip over the fold. Make sure it catches both the twisted hair and the scalp hair beneath for a secure hold.
- Arrange the face-framers. Let them fall naturally. If they are long enough, tuck one side behind the ear and leave the other loose for asymmetry.
Tips and tricks: If you have bangs, mist them with a light-hold dry shampoo before the hike. Bangs absorb oil from your forehead faster than any other section of hair, and dry shampoo extends their freshness by several hours.
15.Half-Up Waves with Pearl Claw Clip
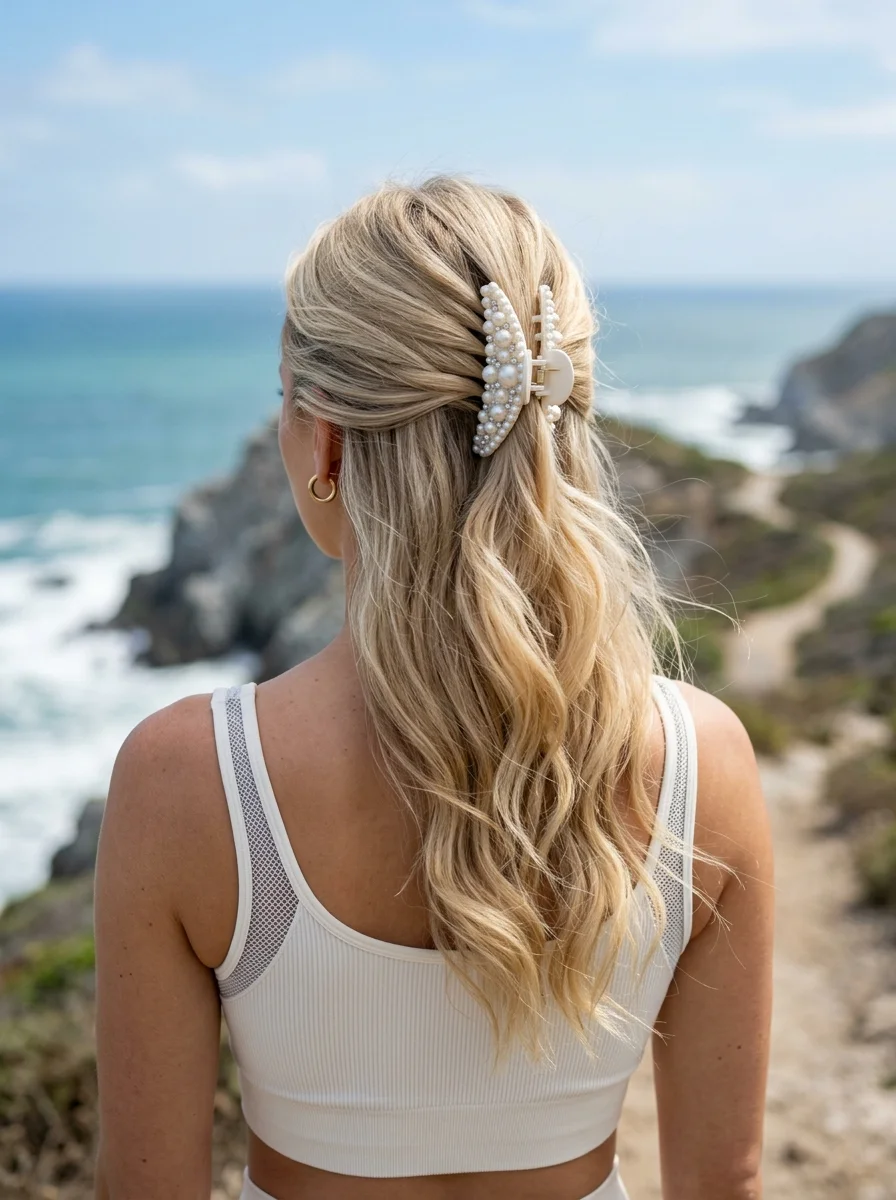
The overview: The top section of long, wavy hair is pulled back and secured with a pearl-embellished claw clip, while the remaining hair cascades in loose, defined waves. The pearl clip transforms a functional half-up style into something that feels dressed up, which is useful when your hike ends at a winery, a restaurant, or a scenic overlook where you want more than a "just hiked a mountain" appearance.
Pearls on hair accessories have shifted from bridal to everyday in the last year, and the claw clip format is the most practical version. The clip itself does the holding work; the pearls are purely decorative. A pearl-embellished clip on a half-up style communicates that you planned your appearance for the whole day, not just the trail portion.
Why this look is popular: It transitions seamlessly from trail to town. The secure half-up structure holds through hours of hiking, and the pearl detail makes the style appropriate for a nice dinner without requiring a complete restyle.
Where this look is suitable: Hikes that end at a social setting, wine country trails, coastal walks that lead to a beachside restaurant.
Step by step:
- Prep for waves. If your hair is naturally straight, create loose waves with a 1.25-inch curling wand before you leave. If it is naturally wavy, enhance the wave with a texturizing spray.
- Section the top half. Gather hair from temple to temple, leaving the bottom section loose.
- Twist and lift. Twist the gathered section once, then lift it slightly to create volume at the crown before securing.
- Place the pearl clip. Open the clip and slide it over the twist, positioning it so the pearls are visible from the back. The clip should grab the twist and the underlying hair.
- Arrange the waves. Let the bottom section fall naturally. Separate any clumped sections with your fingers for a fuller, more defined wave pattern.
Tips and tricks: Apply a lightweight anti-frizz serum to the loose sections before you start the hike. Humidity will be the biggest threat to wave definition, and a silicone-based serum creates a barrier that holds for hours.

30 Cute Ladybug Nail Trends That Are Taking Over (2026)
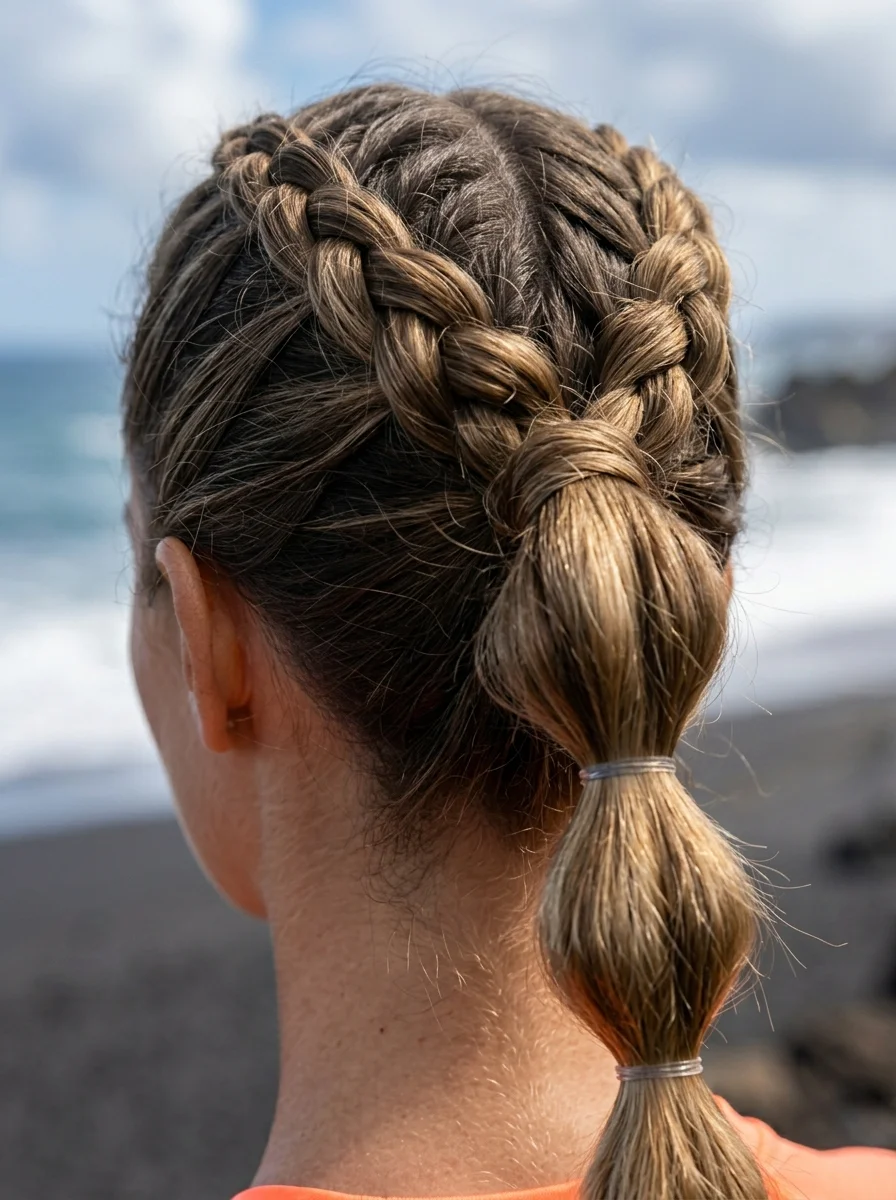
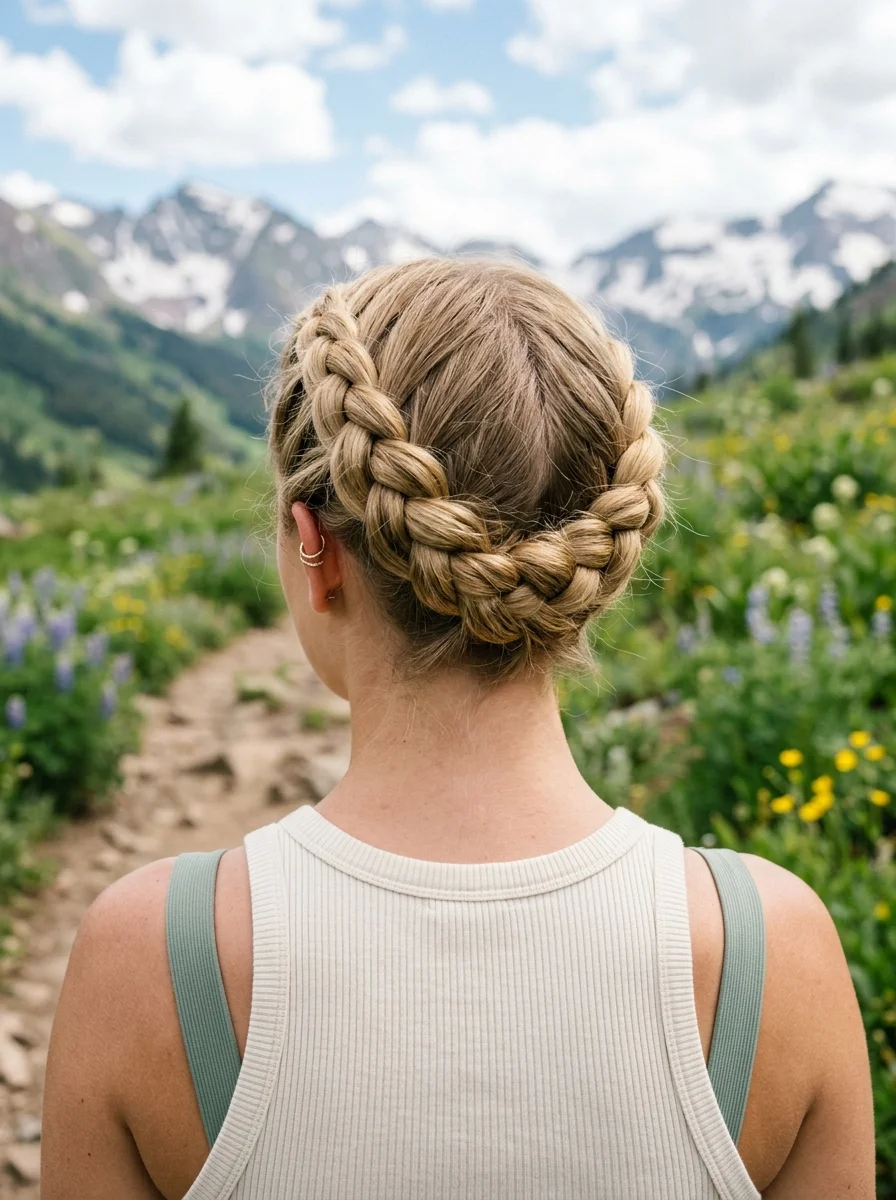
16.Double Braids into Low Twisted Bun
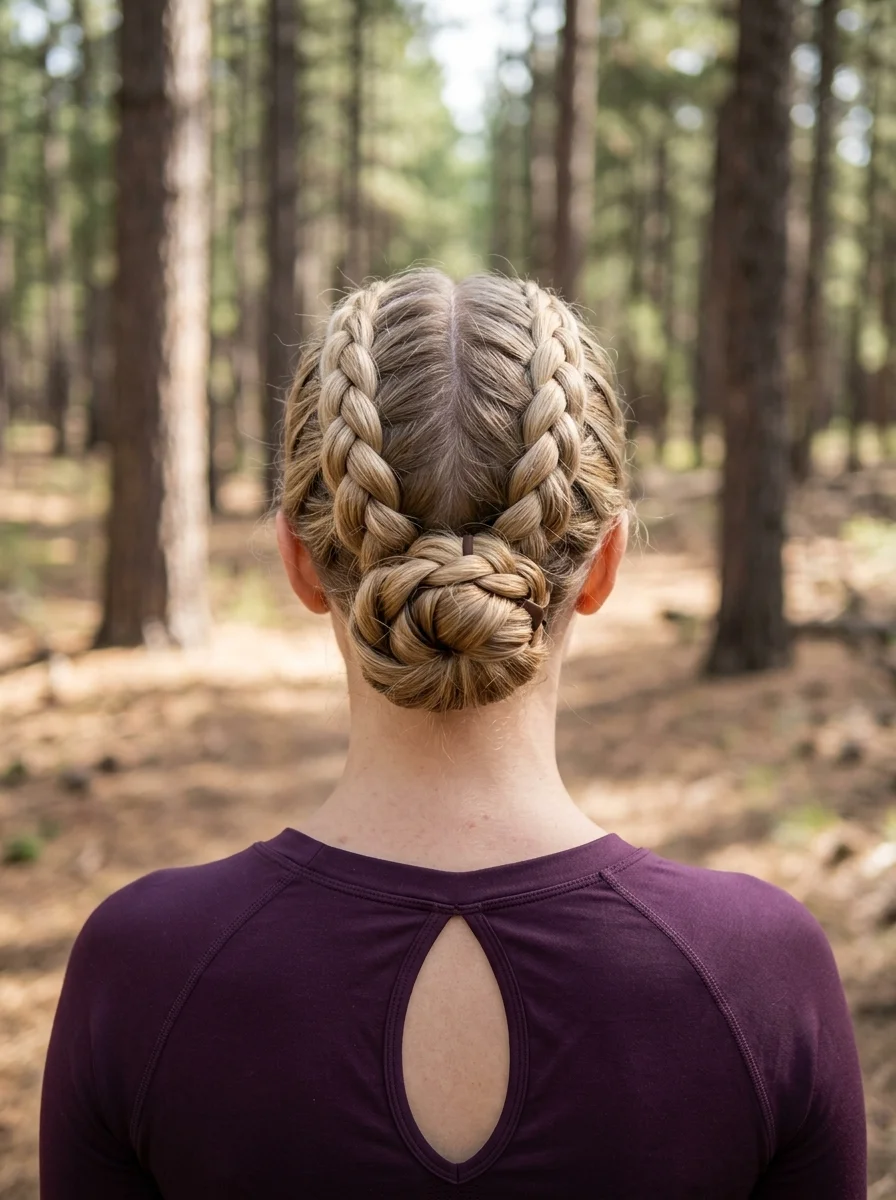
The overview: Two Dutch braids start at the center part and run along each side of the head from the hairline to the nape, where they converge into a compact twisted bun. This is one of the most secure styles on this list. Every section of hair is either braided or tucked into the bun, which means there is nothing loose for wind to grab, nothing hanging to tangle in branches, and nothing rubbing against your pack straps.
The double-braid-to-bun structure distributes tension evenly across the scalp rather than concentrating it at one elastic point. This prevents the headaches that tight single ponytails cause on long hikes. The twisted bun at the nape sits below the pack strap line, which means it will not create a pressure point against your skull.
Why this look is popular: It is the most wind-proof style available. Every strand is locked into either a braid or the bun. Hikers in exposed, high-wind environments (alpine ridges, desert canyons, coastal cliffs) consistently choose this style for that reason.
Where this look is suitable: Windy trails, multi-day backpacking trips, any hike where you will not have access to a mirror for touch-ups.
Step by step:
- Part down the center. A clean center part ensures even braid thickness on both sides.
- Dutch braid the right side. Starting at the right temple, Dutch braid along the hairline, curving around the back of the head toward the nape. Keep it tight against the scalp.
- Dutch braid the left side. Mirror the right side. Both braids should meet at the nape.
- Combine at the nape. Gather both braid tails and any remaining loose hair into a low ponytail. Secure with an elastic.
- Twist into a bun. Twist the ponytail into a rope, coil it around the elastic base, and tuck the ends under. Pin with three to four bobby pins.
Tips and tricks: The nape is where most braids loosen first because the neck area generates the most sweat and movement. Apply a thin line of edge control gel along the nape hairline before braiding. The gel adds grip that keeps the braids tight through hours of activity.
17.Double Dutch Braids with Low Ponytail
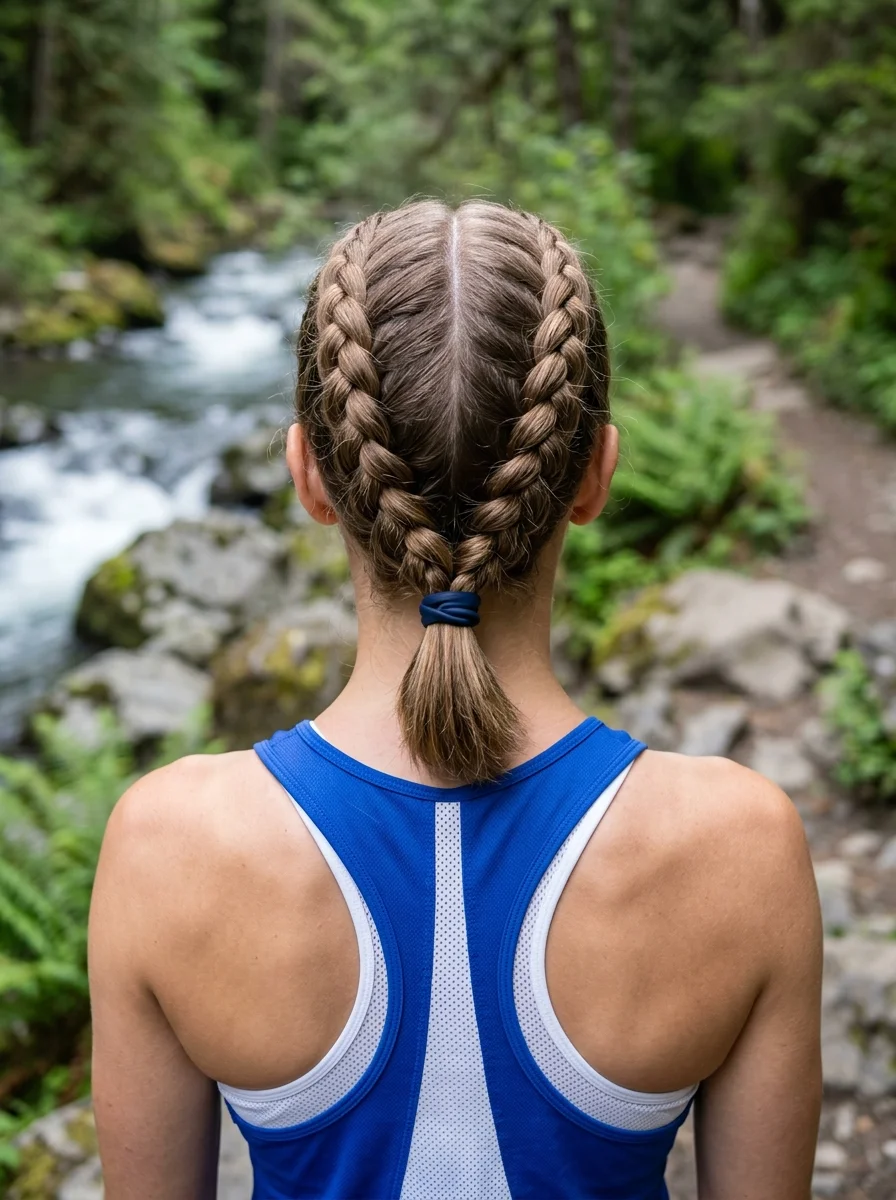
The overview: Two Dutch braids run down either side of a center part and meet at the nape, where they tie into a short, stubby low ponytail secured with a blue scrunchie. This is the simplified version of the double-braid-to-bun, designed for people who find bun-making tedious but still want the security of braids along the hairline.
The low ponytail sits in the sweet spot between the braid and the pack strap. It hangs below where the strap crosses, so there is no rubbing, no flattening, and no discomfort. The scrunchie is easier to remove than bobby pins at the end of the day, which makes this a better choice for people who want a quick exit from their hiking hairstyle.
Why this look is popular: It takes ten minutes to create and holds for the entire day. The Dutch braids keep the front and sides completely controlled, and the short ponytail tail does not bounce or swing while you walk.
Where this look is suitable: All trail types and difficulty levels. The braids handle wind, the low ponytail handles pack straps, and the scrunchie handles sweat.
Step by step:
- Part precisely. Use a comb to create a clean center part from forehead to nape.
- Dutch braid both sides. Starting at each temple, Dutch braid along the hairline, curving around the ears and toward the nape. Keep the braids tight against the scalp.
- Gather at the nape. Collect both braid tails and all remaining hair at the nape. The braids should have consumed most of the hair by this point.
- Secure with a scrunchie. Wrap the scrunchie twice around the gathered hair. The ponytail should hang just below the occipital bone.
- Tighten the braids. Gently tug the outer edges of each braid to ensure they are sitting snugly against the scalp. Adjust any sections that feel loose.
Tips and tricks: A satin scrunchie in a color that matches your hair looks more intentional than a bright contrasting one. But if you want the scrunchie to be a visible accessory, choose a color that complements your hiking outfit.
34 Stunning Summer First Date Hairstyles for 2026 💕☀️
18.High Curly Bun with Green Satin Scrunchie
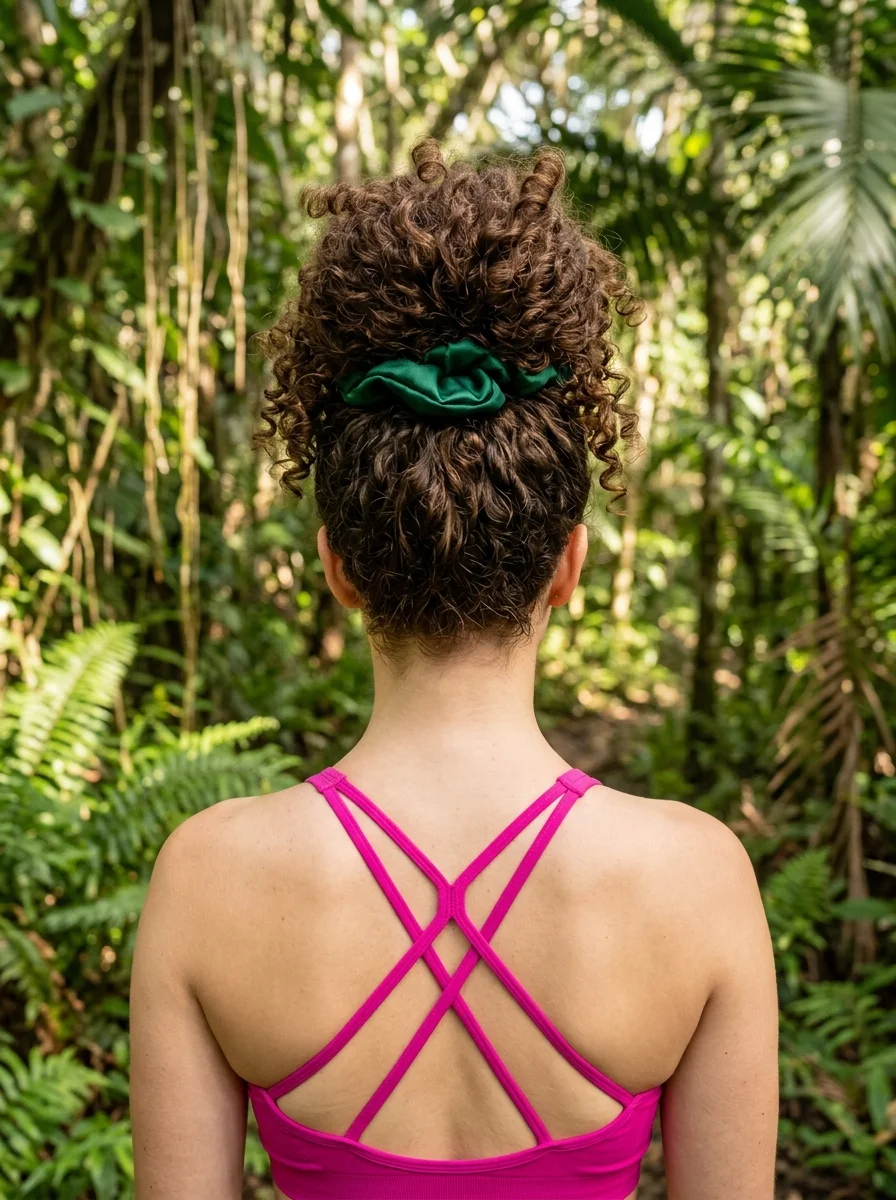
The overview: A voluminous high bun positioned at the crown, with loose curly tendrils left out around the edges for a natural, effortless look. The bun is secured with a large emerald green satin scrunchie that adds a bold color accent while providing more gentle tension than a standard elastic. This style celebrates natural curl texture rather than trying to contain it, and the result is a bun that looks full and intentional rather than smashed and restrained.
Curly and coily hair has a natural advantage in high buns because the existing volume creates a full, round shape without needing to tease or pancake. The curl pattern also provides built-in texture that makes the bun visually interesting without any additional styling. The loose tendrils around the edges are not accidental; they frame the face and prevent the severe, slicked-back look that a tight bun creates on curly hair.
Why this look is popular: The satin scrunchie does not absorb moisture from curly hair the way cotton or elastic bands do, which means the curls stay hydrated and defined throughout the hike. The emerald green color also photographs beautifully against natural landscapes.
Where this look is suitable: Any trail, any season. The high bun sits above the pack line, the curls handle humidity, and the scrunchie prevents breakage.
Step by step:
- Refresh the curls. Mist dry curls with water and leave-in conditioner mix. Scrunch to re-define.
- Gather high. Flip your head forward and gather all hair at the crown. Leave a few curly pieces loose around the hairline and ears.
- Secure with the scrunchie. Wrap the satin scrunchie twice around the gathered hair. The bun should sit on top of your head, not at the back.
- Arrange the bun. Gently pull and shape the curls within the bun to create a round, full shape. Do not flatten or smooth them; the texture is the point.
- Frame the face. Pull out additional curly pieces if needed. Let them fall naturally around your face and neck.
Tips and tricks: Do not use a brush on dry curly hair. It disrupts the curl pattern and creates frizz. Use your fingers or a wide-tooth comb to gather the hair. For Type 4 hair, a satin-lined buff can be pulled over the bun for extra wind protection without crushing the curls.
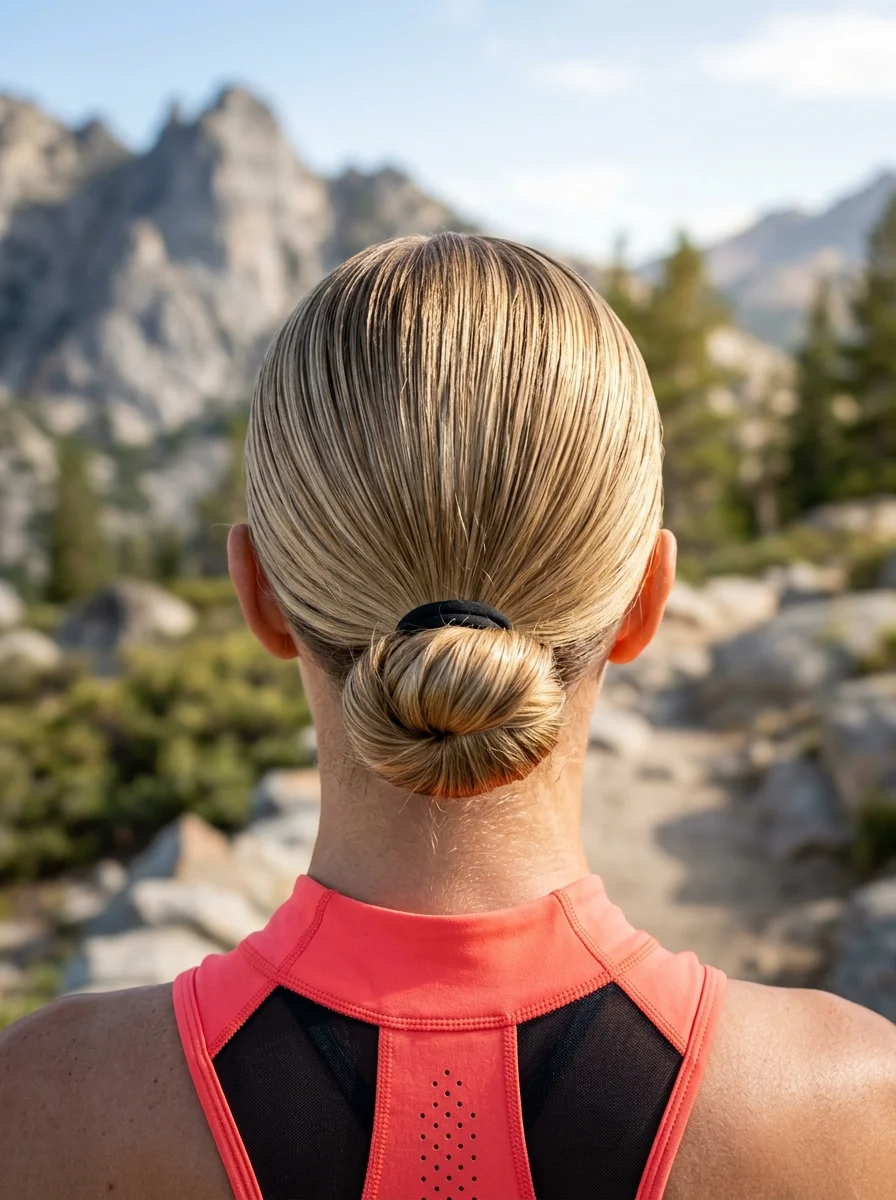
19.Sleek High Bun
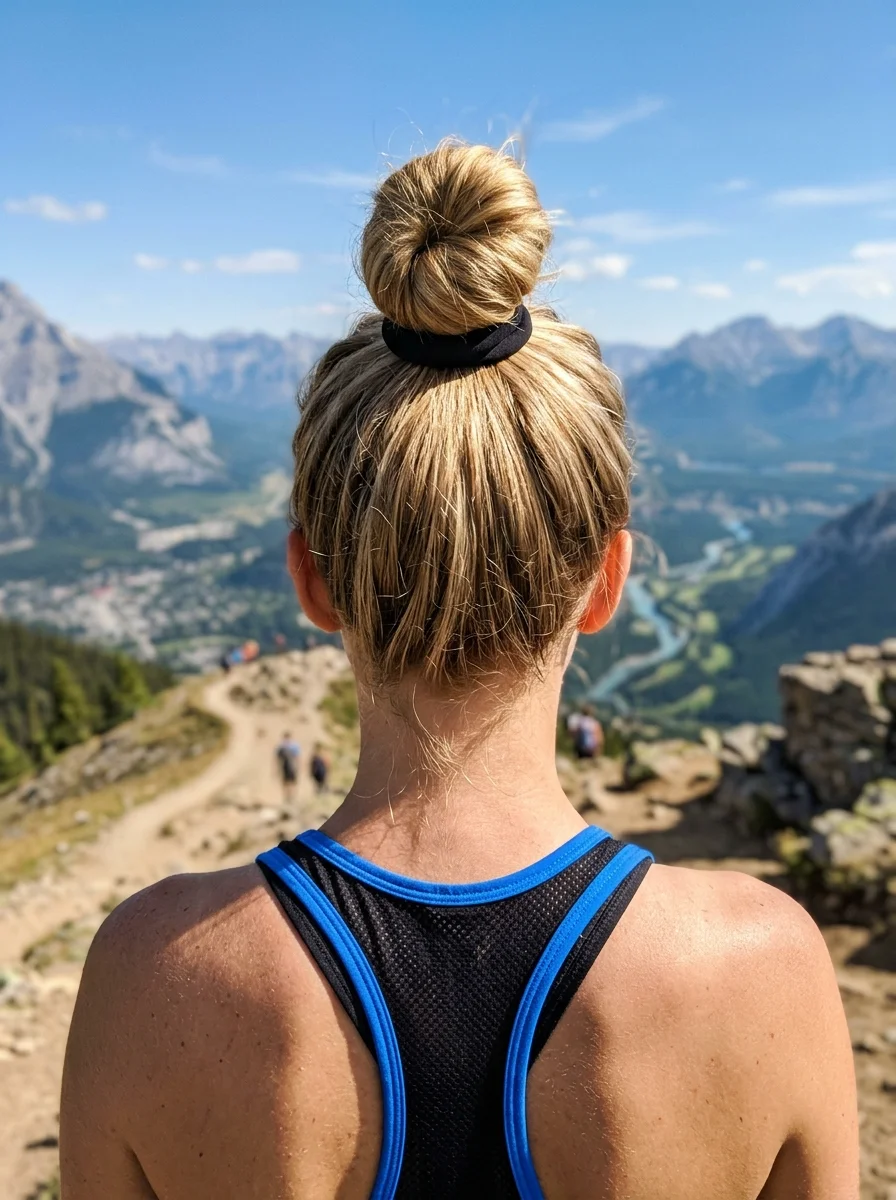
The overview: A simple, compact bun pulled tightly and smoothly to the crown. No loose pieces, no texture, no accessories beyond a single elastic. This is the minimalist option: the hairstyle equivalent of a clean white tee. Its power is in its simplicity. Nothing catches, nothing tangles, nothing needs adjusting. The sleek surface also reflects sunlight, which means your head stays slightly cooler than it would with a textured style that traps air.
The sleek high bun works because of what it removes. No braids to execute, no accessories to lose on the trail, no face-framing pieces to push out of your eyes on a steep climb. It is the most reductive hiking hairstyle, and for people who prefer function over decoration, it is the right choice every time.
Why this look is popular: It takes under three minutes and holds through anything. The high position keeps it above backpack straps, and the sleek surface does not collect dust or debris the way textured styles do.
Where this look is suitable: High-output trails, hot-weather hikes, any situation where maximum function is the only priority.
Step by step:
- Dampen slightly. Mist hair with water or apply a light smoothing cream. Dry hair creates flyaways that undermine the sleek effect.
- Gather high. Flip your head forward. Brush all hair toward the crown using a boar-bristle brush for the smoothest surface.
- Secure tightly. Wrap a strong elastic three times. The ponytail should feel firm against the scalp.
- Twist and coil. Twist the ponytail tightly, then coil it around the elastic base. The tighter the twist, the more compact the bun.
- Pin the perimeter. Use four bobby pins at the 12, 3, 6, and 9 o'clock positions to lock the bun flat against your head.
- Smooth the surface. Apply a small amount of pomade or edge control to the crown and sides with your palms. Brush any remaining flyaways flat with a boar-bristle brush.
Tips and tricks: This style works best on second-day hair. Freshly washed hair is too soft and slippery to hold a sleek surface for long. If you must wash first, apply a strong-hold gel to damp hair before brushing it up.

30 Stunning Vacation Nail Ideas for Your Next Getaway in 2026 💅
20.Braided Low Bun
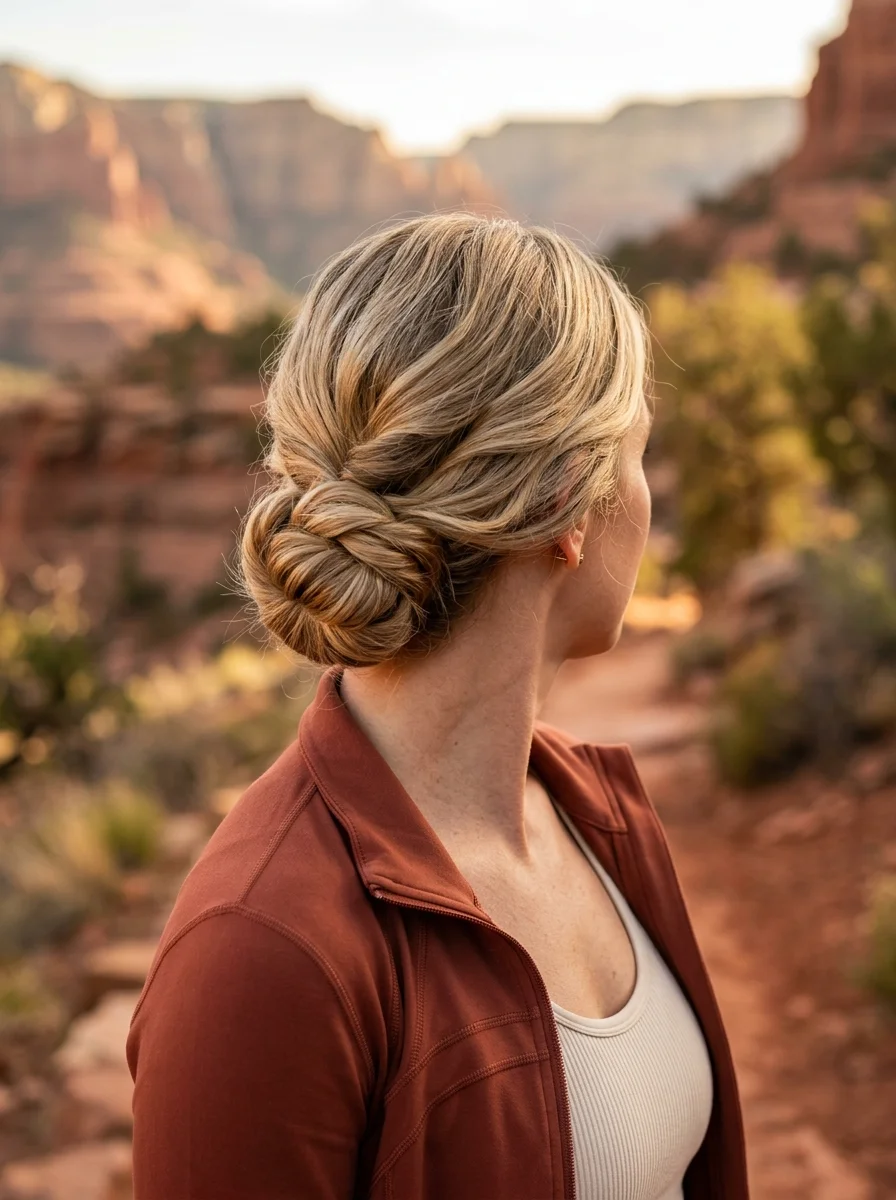
The overview: A polished low bun with integrated braids, positioned at the nape. Hair is smoothly swept back from the face, then sections are braided and coiled into a structured bun. The braids add texture and visual dimension that a simple twist cannot replicate, while keeping the overall shape tight and contained. Face-framing pieces are left soft around the ears for softness.
The braided low bun photographs exceptionally well from behind because the interlocking braid sections create shadows and highlights that read as complex and intentional. From the front, it looks clean and polished. That dual perspective is rare in hiking hairstyles, most of which look better from one angle than the other.
Why this look is popular: The braids lock the bun into place more securely than a simple coil. Each braid section grips the others through friction, which means the bun holds its shape even as you move through uneven terrain.
Where this look is suitable: Scenic hikes, moderate trails, any outdoor event where you want to look polished. Works well for trailside picnics and summit celebrations.
Step by step:
- Gather smoothly. Brush all hair back to the nape. Secure with an elastic to create a low ponytail.
- Divide into sections. Split the ponytail into two to three equal sections.
- Braid each section. Create a standard three-strand braid on each section. Secure ends with small elastics.
- Coil into a bun. Take the first braid and coil it around the ponytail base. Pin it flat. Coil the second braid around the first, slightly overlapping. Pin. Repeat with any remaining braids.
- Tuck the ends. Push the braid tails underneath the bun and pin them out of sight.
- Release face-framers. Pull soft pieces from around the ears. Let them fall naturally.
Tips and tricks: If your braids are different thicknesses (which happens when the ponytail is not perfectly centered), coil the thicker braid first and the thinner one on top. The outer braid is what you see, so putting the thinner one there creates a more balanced appearance.
21.Mid-Height Ponytail with Patterned Scrunchie
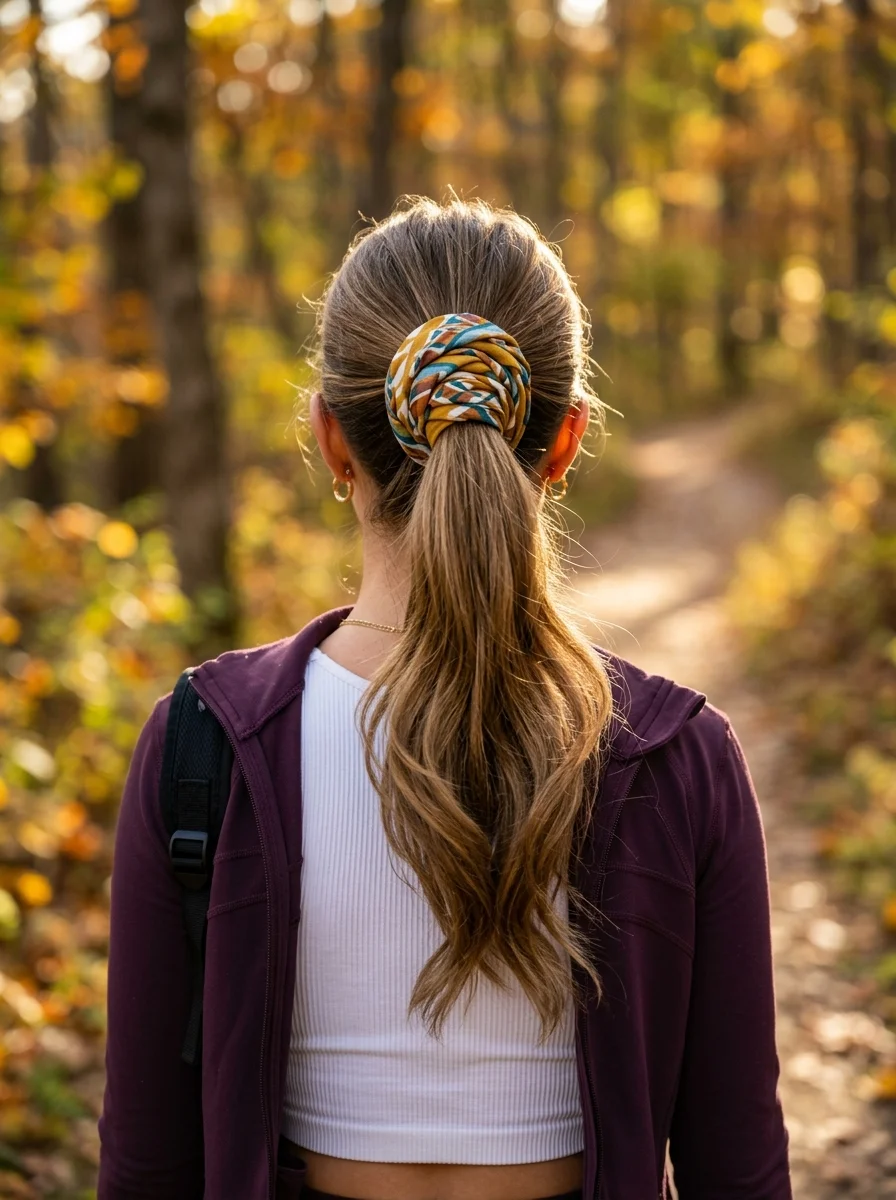
The overview: A casual mid-height ponytail secured with a chunky patterned scrunchie in a marbled design of teal, mustard, brown, and cream. The ponytail falls in soft, loose waves. This is the "I threw my hair up and it happened to look good" style, except the scrunchie is doing all the aesthetic work. A basic elastic in the same position would look like an afterthought. The patterned scrunchie turns it into an accessory-forward style.
The mid-height position is the most comfortable for hiking because it sits above the neck but below the crown. It does not interfere with a pack's headrest, it does not swing against your back, and it keeps hair off your neck without pulling the hairline tight. For people who find high ponytails give them a headache and low ponytails tangle against their pack, this is the compromise that works.
Why this look is popular: It takes two minutes, uses one accessory, and works on virtually any hair texture. The patterned scrunchie adds a deliberate style element that makes the whole look feel considered rather than thrown together.
Where this look is suitable: Easy day hikes, autumn forest trails, any casual outdoor setting. The marbled scrunchie pairs particularly well with fall foliage.
Step by step:
- Add texture. Spritz texturizing spray through the lengths for volume and grip.
- Gather at mid-height. Collect hair at the point between the crown and the nape. The elastic should sit roughly level with the top of your ears.
- Secure with the scrunchie. Wrap the scrunchie twice. The ponytail should feel secure but not painfully tight.
- Fluff the tail. Shake the ponytail with your fingers to build volume. Pull a few sections wider than others for a tousled, natural look.
- Adjust the front. If the front looks too pulled-back, gently tug small sections at the crown to create a little lift and softness.
Tips and tricks: Bring the scrunchie in a ziplock bag in your pack. If the ponytail loosens by midday, re-gather and re-secure it in thirty seconds. The scrunchie holds better on second-day hair than on freshly washed hair.
22 Best Graduation Day Hairstyles for 2026 🎓✨
22.Half-Up Top Knot with Athletic Headband
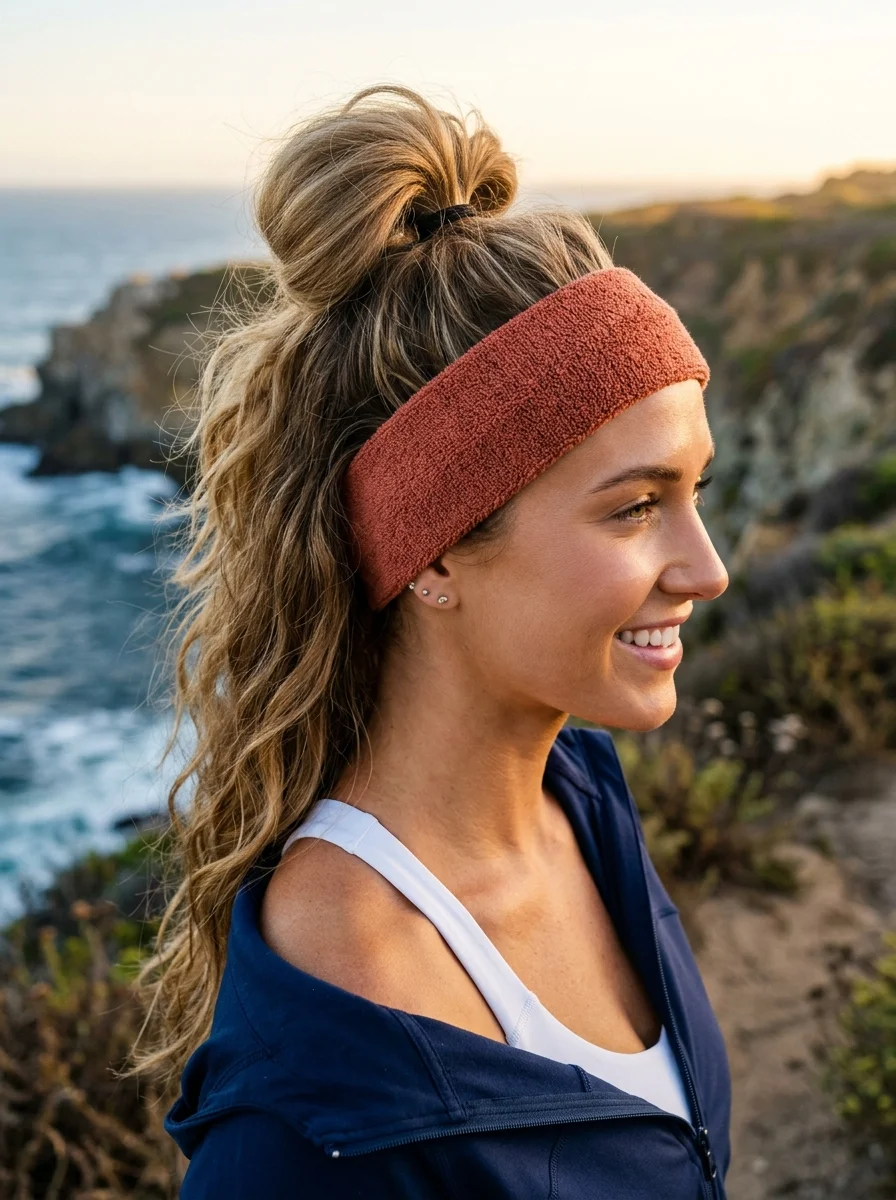
The overview: The top section of wavy hair is pulled up into a loose, messy bun secured with a black elastic, while the remaining hair flows freely down the back in beachy waves. A wide terracotta-colored terry cloth headband absorbs sweat from the forehead and keeps the front sections pushed back. This is a practical compromise: the headband handles the sweat problem, the top knot keeps the crown hair controlled, and the loose hair below maintains a relaxed, outdoorsy vibe.
The terracotta headband is the standout piece here. The warm, earthy tone blends with natural landscapes rather than clashing against them, which is why this specific color has become the most popular headband shade for outdoor activities. It also hides dirt better than white or pastel options.
Why this look is popular: The half-up structure keeps your hair off your face without committing to a full updo. The loose sections below the top knot provide ventilation that a full bun does not, which matters on warm-weather hikes.
Where this look is suitable: Coastal trails, warm-weather hikes, moderate day hikes where you want to look relaxed and approachable.
Step by step:
- Slide on the headband. Push it back about one inch from the hairline. It should sit comfortably without creating pressure.
- Section the top half. Gather hair from the temples upward, leaving the bottom section loose.
- Create the top knot. Twist the gathered section into a loose bun at the crown. Secure with a black elastic. Do not pull it tight; the messiness is the point.
- Arrange the loose hair. Shake out the bottom section. Separate the waves with your fingers for a fuller, more defined look.
- Adjust the headband. Make sure it is sitting evenly and absorbing sweat from the forehead. Push it forward or back depending on your preference.
Tips and tricks: For wavy or curly hair, apply a curl cream to the loose sections before you start the hike. The cream prevents frizz and keeps the wave pattern defined through humidity and wind.
23.Braided Bun with Wooden Hair Stick
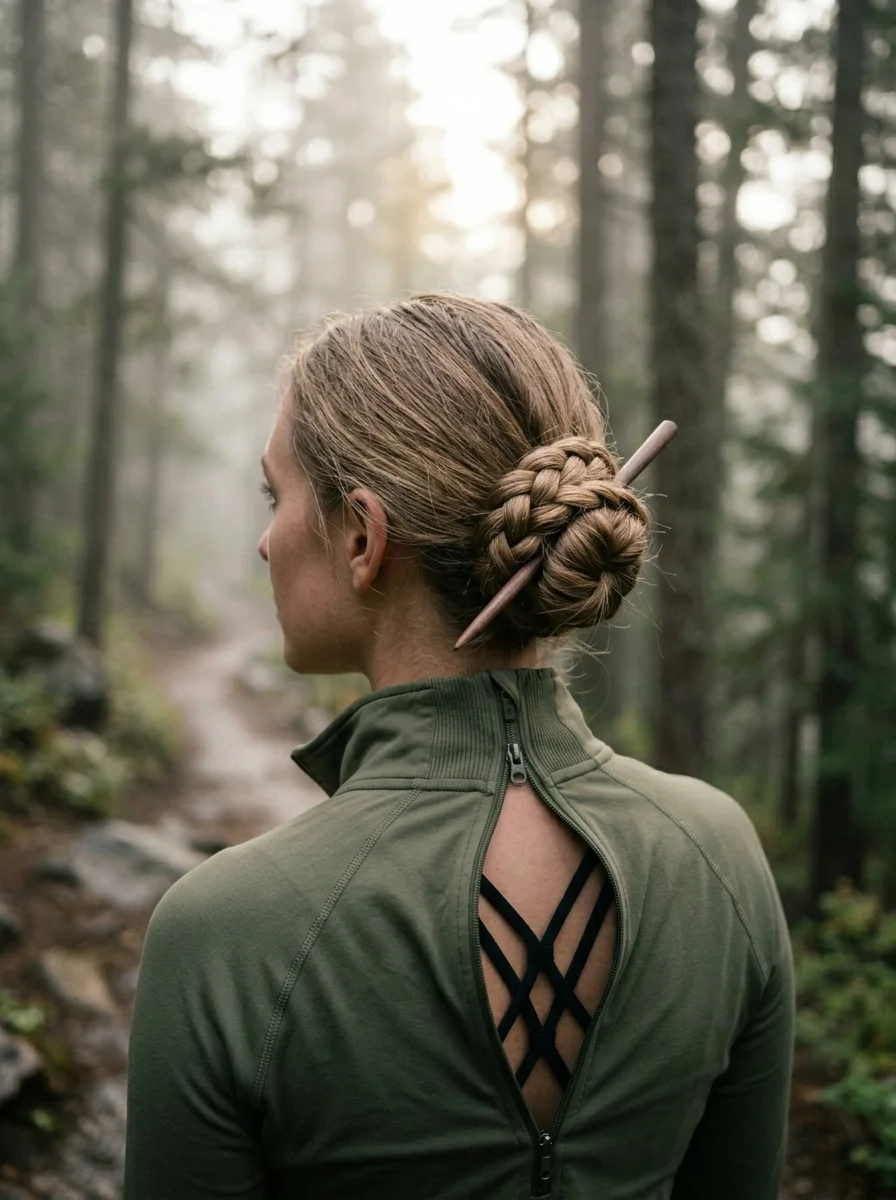
The overview: A single braid coiled into a compact, round bun at the back of the head, secured with a single wooden hair stick threaded diagonally through the entire structure. No elastics, no bobby pins, no clips. The hair stick does all the holding work by creating a friction lock: it enters the bun at one angle, passes through the braided coil, catches the underlying hair at the scalp, and exits at a different angle. The result is a bun that feels like it should not stay up but does, firmly, for hours.
The wooden hair stick has both practical and aesthetic advantages. Wood grips hair better than metal or plastic because the natural grain creates micro-texture that prevents slipping. It is also lighter than metal, which means it does not add weight to the bun or pull on the scalp. The natural wood tone complements outdoor settings in a way that metallic accessories do not.
Why this look is popular: The single-accessory approach is the lightest weight option on this list. You are carrying one stick that weighs almost nothing, rather than a bag of pins, clips, and elastics. For ultralight hikers who count every gram, this matters.
Where this look is suitable: Any trail. The hair stick hold is surprisingly strong once you learn the technique, and the style looks appropriate in both wilderness and town settings.
Step by step:
- Gather and braid. Collect all hair at the back of your head and braid it into a standard three-strand braid. Secure the end with a small elastic.
- Coil the braid. Wind the braid around its base in a flat spiral, creating a compact bun against your head.
- Insert the stick. Hold the bun in place with one hand. With the other, push the stick through the outer edge of the bun at a downward angle, aiming toward the scalp.
- Catch scalp hair. Once the stick tip reaches the scalp, pivot it to a more horizontal angle and push it through the bun in the opposite direction. The stick should pass through the braid coil, catch hair at the scalp, and emerge on the other side.
- Test the hold. Shake your head gently. The bun should feel secure. If it feels loose, re-insert the stick at a steeper angle to catch more scalp hair.
Tips and tricks: This technique requires practice. Try it at home a few times before relying on it for a hike. The angle of insertion is everything: too shallow and the stick slides out; too steep and it pokes your scalp. The sweet spot is about 30 degrees from horizontal.

30 Stunning Beach Nail Ideas for the Best Vacation in 2026 🌊
24.Loose Waves with Paisley Bandana
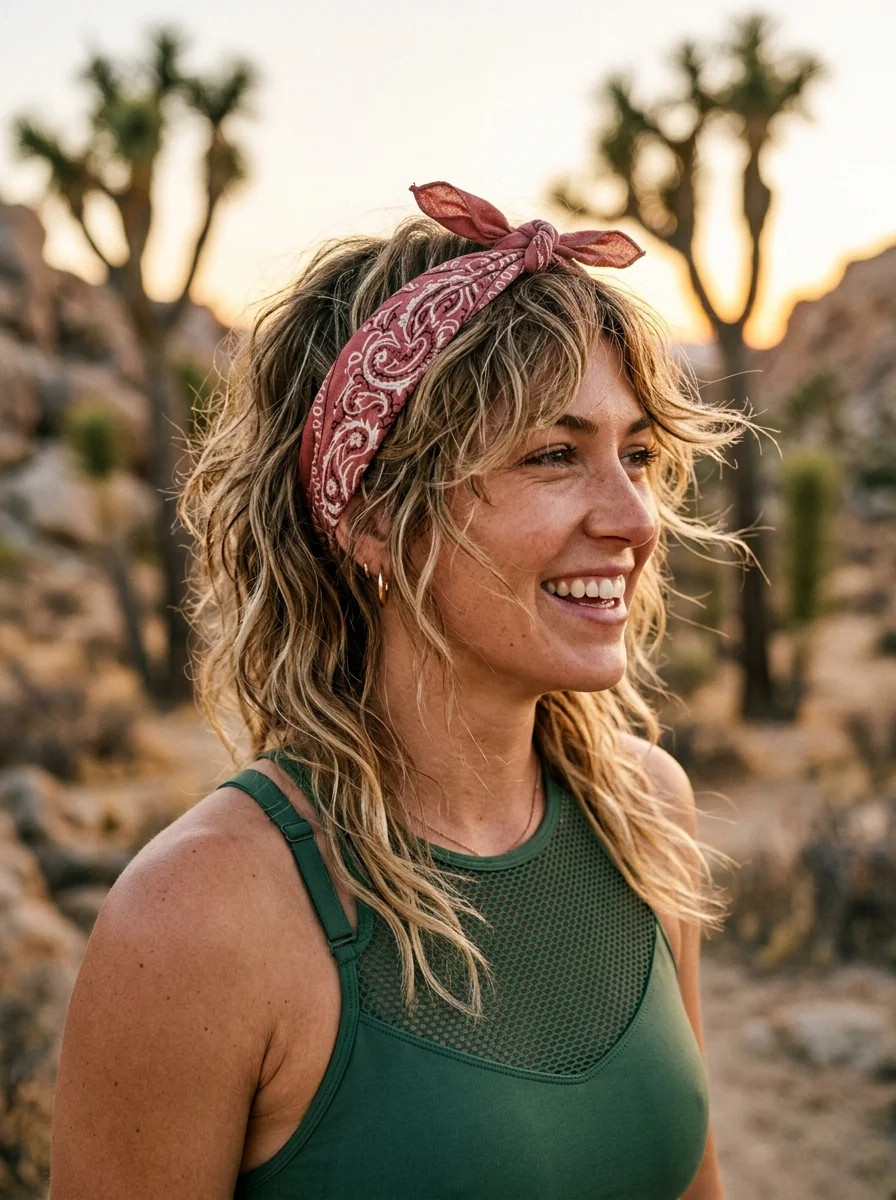
The overview: Natural waves worn completely down, with a pink paisley bandana tied as a headband with a bow knot on top. The bandana pushes hair back from the face while the waves provide volume and movement. This is the most low-effort style on the list: no braiding, no twisting, no pins. The bandana does the only structural work (keeping hair off the forehead), and the rest is your natural texture doing its thing.
The paisley bandana is a heritage accessory that has cycled through counterculture, punk, hip-hop, and outdoor fashion for decades. Its longevity means it does not read as trendy or costumey; it reads as a reference to something that has existed long before you and will exist long after. That gives it staying power that novelty prints lack.
Why this look is popular: It works on hair that is too wavy to stay behind the ears but not long enough for most updos. The bandana also provides UV protection for the scalp along the part line, which is one of the most sunburn-prone areas on the head.
Where this look is suitable: Desert hikes, sunny trails, any warm-weather setting where keeping cool is the priority and you do not want all your hair up against your neck.
Step by step:
- Enhance the waves. If your hair is naturally wavy, scrunch in a sea salt spray. If it is straight, create loose waves with a large-barrel curling iron before you leave.
- Fold the bandana. Fold the square bandana in half diagonally to create a triangle. Fold the long edge over itself twice to create a flat band about 2 inches wide.
- Position the band. Place the center of the band at the nape of your neck, with each end pointing forward past your ears.
- Bring forward and tie. Pull both ends forward over the top of your head. Tie them in a knot or bow at the center of your forehead, just above the hairline.
- Adjust placement. The bandana should sit about one inch back from the hairline. Push it back if it creeps forward.
Tips and tricks: Cotton bandanas grip better than polyester. The stiff cotton of classic Western bandanas holds its fold better than soft, washed cotton. If the bandana keeps slipping, secure it with a single bobby pin hidden underneath on each side.
25.Sleek Low Bun
The overview: An ultra-smooth, tightly pulled-back bun positioned at the nape. No flyaways, no part, no loose pieces. Every strand is combed back with precision and twisted into a small, tight, symmetrical bun. This is the most polished and minimalist style in the collection. Nothing catches on branches, nothing blows in the wind, and nothing moves while you hike. It is pure function, and it looks clean because of it.
The sleek low bun requires more prep than the other styles on this list. You need smooth, tangle-free hair to achieve the glass-like surface, which means a thorough brushing and possibly a smoothing product. But the result holds longer than any other style here because the tight, uniform surface creates maximum friction against the scalp.
Why this look is popular: It is the most wind-resistant style available. There is no loose hair, no textured surface for wind to catch, and no accessory to work loose. It also photographs cleanly from every angle.
Where this look is suitable: Exposed ridgelines, high-wind environments, alpine hikes where conditions are harsh and the style needs to survive hours without adjustment.
Step by step:
- Smooth thoroughly. Brush all hair backward with a boar-bristle brush. Apply a smoothing cream or pomade to eliminate flyaways.
- Gather at the nape. Collect all hair into a low ponytail. Use the brush to smooth the surface as you gather. The surface should be bump-free.
- Secure tightly. Wrap a strong elastic three times. The ponytail should feel firm.
- Twist into a tight bun. Twist the ponytail tightly, then coil it around the elastic base. The bun should be small and compact.
- Pin the perimeter. Use four to six bobby pins around the bun's edge. Push them horizontally through the bun and into the scalp hair beneath.
- Final smooth. Apply a thin layer of pomade or edge control to the crown and sides with your palms. Brush any remaining flyaways flat.
Tips and tricks: Wrap the bun with a silk scarf for ten minutes while you prepare your pack. The scarf compresses the hair surface and sets the smoothing product, creating a more durable sleek finish. Remove the scarf before you start hiking.
24 Stunning Bridesmaid Hairstyles for Weddings 2026 💍✨
26.Crown Braid
The overview: Two braids wrapped up and over the head in opposite directions, pinned along the top and sides to create a halo or crown effect. All hair is completely gathered up and off the neck. The crown braid is both decorative and highly practical: the braids sit flat against the head, which means nothing catches on branches or blows in wind, and the full-head coverage keeps every strand contained. It is the most visually impressive style on this list, and it is also one of the most secure.
The technical challenge is the pinning. Each braid must be anchored at multiple points along its length to prevent it from sagging or shifting during movement. The pins need to go through the braid and into the underlying hair at the scalp, not just through the braid itself. This is where most crown braid attempts fail: the pins are placed too shallow, and the braid loosens by midday.
Why this look is popular: It creates 360-degree visual interest that no other style replicates. From the front, the braids frame the face. From the back, they create a sculptural silhouette. In trail photos from any angle, there is something to look at.
Where this look is suitable: Summit photos, alpine meadows, any hike where the final destination justifies a more elaborate style. Also works for outdoor weddings, garden parties, and festivals.
Step by step:
- Part down the center. Create a clean part from forehead to nape.
- Braid the right side. Dutch braid from the right temple, along the hairline, curving around the back of the head toward the left ear. Secure the end with a small elastic.
- Braid the left side. Dutch braid from the left temple, along the hairline, curving around the back toward the right ear. Secure the end.
- Wrap and pin the first braid. Lift the right braid up and over the top of your head, positioning it about one inch back from the hairline. Pin it in place with bobby pins every two inches along its length.
- Wrap and pin the second braid. Lift the left braid up and over, positioning it slightly behind the first braid. Pin it in place.
- Tuck the tails. Tuck each braid's tail under the opposite braid's body. Pin to secure. This creates a seamless, continuous crown.
- Reinforce. Push additional pins through any sections that feel loose. Tug gently on each braid to test the hold.
Tips and tricks: Braid on second-day hair for maximum grip. If your hair is freshly washed, apply a strong-hold mousse before braiding. The mousse adds texture that prevents the braids from sliding during pinning. For extra security, apply a thin line of gel along the hairline before you start braiding to lock down flyaways.
How to Choose the Right Style for Your Hike
Not every style works for every trail. The right choice depends on three factors: the weather, the terrain, and how long you will be out.
Hot and humid: Keep hair off the neck. High buns, space buns, and the athletic headband with braid are your best options. Anything with loose hair hanging on your neck will become uncomfortable within the first hour.
Windy and exposed: Full containment is non-negotiable. Double braids into a bun, the crown braid, and the sleek low bun are the most wind-proof styles. Avoid anything with loose sections or single-elastic anchors.
Moderate weather, scenic trail: This is where you have options. The claw clip styles, the half-up variations, and the scarf-wrapped bun all work well because the conditions are forgiving enough for less-secured styles.
Multi-day backpacking: Choose a style you can redo without a mirror. Double braids, the French braid bubble ponytail, and the braided low bun can all be executed by feel alone. Save the crown braid and hair stick bun for hikes where you have time and light to work with.