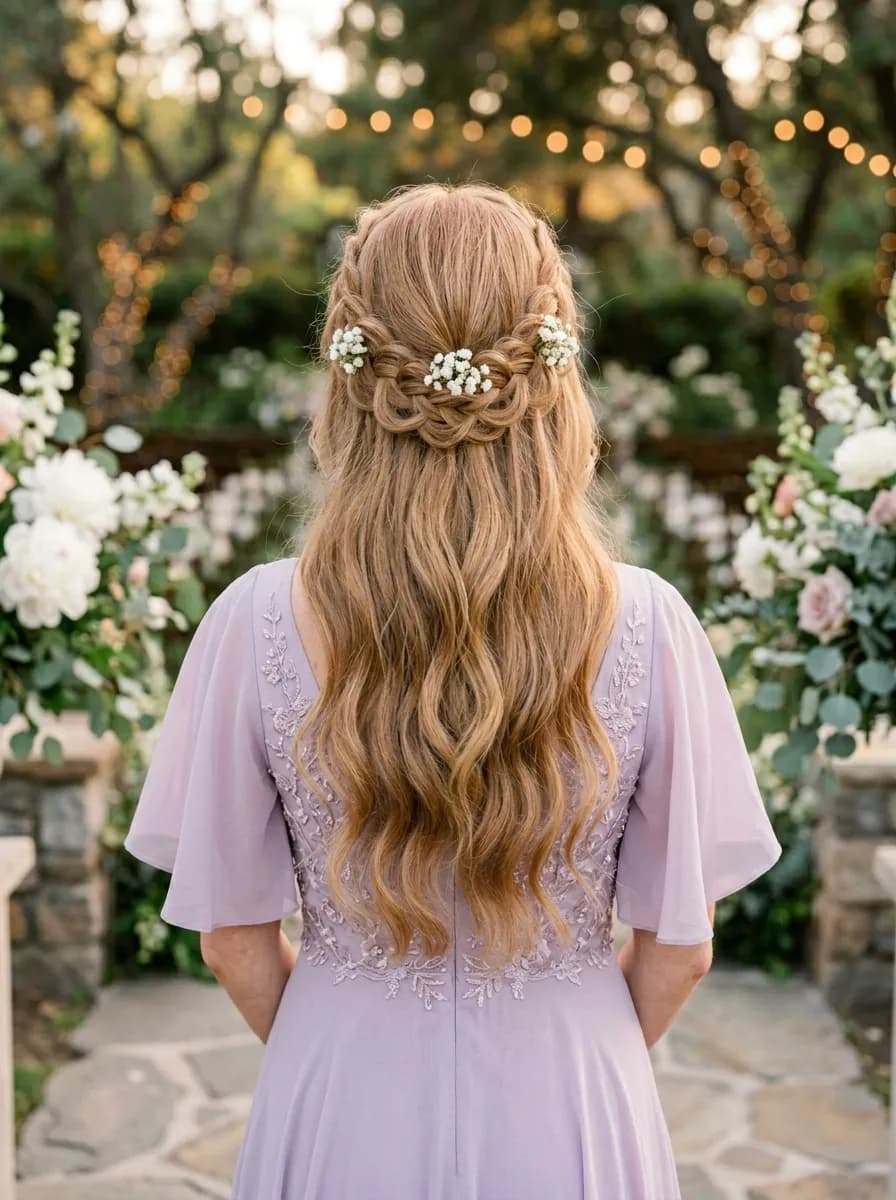
Hair Trends
28 Best Camping Hairstyles for Women That Actually Hold Up Outdoors 2026
Camping hair is its own category. It has to survive wind, humidity, sleeping on a pillow that might be a rolled-up hoodie, and the kind of morning where your only mirror is the side of a parked car. Most camping hair advice boils down to "just throw it in a bun," which ignores the fact that you still want to feel like yourself when you hike to the waterfall for photos.
We pulled together twenty-eight hairstyles that are built for the outdoors. They hold up without daily washing, work with second-day (or third-day) hair, and require minimal tools. Some are braided, some are loose, and a few use accessories that double as decoration and damage control. Every single one has been tested against real camping conditions: tent hair, campfire smoke, and the kind of humidity that makes a hair dryer pointless.
The Camping Hair Philosophy
The biggest mistake people make with camping hair is treating it like a compromise. You grab whatever elastic is in your bag, pull everything back, and call it done. But the right camping hairstyle does more than keep hair out of your face. It protects your hair from sun and wind damage, stretches the time between washes, and actually holds its shape through a full day of hiking, paddling, or sitting around a fire.
The trick is choosing a style that works with your hair's natural state rather than fighting it. Second-day hair is your advantage here. The natural oils give you grip that freshly washed hair can't match. If you can resist the camp shower on day one, your braids will hold tighter, your buns will stay put, and you will spend less time fixing and more time outside.
The packing list? Two strong elastics, a handful of bobby pins, dry shampoo, and one accessory that makes you feel put together. A silk scrunchie, a bandana, or a metal cuff. That is enough.
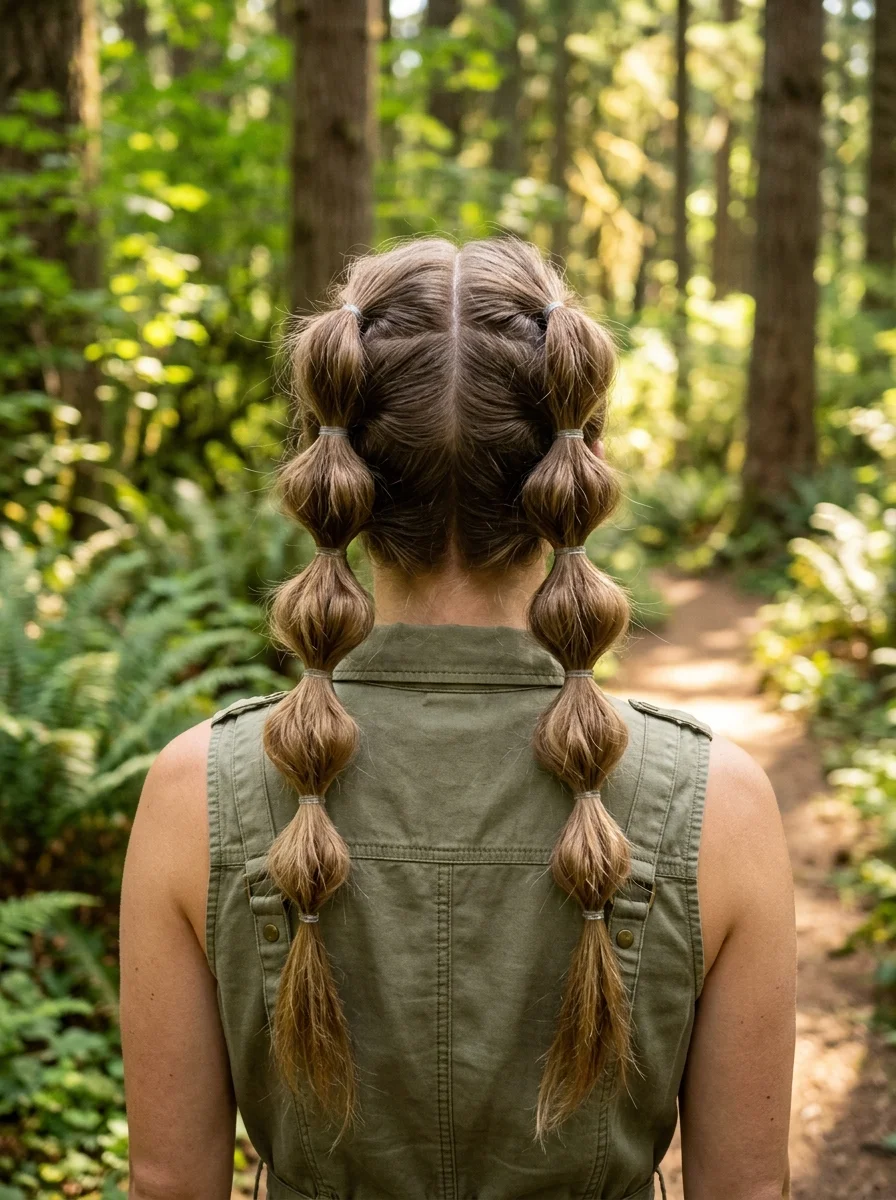
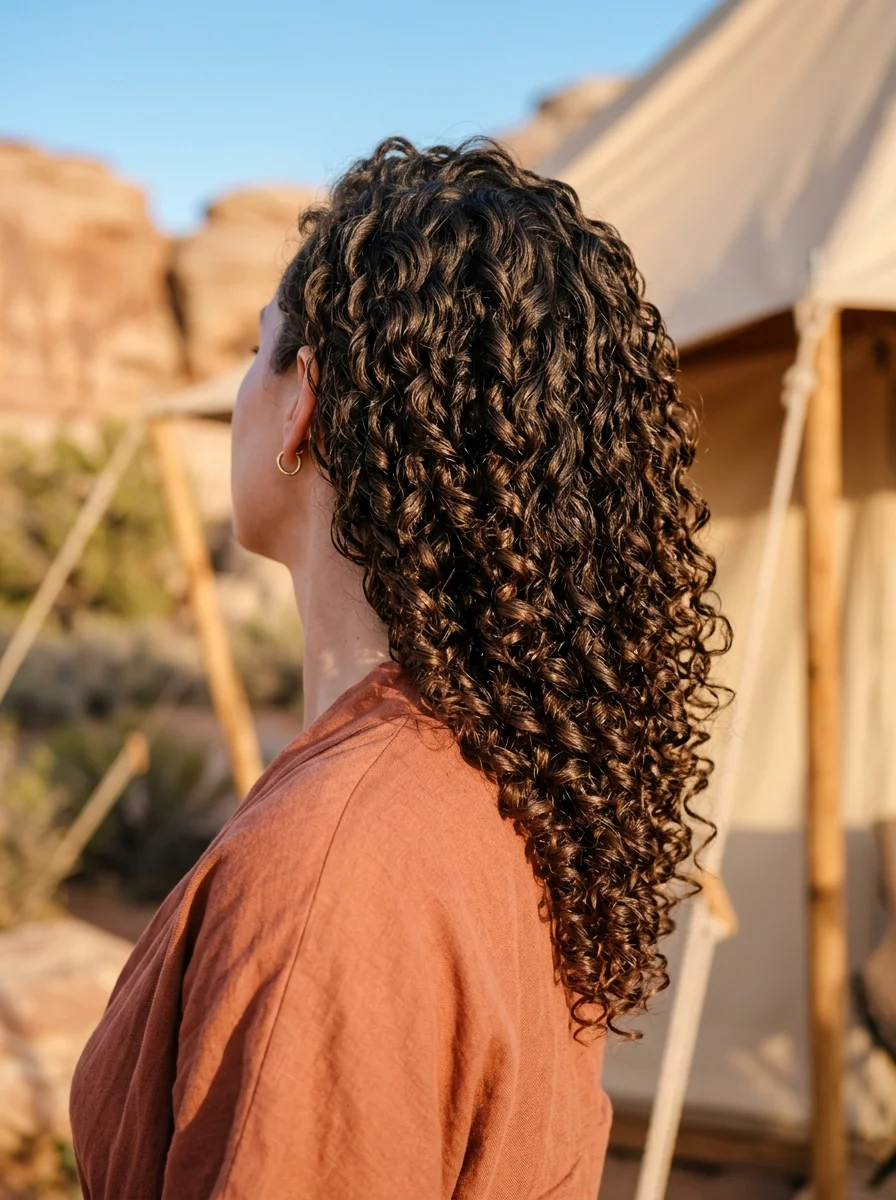
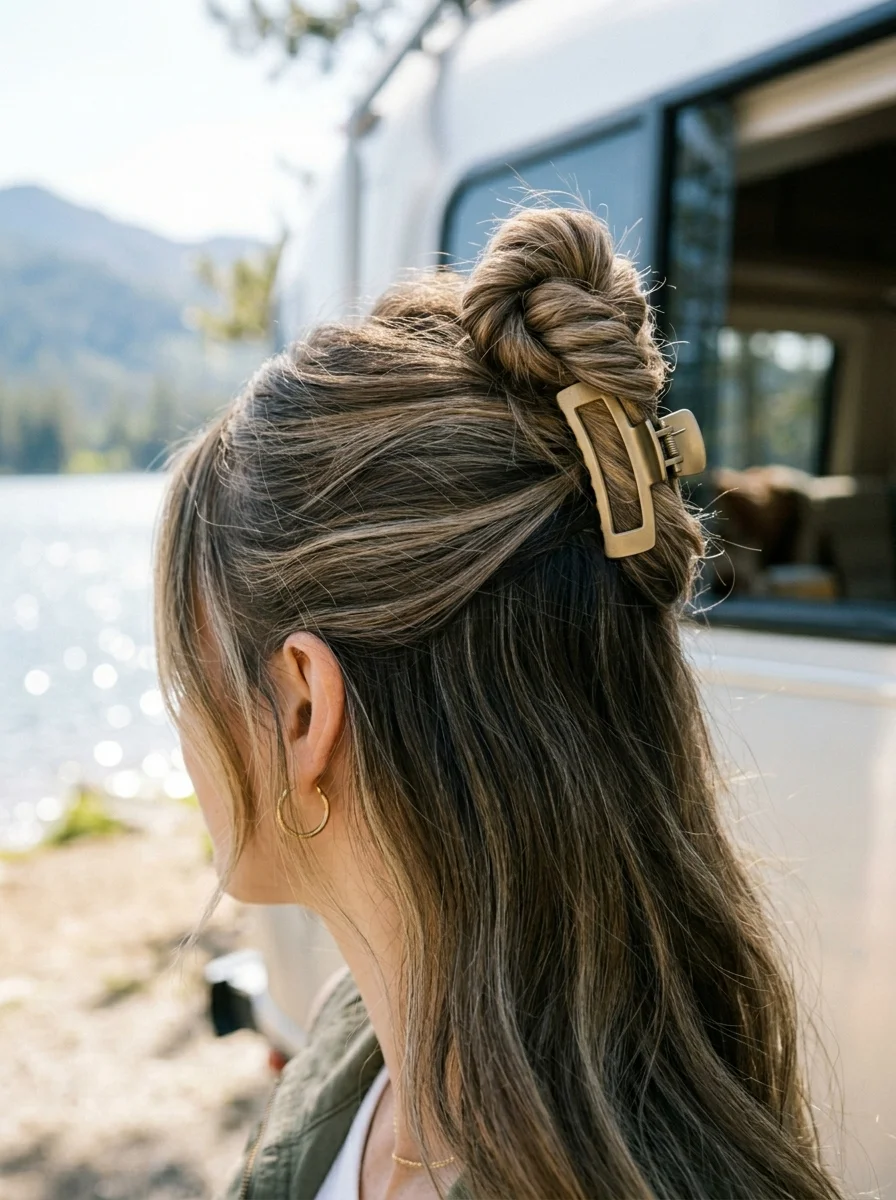
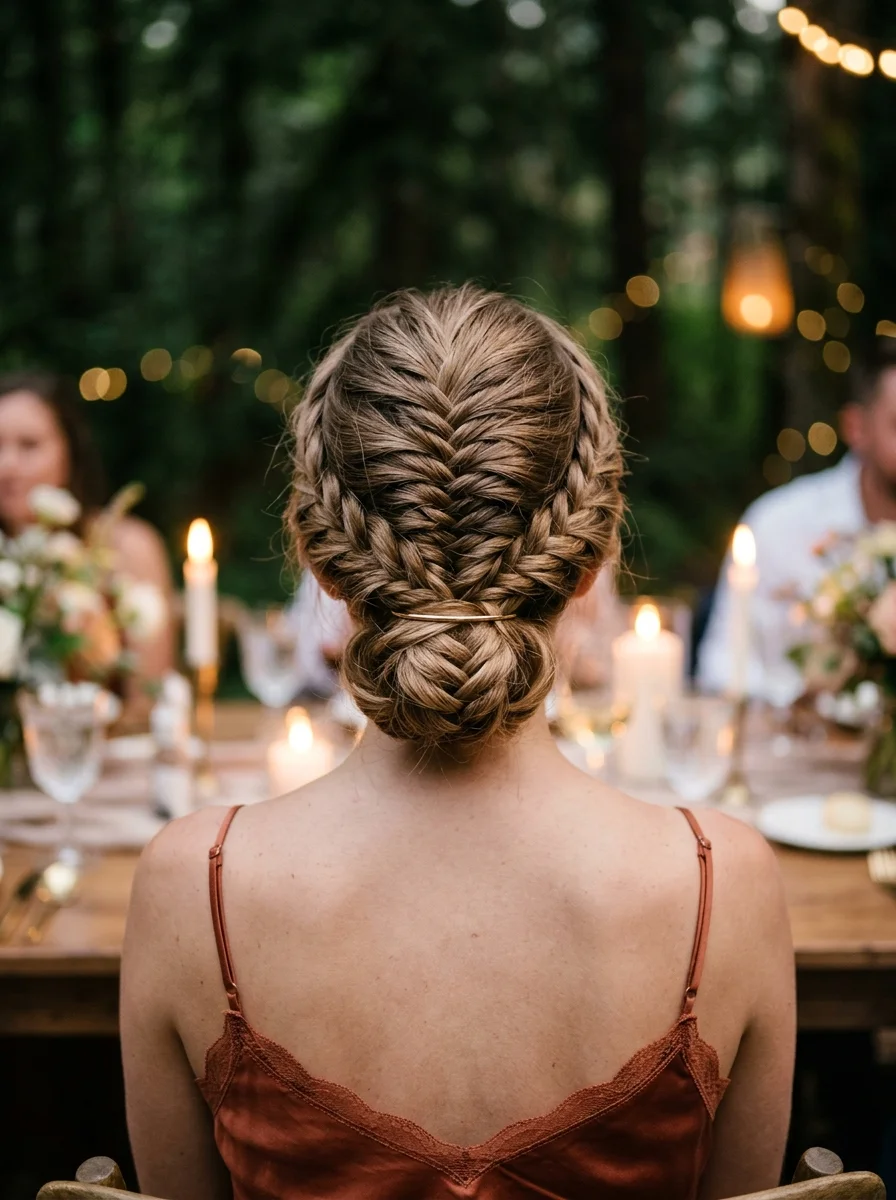
1.Braided High Ponytail with Wrapped Base
The overview: A high ponytail positioned at the crown with a braided section wrapped around the base to conceal the elastic. The ponytail itself falls in loose, natural waves. It is the kind of hairstyle that looks like you tried, but only took about three minutes.
Why this look is popular: The braided wrap eliminates the "gym ponytail" look without adding any extra time. It keeps hair off your neck during hikes and the high placement means it won't catch on backpack straps.
Where this look is suitable: Day hikes, campsite mornings, kayaking trips, and any outdoor activity where you need hair completely out of the way.
The look: Thick, dimensional hair with highlights pulled into a high ponytail at the crown. A three-strand braid from the ponytail wraps around the base, concealing the elastic. The tail falls in soft, tousled waves.
Step by step:
- Brush upward. Flip your head forward and gather all hair at the crown. Use a boar bristle brush to smooth the surface.
- Secure with an elastic. Tie the ponytail tightly. A strong-hold elastic like a spiral cord tie won't slip through the day.
- Separate a section. Pull a 1-inch section from the underside of the ponytail and braid it into a standard three-strand.
- Wrap the base. Wind the braid around the elastic base. Tuck the end underneath and secure with a bobby pin pushed horizontally.
- Release the waves. If hair was braided or tied before, shake out the ponytail and scrunch with your fingers to encourage natural wave.
Tips and tricks: This style works best on day-two hair. If yours is freshly washed, spritz dry shampoo at the roots before gathering for extra grip.

28 Stunning Baddie Summer Hairstyles for 2026 🔥☀️
2.Double Dutch Braids
The overview: Two Dutch braids running parallel from a center part down the back of the head. The braids sit raised on top of the hair rather than flat against it, creating a three-dimensional effect. The ends hang loose below the last weave. This is the camping hairstyle that outdoor photographers actually wear.
Why this look is popular: Dutch braids are the most secure braided style for active days. They distribute tension evenly across the scalp, won't catch on anything, and survive a night of sleep without unraveling. You can wake up, shake them out, and they look the same as when you made them.
Where this look is suitable: Multi-day camping trips, rock climbing, mountain biking, any activity where you need zero maintenance for an extended period.
Step by step:
- Part precisely. Use a rat-tail comb to draw a clean center part from forehead to nape. Uneven parts throw off the symmetry.
- Start on one side. Take a 2-inch section at the hairline. Divide into three strands.
- Dutch braid downward. Cross strands under (not over) to create the raised braid. Add thin sections from each side as you work down.
- Maintain tension. Each new section should be pulled snugly against the scalp. If the braid feels loose, undo the last two crosses and redo them tighter.
- Secure and repeat. Tie off with a small elastic about 2 inches from the ends. Repeat on the other side, matching braid thickness.
Tips and tricks: Braid on damp hair for the tightest hold. If you are camping near water, spritz the braids with a light-hold hairspray after finishing to seal against humidity.
3.Crown Braid into Low Ponytail
The overview: A thick Dutch braid runs along one side of the head from the temple, curving around toward the back where it feeds into a low ponytail at the nape. The braid adds visual interest from the front while the ponytail keeps things practical. It reads as styled without requiring any heat tools.
Why this look is popular: The asymmetry of a single side braid is more modern than a full crown braid and takes half the time. The low ponytail means you can lean back in a camping chair without the whole style pressing into your skull.
The look: Medium-to-thick wavy hair with a Dutch braid starting at the left temple, curving along the hairline and feeding into a low ponytail at the nape. The ponytail extends well past the shoulders in soft waves.
Step by step:
- Section the braid area. Take a section from the temple to just behind the ear on one side. Clip the rest back.
- Dutch braid along the hairline. Braid from the temple toward the back of the head, adding small sections as you go.
- Stop when you reach the center back. Braid the remaining tail as a standard three-strand and secure with an elastic.
- Gather everything low. Collect all hair, including the braid tail, at the nape. Secure with a strong elastic.
- Conceal the elastic. Wrap a thin strand of hair around the elastic and pin underneath.
Where this look is suitable: Campsite mornings, easy trails, lakeside days. It is casual enough for sitting around a fire but polished enough for photos.

28 Trendy May Nail Designs for 2026 💅
4.Braided Pigtails with Bandana
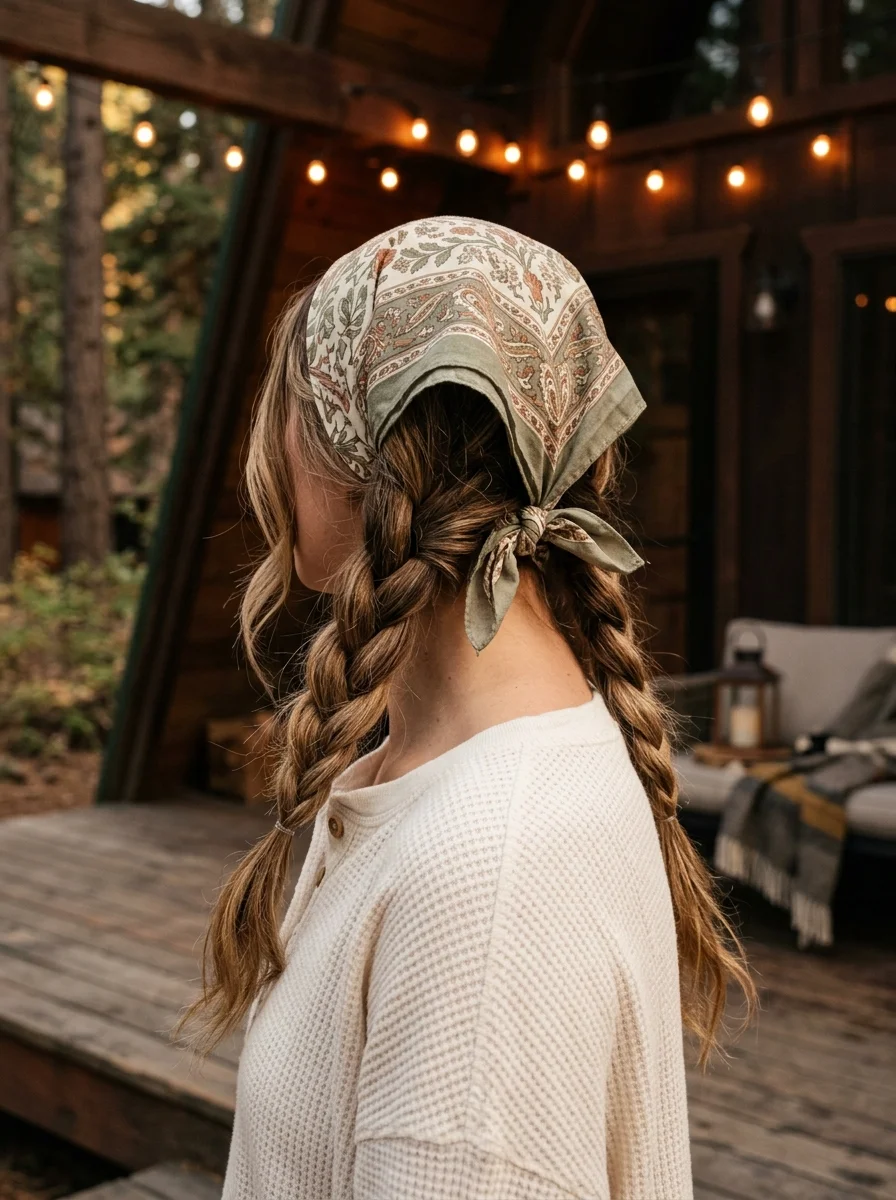
The overview: Two loose, relaxed three-strand braids hanging over the shoulders. The braids are intentionally bohemian with soft face-framing pieces left out. A sage green paisley bandana is tied at the nape, adding color and keeping the back sections contained.
Why this look is popular: Pigtail braids are the original camping hairstyle for a reason. They keep hair controlled without looking severe, and the bandana adds a layer of sun protection for the nape. The loose, slightly messy braid tension looks better with wear, not worse.
Where this look is suitable: Road trips, campground setup days, fishing trips, and any casual outdoor setting where practicality and style both matter.
Step by step:
- Center part. Draw a clean line from forehead to nape. Crooked parts make the braids look uneven.
- Leave out face-framers. Pull 2-3 small sections from the hairline in front of each ear before braiding.
- Braid loosely. Create standard three-strand braids on each side. Keep tension deliberately slack for that relaxed, lived-in texture.
- Tie off. Secure each braid about 2 inches from the ends with small clear elastics.
- Add the bandana. Fold a square bandana into a band, wrap it around the nape, and tie underneath the braids. Let the tails hang or tuck them in.
Tips and tricks: Cotton bandanas grip better than polyester and absorb sweat. Choose a bandana in a muted earth tone if you want it to blend with outdoor settings rather than compete with them.
5.Half-Up Bubble Ponytail
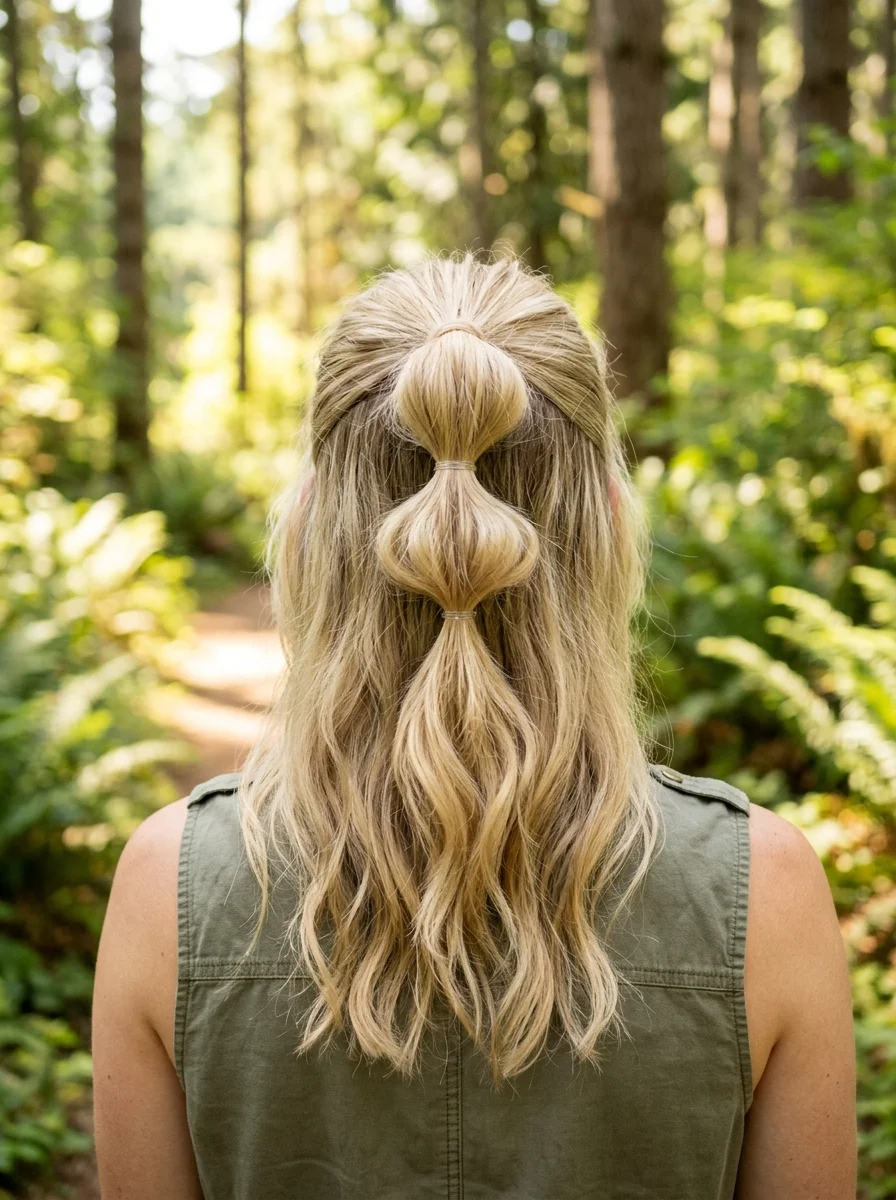
The overview: A section from the crown is gathered and secured with multiple elastics at intervals, creating three "bubble" sections that add volume and visual interest. The remaining hair falls loose with natural waves below. It is playful without being costume-y.
Why this look is popular: The bubble technique is one of the easiest ways to make a half-up style look intentional. It takes under two minutes and requires zero braiding skill. The segmented shape also photographs well from a distance, which matters when someone is taking your picture across a campsite.
The look: Thick, wavy hair with three bubble sections created by clear elastics spaced about two inches apart. The lower half flows in natural, tousled waves.
Step by step:
- Gather the top section. Take hair from the temples back to the crown. Secure with an elastic at the crown.
- Create the first bubble. Place a second elastic about 2 inches below the first. Gently tug the hair between the elastics outward to create volume.
- Repeat. Add a third elastic another 2 inches down. Pull the section outward again.
- Release and blend. Let the remaining hair fall naturally. Adjust the bubbles so they are even on both sides.
Where this look is suitable: Festival-style camping events, beach camping, car camping where you want something quick and photogenic.
24 Stunning Bridesmaid Hairstyles for Weddings 2026 💍✨
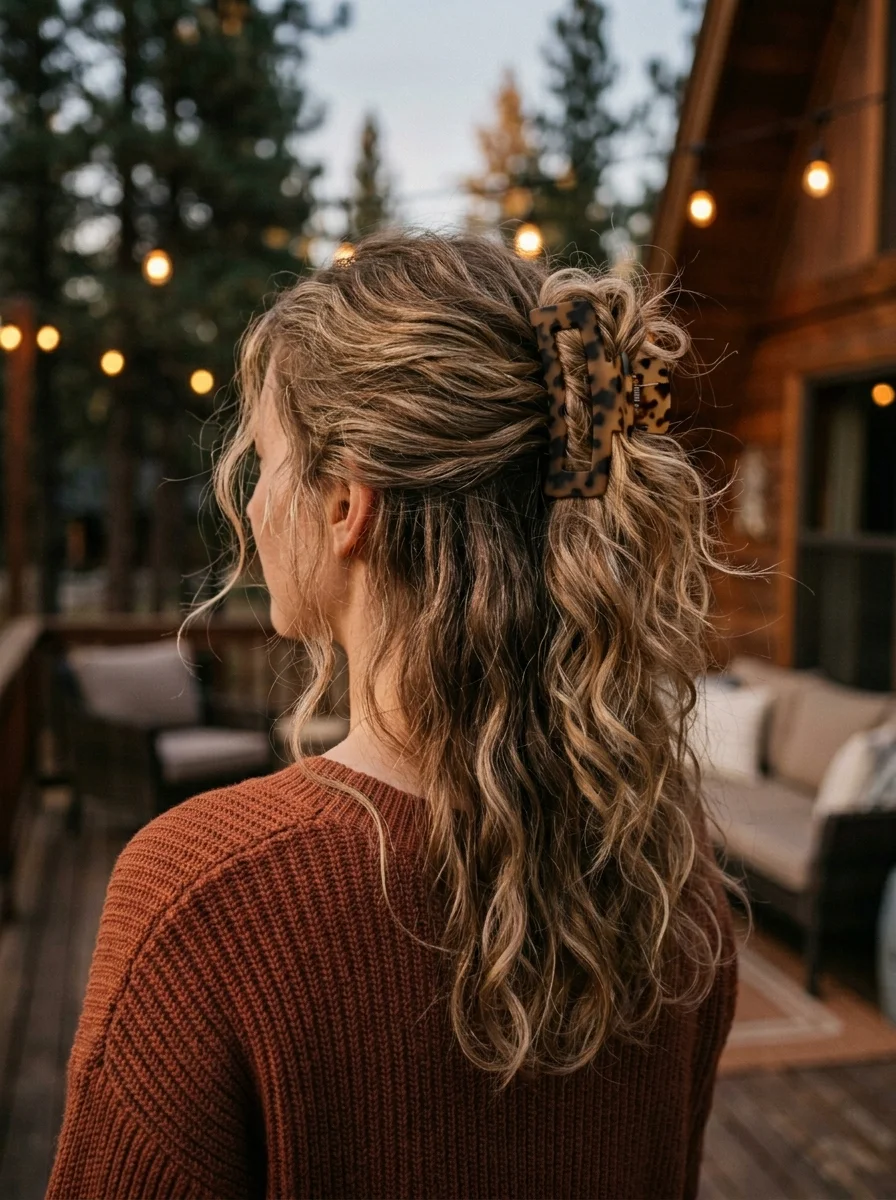
6.Half-Up Half-Down with Claw Clip
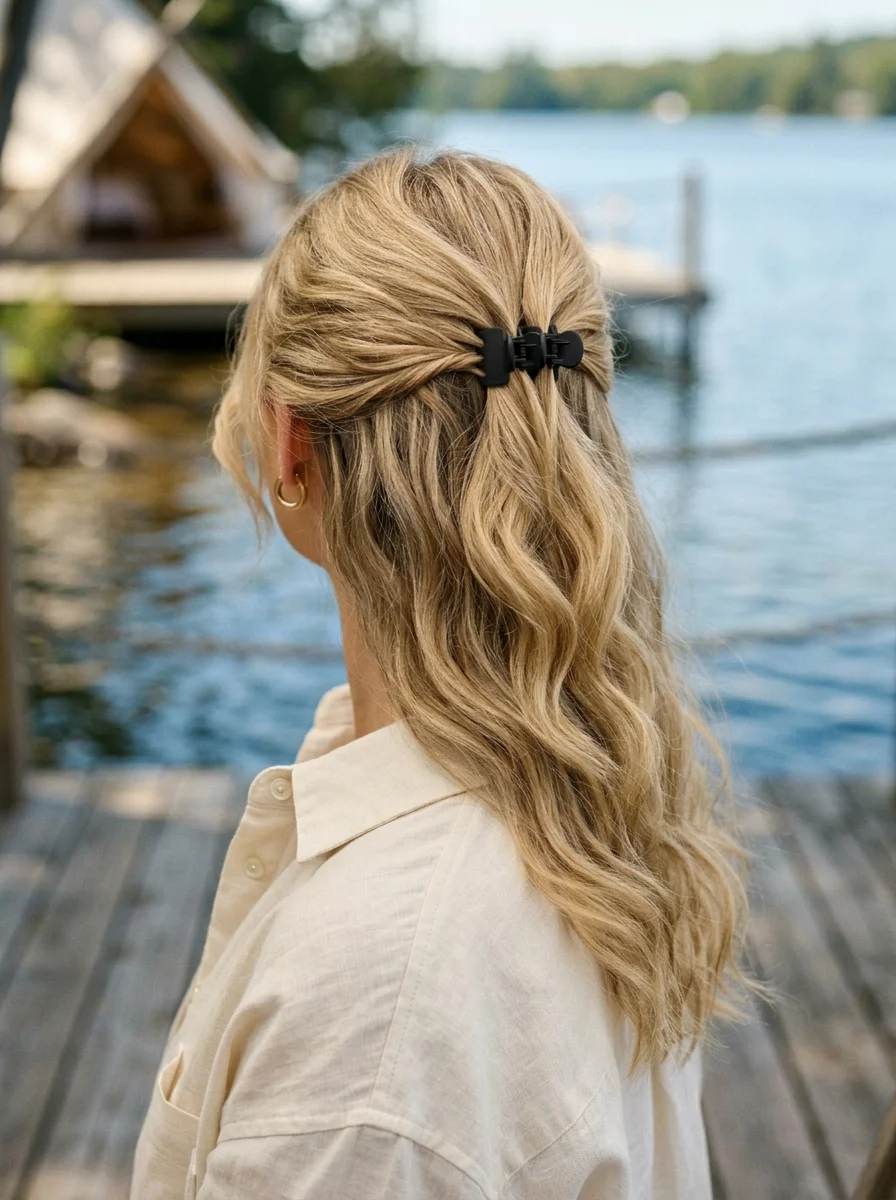
The overview: The top section is twisted at the back of the crown and secured with a small claw clip, while the remaining hair flows down in soft waves. It is the fastest hairstyle on this list: gather, twist, clip, done.
Why this look is popular: The claw clip does the structural work that bobby pins and elastics usually handle, and it does it without pulling or creating dents. On camping mornings where you have five minutes before the group leaves, this is the move.
Step by step:
- Section the top. Take hair from the temples back to the crown.
- Twist once. Give the section a single twist toward the back of your head.
- Clip it. Open the claw clip and clamp it over the twist, catching hair from both the twisted section and the hair beneath.
- Adjust the tail. Let the twisted section's tail cascade over the clip for a more relaxed look, or tuck it in for something cleaner.
Tips and tricks: Choose a clip with strong spring tension. Cheap clips lose their grip by midday, especially in heat. A medium-sized tortoiseshell clip holds more hair than a mini and still looks proportionate.
7.Bubble Pigtails
The overview: Two low pigtails, each divided into four to five bubble sections using elastics at regular intervals. A clean center part keeps everything balanced. No braiding involved, just segmenting and pulling. The result is structured, symmetrical, and surprisingly secure.
Why this look is popular: Bubble pigtails distribute the weight of long hair across two sections instead of one, which reduces the tension headache that a single tight style can cause after hours of wear. The segmented shape also stays out of the way during activities better than a loose ponytail.
The look: Straight-to-wavy hair parted down the center and divided into two low pigtails. Each pigtail has four to five bubble sections created by clear elastics, with each section gently pulled outward for volume.
Step by step:
- Part precisely. A clean center part ensures equal volume on both sides.
- Create two low ponytails. Gather each side at the nape and secure with elastics.
- Segment. Place elastics every 2 inches down each pigtail. The spacing determines the bubble size.
- Fluff each section. Gently tug the hair between each elastic outward. Work from the bottom up so you don't pull out earlier sections.
Where this look is suitable: Multi-day camping trips, trail running, any activity where you want something low-maintenance that still looks considered.

26 Stunning Sunflower Floral Nails for Spring & Summer 2026 🌻
8.Half-Up with Tortoiseshell Claw Clip
The overview: The top section of curly hair is gathered at the crown and secured with a large tortoiseshell claw clip, while the remaining curls flow freely below. The clip does the heavy lifting, holding the twist in place while adding a polished detail to an otherwise effortless style.
Why this look is popular: Claw clips have made a full comeback, and for good reason. They hold more hair than bobby pins, create less tension than tight elastics, and the visible accessory adds intention to a style that takes under a minute. On curly hair, the clip creates a height contrast between the gathered crown and the loose curls below.
The look: Thick, curly-to-wavy hair with defined curl pattern. The top section is twisted back and clamped with a large tortoiseshell clip. Remaining curls fall past the shoulders with natural volume.
Step by step:
- Define curls first. If curls are undefined, spritz with water and scrunch with a small amount of curl cream.
- Section the crown. Gather hair from the temples back to the crown. Do not smooth it too much; the texture is part of the look.
- Twist and clip. Give the section a single twist toward the back and clamp with the claw clip. Make sure the clip's teeth catch hair from the twisted section and the base layer beneath.
- Release the curls. Shake the lower section gently to encourage curl separation.
Tips and tricks: For curly hair, a larger clip works better than a mini. The volume of curls needs more surface area to grip. Look for clips with wide-set teeth that won't snag individual curls.
9.Top Knot with Fabric Headband
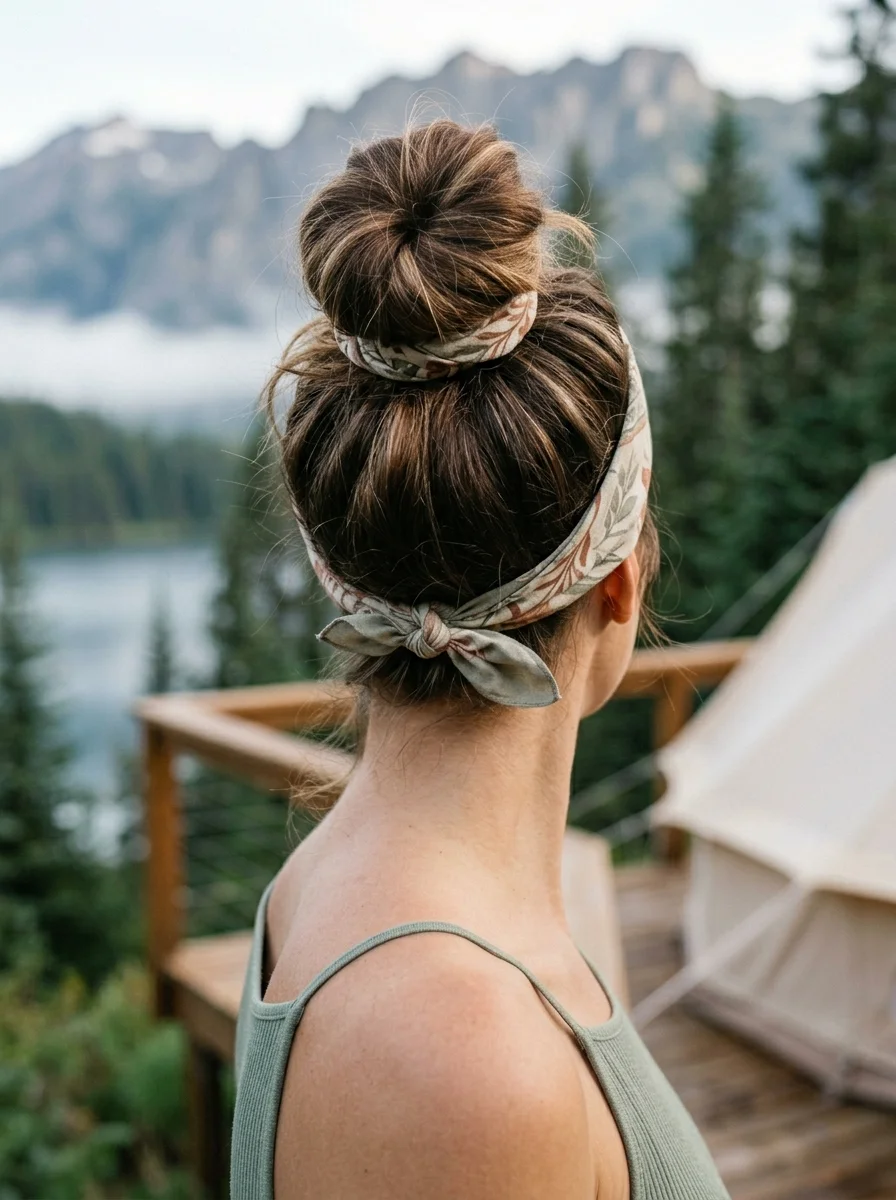
The overview: A neat, rounded top knot positioned at the crown with a sage green floral fabric headband tied at the nape. The bun is smooth and compact, not messy. The headband adds color and keeps flyaways controlled along the hairline.
Why this look is popular: The headband does double duty: it absorbs sweat during hikes and adds a feminine detail to a utilitarian style. The top knot itself keeps all hair off the neck and face, which is the primary goal when temperatures climb.
The look: Brown hair with caramel highlights pulled into a smooth, rounded bun at the crown. A fabric headband in sage green with a leaf pattern sits about an inch back from the hairline, tied at the nape.
Step by step:
- Gather high. Brush all hair upward toward the crown. Use a boar bristle brush to smooth the surface.
- Secure the ponytail. Tie with an elastic at the crown. The ponytail base determines the bun position.
- Twist and coil. Twist the ponytail tightly, then wrap it around the elastic base. The tighter the twist, the more structured the bun.
- Pin and tuck. Secure with bobby pins pushed horizontally through the bun. Tuck any loose ends under.
- Add the headband. Place the center of the folded headband at your forehead, about an inch back from the hairline. Wrap the ends to the nape and tie in a knot.
Where this look is suitable: Hot-weather camping, desert trips, any setting where keeping hair completely off your face and neck is the priority.
30 Stunning Summer Hair Trends for 2026 ☀️🌊
10.Double Braids into Low Ponytail with Scrunchie
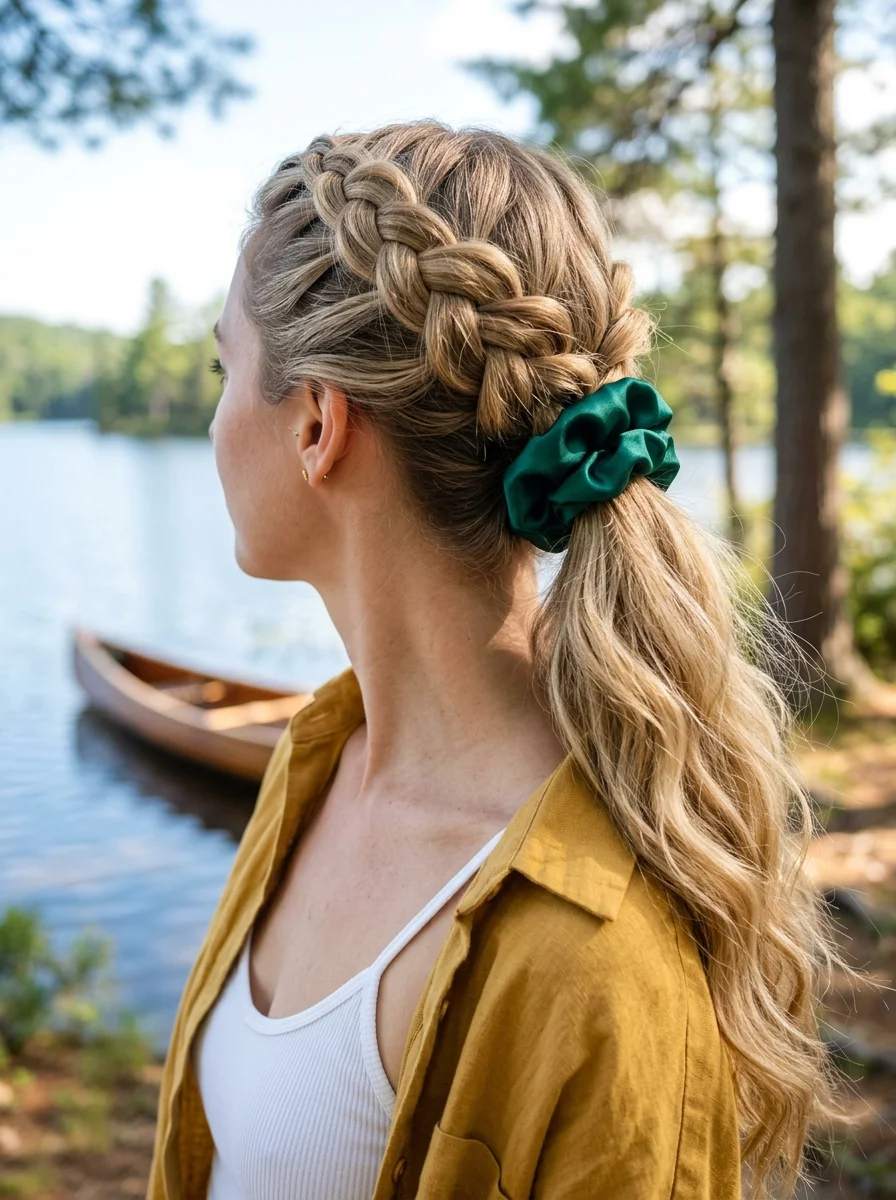
The overview: Two Dutch braids run along the sides of the head and converge into a single low ponytail at the nape, secured with a velvet scrunchie. The braids are thick and raised, creating a structured frame for the face before transitioning into a soft, wavy tail.
Why this look is popular: Combining braids with a ponytail gives you the security of braided sides with the movement of loose hair. The velvet scrunchie adds a tactile detail that softens the athletic energy of the braids.
The look: Thick, wavy blonde hair with two Dutch braids running along each side, feeding into a low ponytail at the nape. An emerald green velvet scrunchie secures the ponytail.
Step by step:
- Part down the center. Clean line from forehead to nape.
- Dutch braid each side. Start at the hairline above each ear and braid downward, adding hair as you go. Stop when you reach the nape.
- Combine into a ponytail. Gather both braid tails and any remaining loose hair at the nape.
- Secure with the scrunchie. Wrap the velvet scrunchie once or twice around the gathered hair.
- Release the waves. Let the ponytail tail fall naturally. Scrunch with your fingers to encourage wave pattern.
Tips and tricks: Velvet scrunchies absorb moisture and grip better than satin on smooth hair. They also create less friction damage than regular elastics, which matters when you are wearing the same style for multiple days.
11.Loose Fishtail Braid
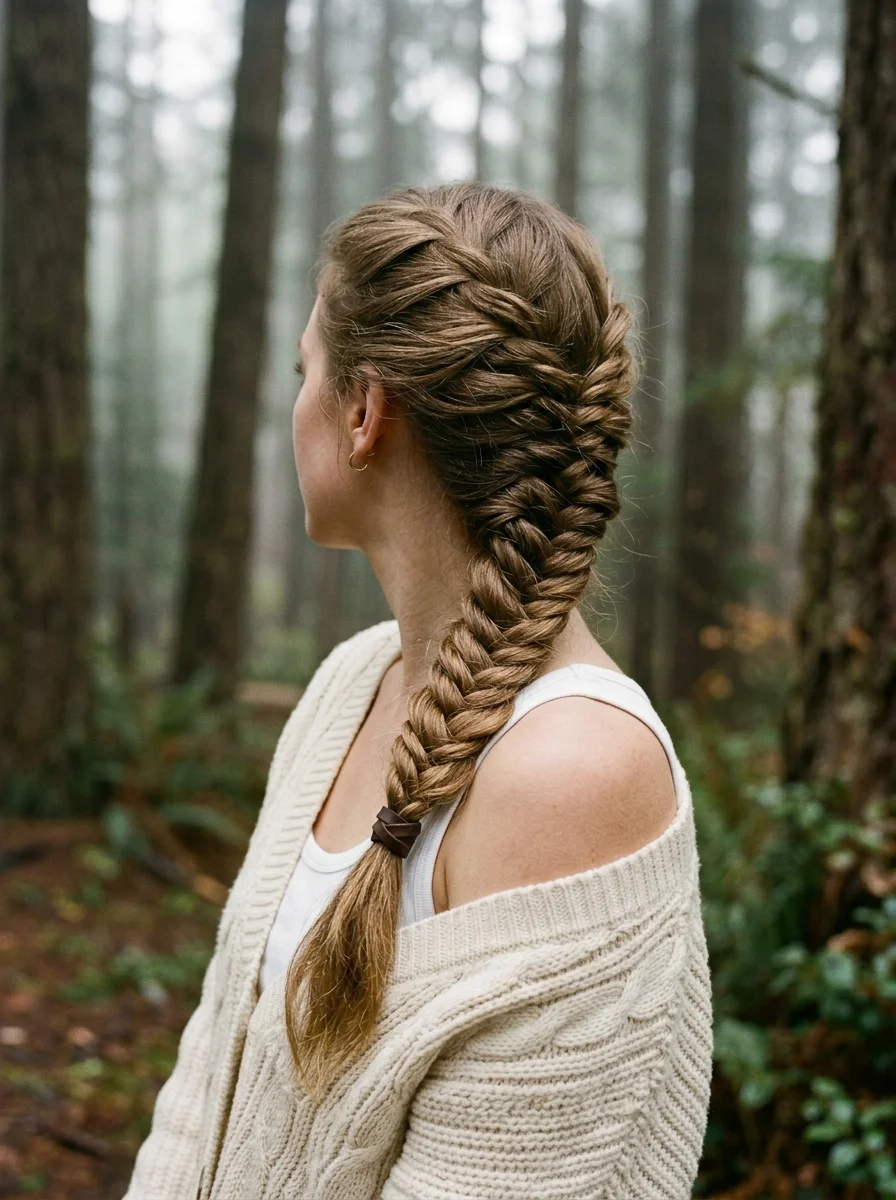
The overview: A thick, relaxed fishtail braid cascading down the back. The braid starts from a low ponytail position and has a slightly messy, undone quality with strands pulling loose at the edges. It is the braid that looks like it took an hour but actually took ten minutes.
Why this look is popular: Fishtail braids have a finer, more intricate pattern than three-strand braids, which makes them look more polished even when done loosely. The two-strand technique is also easier to maintain tension on, so it holds up better through active days.
The look: Medium-to-thick hair with slight natural wave, gathered into a low fishtail braid. The weave is loose and relaxed with some strands pulling free. The braid extends to mid-back.
Step by step:
- Gather low. Pull all hair to one side or directly back at the nape.
- Divide in two. Fishtail braids use two sections, not three.
- Cross small sections. Take a thin piece from the outer edge of the left section and cross it to the right. Repeat from right to left.
- Keep it loose. Deliberately maintain slack in the weave. Tight fishtails lose their characteristic texture.
- Pancake after securing. Once tied off, gently pull the edges of the braid to widen it and create that relaxed, full appearance.
Where this look is suitable: Campfire evenings, sunset hikes, any outdoor moment where you want something that photographs beautifully in natural light.
27 Gorgeous Mint Green Nails That Are Popular Right Now (2026)
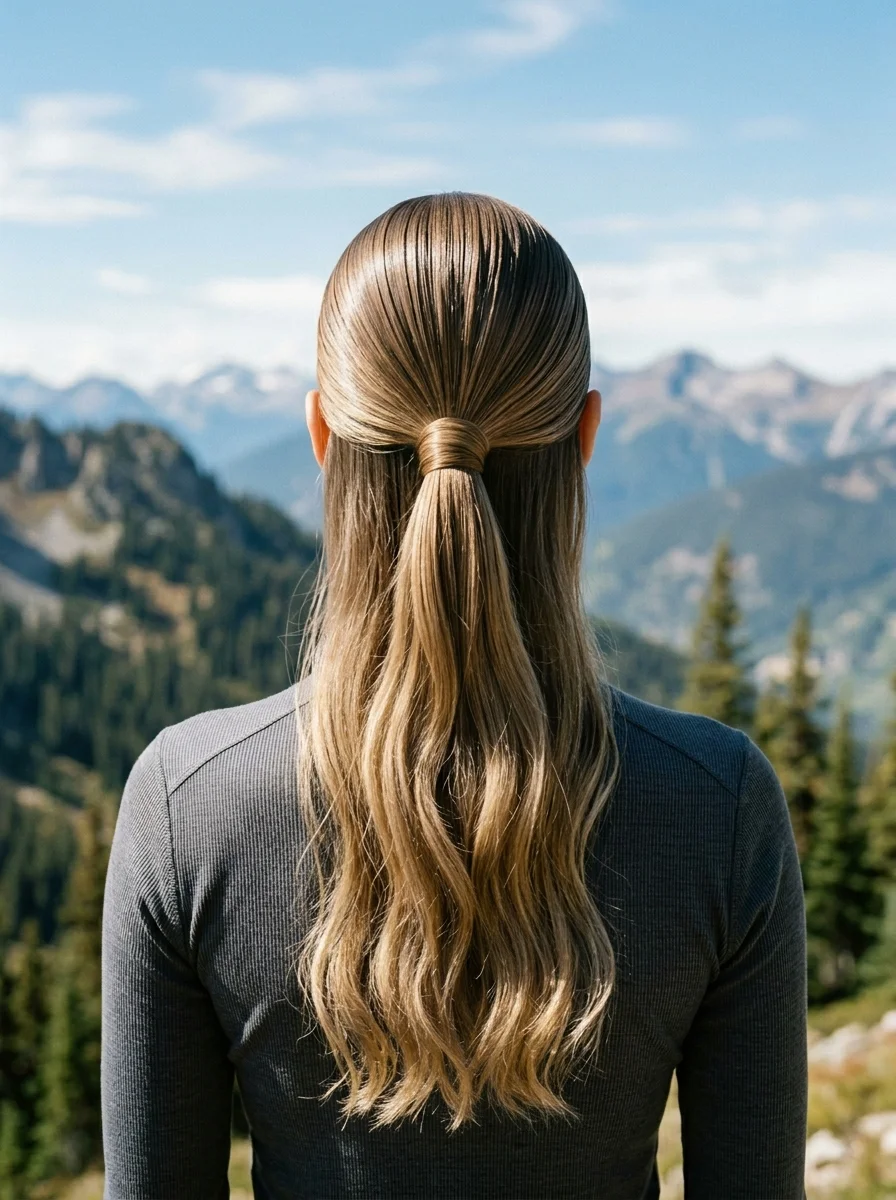
12.Sleek High Ponytail
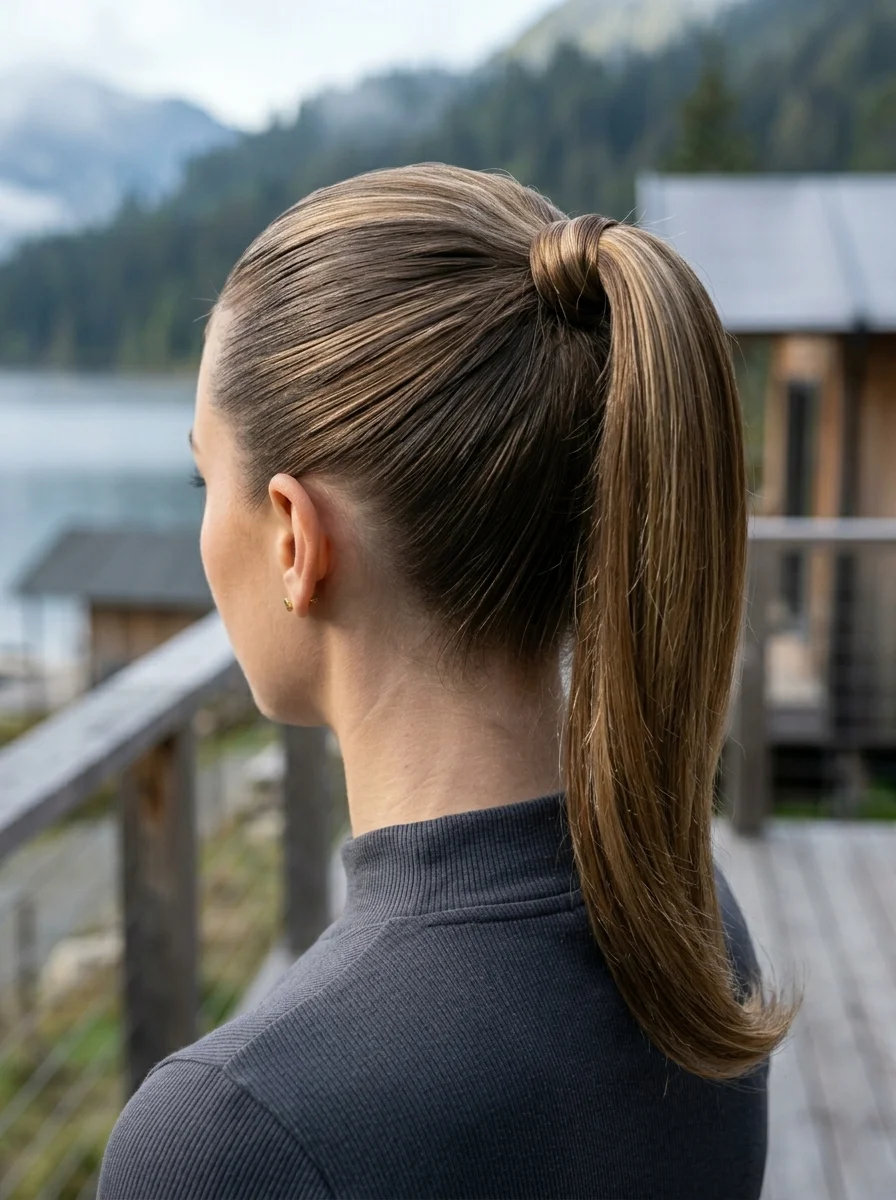
The overview: Hair is smoothly brushed back from the face and secured high on the head. The base of the ponytail is wrapped with a strand of hair to conceal the elastic. Clean, polished, and completely off the face. This is the camping hairstyle that makes you look like you have your life together.
Why this look is popular: A sleek high ponytail is the quickest path from campsite mess to put-together. The smooth surface reflects light, which makes hair look healthier than it might actually be after days of dry shampoo. It also keeps every strand away from the face, which matters during activities.
Step by step:
- Dampen slightly. Mist the surface with water or a light-hold gel for control.
- Brush upward. Use a boar bristle brush to sweep all hair toward the crown. Eliminate bumps by brushing from the nape upward.
- Secure tightly. Tie with a strong elastic at the crown. The ponytail should feel snug but not painful.
- Wrap the elastic. Take a thin strand from the ponytail's underside, wrap it around the base, and pin underneath with a bobby pin.
- Smooth the surface. Use the brush or your palms to flatten any flyaways. A light-hold gel or pomade works better than hairspray for outdoor conditions.
Tips and tricks: If your hair is too slippery for the style to hold, apply a small amount of gel to the roots before brushing upward. The gel dries clear and creates the grip that smooth hair lacks.
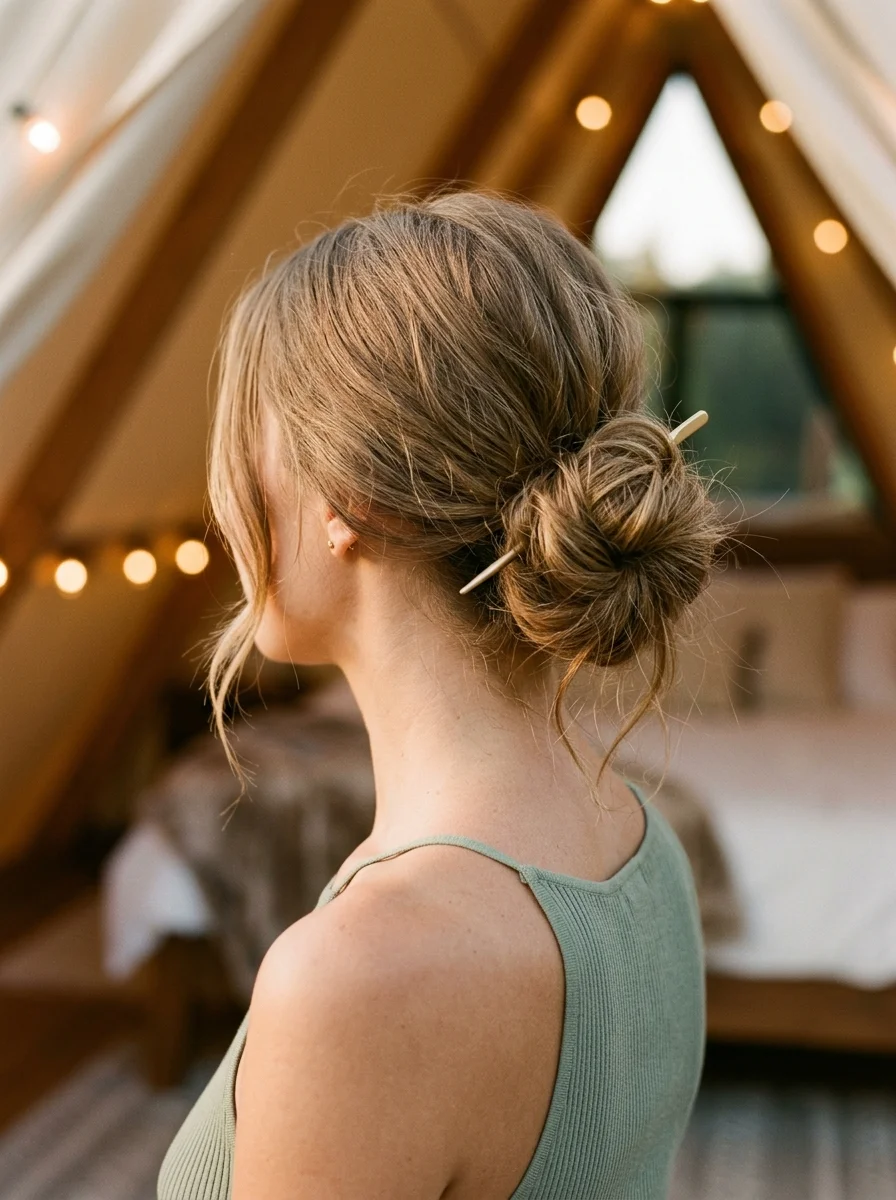
13.Low Messy Bun with Hair Stick
The overview: A loose, undone low bun positioned at the nape with a single hair stick inserted through it. Face-framing pieces are left loose around the temples. The hair stick is both decorative and functional, holding the bun in place without the need for multiple pins.
Why this look is popular: Hair sticks are the most underrated camping accessory. One stick replaces four to six bobby pins, weighs almost nothing, and won't rust in humid conditions. The style itself looks intentional without requiring any skill beyond twisting hair and pushing a stick through it.
The look: Medium-length wavy hair gathered into a loose, textured bun at the nape. A single hair stick (chopstick-style) is inserted through the bun at an angle. Soft face-framing pieces fall around the temples.
Step by step:
- Gather loosely. Collect all hair at the nape without brushing. Use your hands for a more organic texture.
- Twist once. Twist the gathered hair into a loose rope. Do not twist tightly, or the bun will be too compact.
- Coil into a bun. Wrap the twisted rope around its base. Leave the ends loose for a more undone look.
- Insert the stick. Push the hair stick through one side of the bun, catch a small section of hair from the scalp, and push through the other side. The stick should feel secure.
- Pull out face-framers. Release 2-3 small sections from the hairline. Let them fall naturally.
Where this look is suitable: Campsite evenings, casual hikes, morning coffee by the tent. It is low-key enough for any setting.
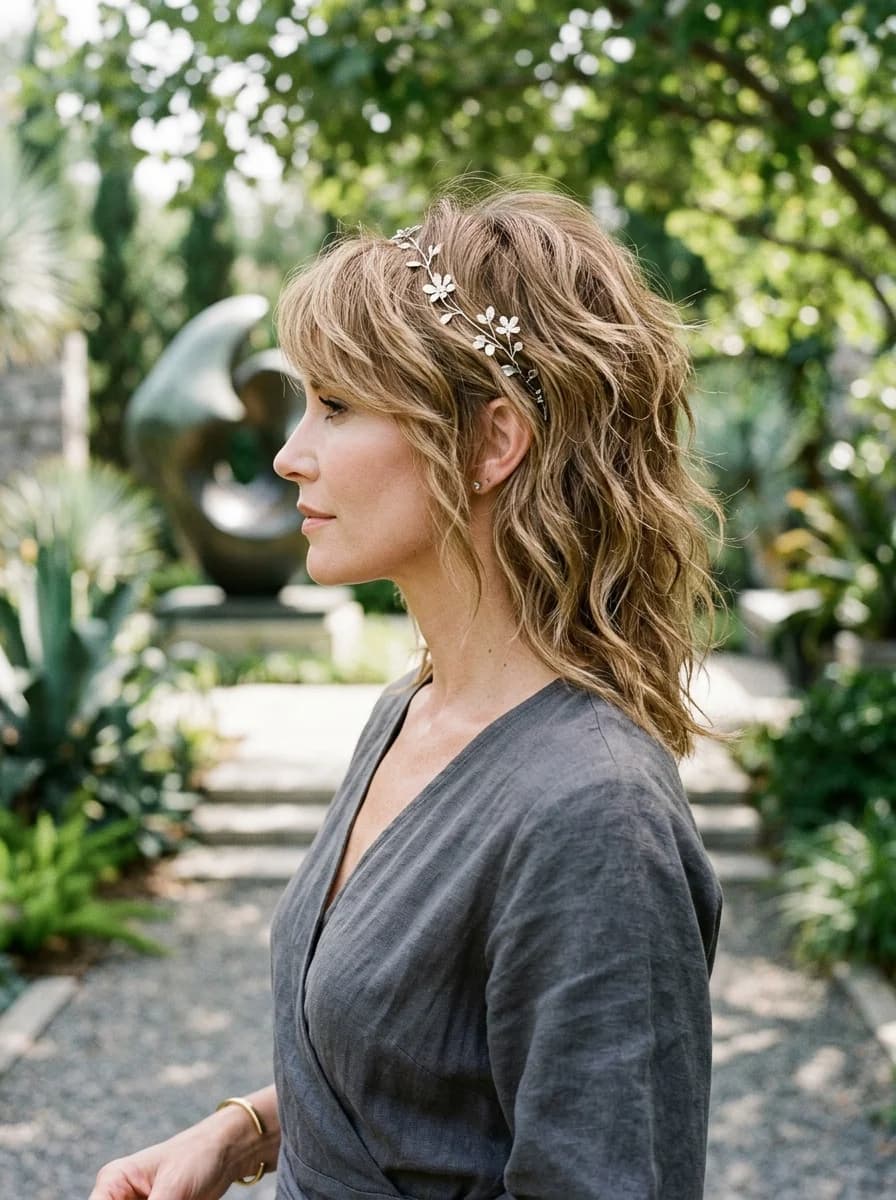
31 Flattering Summer Hairstyles for Women Over 40 (2026)
14.Braided Updo with Silk Scarf
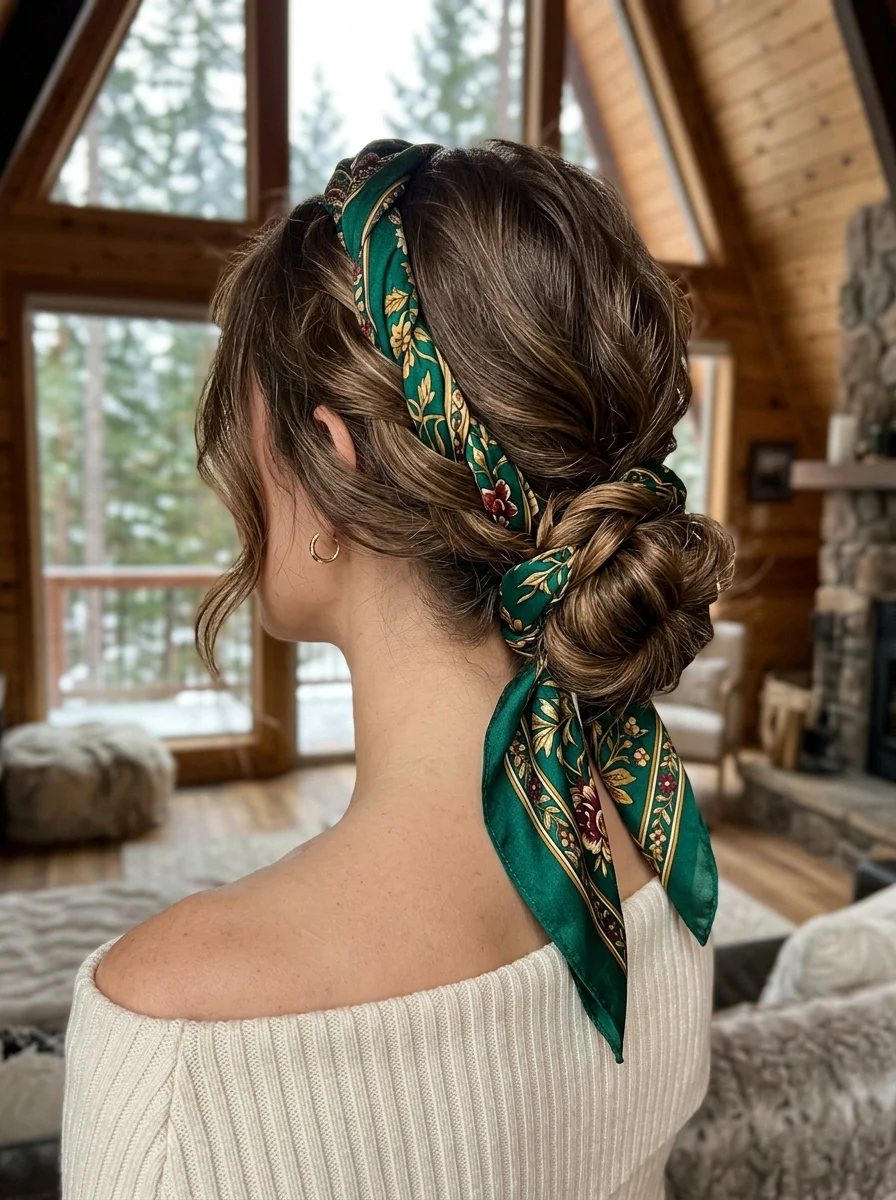
The overview: An intricate braided updo with a green floral silk scarf woven through the braids and tied around the bun at the nape. The scarf adds color, texture, and structural support to the braids. It is one of the more detailed styles on this list, but the scarf does a lot of the visual work.
Why this look is popular: Weaving a scarf through braids is a technique that elevates a basic braided updo into something that looks like you planned it. The scarf also adds grip between the braids, helping the updo hold its shape longer than braids alone.
Step by step:
- Section into three parts. Divide hair into a top section and two side sections. Clip each separately.
- Braid each section. Create standard three-strand braids on all three sections. Secure ends with small elastics.
- Weave in the scarf. Thread the silk scarf through the braid loops as you go, or wrap it around the braids after braiding.
- Pin into a low bun. Coil all three braids together at the nape, incorporating the scarf. Pin with bobby pins, making sure some of the scarf remains visible.
- Tie the scarf ends. If the scarf has remaining length, tie it in a small bow or knot at the base of the bun.
Tips and tricks: Use a lightweight silk or cotton scarf. Heavy fabric adds weight that pulls on the braids. A scarf that is too thick will also make the bun bulky and difficult to pin flat.
15.Half-Up Crown Braid
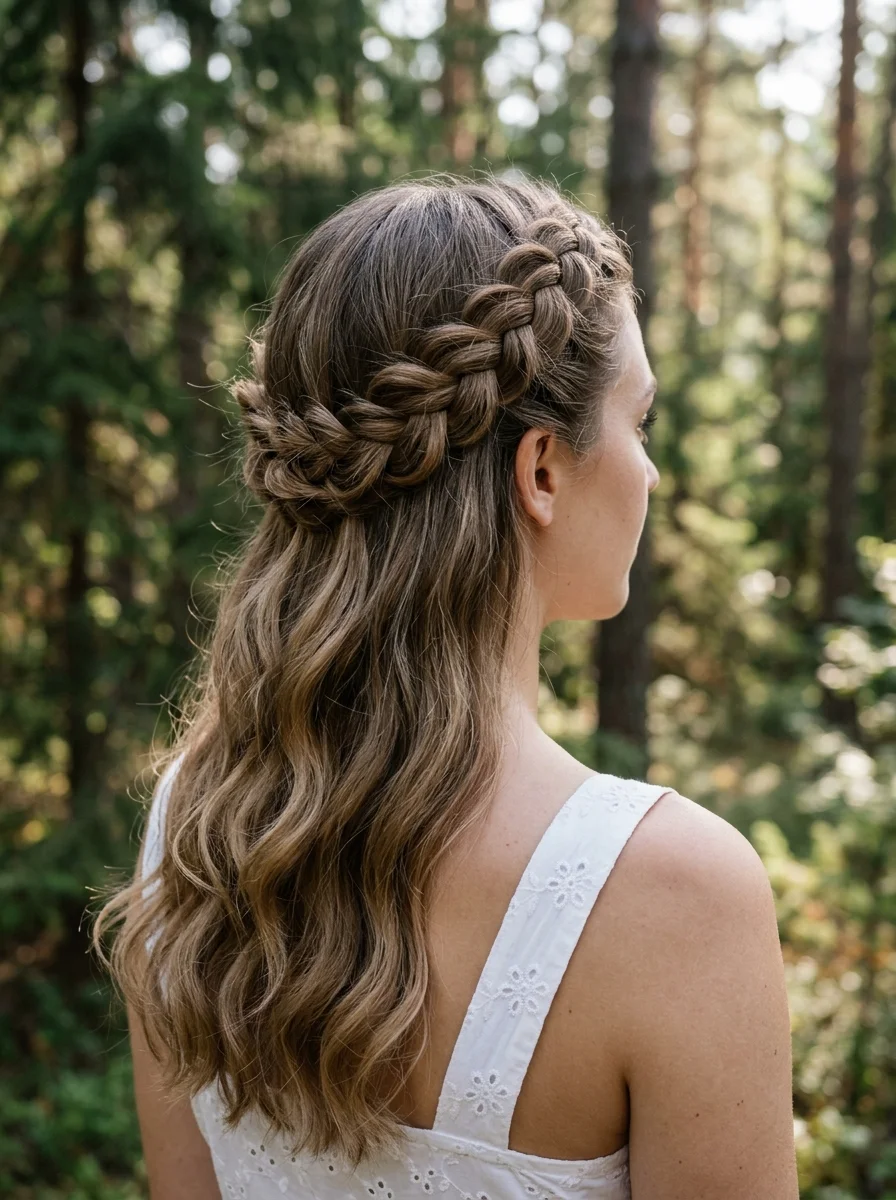
The overview: A thick crown or halo braid wraps around the back of the head, with the remaining hair falling loose in soft waves below. The braid sits above the ears and acts as a built-in headband, keeping the top section contained while the lower half moves freely.
Why this look is popular: The half-up crown braid is the most practical outdoor style because it keeps hair off the face without sacrificing length or movement. The braid prevents the wind-blown curtain effect that loose hair creates, while the loose section below maintains a feminine, relaxed feel.
Where this look is suitable: Scenic hikes, outdoor photography, lakeside afternoons. The kind of day where you want to look good in photos but also actually enjoy the activity.
Step by step:
- Section the top. Take a section from ear to ear over the crown. Clip the lower half down.
- Dutch braid along the hairline. Starting at one temple, braid backward along the hairline, adding small sections as you go.
- Continue around. Once you pass the back of the head, continue the braid along the other side until you reach the opposite temple.
- Secure and tuck. Braid the remaining tail, tuck it under the starting point of the braid, and pin.
- Release the lower section. Unclip the bottom half and let it fall naturally. Adjust the braid by gently pulling at each section for width.
Tips and tricks: Pancake the braid by gently pulling the outer edges of each loop. This widens the crown and makes it look fuller without adding any extra braiding.
29 Bright Lemon Nail Art Designs for Summer & Spring (2026)
16.Natural Curls Worn Loose
The overview: Defined spiral curls worn completely loose and flowing. No clips, no elastics, no structural work. The curls themselves are the style. This is the option for days when you want to let your hair do exactly what it wants to do.
Why this look is popular: Camping is one of the few environments where natural curls can truly be left alone. The humidity that ruins straight hair actually benefits curly hair, adding volume and definition without any product. The key is accepting frizz as texture rather than fighting it.
The look: Well-defined 3B/3C spiral curls with good volume, falling past the shoulders. Dark brown to black hair with natural shine. No accessories or structural elements.
Step by step:
- Wash and condition. Use a sulfate-free shampoo and a rich conditioner. Detangle with a wide-tooth comb while conditioner is in.
- Apply curl cream to wet hair. Work a curl-defining cream through each section, scrunching upward.
- Air-dry completely. Do not touch the hair while it dries. Touching creates frizz. Let the curls set on their own.
- Scrunch out any crunch. If the curl cream created a cast, scrunch each section to break it.
Where this look is suitable: Every camping day. Curls thrive in outdoor conditions. Let them be.
17.Natural Wavy Hair Down
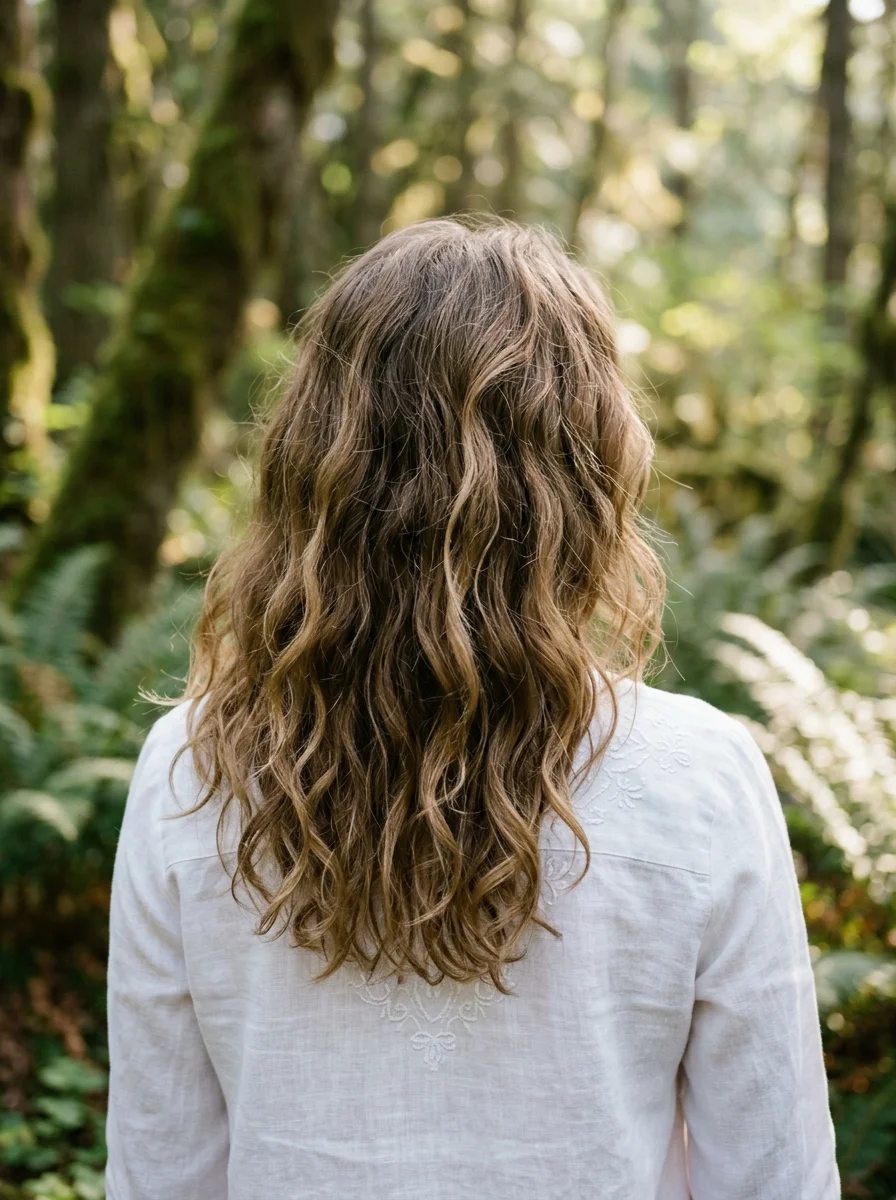
The overview: Loose, natural waves worn completely down with a relaxed, beachy texture. No clips, no ties, no accessories. Hair has a slightly tousled quality that comes from air-drying in outdoor conditions. This is the style for people whose hair actually looks better after a day outside.
Why this look is popular: Wavy hair benefits from the same humidity that makes straight hair unmanageable. The moisture in the air encourages the natural wave pattern, creating texture that would take a curling iron to replicate at home. The key is working with the wave, not against it.
The look: Fine-to-medium wavy hair in a 2A-2C pattern. Light brown to blonde with natural dimension. Hair falls past the shoulders with a slightly tousled, air-dried finish.
Step by step:
- Wash the night before. Let hair air-dry overnight. Sleeping on damp hair enhances wave pattern naturally.
- Scrunch in the morning. If waves have been flattened by sleep, mist with water and scrunch upward to reactivate.
- Add a leave-in conditioner. Work a small amount through the ends to prevent dryness from sun and wind exposure.
Tips and tricks: Skip the brush. Brushing wavy hair disrupts the wave pattern and creates frizz. Use a wide-tooth comb only when detangling wet hair.

25 Stunning Summer Vacation Hairstyles for 2026 ☀️🌊
18.High Top Knot with Satin Scrunchie
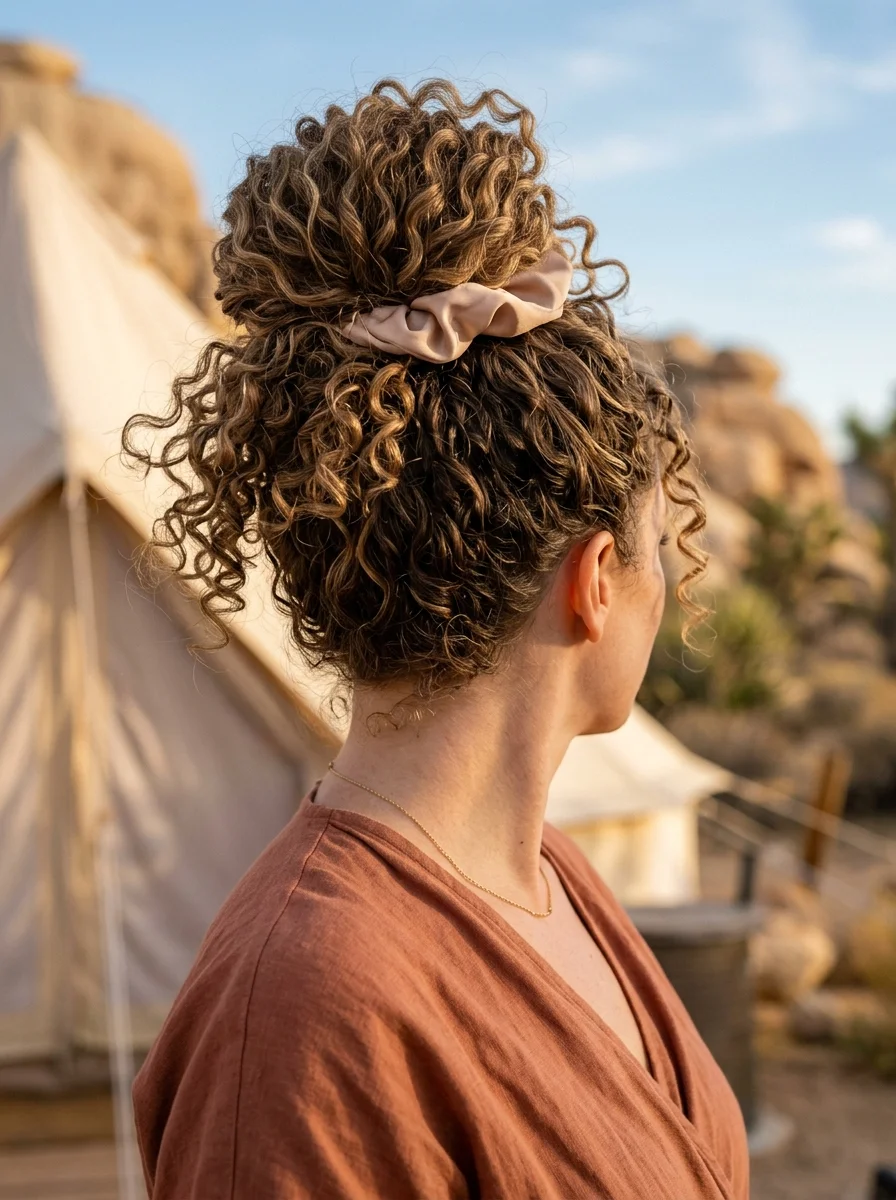
The overview: A high, voluminous messy bun secured with a satin scrunchie. The curly texture creates a full, textured bun with some curls escaping naturally. This is the style that looks effortless because it basically is.
Why this look is popular: A high bun on curly hair creates natural volume that straight hair has to work for. The scrunchie provides a gentle hold that won't dent or break curly hair, and the satin surface reduces friction that causes frizz. It is the camping bun that actually respects your hair texture.
The look: Dark brown curly hair gathered into a high, voluminous bun at the crown. A light pink satin scrunchie is visible. Some curls escape from the bun, adding texture and softness.
Step by step:
- Flip forward. Tilt your head forward and gather all hair at the crown. The forward position creates natural volume at the top.
- Secure loosely. Wrap the scrunchie once or twice around the gathered hair. Do not pull tight; the loose tension creates the messy volume.
- Arrange the bun. Pull sections of the bun outward to create shape. Let some curls escape for that intentionally undone look.
- Leave it. Resist the urge to keep adjusting. The beauty of this style is that it settles into itself over time.
Where this look is suitable: Every type of camping. This is the universal backup plan.
19.Full Head Scarf Wrap
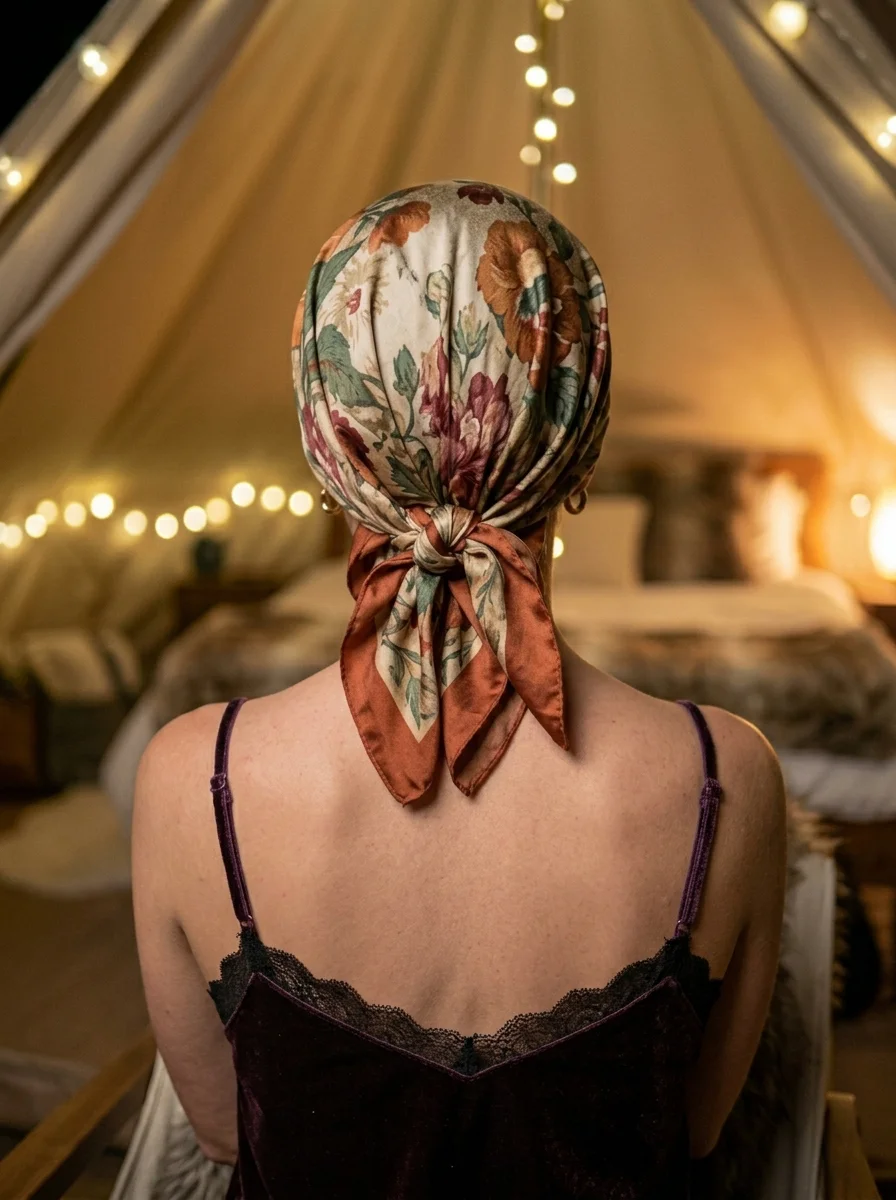
The overview: Hair is completely covered by a large floral silk scarf wrapped in a turban style. The scarf is tied at the nape with the ends hanging down as decorative tails. No hair is visible. The scarf becomes the hairstyle.
Why this look is popular: The head scarf is the ultimate camping hack. It protects hair from sun damage, hides dirty hair completely, absorbs sweat, and looks more intentional than any messy bun ever could. On day-three hair when dry shampoo has given up, the scarf says "I meant to do this."
Step by step:
- Gather hair. Twist all hair into a low bun or French twist at the nape. The shape underneath doesn't matter since it won't be visible.
- Position the scarf. Hold the unfolded square scarf behind your head. Place the center at the nape with equal lengths hanging forward on each side.
- Cross at the forehead. Bring both ends forward and up. Cross them at the center of your forehead.
- Twist and wrap. Twist each tail once, then bring them back to the nape. Cross again.
- Tuck or tie. Tuck the ends under the wrapped layers or tie them at the nape. Let the decorative tails hang.
Tips and tricks: Choose a large scarf, at least 28 by 28 inches. Small bandanas don't have enough fabric for a full wrap. Silk or cotton blends drape better than stiff cotton.

27 Coral Nail Art Designs for a Warm, Tropical Manicure (2026)
20.Short Textured Pixie
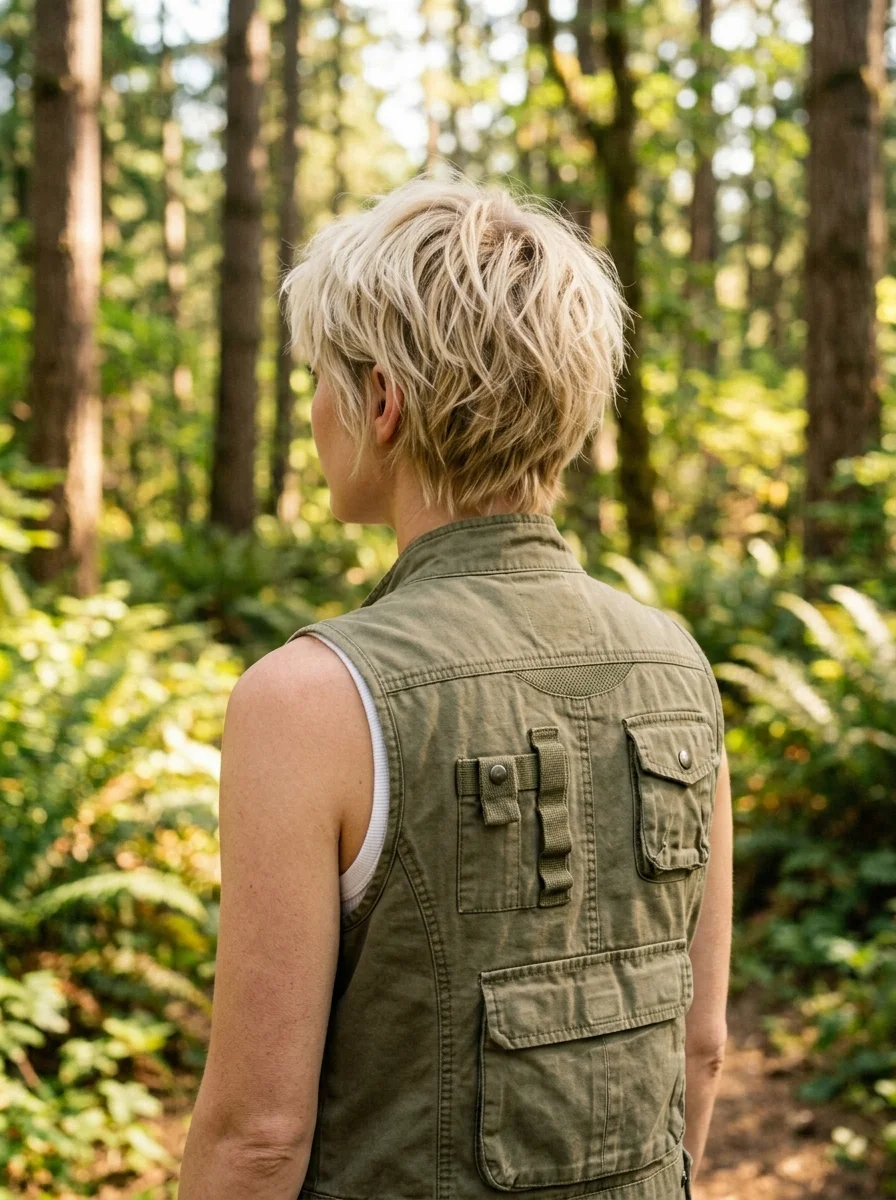
The overview: A short, textured pixie cut with choppy layers styled in a tousled, spiky manner. Volume at the crown, close-cropped sides. This is the camping hairstyle that requires zero tools, zero accessories, and zero thought. Wake up, maybe run your fingers through it, and you're done.
Why this look is popular: Short hair is the most practical camping option. There is nothing to tie back, nothing to braid, nothing to pin. It dries in minutes after swimming, takes up no space in a toiletry bag, and the wind actually makes it look better by adding natural texture.
The look: Platinum blonde pixie cut with choppy, textured layers. Hair is styled in a tousled, slightly spiky manner with volume at the crown. Clean, angular silhouette.
Step by step:
- Wash and towel-dry. Blot excess water with a towel. Do not rub.
- Apply a small amount of product. Work a pea-sized amount of matte clay or texturizing paste through the crown. Skip the sides.
- Push and arrange. Use your fingers to push sections in different directions for that natural, wind-tousled look.
Where this look is suitable: Every outdoor setting. Short hair is the original camping hairstyle for a reason.
21.Braided Updo with Wheat Accent
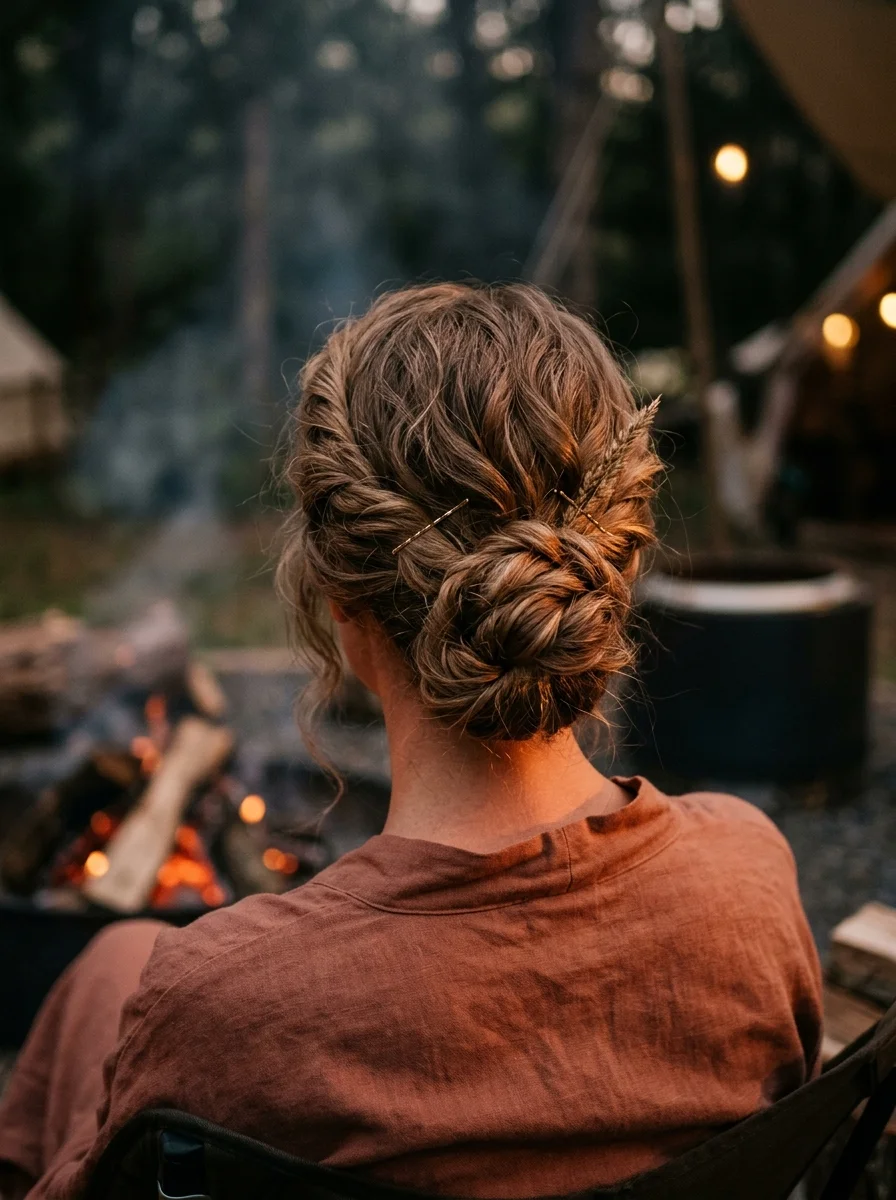
The overview: A low braided updo at the nape with small dried wheat stalks or botanical accents tucked into the braids. The braids are twisted and pinned into a textured, slightly messy bun. The wheat accents add a foraged, organic detail that no store-bought accessory can replicate.
Why this look is popular: Using natural elements as hair accessories connects the style to its environment in a way that feels authentic. A wheat stalk from the campsite costs nothing, looks beautiful, and starts a conversation. The braided base is secure enough for hiking, and the accents make it feel special for campfire dinners.
Step by step:
- Create two braids. Braid two standard three-strand braids from the sides, directing them toward the nape.
- Pin into a bun. Coil both braids together at the nape and pin with bobby pins. Allow some texture and looseness.
- Add the wheat. Tuck small wheat stalks or dried botanicals into the braid loops at random intervals. Odd numbers (3 or 5) look more natural.
Tips and tricks: If you cannot find wheat, any dried grass, lavender sprigs, or small wildflowers work. The goal is something that looks like you found it on a walk, not something you ordered online.
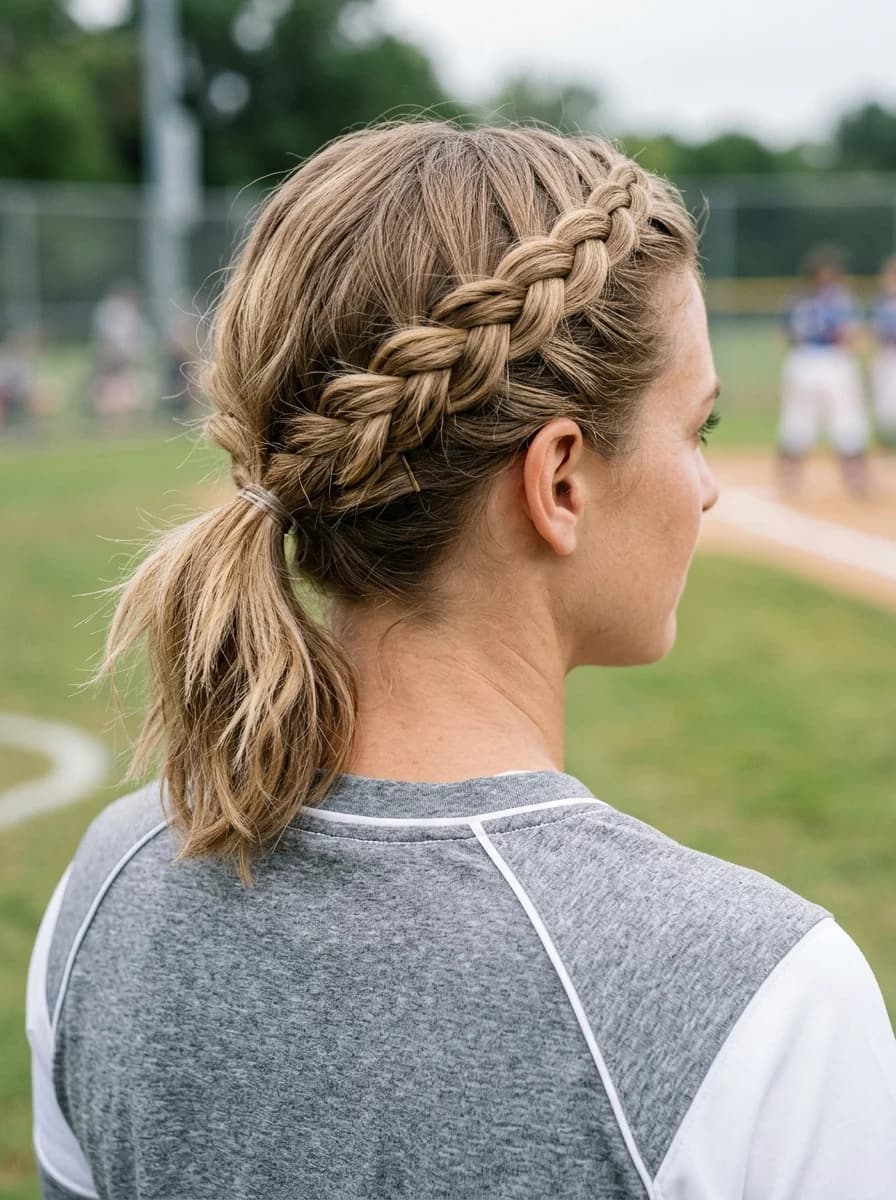
28 Stunning Softball Hairstyle Ideas with Braids for 2026 🥎✨
22.Low Ponytail with Gold Metal Cuff
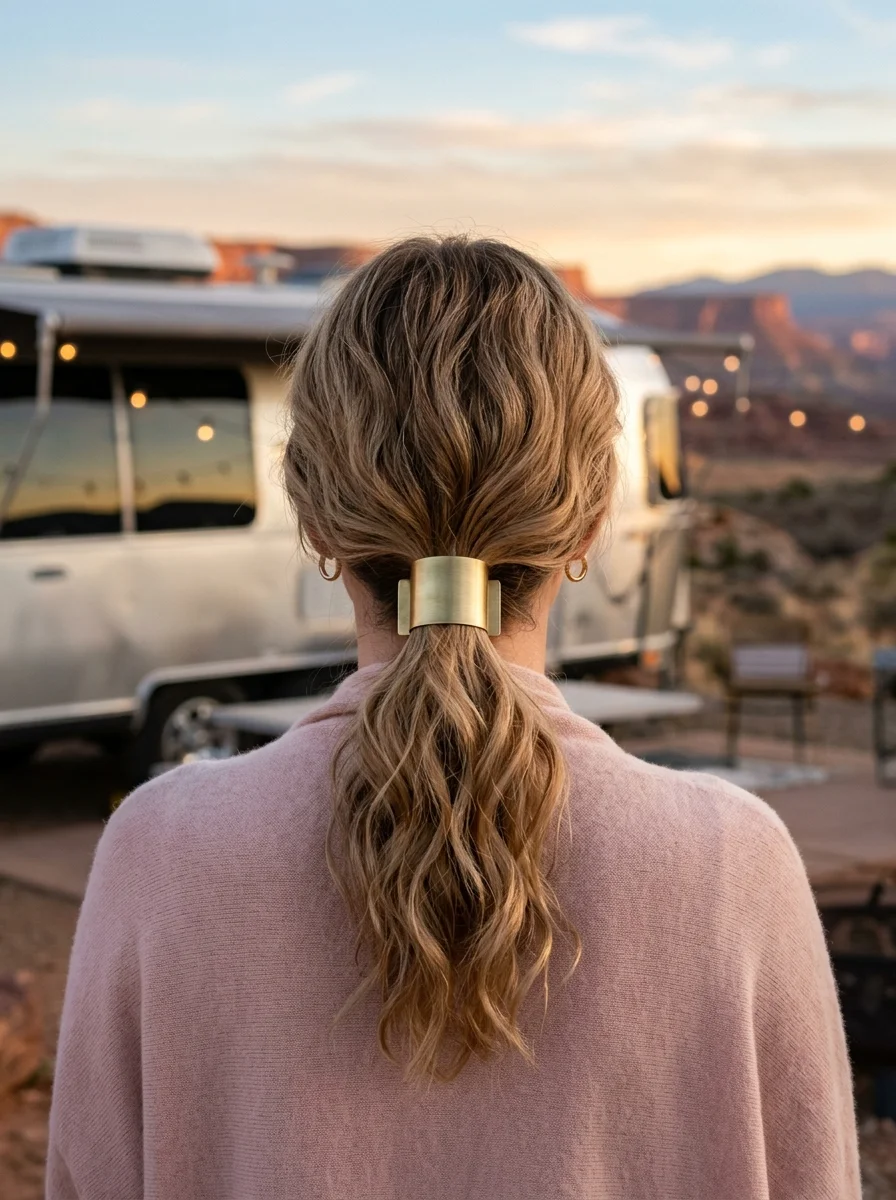
The overview: A low ponytail gathered at the nape, secured with a wide brushed-gold metal cuff instead of a regular elastic. The top section has loose, natural waves with volume. The metal cuff transforms a basic ponytail into something that looks intentional and a little editorial.
Why this look is popular: The metal cuff is the single most effective accessory for making a simple hairstyle look expensive. One piece of hardware does the work that would otherwise require braiding, twisting, or pinning. On camping mornings where you want to look good with zero effort, the cuff is the answer.
The look: Wavy-to-curly hair with blonde highlights gathered into a low ponytail at the nape. A wide, brushed-gold metal cuff secures the ponytail. The tail falls in soft, tousled waves past the shoulders.
Step by step:
- Gather low. Collect all hair at the nape. Do not over-brush; natural texture is the point.
- Secure with an elastic first. Use a basic elastic underneath. The cuff is decorative, not structural.
- Slide the cuff on. Open the metal cuff and position it over the elastic. Close it so it sits snugly.
- Adjust the waves. Pull the ponytail tail forward and scrunch to encourage natural wave pattern.
Where this look is suitable: Campsite dinners, outdoor gatherings, any moment where you want a little polish without any work.
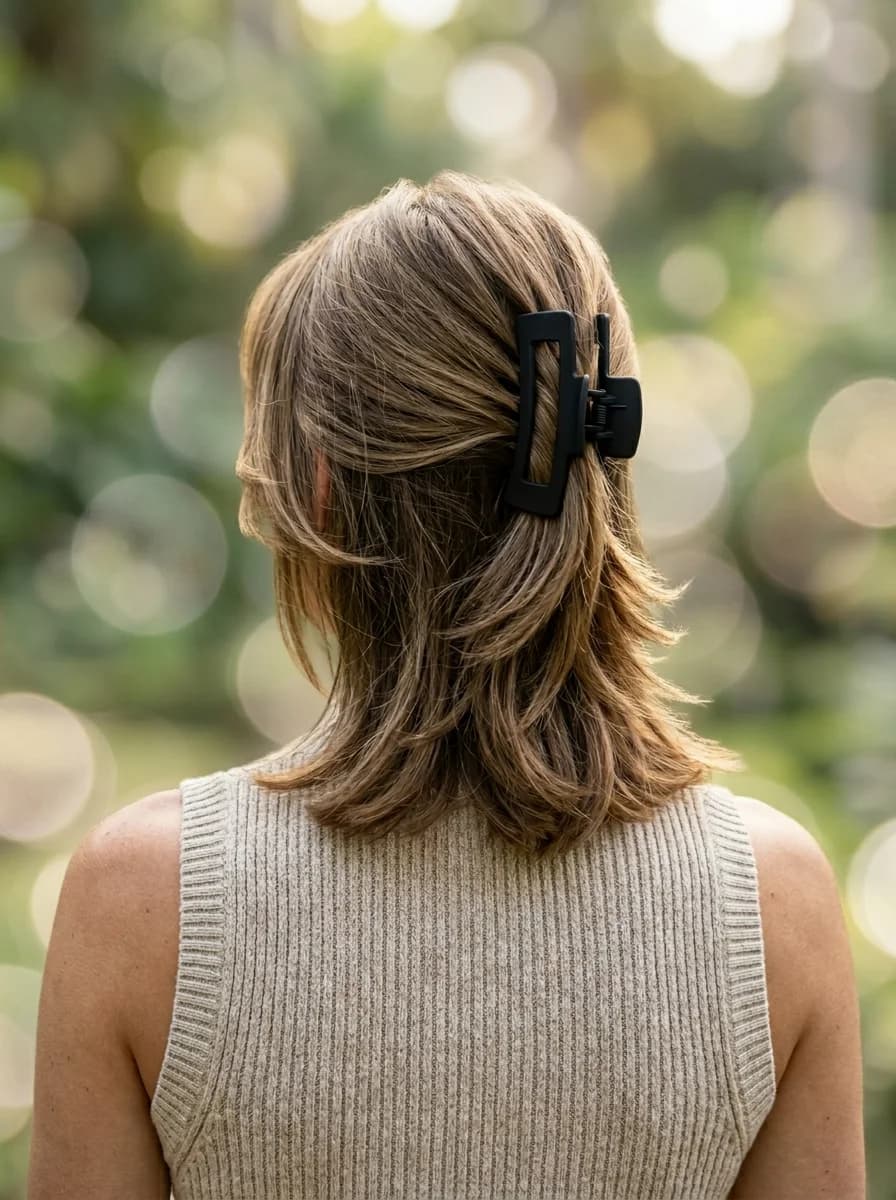
23.Twisted Half-Up Bun with Claw Clip
The overview: The top section of hair is twisted into a small bun or knot at the crown, secured with a rectangular claw clip. The rest of the hair flows down freely. The clip does the structural work while adding a matte gold accent that catches the light.
Why this look is popular: This is the upgraded version of the basic half-up clip style. The twist adds visual texture at the crown, and the rectangular clip is more modern than the classic rounded claw. It holds better than a claw clip alone because the twisted section creates more surface area for the clip's teeth to grip.
The look: Slightly wavy, medium-thickness hair with ash-blonde tones. The top section is twisted into a small bun at the crown, secured with a rectangular matte gold claw clip. The remaining hair flows past the shoulders.
Step by step:
- Gather the top section. Take hair from the temples back to the crown.
- Twist into a small bun. Twist the gathered section and coil it into a compact bun at the crown.
- Clip it. Slide the claw clip over the bun, making sure the teeth catch both the twisted hair and the base layer beneath.
- Adjust the lower section. Let the remaining hair fall naturally. If it needs refreshing, mist with water and scrunch.
Tips and tricks: Matte metal clips look more modern than shiny ones and don't show fingerprints. They also photograph better in natural light because they don't create harsh reflections.

30 Stunning July Nail Designs for Summer 2026 💅
24.Blunt Bob with Pearl Hair Pins
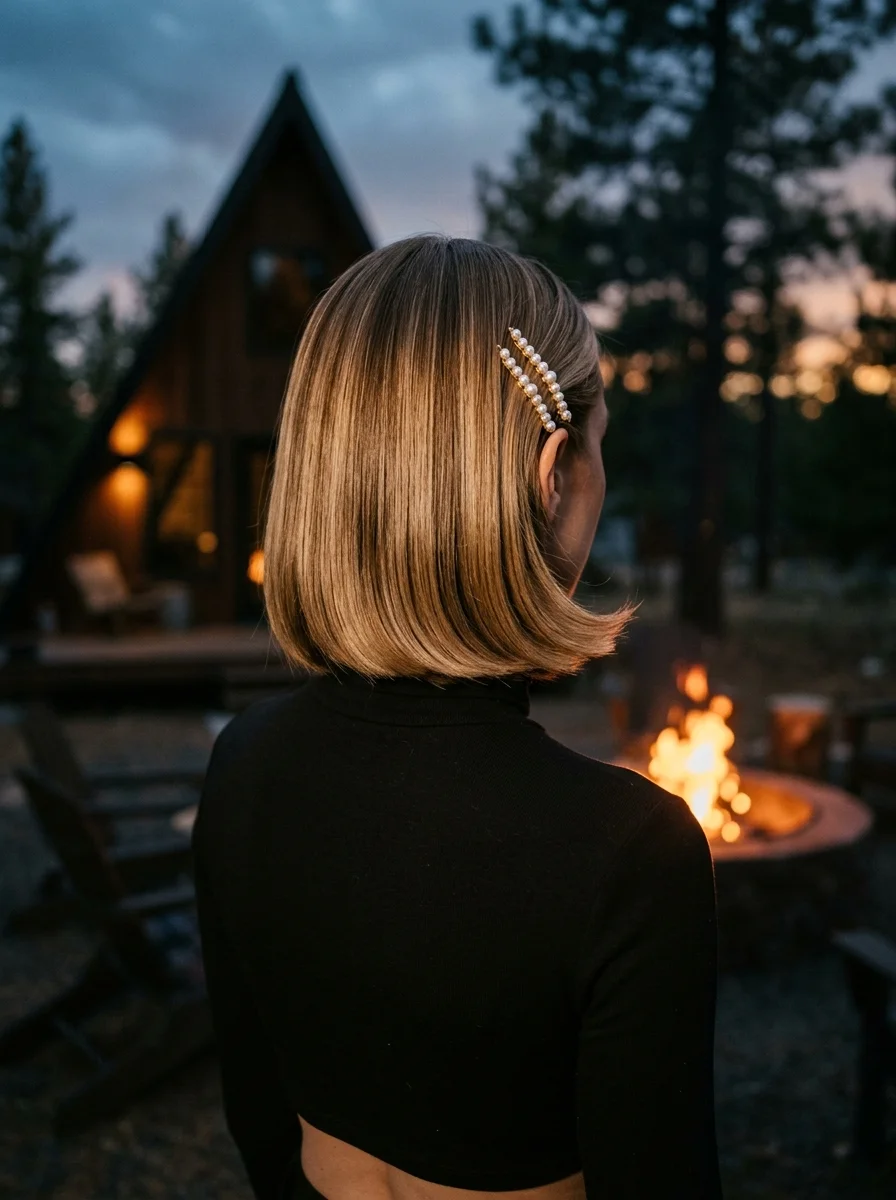
The overview: A straight, sleek blunt-cut bob that curves slightly inward at the ends, parted to the side and tucked behind one ear. Two pearl-adorned bobby pins are arranged in a diagonal pattern above the ear. It is proof that short hair can look just as considered as long hair at a campsite.
Why this look is popular: Short hair is the most practical camping option, but it can feel limiting. Pearl pins add a small, deliberate detail that elevates the bob from "I chopped my hair off" to "I chose this specific look." The pins also serve a functional purpose, keeping the tucked side in place through wind and movement.
The look: Very straight, smooth, glossy bob cut just below the chin. Hair is parted to the side and tucked behind one ear on the heavier side. Two pearl pins are placed diagonally above the ear.
Step by step:
- Straighten if needed. A quick pass with a flat iron creates the sleek surface this style depends on. Apply a light heat protectant first.
- Create a deep side part. The asymmetric part gives the bob more visual interest than a center part.
- Tuck behind one ear. Smooth the heavier side behind the ear. Use a small amount of pomade to keep it flat.
- Place the pearl pins. Insert two pins diagonally, about half an inch apart, above the ear. Push them in deep enough that only the pearl heads show.
Where this look is suitable: Campfire dinners, outdoor evening events, any camping moment where you want something polished and understated.
25.Low Wavy Ponytail with Silk Scarf
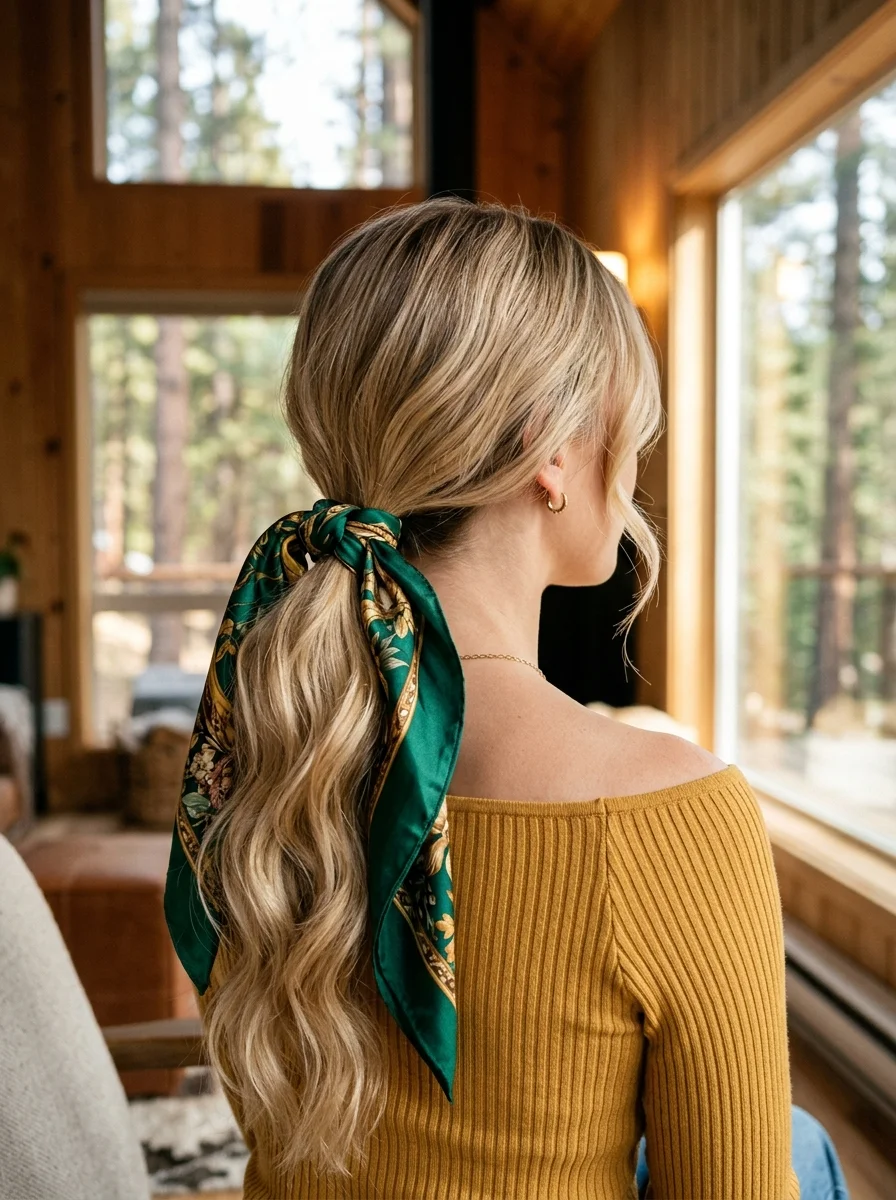
The overview: A low, loose ponytail at the nape with soft flowing waves. A green silk scarf with a botanical print is tied around the ponytail base with the ends cascading down alongside the hair. The scarf adds movement, color, and a touch of elegance to an otherwise simple style.
Why this look is popular: A scarf tied around a ponytail is the fastest way to make a basic style feel considered. The cascading tails move with the hair, creating a romantic, flowing effect that photographs beautifully. On camping days when you want to look good without trying, the scarf does the work.
The look: Wavy, voluminous blonde hair with a low ponytail at the nape. A large green silk scarf with gold botanical print is tied around the ponytail base, with the tails flowing down alongside the hair.
Step by step:
- Gather low. Collect all hair at the nape. Keep it loose and relaxed.
- Secure with an elastic. Use a thin elastic that matches your hair color.
- Tie the scarf. Fold the scarf into a band. Wrap it around the elastic and tie in a single knot or small bow. Let the tails hang.
- Adjust the waves. Pull the ponytail forward and scrunch to encourage the wave pattern.
Tips and tricks: Silk scarves slip on smooth hair. If yours won't stay put, secure it with a small bobby pin hidden underneath at the nape. Cotton scarves grip better but don't drape as elegantly.
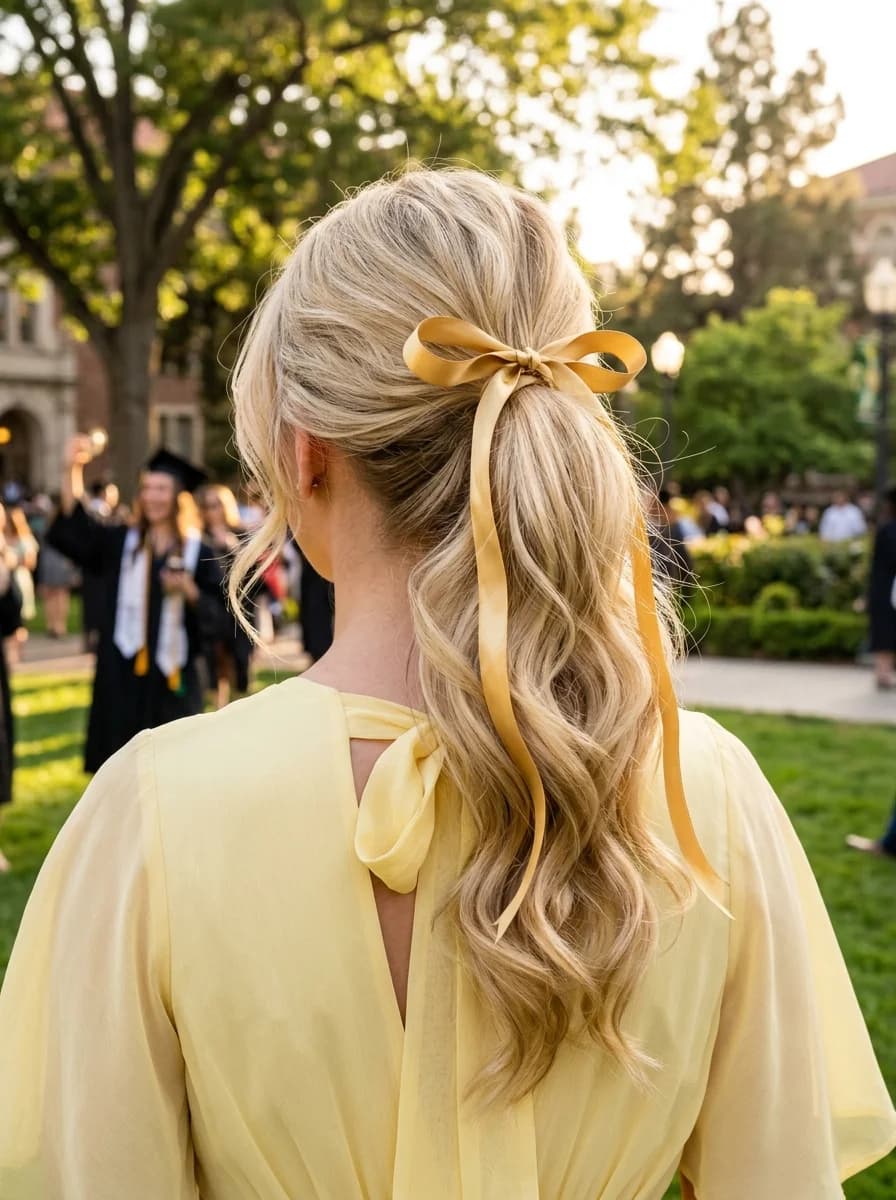
22 Best Graduation Day Hairstyles for 2026 🎓✨
26.Multi-Braid Updo
The overview: Multiple Dutch braids weaving from the sides and crown into a low braided bun at the nape. The braids are tight and precisely woven, creating a basket-like pattern across the back of the head. This is the most technically involved style on this list, and the result justifies the time.
Why this look is popular: Multi-braid updos are the most secure camping hairstyle available. With multiple braids reinforcing each other, this style will survive sleeping, hiking, and wind without a single pin coming loose. The woven texture also looks extraordinary in photos.
Step by step:
- Section into three or four parts. Divide hair from temple to temple and crown to nape. Clip each section.
- Dutch braid each section. Braid each section toward the nape, keeping the braids tight against the scalp.
- Combine at the nape. Gather all braid tails at the nape and secure with an elastic.
- Form a braided bun. Coil the combined braid tails into a low bun. Pin with bobby pins in crossing pairs for maximum hold.
- Weave in any loose sections. If any sections between braids are loose, twist and pin them into the bun.
Where this look is suitable: Multi-day camping trips, formal campsite dinners, outdoor weddings. This is a style that earns compliments.
27.Sleek Half-Up Ponytail
The overview: The top section is pulled back very smoothly and tightly with no flyaways, secured with a hair-wrapped base. The remaining hair flows down in soft, loose waves. It is the contrast between the sleek crown and the relaxed tail that makes this style work.
Why this look is popular: This style solves the camping hair dilemma of wanting something polished without committing to a full updo. The sleek top keeps hair out of your face, while the loose bottom maintains a sense of effortlessness. It also works better than a full ponytail for people whose hair is too short or layered to gather completely.
The look: Very straight, smooth hair at the crown, pulled back tightly with no bumps or flyaways. The elastic is concealed by a wrapped strand of hair. The lower half falls in soft, loose waves past the shoulders.
Step by step:
- Section the top. Take hair from the temples back to the crown. The parting line should follow the top of each ear.
- Smooth with product. Apply a small amount of gel or pomade to the top section. Use a boar bristle brush to smooth every bump.
- Secure tightly. Tie the section at the crown with a strong elastic. The tension should be firm enough that no hair slips.
- Wrap the elastic. Take a thin strand from the ponytail's underside, wrap it around the base, and pin underneath.
- Blend the lower section. Let the remaining hair fall naturally. If the top-to-bottom transition is too harsh, pull a few strands from the ponytail to blend with the loose section.
Tips and tricks: For the sleepest possible surface, use a fine-tooth comb after the brush. The comb eliminates the micro-bumps that the brush leaves behind. A light mist of flexible-hold hairspray sets the surface without creating stiffness.

33 Trendy Polka Dot Nail Ideas for 2026 💅
28.Textured Wavy Lob
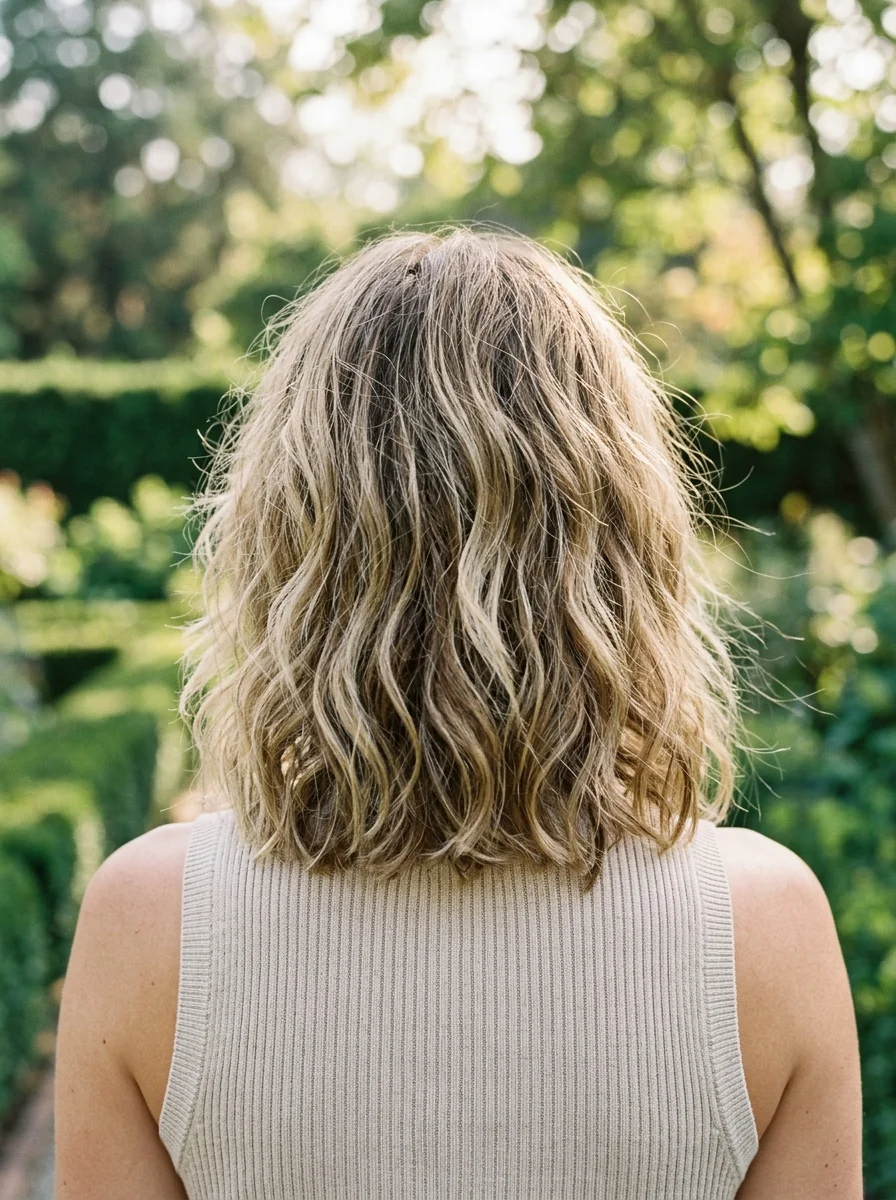
The overview: A textured, wavy lob (long bob) worn completely down and loose. The waves are defined but natural-looking with a slightly messy, beachy texture. Hair is parted naturally with no clips or pulls. This is the camping hairstyle for people who want their hair to look like it belongs outdoors.
Why this look is popular: A wavy lob is the ideal camping length. Long enough for visible wave pattern, short enough that it doesn't get tangled in backpack straps or caught in things. The textured finish hides the fact that you haven't washed your hair in two days, and the natural wave improves with outdoor humidity.
The look: Shoulder-length lob with a 2A-2C wave pattern. Blonde with darker roots. The texture is slightly rough, suggesting sea salt spray or natural air-drying. Hair falls naturally with no visible parting.
Step by step:
- Air-dry. After washing, let hair dry naturally. Do not blow-dry. The natural drying process creates the irregular wave pattern that makes this style look authentic.
- Add texture. Once dry, mist with sea salt spray and scrunch upward. This adds grit and definition to the waves.
- Separate with fingers. Do not brush. Use your fingers to separate sections and create that piecey, lived-in texture.
Tips and tricks: If your lob falls flat by day two, flip your head upside down and shake vigorously. This re-introduces volume at the roots without requiring any product. A dry shampoo at the roots absorbs oil and adds lift.
Camping Hair Care Essentials
The best camping hairstyle won't matter if your hair is damaged from sun, wind, and infrequent washing. Here is what actually helps.
Pre-trip preparation: Deep condition your hair the week before camping. Sun and wind strip moisture faster than you can replenish it outdoors. Starting with well-hydrated hair gives you a buffer.
Dry shampoo is non-negotiable: It absorbs oil, adds volume, and extends the time between washes by a full day. Apply it to roots at night so it has time to absorb by morning.
The overnight rule? Sleep with your hair in a loose braid or pineapple. A satin pillowcase (or satin scrunchie) reduces friction that causes breakage and tangles. Your morning hairstyle will take half the time if your hair isn't a matted mess when you wake up.