Nail Trends
30 Sweet Strawberry Nail Art Designs for Every Season (2026)
From delicate micro-strawberry French tips and holographic glitter sets to bold chocolate-drip designs and moody midnight berry gardens, this roundup features the best strawberry nail art to inspire your next salon visit. Grab a seat, scroll through these sweet designs, and find the berry-inspired look that fits your style.
Finding Your Berry Tone: Color and Shape Pairings
Strawberry red is one of the more versatile nail colors because it spans a wide range of tones, from bright cherry to deep crimson. To pick the right shade, consider your skin's undertone. Those with cool undertones (pink or blue veins) look best with blue-based reds and bright berry pinks. For warm undertones (golden or olive skin), orange-based reds and warm terracotta tones will naturally harmonize.
The nail shape you choose also affects how the art registers. A tapered medium almond or oval shape provides a gentle curve that works beautifully for organic hand-painted berry vines and scattered fruit illustrations. Structured coffin or square shapes provide an excellent geometric border for French tips, gingham patterns, and color-blocked designs where the strawberry art needs a clean frame.
In This Guide
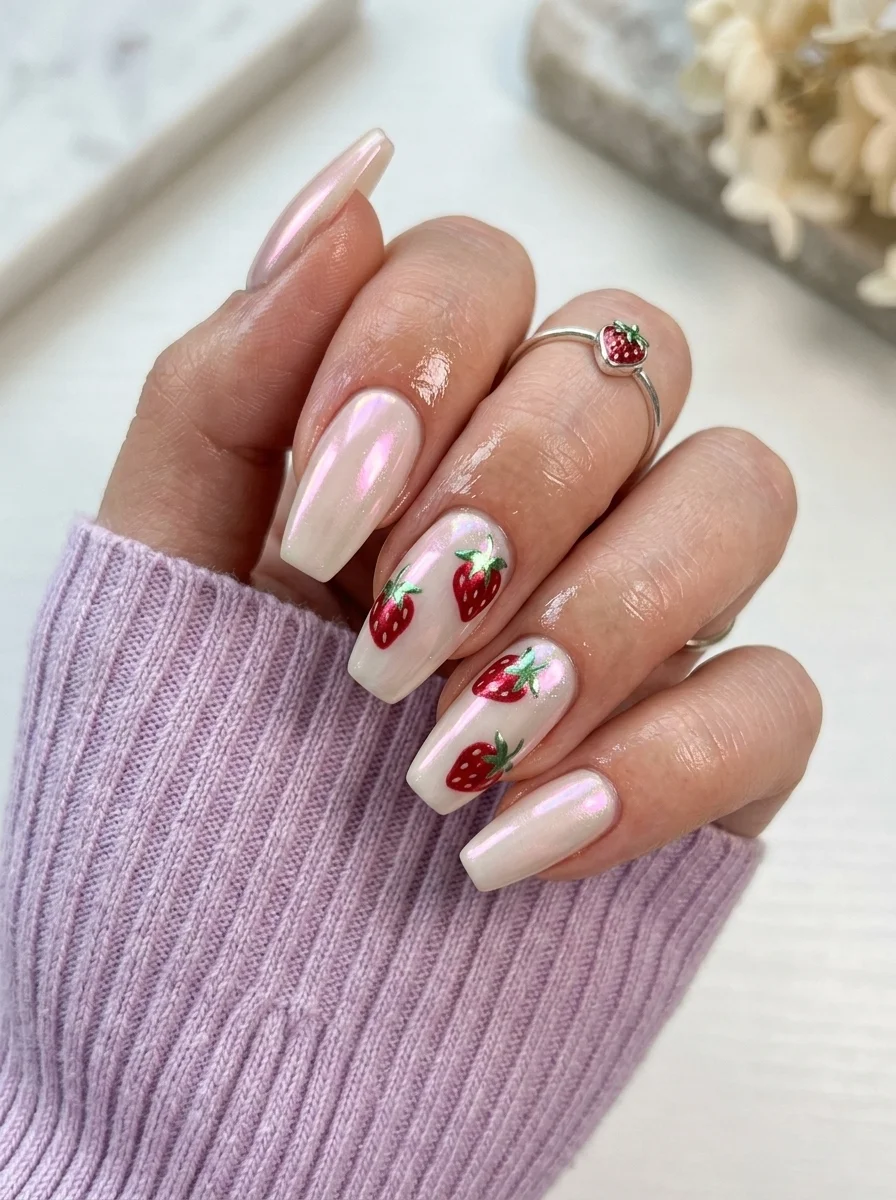
1.Micro Strawberry Red Frenchie
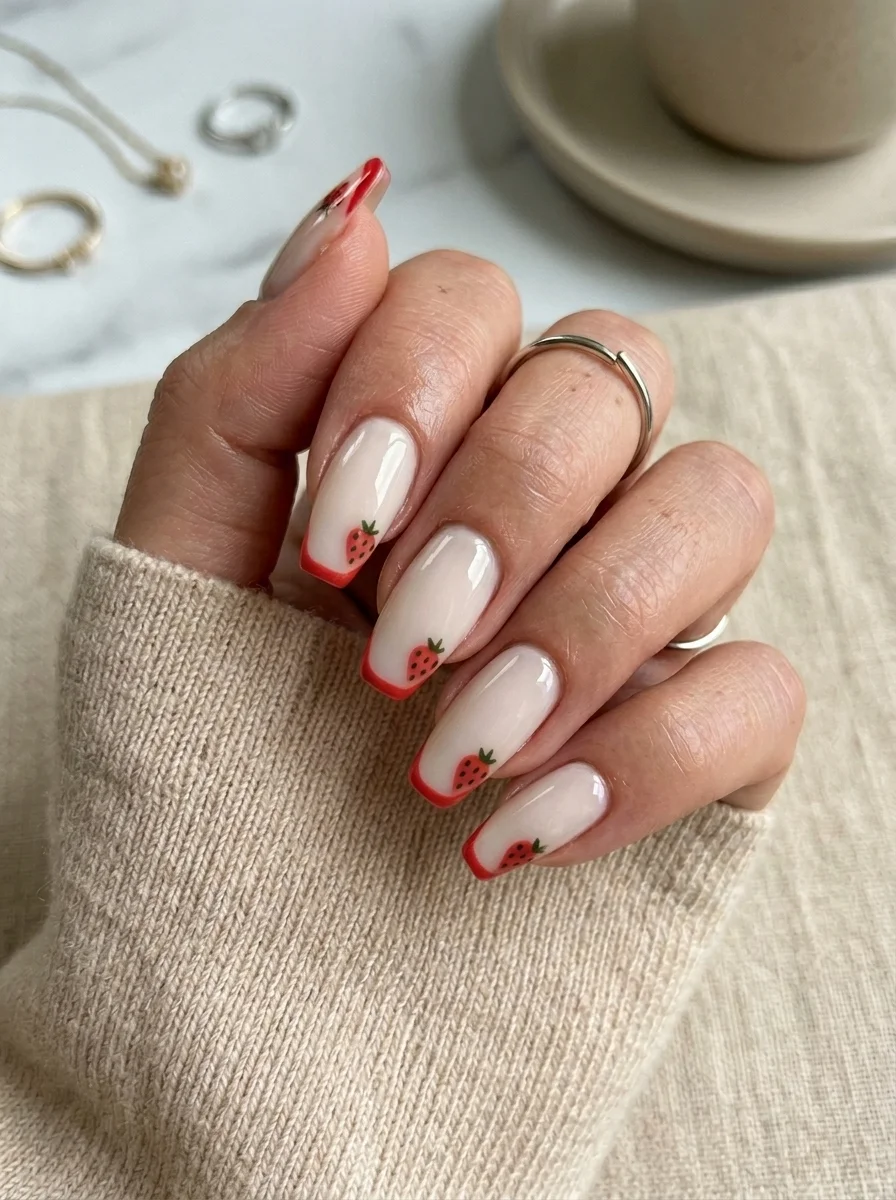
A delicate, barely-there take on strawberry nails that lets the French tip do the talking.
Overview:
Most strawberry nail designs go big: full-nail illustrations, bold red bases, fruit scattered across every finger. This one does the opposite. The strawberries are so small they function as texture rather than illustration, and the red French tips give the design enough structure to read as intentional from across a room.
The milky nude base is doing critical work here. It keeps the overall look clean and lets the tiny strawberries reward close inspection without shouting about their presence. You notice them second, after the red tips register, and that delayed discovery is what makes the design feel considered rather than busy.
One thing to watch: the strawberries are small enough that any inconsistency in their shape becomes visible. If your dotting tool technique is shaky, the berries read as red blobs instead of fruit. Practice on a piece of paper first. Two or three confident dots per berry is all you need.
Design Breakdown:
Minimal illustration paired with a structured French. The restraint is the design.
Base Color: Sheer milky nude or pink. The natural nail should be visible through the base.
Nail Shape: Medium almond. The tapered shape gives the small strawberries room to sit without looking cramped.
Design Element: Thin red French tips on most nails. Hand-painted micro strawberries (tiny red dots with green leaf caps) placed near the tips on select nails.
Finish: High-gloss top coat to protect the delicate art.
Get The Look at Home:
The French tips and the strawberry art are separate rounds. Do the tips first.
- Sheer base: Two coats of milky nude on all nails. Let dry fully.
- Red tips: Using a French liner brush and bright red polish, paint the smile line from sidewall to center on each nail. One confident coat is enough if the formula is pigmented.
- Strawberry dots: Using your smallest dotting tool and red polish, place a single tiny dot near the tip on select nails. Two or three dots per nail maximum.
- Leaf caps: With a toothpick and green polish, add a single tiny V-shaped stroke above each red dot. This is what turns a red dot into a strawberry.
- Cleanup: An angled brush dipped in acetone sharpens the French smile line. This step is non-negotiable on a sheer base.
- Seal: One coat of top coat, applied carefully to avoid dragging the tiny art.

26 Quick Hairstyles for a Waitress Job (2026)
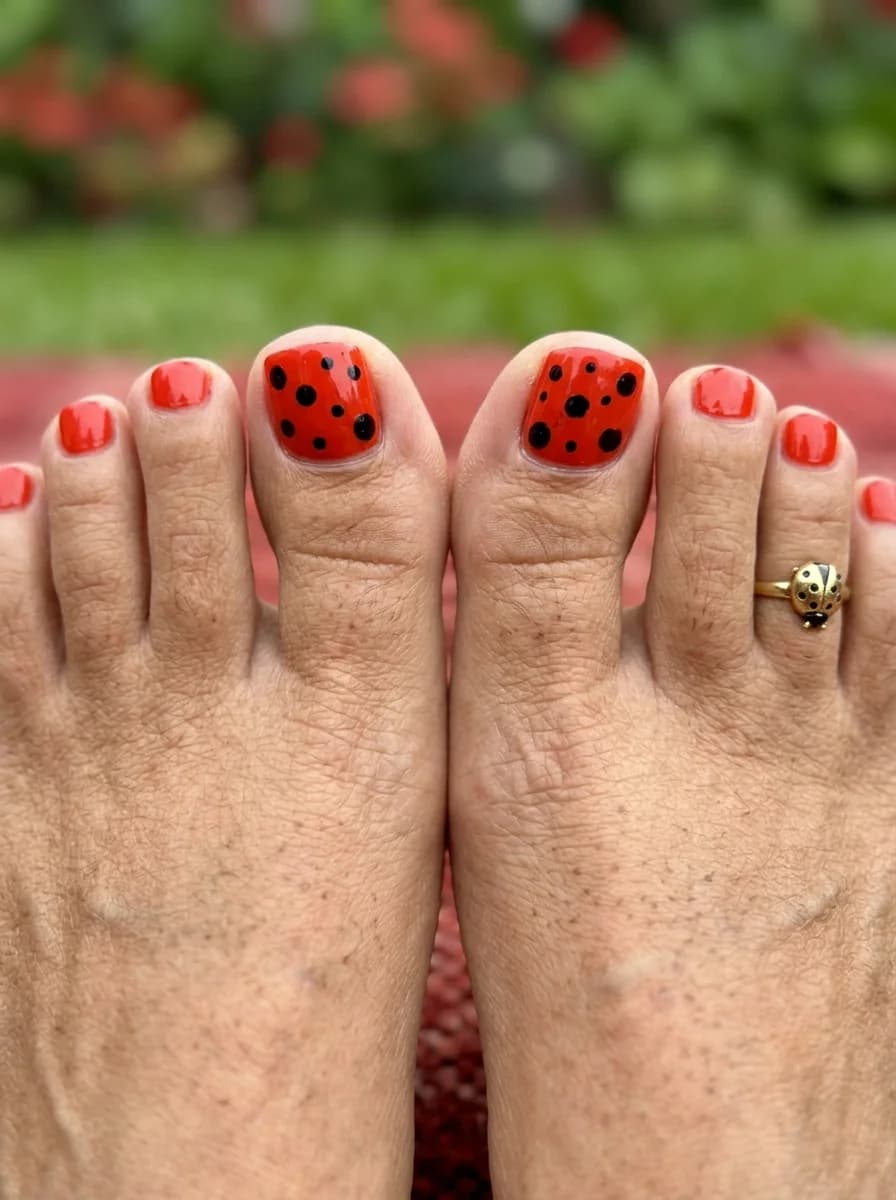
2.Red Cat-Eye with Scattered Dots
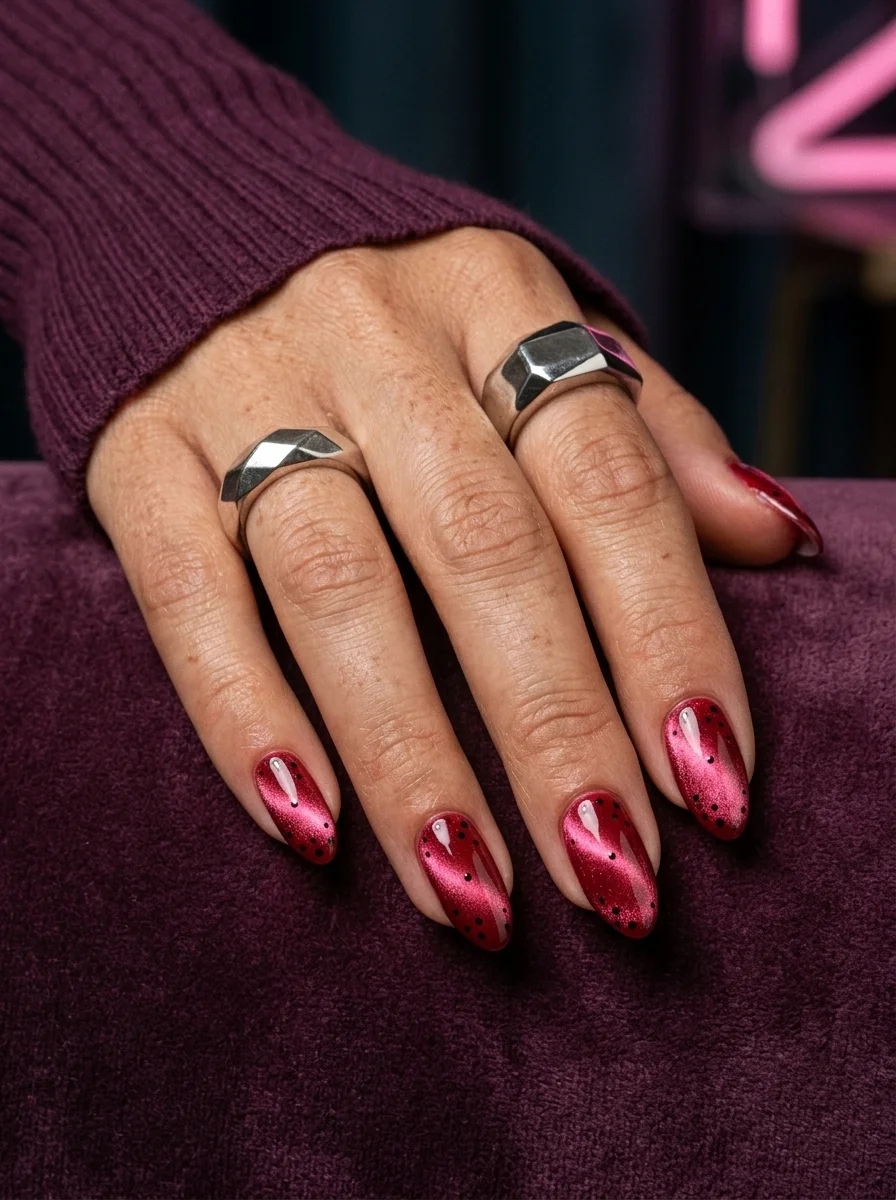
A moody, magnetic take on red nails with a playful dotted twist.
Overview:
Cat-eye polish creates a velvet-like shimmer that shifts as your hand moves. The magnetic particles align under a magnet to produce a concentrated line of light across the nail, which gives the red base a depth that standard cream polish can't replicate. Adding black dots on top of the magnetic effect creates an interesting contrast: the shimmer moves, the dots stay fixed.
This design leans more "moody evening" than "sweet strawberry," despite the red base. The scattered black polka dots across the magnetic surface give it a slightly edgy, almost leather-like quality. It's the kind of set that works with a leather jacket as easily as it does with a sundress.
The practical challenge with cat-eye polish is the magnet step. You need to hold the magnet steady for fifteen to twenty seconds after each coat while the polish is still wet. Move too early and the particles scatter. Hold too long and you can pull the polish off the nail entirely. It takes a few attempts to find the right distance and timing.
Design Breakdown:
Magnetic shimmer base with flat, graphic dots layered on top. Two very different textures on the same nail.
Base Color: Deep red cat-eye magnetic polish. The shimmer should be concentrated in a diagonal line across the nail.
Nail Shape: Medium almond. The curved surface shows off the magnetic shimmer effect better than flat shapes.
Design Element: Scattered black polka dots placed randomly across the magnetic red base.
Finish: Ultra-glossy top coat to intensify the cat-eye shimmer.
Get The Look at Home:
Cat-eye polish requires a magnet. If you don't own one, most nail supply stores carry them for under five dollars.
- Base coat: Apply a ridge-filling base coat. Magnetic polish magnifies surface imperfections.
- First magnetic coat: Paint a thin layer of red cat-eye polish. Immediately hold the magnet at a 45-degree angle above the nail, about two millimeters from the surface. Hold for fifteen seconds.
- Second magnetic coat: Repeat with a second coat. The shimmer line will become more defined.
- Dots: Using a small dotting tool and black polish, press straight down to create scattered dots. Space them irregularly for a more organic feel.
- Dry time: Wait at least five minutes before top coating. The magnetic particles can shift if the surface is disturbed.
- Seal: One coat of thick, glossy top coat. Cap the free edge.
3.Gold Leaf Strawberry Accent
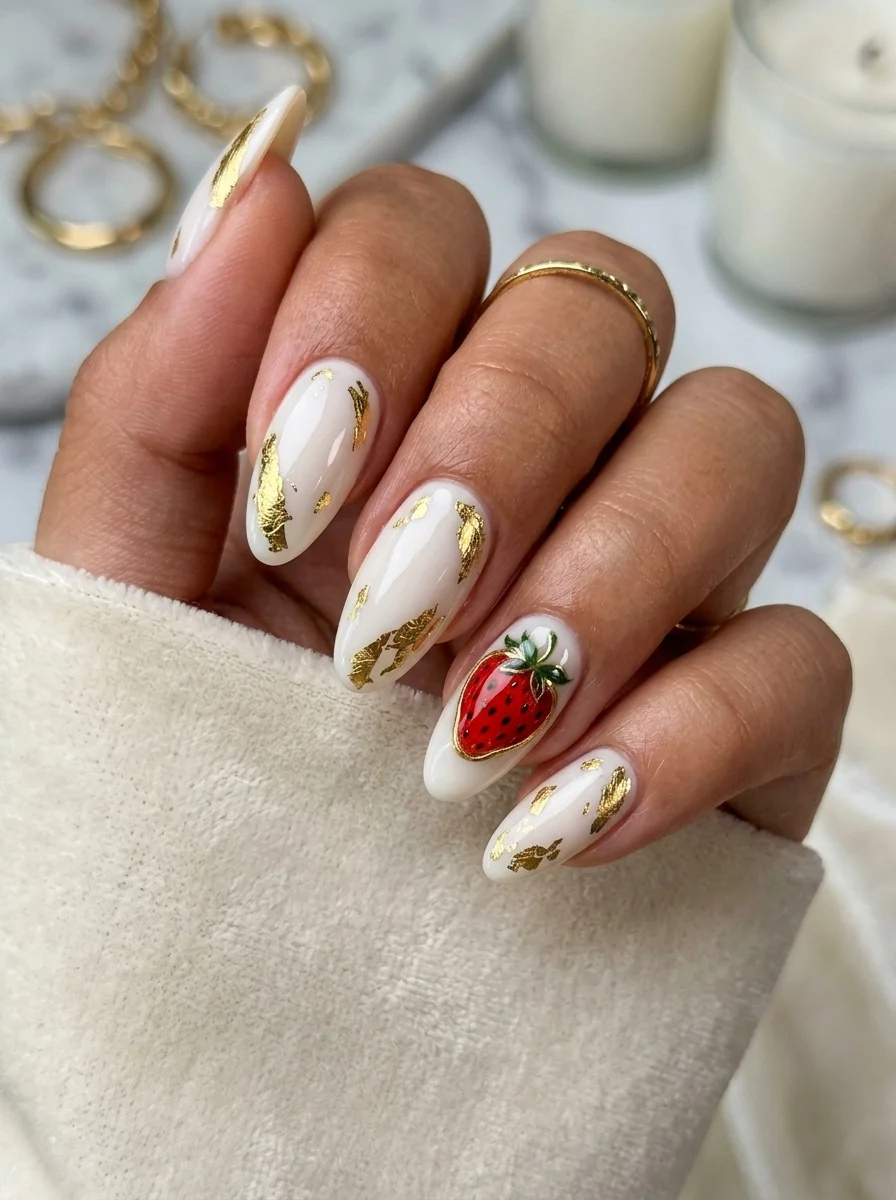
A luxe, editorial take on strawberry nails with metallic foil and a single showpiece berry.
Overview:
Gold foil on nails is one of those techniques that looks expensive but is actually simpler than hand-painted art. The irregular, organic edges of real gold leaf catch light in ways that uniform glitter or metallic polish can't replicate. Each piece sits differently, which means no two nails look identical.
The ring finger is where this design reveals its full concept. A single large strawberry, hand-painted with a gold outline, sits against the milky white base surrounded by gold foil flakes. Without that accent nail, you have gold foil nails, which are fine but common. With it, you have a deliberate strawberry story that rewards closer inspection.
The practical challenge with gold leaf is adhesion. It needs a tacky surface to stick to, but if the polish is too wet, the foil sinks and loses its texture. The sweet spot is a base coat that's dry to the touch but not fully cured, about sixty seconds after application. Press the foil gently, then seal immediately with a thick top coat to prevent lifting.
Design Breakdown:
Metallic texture meets botanical illustration. The foil adds a third dimension that flat art alone can't achieve.
Base Color: Milky semi-sheer white on all nails. The translucency lets the gold foil float rather than sit flat.
Nail Shape: Medium almond. The tapered shape gives the foil and art room to breathe.
Design Element: Randomly placed gold foil flakes on most nails. One accent nail with a large, detailed hand-painted strawberry with green leaves and a gold outline.
Finish: Ultra-glossy top coat to encapsulate the foil and smooth the surface texture.
Get The Look at Home:
Work with tweezers for the foil placement. Fingers transfer oils that weaken adhesion.
- Milky base: Two coats of semi-sheer white. Let dry until just slightly tacky.
- Foil placement: Using tweezers, press small, irregular pieces of gold leaf onto the nail. Vary the density across nails.
- Flatten: Press the foil flat with a dry brush. Jagged edges catch on things and peel off within a day.
- Strawberry art: On the ring finger, paint a large red strawberry shape with a fine brush. Add green leaves at the top and tiny yellow seed dots.
- Gold outline: Using a thin liner brush and gold metallic polish, outline the strawberry shape. This ties the art to the gold foil on the other nails.
- Seal: Two coats of thick top coat. The first locks the foil in place; the second creates a smooth surface.

29 Stunning Summer Almond Nails for Women in 2026 💅
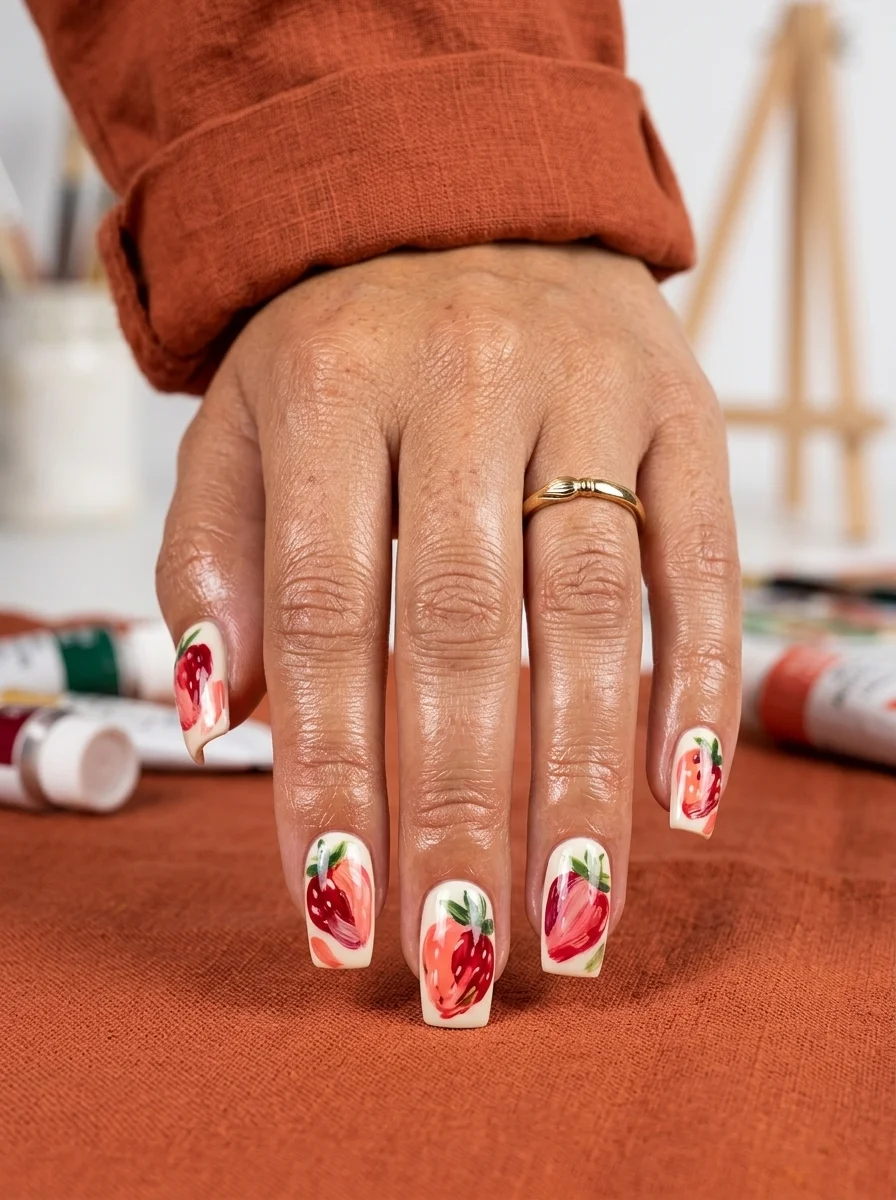
4.Terracotta Berry Abstract
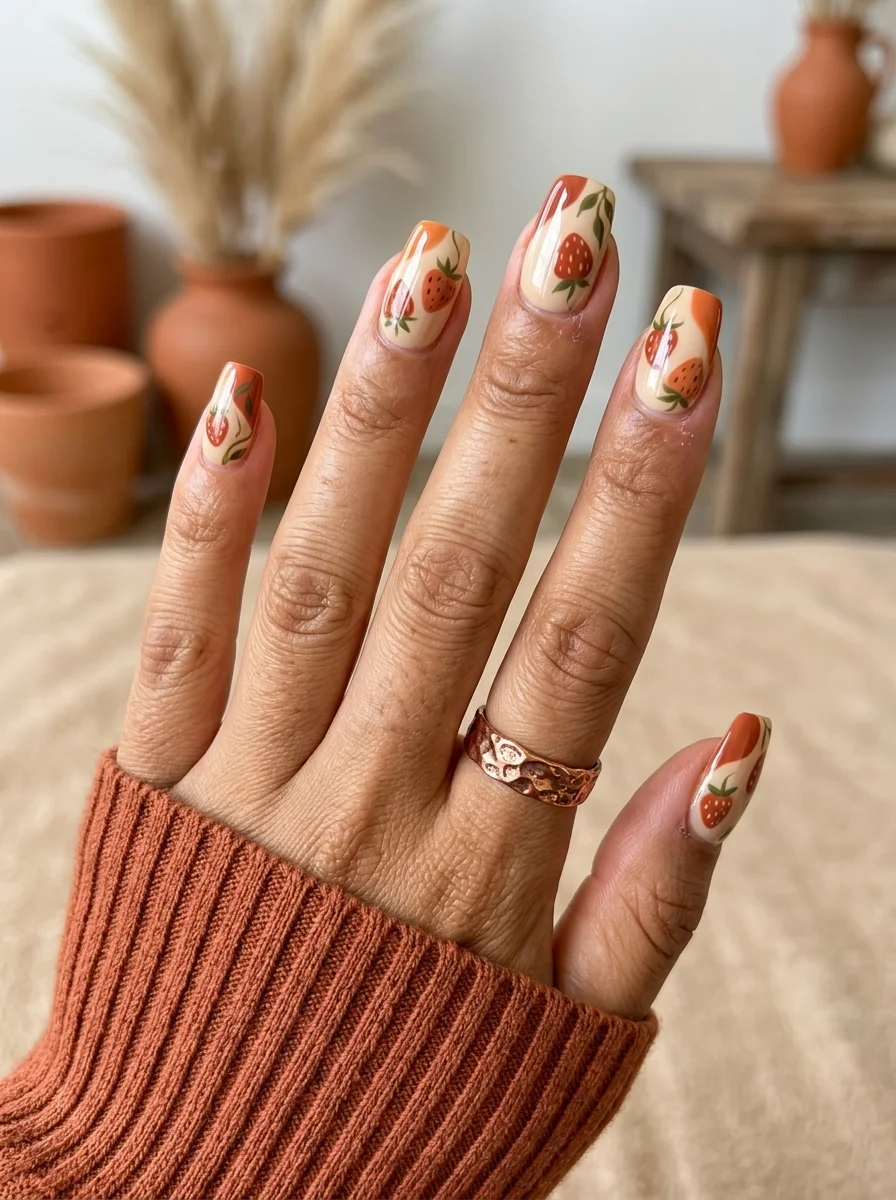
An earthy, autumn-ready take on strawberry art with warm burnt orange tones.
Overview:
Terracotta and strawberry red share a warm undertone, which is why this color combination works better than it should on paper. The burnt orange abstract swooshes at the tips frame the hand-painted berries like a border around a painting. It reads as autumn rather than summer, which broadens the occasions where strawberry nails actually make sense.
The cream base does the heavy lifting. A white would make the terracotta look harsh. A nude would make the strawberries disappear. This warm cream tone sits in the middle, keeping both the fruit art and the abstract accents visible without either competing for attention.
One thing to watch: terracotta formulas vary between brands. Some lean orange, others lean brown. For this design, you want the orange-leaning version. A brown-heavy terracotta will muddy the strawberry art underneath. Test the color on a piece of paper before committing to your nails.
Design Breakdown:
Warm, earthy palette with organic fruit art and abstract color blocking.
Base Color: Warm cream or off-white on all nails. Not stark white, not pink-toned nude.
Nail Shape: Medium square. The flat surface gives the abstract swooshes and fruit art room to coexist.
Design Element: Hand-painted strawberries with green leaves on most nails. Abstract terracotta orange swooshes at the tips on select nails.
Finish: High-gloss top coat to saturate the warm tones.
Get The Look at Home:
The abstract swooshes are more forgiving than straight lines. Let the brush follow the natural curve of the nail.
- Cream base: Two coats of warm cream polish on all nails. Let dry fully.
- Strawberry shapes: On select nails, paint small red strawberries with a fine brush. Add green leaf caps and tiny seed dots.
- Abstract swooshes: On the remaining nails, paint a curved terracotta orange shape at the tip. The shape should feel organic, not geometric.
- Details: Add tiny green leaf strokes near the terracotta swooshes to tie the two design elements together.
- Check balance: Hold both hands at arm's length. The strawberries and the abstract swooshes should feel evenly distributed across the set.
- Seal: One thick coat of top coat to smooth the layered texture.
5.Botanical Berry Medley
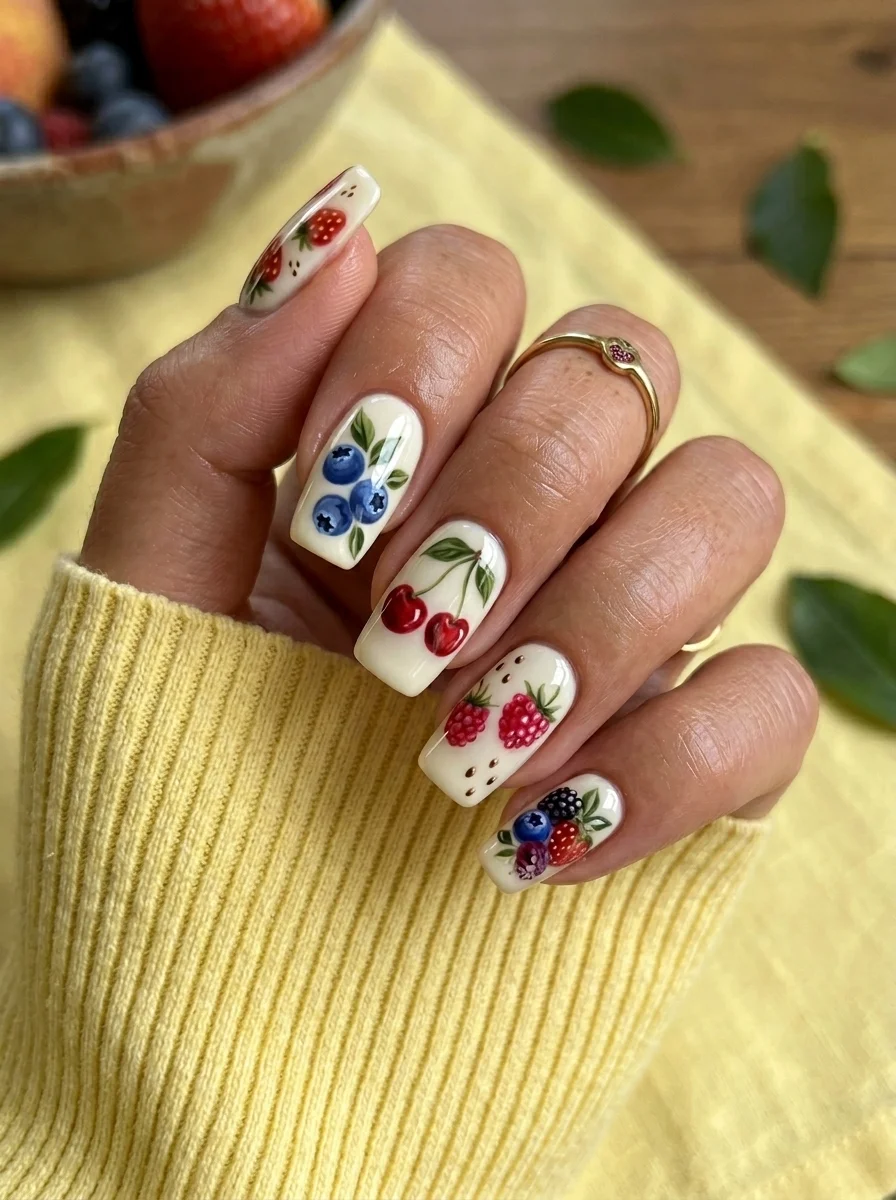
A kitchen-illustration-style berry set that celebrates every fruit in the bowl.
Overview:
Mixing multiple berry types on the same hand is a risk. Each fruit has its own color story, its own shape, and its own level of detail. The blueberries need round forms and a dusty blue tone. The cherries need a deep, glossy red and thin stems. The raspberries need texture dots. And the strawberries need their signature seed pattern and green caps. Combining all four on a single set could easily look scattered.
This design survives the combination because the white base provides a unifying canvas. Every fruit sits against the same clean background, which creates visual consistency despite the variety. The green leaves on each fruit also share the same shade, which ties the different berries together into a single botanical illustration.
The white base needs to be completely opaque. Any streakiness in the white will show through between every fruit and make the entire design look unfinished. Three thin coats rather than two thick ones prevents the streaking that plagues white polish applications.
Design Breakdown:
Multiple fruit illustrations on a white canvas. The uniformity of the base color is what holds the variety together.
Base Color: Bright, opaque white. Needs to be fully streak-free.
Nail Shape: Medium square. The flat surface provides enough room for the detailed fruit illustrations.
Design Element: Hand-painted blueberries, cherries, raspberries, blackberries, and strawberries scattered across the nails, each with green leaves.
Finish: High-gloss top coat to smooth the layered art and make the fruit look juicy.
Get The Look at Home:
Work in color layers across all nails rather than finishing one fruit at a time. All reds first, then blues, then greens.
- White base: Three thin coats of opaque white. Let each coat dry fully.
- Red fruits: Paint strawberries and cherries across the nails using red polish. Vary the sizes and placement.
- Blue fruits: Add blueberries using a dusty blue polish. Two or three per nail, clustered together.
- Texture dots: Add tiny darker dots to the raspberries for texture. Use a toothpick for precision.
- Green leaves: Using a fine liner brush, add small leaves to each fruit cluster. Keep the green consistent across all nails.
- Stems: Thin brown or dark green lines connecting the fruits to their leaves.
- Seal: Two coats of top coat to encapsulate the raised art and create a smooth surface.

30+ Chic Pool Party Hairstyles for Summer 2026 🌊👙
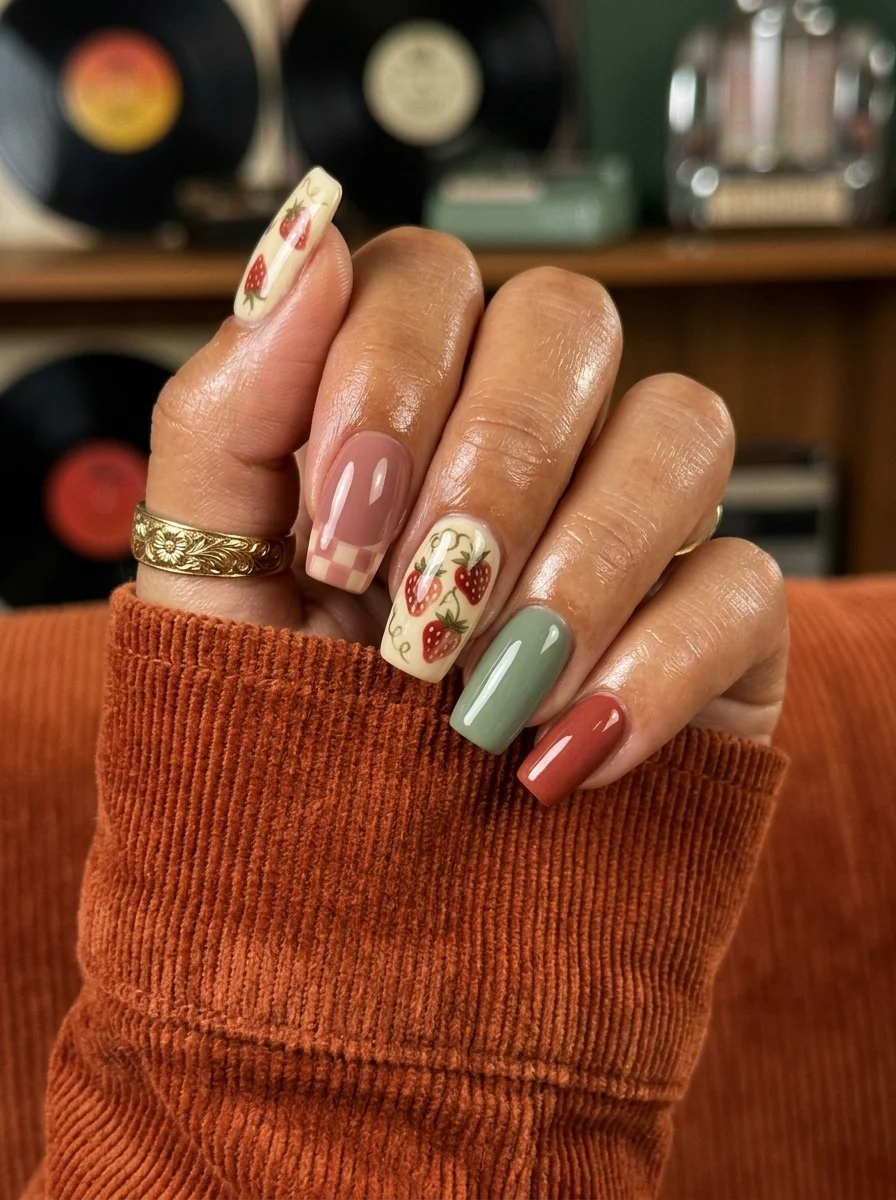
6.Color-Block Berry Pop Art
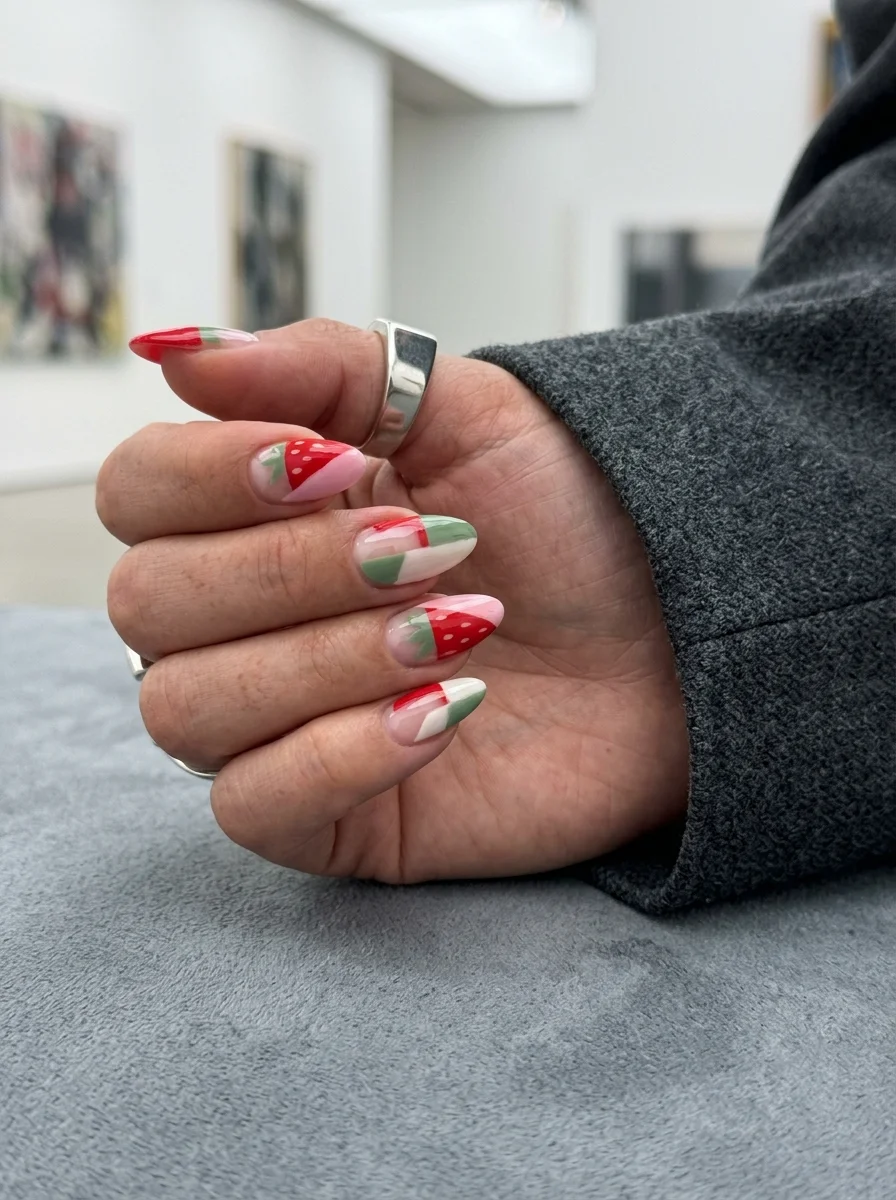
A modern, editorial mix of geometric blocks and hand-painted fruit.
Overview:
Abstract color-blocking on nails walks a fine line between "fashion editorial" and "paint swatch test." This design lands on the right side of that line because the strawberry motifs anchor the abstract shapes to a recognizable theme. Without the fruit art, you'd have random blocks of color. With it, every shape feels like a deliberate part of a story.
The palette is doing something interesting. Red, sage green, white, and dusty pink share a similar saturation level, which prevents any single color from dominating. Your eye moves across the hand without landing on one color for too long. That equal visual weight across four colors is harder to achieve than it looks.
The organic edge where the color blocks meet is what makes this design work. Straight, taped-off lines would make the design feel rigid and clinical. The slightly wavy, hand-painted edges keep it feeling artistic and loose, which matches the hand-painted strawberry illustrations better than geometric precision would.
Design Breakdown:
Geometric abstraction with illustrative fruit layered on top. Two distinct techniques held together by a four-color palette.
Base Color: Varies by nail: red, sage green, white, and dusty pink used as both base colors and block fills.
Nail Shape: Medium almond. The curved shape softens the geometric blocks.
Design Element: Abstract color blocks with organic edges. Hand-painted strawberry patterns (red with green leaves and white dots) integrated into some of the color blocks.
Finish: High-gloss top coat to unify the different colors.
Get The Look at Home:
Map your layout before painting. Decide which nails get which colors and which sections get strawberry art.
- Base colors: Paint each nail a different base color from the palette. Two coats each for full opacity.
- Color blocking: On each nail, paint a second color in a curved, organic shape that covers part of the base. Let the edges feel loose and hand-painted.
- Third layer: Add a third color block on select nails. The layers should overlap slightly for depth.
- Strawberry art: On the color-blocked sections, paint small strawberry patterns. Red bodies with green leaves and white seed dots.
- Check balance: Compare both hands. The color distribution should feel roughly even.
- Seal: Two coats of top coat to smooth the raised texture of the layered paint.
7.Midnight Berry Garden
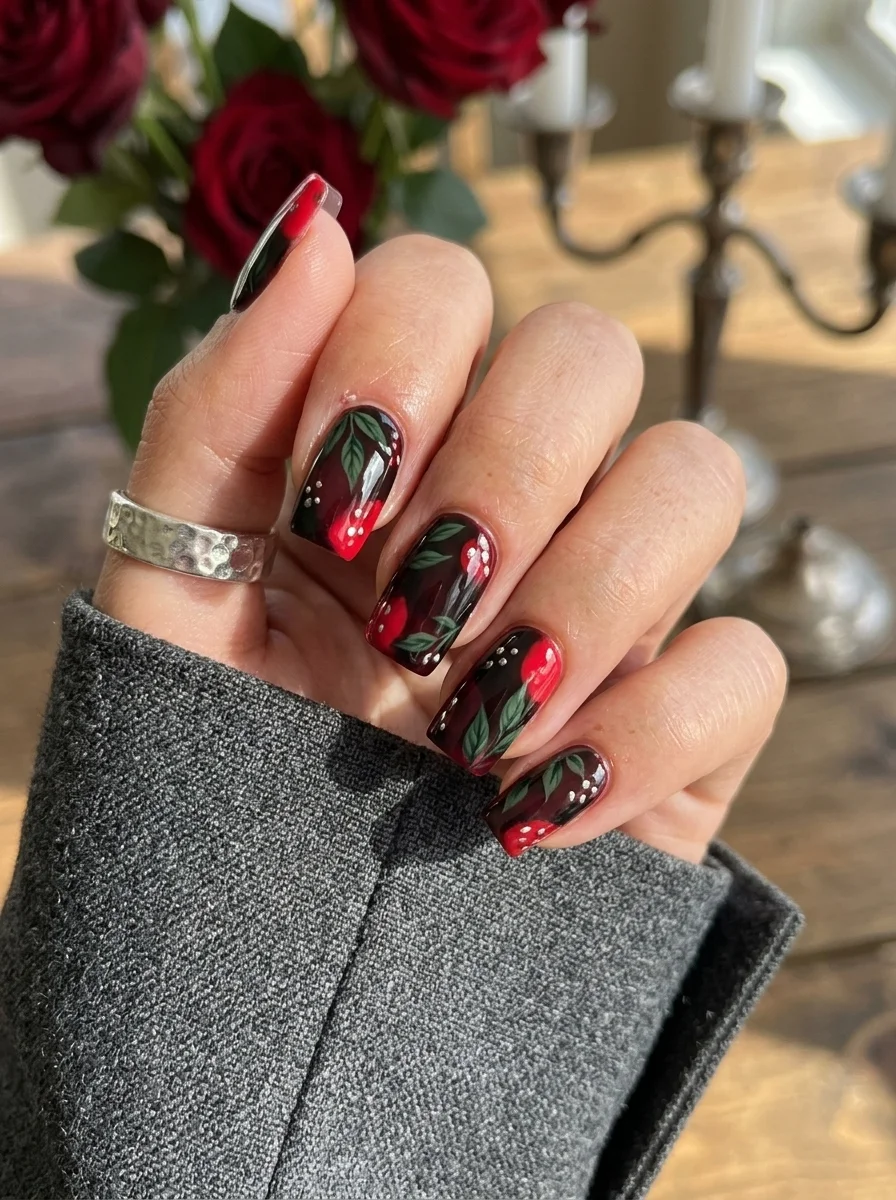
A moody, dark-romantic take on berry art that breaks every rule about summer nails.
Overview:
Red berries on a black base is a combination borrowed from still-life paintings, the kind where fruit sits in dramatic shadow against dark velvet. On nails, the black background does something unexpected to the red: it makes the berries look luminous, almost lit from within. The contrast between the deep, light-absorbing black and the bright, reflective red creates a visual intensity that white or nude bases can't match.
The green leaves provide the only other color, and they're painted in a muted, slightly desaturated tone that prevents the design from looking like Christmas nails. That restraint in the green is what keeps this feeling like a moody botanical illustration rather than a holiday theme.
Black polish is notoriously difficult to remove. It stains cuticles, lifts poorly with regular remover, and leaves a shadow on the nail even after you think it's off. Budget an extra five minutes for cleanup, and consider applying a peel-off base coat on the black nails if you change manicures frequently.
Design Breakdown:
High-contrast illustration on a dark ground. The black base does most of the atmospheric work.
Base Color: Deep, glossy black on all nails. Needs to be fully opaque and free of brush marks.
Nail Shape: Medium square. The flat surface provides a stable canvas for the botanical art.
Design Element: Hand-painted red berries with green leaves and tiny white dot accents scattered across the dark base.
Finish: Ultra-glossy top coat. The shine makes the black look like obsidian and the red berries look juicy.
Get The Look at Home:
Black base coats need to be fully dry before any art goes on. Painting on tacky black polish creates muddy smears.
- Black base: Two coats of opaque black. Let each coat dry fully, at least three minutes between coats.
- Berry shapes: Using a medium dotting tool and bright red polish, place clusters of berry shapes across the nails. Two or three per nail.
- Leaves: With a fine liner brush and muted green, paint small leaves around the berry clusters. Keep the green slightly desaturated to avoid a holiday look.
- White dots: Tiny white dots near the berries add highlight and dimension. Use a toothpick for precision.
- Dry time: Wait at least five minutes before top coating. The contrast between red and black means any smearing is immediately visible.
- Seal: One coat of thick top coat. Float the brush to avoid dragging the art.

29 Trendy Pink Summer Nails for 2026 💅
8.Painterly Strawberry Abstract
A loose, artistic interpretation of strawberries that looks like it belongs in a gallery.
Overview:
Most strawberry nail art aims for recognizable, literal fruit shapes. This design goes the opposite direction: the strawberries are suggested through loose brushstrokes and blended reds rather than outlined and filled. The effect is more watercolor painting than illustration, which gives the set an artistic quality that photorealistic fruit art can't achieve.
The cream base is essential. A white would make the loose brushwork look unfinished. A colored base would compete with the abstract strawberry tones. The warm cream provides just enough warmth to complement the reds and pinks without asserting itself as a design element.
The abstract style is more forgiving than precise fruit illustration, which makes this a good entry point for people who want to try hand-painted nail art without needing the steady hand required for detailed berries. The looser your brushwork, the more "intentional" the design looks.
Design Breakdown:
Loose, painterly abstraction. The fruit is suggested, not defined.
Base Color: Warm cream or off-white. The base should feel soft, not clinical.
Nail Shape: Medium square. The flat surface gives the brushstrokes room to flow.
Design Element: Abstract strawberry forms painted with loose, visible brushstrokes in red, pink, and green tones. No hard outlines.
Finish: High-gloss top coat to add depth to the layered brushwork.
Get The Look at Home:
The key is working quickly and not over-blending. Let the brushstrokes stay visible.
- Cream base: Two coats of warm cream on all nails. Let dry fully.
- Red shapes: Using a medium brush and red polish, paint loose, irregular shapes where you want the strawberries. Don't outline first, just paint.
- Pink highlights: While the red is still slightly wet, add pink strokes inside the shapes for dimension.
- Green accents: With a thin brush and green, add loose leaf strokes near the red shapes. Two or three strokes per cluster.
- Texture: If the brushstrokes look too uniform, drag a dry brush through the wet polish to add variation.
- Seal: Two coats of top coat to smooth the raised texture of the layered paint.
9.Chocolate-Covered Strawberry Drip
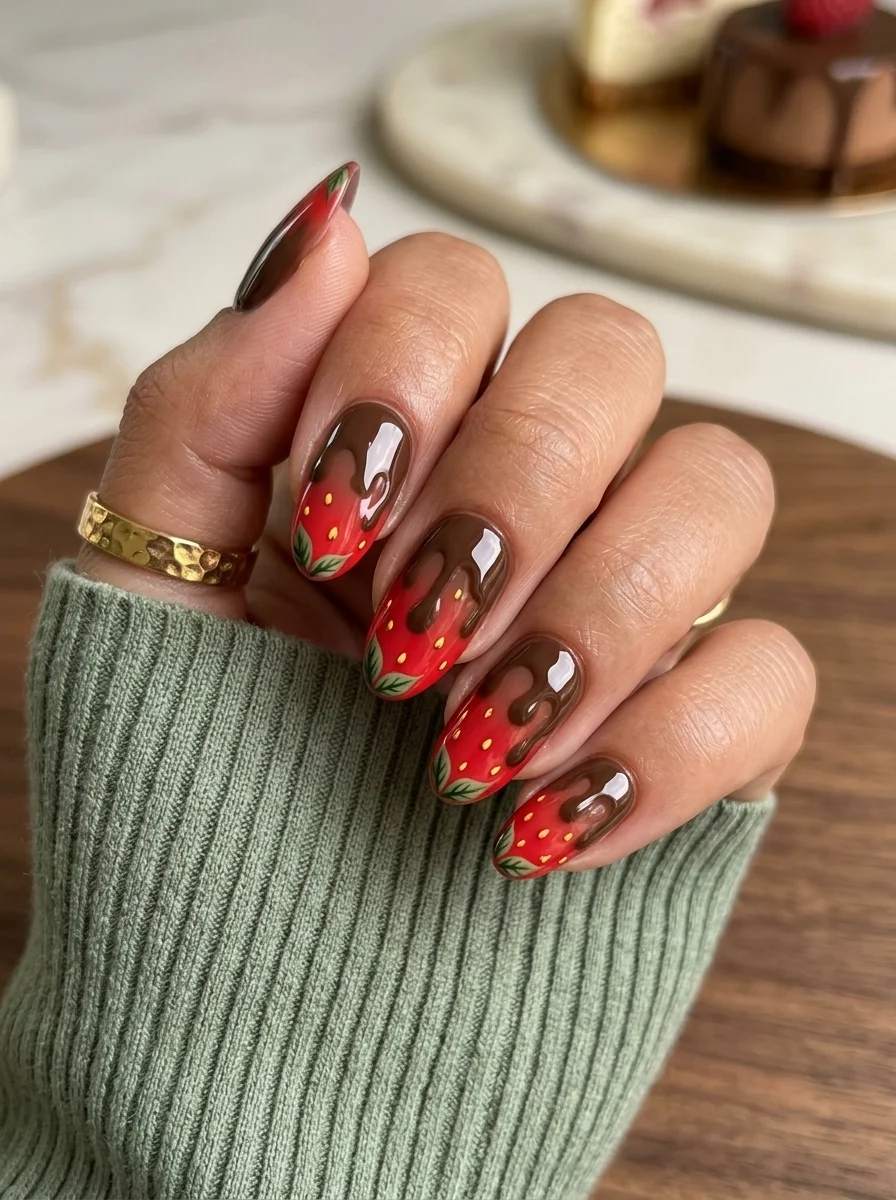
A playful, dessert-inspired design that looks almost good enough to eat.
Overview:
The concept is simple and clever: paint the entire nail to look like a strawberry, then add brown "chocolate" drips running down from the cuticle. The effect is immediately recognizable and surprisingly effective at a distance. Up close, the tiny yellow seed dots and green leaf caps on the red base sell the strawberry illusion.
The brown drip is the design's centerpiece, and the key is keeping it glossy. A matte brown would look like dirt. A glossy, almost wet-looking brown reads as melted chocolate, which is the entire point. The contrast between the matte-looking strawberry texture and the high-shine "chocolate" creates a tactile illusion that makes you want to touch the nails.
The practical challenge is controlling the drip. Too much brown polish on the dotting tool and the drip runs too far down the nail. Too little and it looks like a brown smudge rather than a drip. Practice the drip technique on a piece of plastic wrap first to find the right amount of polish per drip.
Design Breakdown:
Strawberry base with a 3D-effect drip overlay. The two textures (fruit and chocolate) create the design.
Base Color: Bright red with tiny yellow seed dots and green leaf caps painted across the entire nail.
Nail Shape: Medium almond. The tapered shape gives the drip a natural direction to flow.
Design Element: Brown glossy "chocolate" drips originating from the cuticle area and flowing downward over the strawberry base.
Finish: High-gloss top coat across everything. The chocolate drips need the shine to read as liquid.
Get The Look at Home:
The strawberry base needs to be completely dry before the chocolate drips go on. Any tackiness will cause the brown to bleed into the red.
- Red base: Two coats of bright red on all nails. Let dry fully.
- Seed dots: Using a toothpick and yellow polish, place tiny dots across the red surface. Space them irregularly.
- Leaf caps: With a fine brush and green polish, paint small leaf shapes at the cuticle end of each nail.
- Dry completely: Wait at least ten minutes. The red base needs to be hard before the brown goes on.
- Chocolate drips: Using a dotting tool and glossy brown polish, place a bead of brown at the cuticle and let it drip downward naturally. Control the length by how much polish you apply.
- Seal: One coat of high-gloss top coat to unify the finish and intensify the chocolate shine.

21 Hot Summer Buns Hairstyle Ideas for 2026 ☀️🔥
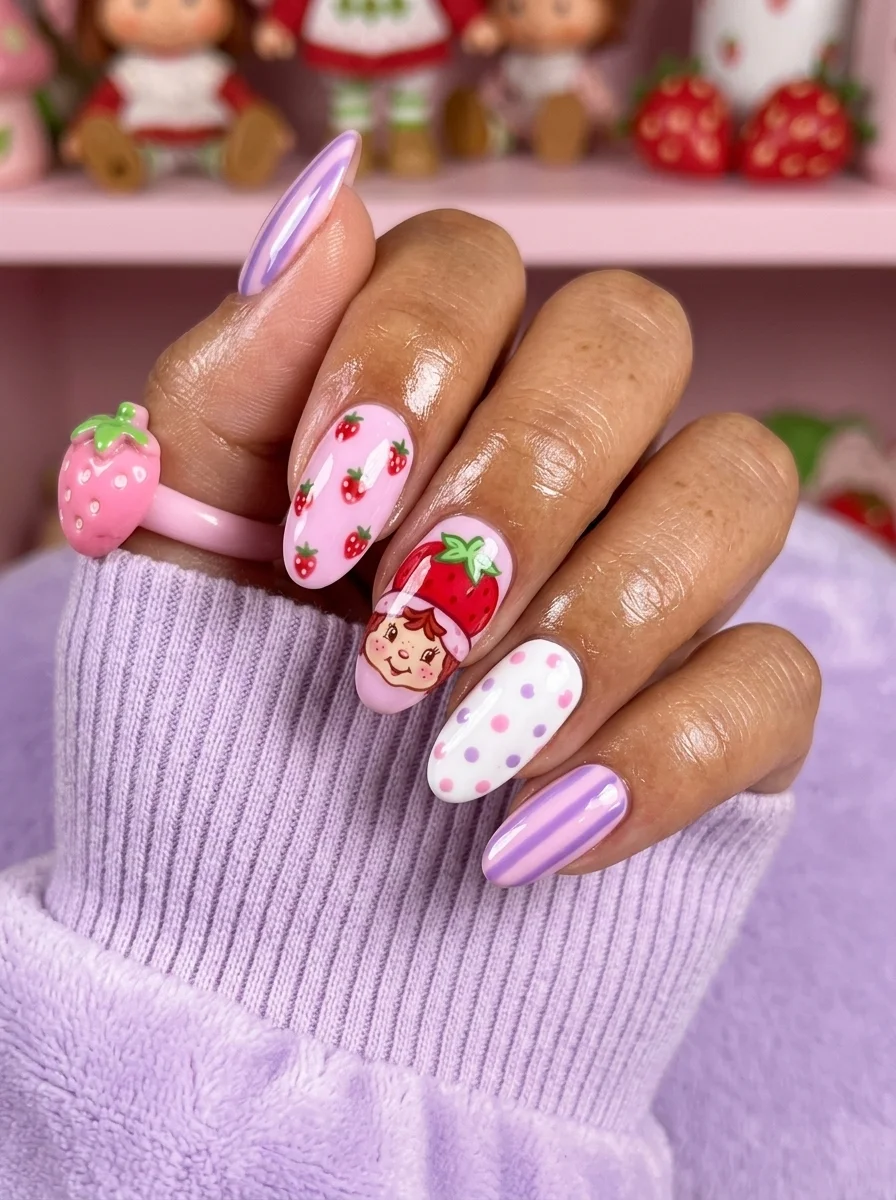
10.Pastel Polka Dot Berry Patch

A kawaii-inspired pastel mix with polka dots and micro strawberries for maximum charm.
Overview:
Five different pastel base colors across five nails is a choice that either looks intentional or chaotic, with very little middle ground. This design commits to the variety and makes it work by keeping every other element consistent: the white polka dots are the same size across all nails, the strawberries appear on only two or three nails, and the pastel tones all share a similar saturation level.
The strawberries are small enough to function as accent details rather than the main event. From arm's length, the design reads as "pastel polka dots." Up close, the tiny berries reveal themselves as a surprise. This delayed discovery is what makes the design feel layered rather than busy.
Pastel formulas are notoriously chalky. The lavender and mint in particular tend to streak on the first coat. Three thin coats rather than two thick ones is the difference between a smooth, creamy finish and a patchy, uneven one. The extra time is worth it.
Design Breakdown:
Multiple pastel bases unified by consistent polka dots and selective fruit accents.
Base Color: Five different pastels: lavender, mint green, peach, light blue, and soft pink. Each nail gets a different color.
Nail Shape: Short to medium square. The flat surface suits the playful, casual aesthetic.
Design Element: White polka dots on every nail. Tiny hand-painted strawberries on two or three accent nails.
Finish: High-gloss top coat to make the pastels look creamy rather than chalky.
Get The Look at Home:
Apply all the base colors first across both hands, then do the dots, then the strawberries. Working in layers is faster than finishing one nail at a time.
- Pastel bases: Three thin coats of each pastel color on the designated nails. Let each coat dry fully.
- Polka dots: Using a medium dotting tool and white polish, place dots in a staggered pattern across all nails. Press straight down and lift straight up.
- Strawberry shapes: On two or three nails, use your smallest dotting tool and red polish to place tiny berry shapes in the open spaces between dots.
- Leaf caps: With a toothpick and green, add a single tiny leaf stroke to each strawberry.
- Check spacing: Hold both hands at arm's length. If any nail looks significantly more crowded than the others, adjust before top coating.
- Seal: One coat of glossy top coat to smooth the surface.
11.Pink Plaid Berry Charm
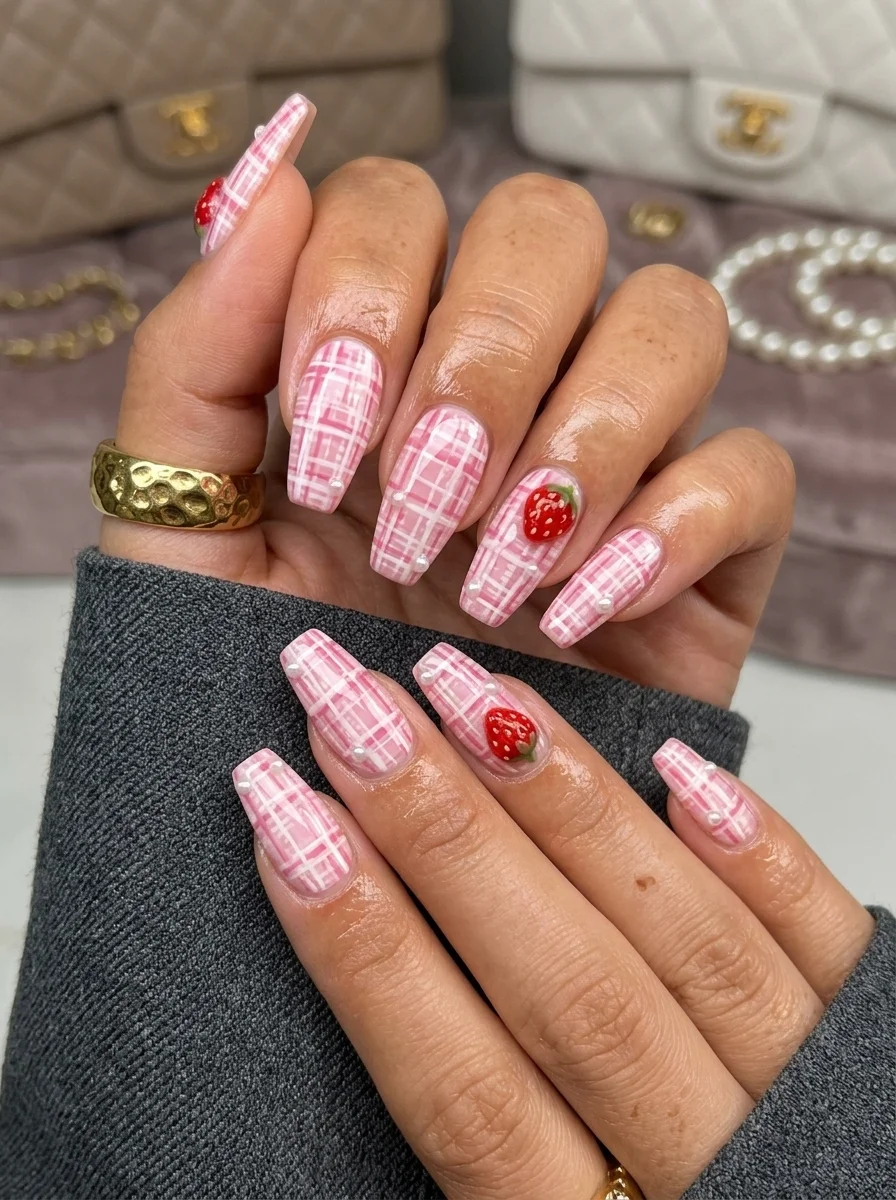
A preppy, feminine mix of gingham checks, berry art, and pearl accents.
Overview:
Plaid on nails lives or die on the grid. If the lines are slightly crooked, the whole thing reads as off, which is why this design works better on coffin nails where the flat tip provides a stable canvas for the intersecting lines. The wider surface area means each grid square can be bigger, which is more forgiving than trying to cram a plaid pattern onto a narrow almond.
The pearls are the detail that elevates this from "cute plaid nails" to a designed set. They sit at the intersections of the grid lines, which is exactly where gingham fabric creates its darkest overlap squares. Translating that fabric detail into a 3D element is a clever bit of design thinking that most people won't consciously notice but will feel as "something extra."
The practical reality of pearl embellishments: they snag on hair, knitwear, and pillowcases. Sealing the edges with a thick bead of top coat around the base of each pearl reduces this, but it doesn't eliminate it. Budget about a week of wear before something catches.
Design Breakdown:
Plaid pattern with botanical art and 3D embellishments. Three distinct design elements sharing one pink palette.
Base Color: Soft pink and white creating a plaid/check pattern across most nails. Solid pink or white on accent nails for the strawberry art.
Nail Shape: Long coffin. The flat tip provides a stable canvas for the plaid grid.
Design Element: Pink and white plaid grid with small pearl embellishments at intersections. Hand-painted strawberries with green leaves on accent nails.
Finish: High-gloss top coat to unify the pattern and secure the pearls.
Get The Look at Home:
The plaid grid is the foundation. Get the lines straight before adding any embellishments.
- White base: Two coats of opaque white on all nails. Let dry fully.
- Pink stripes: Using a striper brush and semi-sheer pink, paint horizontal lines spaced 3mm apart. Let dry.
- Vertical stripes: Paint vertical lines at the same spacing. Where they cross, the doubled pink creates darker squares.
- Strawberry accent: On select nails, paint small red strawberries with green leaves over the white sections.
- Pearls: Using a dotting tool and nail glue, place small white pearls at the grid intersections. Press firmly.
- Seal: Two coats of top coat. The first locks the pearls in place; the second smooths the surface around them.

28 Trendy May Nail Designs for 2026 💅
12.Tennis Court Strawberry Plaid
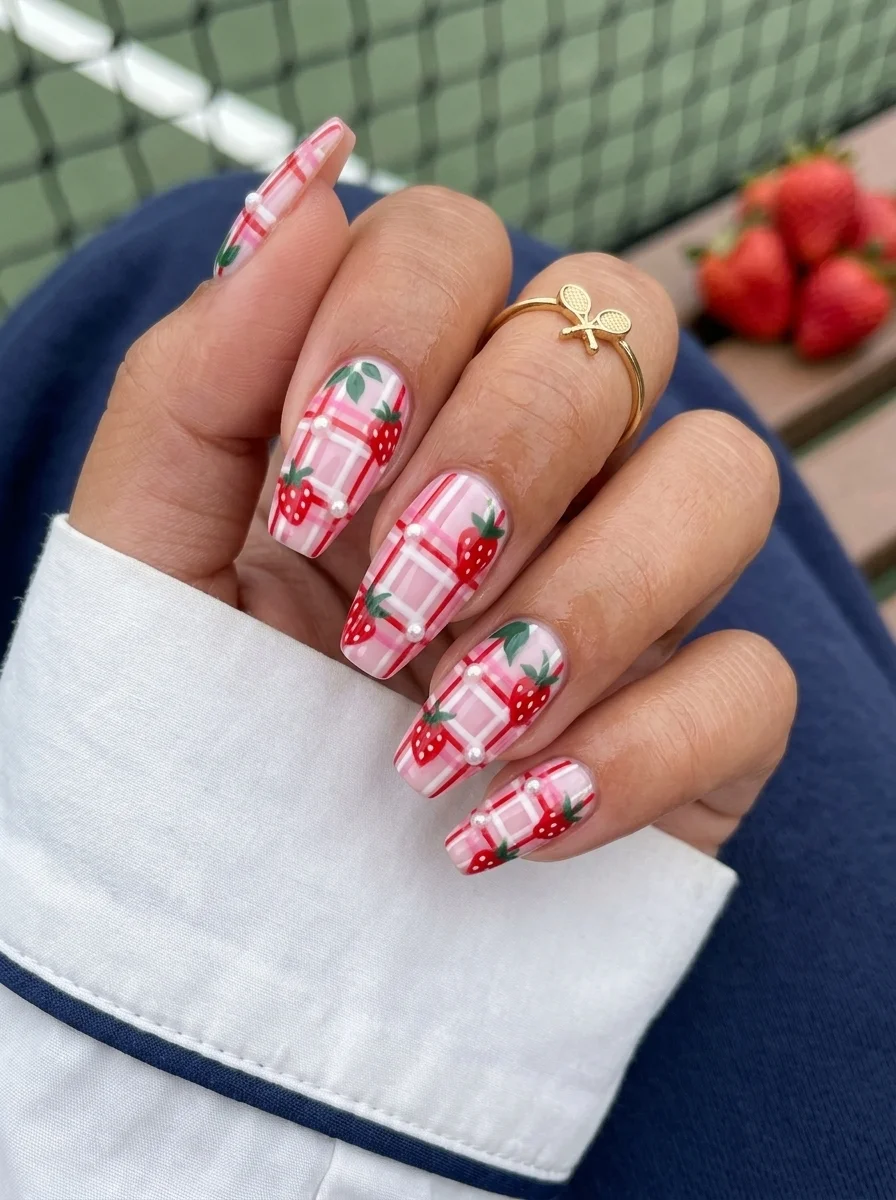
A sporty-chic plaid with strawberry accents that channels country club energy.
Overview:
This plaid is bolder than the previous design, with wider stripes and a more saturated pink that reads as confident rather than sweet. The wider grid squares give each strawberry room to sit inside a single block of the pattern, which makes the fruit feel integrated into the plaid rather than layered on top of it.
The green leaves on the strawberries do important color work here. Without them, the design is entirely pink, white, and red, which risks feeling flat. The green introduces a complementary accent that makes the red berries pop and gives the eye a place to rest between the busy grid lines.
Long coffin is the right shape for this design. The length gives the bold plaid enough surface area to register as a pattern rather than a few random lines. On shorter nails, the wider grid would feel cramped and lose its visual impact.
Design Breakdown:
Bold plaid with organic fruit art. The geometric and botanical elements create a deliberate tension.
Base Color: Bright pink and white in a wide-plaid grid pattern across all nails.
Nail Shape: Long coffin. The extended length gives the bold pattern room to breathe.
Design Element: Wide pink and white plaid grid with hand-painted strawberries and green leaves placed inside the grid blocks.
Finish: High-gloss top coat to saturate the pink and make the pattern look crisp.
Get The Look at Home:
The wider grid is actually easier to execute than a tight one. Use wider striping tape or paint thicker lines.
- White base: Two coats of opaque white. Let dry fully.
- Wide pink stripes: Using a striper brush and bright pink, paint horizontal lines spaced 4-5mm apart. Let dry.
- Vertical stripes: Paint vertical lines at the same spacing, creating the plaid grid.
- Strawberries: Inside select grid squares, paint small red strawberries with green leaves. Keep them proportional to the block size.
- Consistency check: Compare all nails. The stripe width should feel consistent across the set.
- Seal: One coat of glossy top coat to level the texture and make the pink look saturated.
13.Iridescent Chrome Berry
A dreamy, pearlescent base that shifts color in the light, paired with classic berry art.
Overview:
Iridescent chrome powder creates a finish that shifts between pink, purple, and white depending on the angle of your hand. It's one of those techniques that photographs poorly but looks stunning in person. The effect is less "painted nail" and more "seashell," which gives the entire set an ethereal quality that standard cream polish can't replicate.
The strawberries on two accent nails ground the design in something recognizable. Without them, you have iridescent chrome nails, which are beautiful but lack personality. With them, the design tells a story: something dreamy and magical meets something sweet and familiar. The contrast between the otherworldly chrome and the hand-painted fruit is what makes this set memorable.
The chrome powder step requires a no-wipe gel top coat underneath. Regular polish won't give the powder anything to adhere to, and you'll end up brushing shimmer off your nails for the rest of the day. If you're working with regular polish, an iridescent topper like ILNP "Cheri" achieves a similar effect without the powder step.
Design Breakdown:
Chrome finish as the main event, with illustrative art on accent nails providing personality.
Base Color: Iridescent pearl chrome on most nails. Milky white or sheer nude on the accent nails for the strawberry art.
Nail Shape: Long coffin. The flat surface maximizes the chrome's light-catching ability.
Design Element: Full iridescent chrome on four nails. Two accent nails with hand-painted red strawberries and green leaves over a milky base.
Finish: The chrome provides its own finish. Top coat over the accent nails only.
Get The Look at Home:
Chrome powder is applied differently from regular polish. If you've never used it before, practice on a single nail first.
- Base color: Apply a milky white or sheer pink base on all nails. Let dry.
- No-wipe top coat: Apply a no-wipe gel top coat on the nails you want chromed. Cure under a UV lamp.
- Chrome application: Using a silicone applicator, rub iridescent chrome powder onto the cured top coat. Buff until the surface is mirror-smooth.
- Strawberry accent: On the remaining nails, paint red strawberries with green leaves over the milky base.
- Seal the art: Apply top coat over the accent nails to protect the hand-painted strawberries.
- Clean up: Brush away any loose chrome powder from the cuticles with a soft brush.

21 Stunning Concert Hairstyles for Women 2026 🎶✨
14.English Garden Strawberry Bouquet
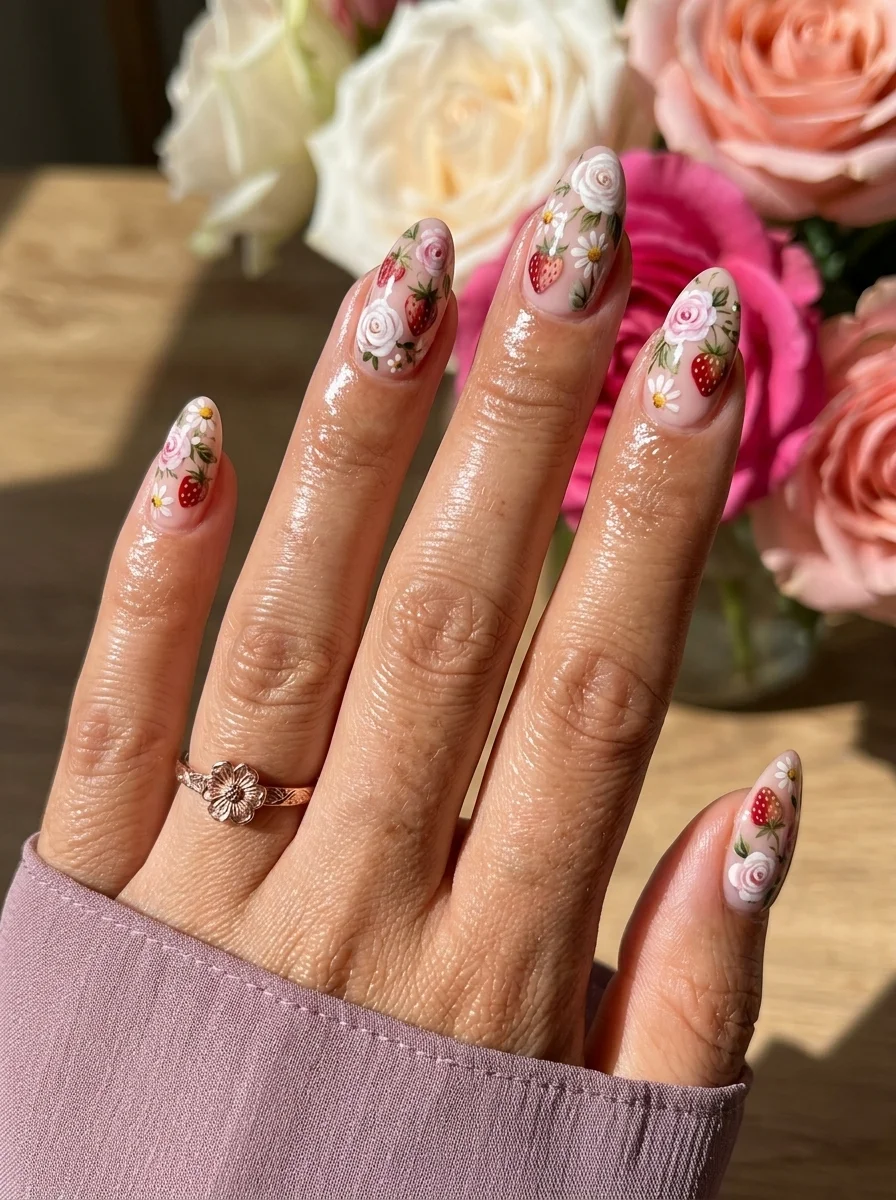
A romantic, botanical garden scene with strawberries nestled among roses and wildflowers.
Overview:
Combining strawberries with roses and daisies on the same hand creates a design that reads as an English garden illustration rather than a fruit-themed manicure. The strawberries function as one element in a larger botanical composition, which elevates them from "cute fruit art" to something with genuine artistic merit.
The sheer nude base is essential. It creates the illusion that the entire garden scene is painted directly onto bare skin, which gives the design an organic, natural quality that a colored base would undermine. The transparency also means growth-out is nearly invisible for the first two weeks, making this one of the most maintenance-friendly designs in the strawberry category.
This design demands patience. Each nail carries a different arrangement of flowers and fruit, and the detail level is high. Budget at least an hour for the full set if you're painting by hand. The result is worth the time, but it's not a quick lunch-break manicure.
Design Breakdown:
Dense botanical illustration on a transparent canvas. Multiple flower and fruit types create a rich, layered composition.
Base Color: Sheer nude or milky pink. The natural nail should be visible.
Nail Shape: Medium almond. The curved shape complements the organic floral and fruit forms.
Design Element: Hand-painted roses (pink with layered petals), daisies (white with yellow centers), strawberries (red with green leaves), and small berries scattered across all nails.
Finish: High-gloss top coat to protect the fine detail work.
Get The Look at Home:
Work in color layers across all nails. All pinks first (roses and strawberries), then whites (daisies), then greens (leaves).
- Sheer base: One or two coats of milky nude. Let dry fully.
- Roses: Using a small brush and pink polish, paint loose spiral shapes for the roses. Two or three per nail, varying in size.
- Daisies: Using a dotting tool and white polish, place five-petal flowers in the gaps between the roses. Add yellow centers with a smaller dotting tool.
- Strawberries: Paint small red berry shapes with green leaf caps in the remaining open spaces.
- Leaves: Using a fine liner brush and green, add small leaves along the edges of the flowers and berries. Alternate between a lighter and darker green for depth.
- Seal carefully: One coat of top coat, applied in a single stroke per nail to avoid smearing the detail work.
15.Strawberry Lemonade Color Pop
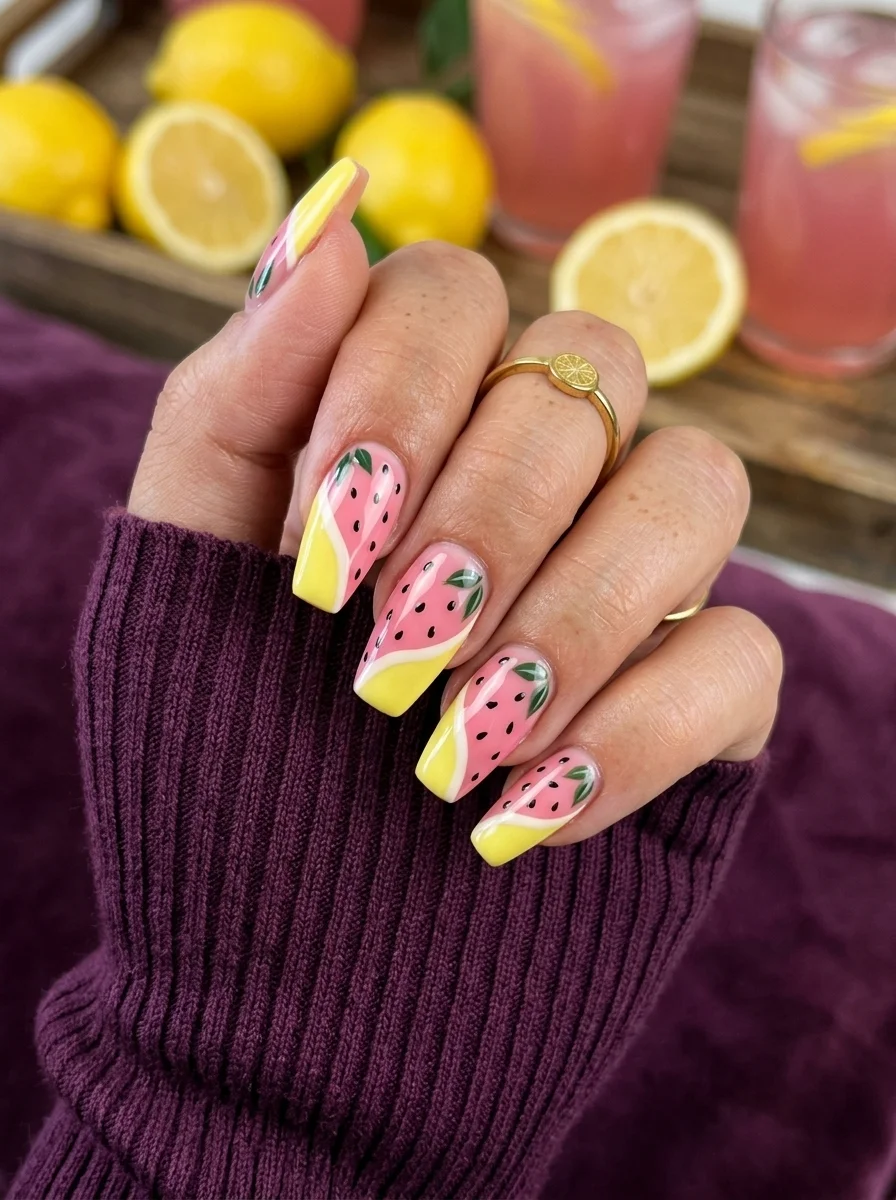
A fruity, high-energy mashup of strawberry and lemonade color stories.
Overview:
Yellow and pink together sounds like a combination that should look like a sunset. In practice, when the pink leans strawberry and the yellow stays within the lemon-zest range, the result reads as fruity and energetic rather than chaotic. The organic edge where the pink meets the yellow, rather than a straight French line, is what makes this design feel loose and fun instead of structured.
The black seed dots scattered across the pink sections sell the strawberry illusion. Without them, you'd have pink nails with yellow tips, which is a fine color story but lacks specificity. The seeds turn the pink into something recognizable, and the green leaf accents tie the two colors together.
The wavy edge between the pink and yellow is harder to execute than a straight French line. You need to paint the yellow tip first, then carefully overlap the pink in an organic, flowing shape. If the wave looks too uniform across all nails, the design loses its loose, hand-painted quality. Vary the curve on each nail.
Design Breakdown:
Two fruity colors meeting at an organic edge. The shape of the transition is what makes it interesting.
Base Color: Bright yellow on the tips, strawberry pink on the body. The two colors meet at a wavy, organic edge.
Nail Shape: Long coffin. The flat tip gives the yellow section enough surface area to register.
Design Element: Pink strawberry body with black seed dots and green leaf accents. Bright yellow tips with an organic, wavy edge.
Finish: High-gloss top coat to saturate both colors.
Get The Look at Home:
Paint the yellow tips first, then layer the pink on top. The pink should overlap the yellow slightly at the wavy edge.
- Yellow tips: Using a French liner brush and bright yellow, paint wide tips on all nails. The tips should cover about 40% of the nail.
- Pink body: Paint strawberry pink over the remaining nail, overlapping the yellow in a wavy, organic line. Vary the curve on each nail.
- Seed dots: Using a toothpick and black polish, place tiny dots across the pink sections. Space them irregularly.
- Leaf accents: With a fine brush and green, paint small leaf shapes at the wavy edge where pink meets yellow.
- Cleanup: An angled brush dipped in acetone can sharpen any areas where the colors bled into each other.
- Seal: One thick coat of top coat to smooth the transition texture between the two colors.

30 Stunning Vacation Nail Ideas for Your Next Getaway in 2026 💅
16.Holographic Strawberry Shimmer
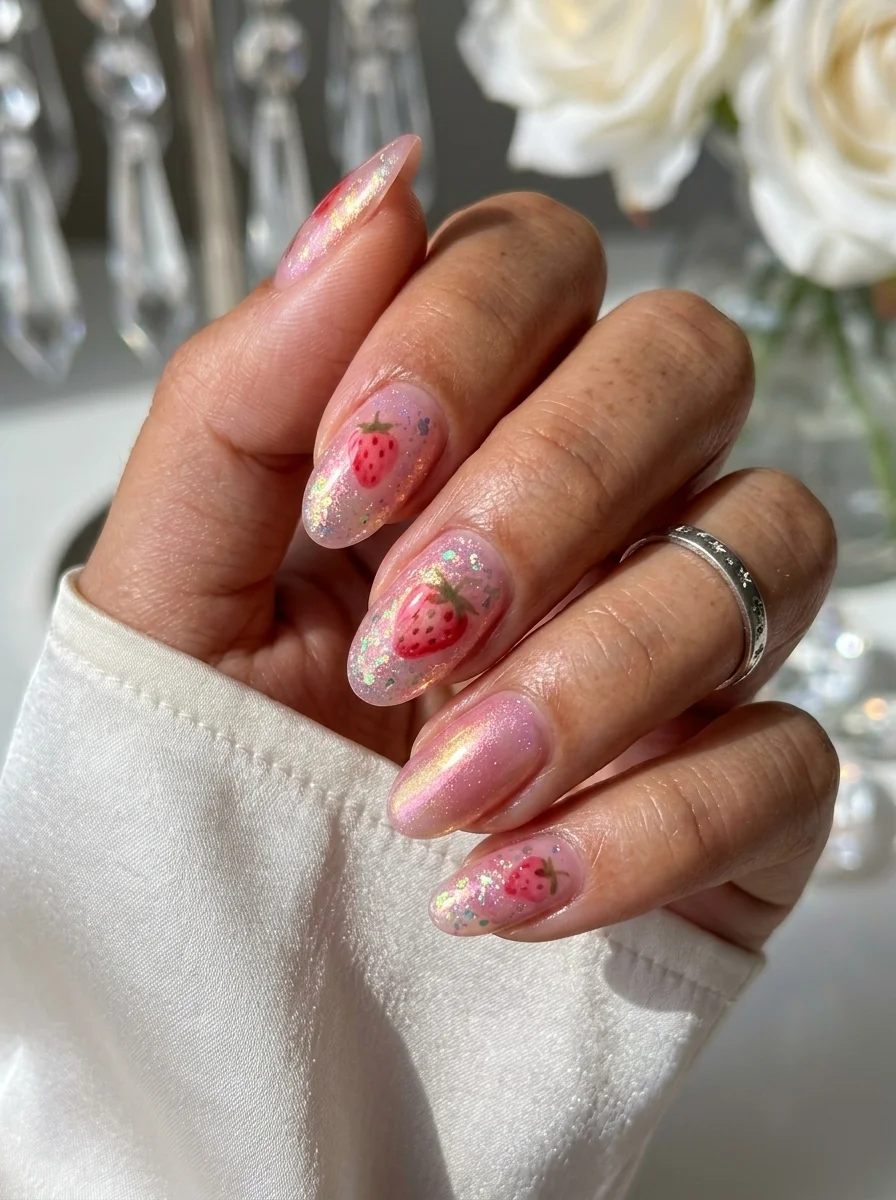
A sparkly, romantic base that catches every light source in the room.
Overview:
Holographic glitter creates a rainbow shimmer that shifts with every movement of your hand. Unlike regular glitter, which reflects a single color, holographic particles split light into its full spectrum, which gives the pink base an almost magical quality. In direct sunlight, the nails practically glow.
The strawberries on two accent nails ground the sparkle in something recognizable. Without them, you have holographic pink nails, which are gorgeous but generic. The hand-painted berries add personality and make the set feel designed rather than just a glitter application. The contrast between the futuristic shimmer and the rustic fruit art is what makes this design interesting.
Holographic glitter polish is notoriously difficult to remove. The particles cling to the nail and resist regular remover. Soaking a cotton pad in acetone and holding it against the nail for thirty seconds before wiping is more effective than scrubbing. Even then, expect glitter fragments on your fingers for a day or two.
Design Breakdown:
Full-coverage holographic glitter with illustrative accents. The sparkle is the main event; the fruit is the personality.
Base Color: Iridescent pink holographic glitter on most nails. Milky white or sheer nude on the accent nails.
Nail Shape: Medium almond. The curved surface catches light from multiple angles, maximizing the holographic effect.
Design Element: Full holographic glitter on four nails. Two accent nails with hand-painted strawberries and green leaves over a milky base.
Finish: The glitter provides its own finish. Top coat over the accent nails and a glitter-smoothing top coat over the glitter nails.
Get The Look at Home:
Glitter polish needs a thick top coat to smooth the texture. Without it, the surface feels rough and catches on fabric.
- Base coat: Apply a ridge-filling base coat on all nails.
- Glitter layers: Apply two to three coats of holographic glitter polish on the designated nails. Let each coat dry fully.
- Accent nails: On the remaining nails, apply two coats of milky white.
- Strawberry art: Paint red strawberries with green leaves on the accent nails. Keep the art small enough to leave some of the milky base visible.
- Smooth the glitter: Apply a glitter-smoothing top coat over the holographic nails. This fills the gaps between particles.
- Final seal: One coat of glossy top coat over everything.
17.Strawberry Confetti Party

A party-ready glitter overload with berry art on every finger.
Overview:
This is the louder, more maximal version of holographic strawberry nails. The glitter is denser and more opaque, and the strawberries appear on every nail rather than just accent fingers. The effect is unapologetically fun, like a birthday party in nail form.
The coffin shape is doing important work here. The flat tip and wide surface area give the dense glitter enough room to read as a deliberate texture rather than a mistake. On shorter, rounder nails, heavy glitter can look like craft supplies. On long coffin, it reads as a fashion choice.
Dense glitter formulas dry with a rough, sandpaper-like texture that catches on everything. A single coat of top coat isn't enough to smooth it. You need either a dedicated glitter-smoothing top coat or two thick layers of regular top coat to create a glassy surface. The extra step is non-negotiable if you want the nails to feel smooth.
Design Breakdown:
Full-coverage glitter with art on every nail. Maximum impact, minimum restraint.
Base Color: Dense, opaque pink glitter on all nails.
Nail Shape: Long coffin. The flat tip and wide sides showcase the glitter texture.
Design Element: Hand-painted strawberries with green leaves scattered across all nails, sitting on top of the glitter base.
Finish: Thick, multi-layer top coat to smooth the glitter texture.
Get The Look at Home:
Glitter-smoothing top coat is your best friend here. Regular top coat alone won't create a smooth surface.
- Glitter base: Apply two to three coats of dense pink glitter on all nails. Let each coat dry fully.
- Smoothing coat: Apply a glitter-smoothing top coat over all nails. Let dry completely.
- Strawberries: Using a fine brush and red polish, paint strawberry shapes across all nails. Vary the sizes and placement.
- Leaves: Add green leaf caps to each strawberry. Keep the green consistent.
- Final seal: Two coats of thick top coat to encapsulate the art and create a smooth, glassy surface.
25 Trendy Beach Day Hairstyles for Vacation 2026 ☀️🌊
18.Sage Green Marble Berry
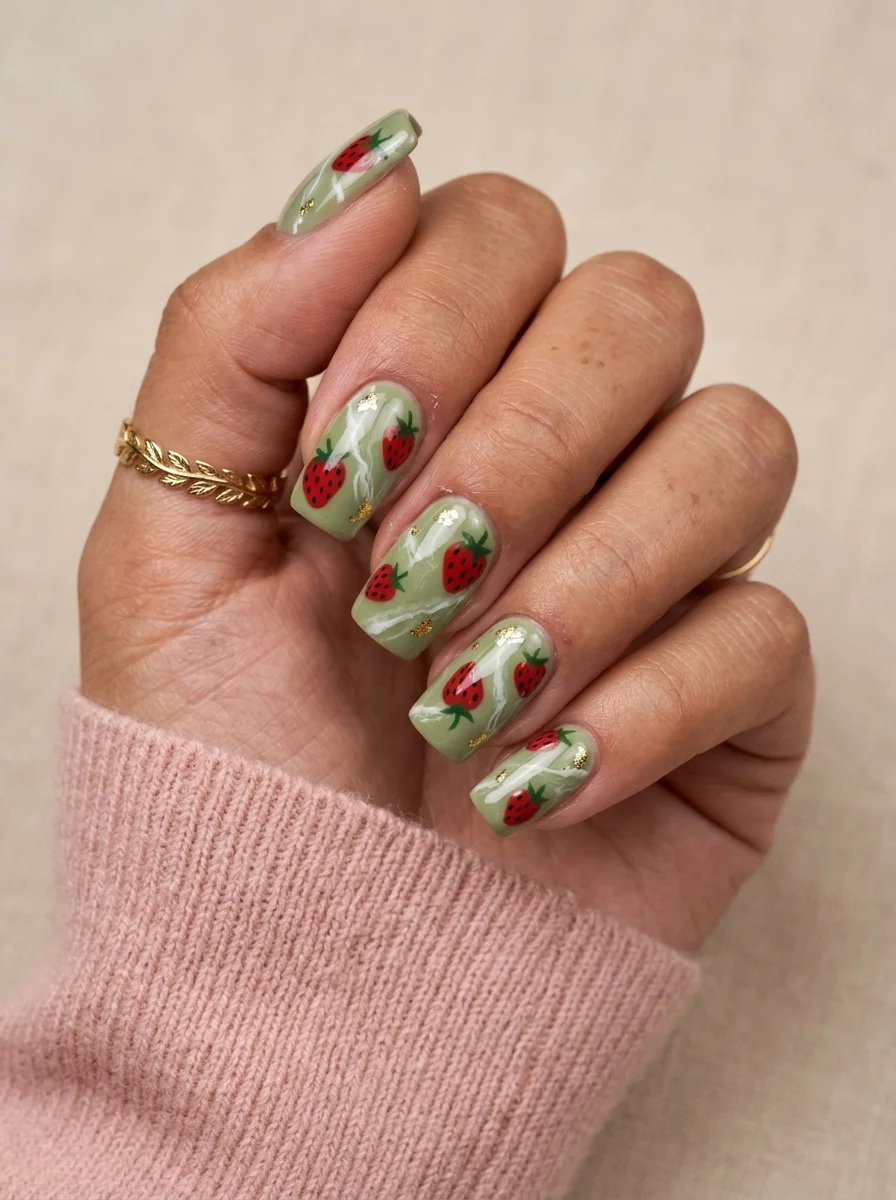
An earthy, sophisticated palette that makes strawberry art feel grown-up.
Overview:
Sage green and strawberry red are complementary colors, which means they create maximum contrast when placed next to each other. The green base makes the red berries look brighter and more saturated than they would on a neutral background. It's color theory doing the work for you.
The white marble veining adds a layer of texture that keeps the sage base from reading as flat. The veins look like natural stone, which gives the design an organic, earthy quality that pairs well with the hand-painted fruit. The small gold foil accents scattered throughout add just enough shine to elevate the design without tipping into glam territory.
The marble technique is simpler than it looks. You don't need to paint individual veins. A thin brush dragged through wet white polish over the green base creates the veining effect naturally. The key is working while the white is still wet so the lines blur and soften instead of staying crisp.
Design Breakdown:
Earthy green base with stone-like texture and botanical accents. The natural materials aesthetic ties everything together.
Base Color: Muted sage green on all nails. Not too grey, not too olive.
Nail Shape: Medium square. The flat surface suits the marble texture and provides room for the fruit art.
Design Element: White marble veining across the green base. Small gold foil accents. Hand-painted strawberries with green leaves on select nails.
Finish: High-gloss top coat to make the marble look like polished stone.
Get The Look at Home:
The marble veining needs to be done while the white polish is wet. Work one nail at a time for this step.
- Sage base: Two coats of sage green on all nails. Let dry fully.
- White veining: On one nail, apply a thin coat of white polish. Immediately drag a clean, thin brush through the wet white to create vein-like lines. Repeat on each nail individually.
- Gold foil: While the surface is still slightly tacky, press small pieces of gold leaf onto select areas. Flatten with a dry brush.
- Strawberries: On select nails, paint small red strawberries with green leaves over the marbled base.
- Dry time: Wait at least five minutes before top coating. The marble texture needs time to set.
- Seal: Two coats of top coat to smooth the marble texture and secure the gold foil.
19.Berry Gradient Dots
A subtle, gradient-driven take on berry tones with a playful dotted finish.
Overview:
A red-to-nude gradient that transitions from deep berry at the tips to bare nail at the cuticle is one of the more wearable entry points into the strawberry color story. The gradient does the atmospheric work, creating a berry-like color impression without requiring any actual fruit illustration. Adding black dots on top gives the design texture and a slightly playful quality.
The dots serve a dual purpose. Visually, they echo the seeds on a strawberry without being literal about it. Practically, they distract from any imperfections in the gradient blend. If the ombre transition is slightly uneven in spots, the dots draw the eye away from those areas. It's a design that hides its own construction.
Sponge gradients need a white base coat underneath to look vibrant. Without it, the red pigment sheers out against the natural nail tone and the gradient reads as a faint pink stain rather than a bold berry fade. Two thin coats of white, fully dried, give the sponge something opaque to work against.
Design Breakdown:
Gradient atmosphere with flat graphic dots layered on top. Two techniques serving different purposes.
Base Color: White undercoat for opacity. The gradient itself transitions from deep red at the tips to nude at the cuticle.
Nail Shape: Medium almond. The tapered tip gives the gradient a natural direction.
Design Element: Sponge-applied red-to-nude vertical ombre. Scattered black polka dots placed randomly across the gradient.
Finish: High-gloss top coat to blend the gradient transitions.
Get The Look at Home:
The gradient needs to be fully dry before the dots go on. Painting on a tacky surface drags the red into the black.
- White base: Two coats of opaque white. Let dry fully.
- Sponge setup: Paint a stripe of deep red and a stripe of nude side by side on a makeup sponge. Dab on paper first.
- Build the gradient: Press the sponge onto the nail with the red at the tip and nude at the cuticle. Three to four passes builds opacity. Let each pass dry for thirty seconds.
- Dry completely: Wait at least ten minutes. The sponge leaves a textured surface that needs time to level.
- Dots: Using a small dotting tool and black polish, place scattered dots across the gradient. Space them irregularly.
- Seal: Two coats of top coat to smooth the sponge texture and blend the gradient.

33 Trendy Polka Dot Nail Ideas for 2026 💅
20.Berry Vine Ombre
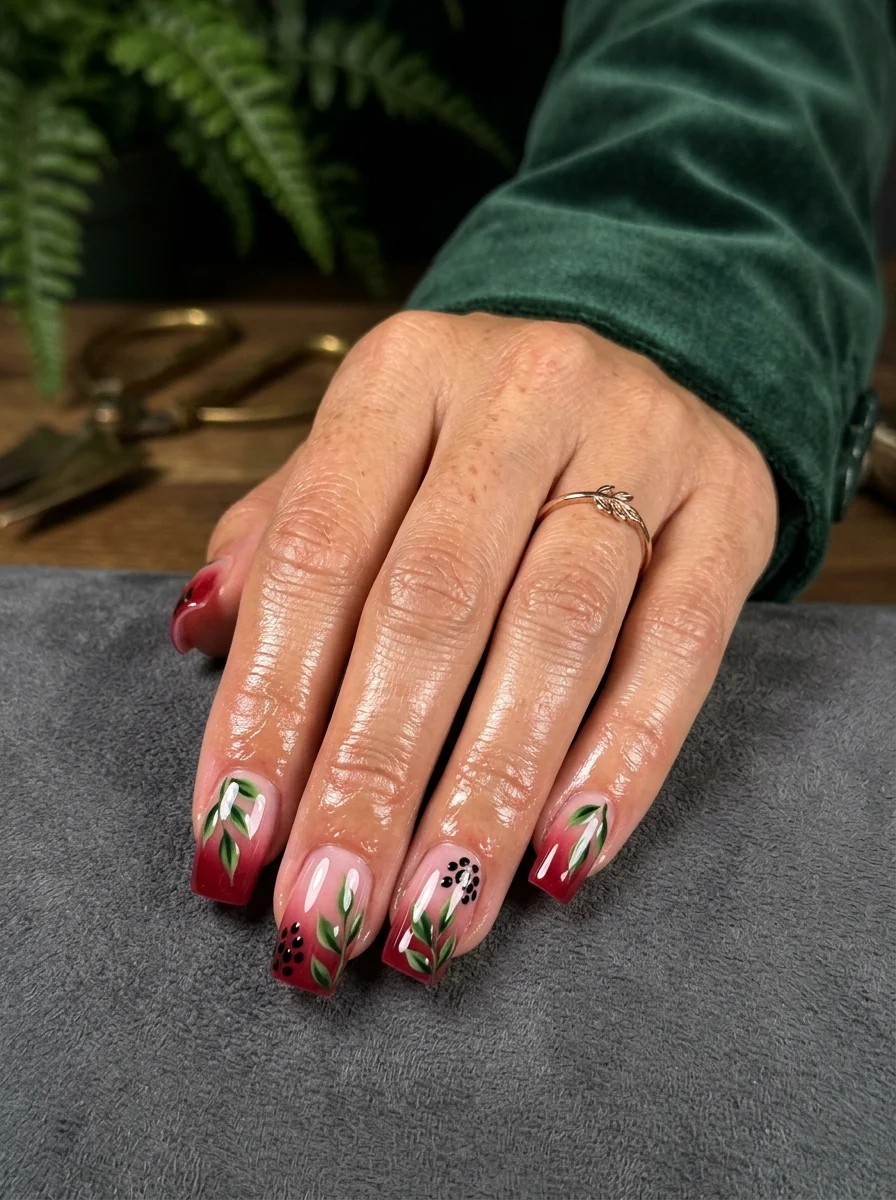
A trailing botanical vine design that climbs across an ombré backdrop.
Overview:
Berry vines trailing across a gradient base is a design that borrows from textile patterns, the kind you'd see on vintage wallpaper or hand-painted porcelain. The gradient provides atmospheric depth, while the vines create movement across the nails. Your eye follows the trailing leaves from one finger to the next, which makes the ten nails read as a single composition rather than ten individual designs.
The dark berries and green leaves painted over the gradient create a layered effect where the fruit art sits visually in front of the color fade. This depth is what makes the design feel rich and dimensional rather than flat. The vine connects the berries to each other and to the leaves, which gives the illustration a natural, growing quality.
The vine lines need a very thin liner brush. Thick lines overpower the delicate gradient underneath and make the design feel heavy. The goal is delicacy, which requires a brush that holds enough polish to draw a complete vine section without re-dipping.
Design Breakdown:
Gradient atmosphere with botanical illustration layered on top. The two techniques serve different purposes.
Base Color: Nude at the cuticle fading into deep red at the tips.
Nail Shape: Medium square. The flat surface gives the vine art a stable canvas.
Design Element: Sponge-applied nude-to-red gradient. Hand-painted dark berry clusters with trailing green vines and leaves.
Finish: High-gloss top coat to blend the gradient and intensify the colors.
Get The Look at Home:
The gradient needs to be completely dry before the vine art goes on. Painting on a tacky gradient creates muddy colors.
- Sponge gradient: Paint a nude-to-red ombre using a makeup sponge. Three to four passes for full opacity.
- Dry completely: Wait at least fifteen minutes. The gradient texture needs time to level.
- Vine lines: Using a thin liner brush and dark green, draw trailing vine lines across the nails. Let them flow organically.
- Berry clusters: Place small dark berry dots along the vines. Two or three per cluster.
- Leaves: Add small almond-shaped leaves along the vine lines. Alternate between a lighter and darker green for depth.
- Seal: One coat of top coat, applied carefully to avoid smearing the fine vine lines.
21.Coquette Berry French with Bows
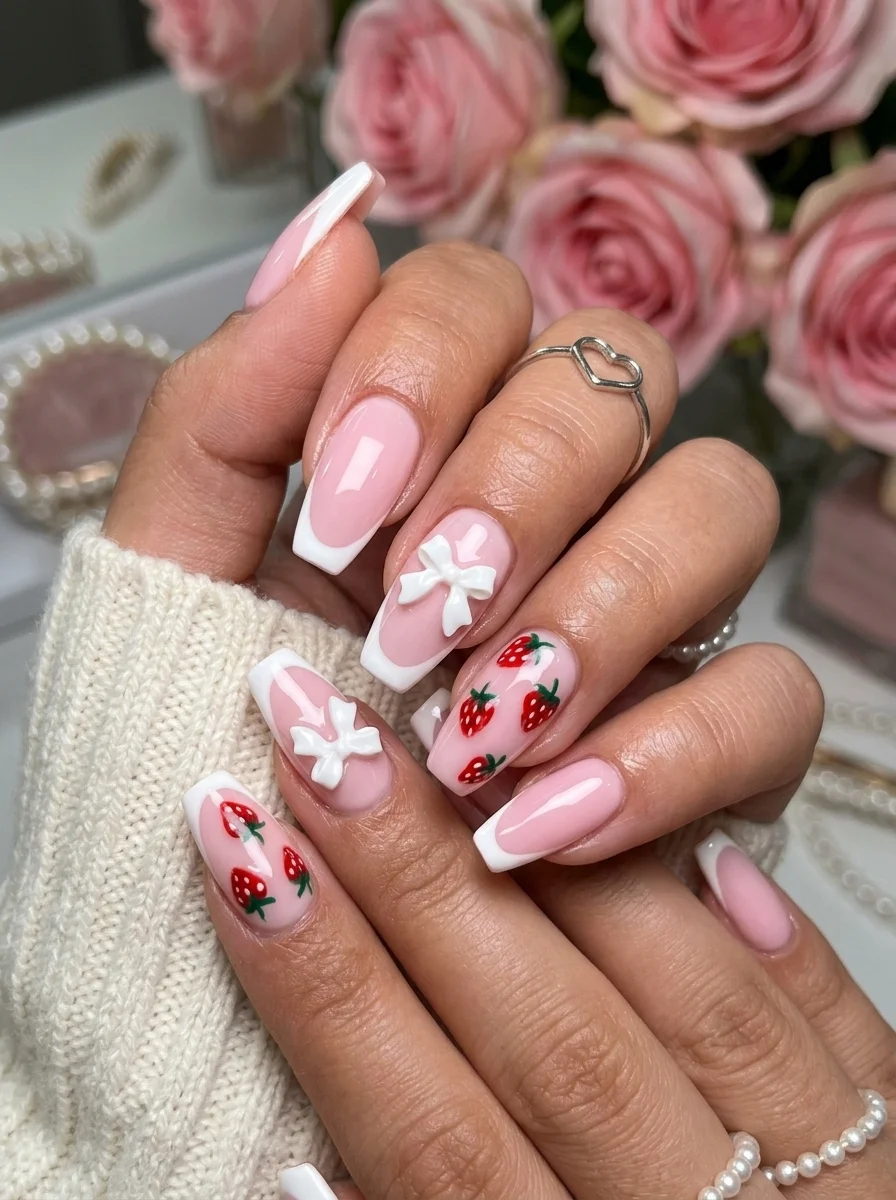
A hyper-feminine coquette design combining bows, berries, and French tips.
Overview:
The coquette aesthetic on nails combines three things: soft pink, bows, and delicate illustration. This design nails all three. Pink French tips on some nails, 3D white bow charms on others, and hand-painted strawberries on the remaining fingers. Each element occupies its own nails, which prevents the design from feeling cluttered despite the variety.
The 3D bow charms are the detail that people notice first. They sit slightly raised from the nail surface, which creates a tactile quality that flat art can't replicate. The white bows against the pink French base read as feminine without being saccharine, partly because the coffin shape carries enough edge to counterbalance the sweetness.
Bow charms need strong adhesive. Regular nail glue holds for a day or two before the charm catches on something and pops off. A UV-cured gem gel is more reliable and can hold charms for the full two weeks of a gel manicure. The extra step is worth it if you want the bows to survive real life.
Design Breakdown:
Three distinct nail types across the hand, unified by a pink-and-white palette.
Base Color: Sheer milky pink for the French base. Solid white on the bow accent nails.
Nail Shape: Long coffin. The flat tip gives the French line a clean edge and provides a stable surface for the bow charms.
Design Element: Pink French tips on some nails. 3D white bow charms on accent nails. Hand-painted strawberries with green leaves on the remaining nails.
Finish: High-gloss top coat to unify the different elements.
Get The Look at Home:
The three nail types use different techniques. Plan your layout before you start painting.
- Sheer base: Two coats on all nails. Let dry fully.
- Pink tips: Using a French liner brush and soft pink, paint the smile line on the designated nails. Two thin coats for opacity.
- Strawberry art: On select nails, paint small red strawberries with green leaves over the sheer base.
- Bow placement: Using gem gel and a UV lamp, adhere white bow charms to the designated accent nails. Cure for thirty seconds.
- Cleanup: An angled brush dipped in acetone sharpens the French smile lines.
- Seal: One coat of top coat over the French and strawberry nails. Avoid coating the bow charms directly.
25 Top Curly Hairstyle Trends for 2026 ➰✨
22.Kawaii Face Berry Patch
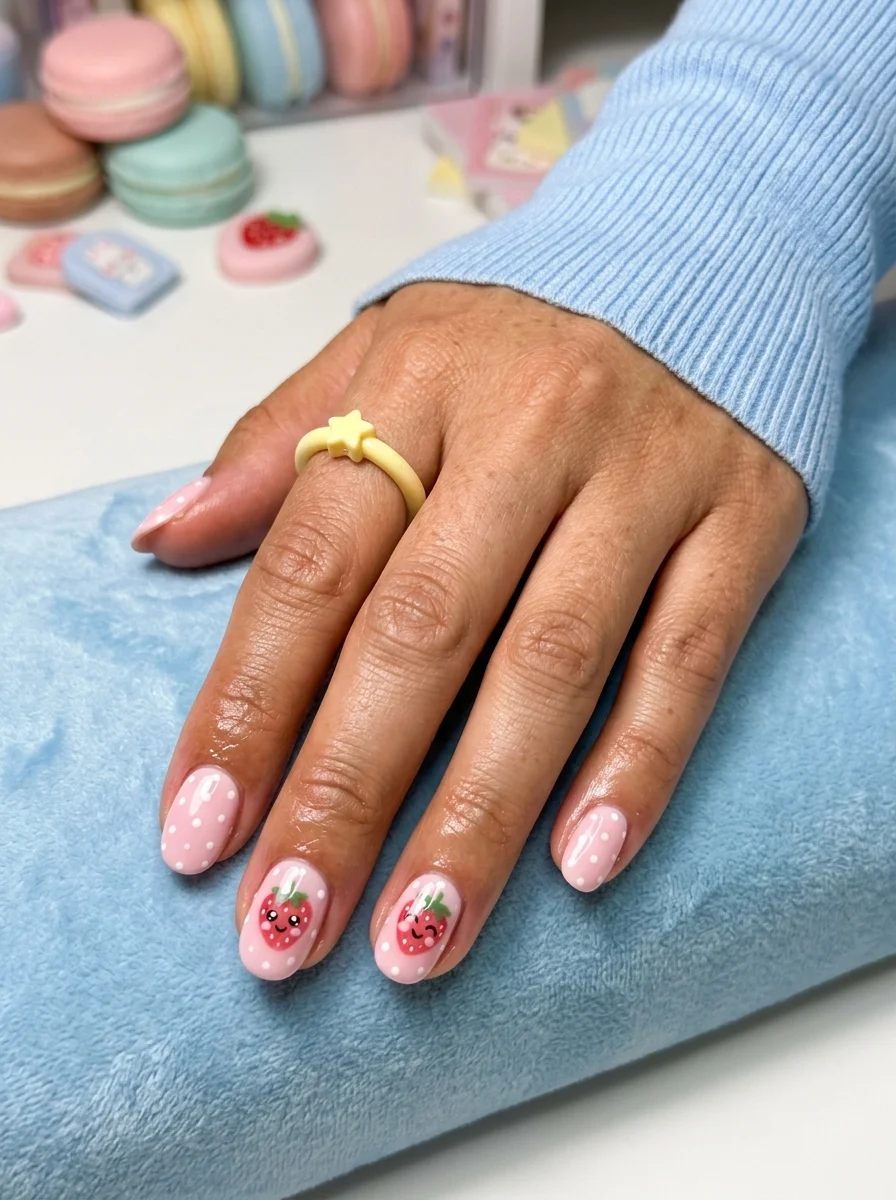
An adorable, character-driven take on strawberry nails with happy little berries.
Overview:
Kawaii nail art takes familiar objects and gives them faces. The strawberries here have tiny eyes and smiles, which transforms them from fruit illustration into characters. It's a small change that completely alters the design's personality, turning a standard berry print into something with genuine charm.
The pink polka dot base provides a playful, slightly retro backdrop that matches the whimsical energy of the faced strawberries. The white dots keep the pink from reading as too sweet, and the scattered placement gives the design a casual, hand-done quality that suits the kawaii aesthetic.
The face details are tiny and require a very steady hand. A toothpick or the finest dotting tool you own is essential. If the eyes are uneven or the smile is crooked, the strawberries look dazed rather than cute. Practice the face on a piece of paper before committing to the nail.
Design Breakdown:
Character-driven illustration on a patterned base. The faces are the personality; the polka dots are the atmosphere.
Base Color: Soft pink with white polka dots on most nails. Milky white or solid pink on the accent nails for the strawberry characters.
Nail Shape: Medium almond. The curved shape complements the round strawberry characters.
Design Element: White polka dots scattered across pink base. Two accent nails with kawaii-style strawberries that have tiny black eyes, pink cheeks, and small smiles.
Finish: High-gloss top coat to protect the tiny face details.
Get The Look at Home:
The faces are the hardest part. Use the smallest tool you have and work slowly.
- Pink base: Two coats of soft pink on all nails. Let dry fully.
- Polka dots: Using a medium dotting tool and white polish, place dots in a staggered pattern on most nails.
- Strawberry shapes: On the accent nails, paint red strawberry shapes with green leaf caps.
- Face details: Using a toothpick and black polish, add two tiny dots for eyes and a small curved line for a smile. Add tiny pink circles for cheeks.
- Dry time: Wait at least five minutes before top coating. The tiny face details smear instantly if the surface is tacky.
- Seal: One coat of top coat, applied in a single stroke per nail to avoid dragging the face details.
23.Deep Berry Ombre Harvest
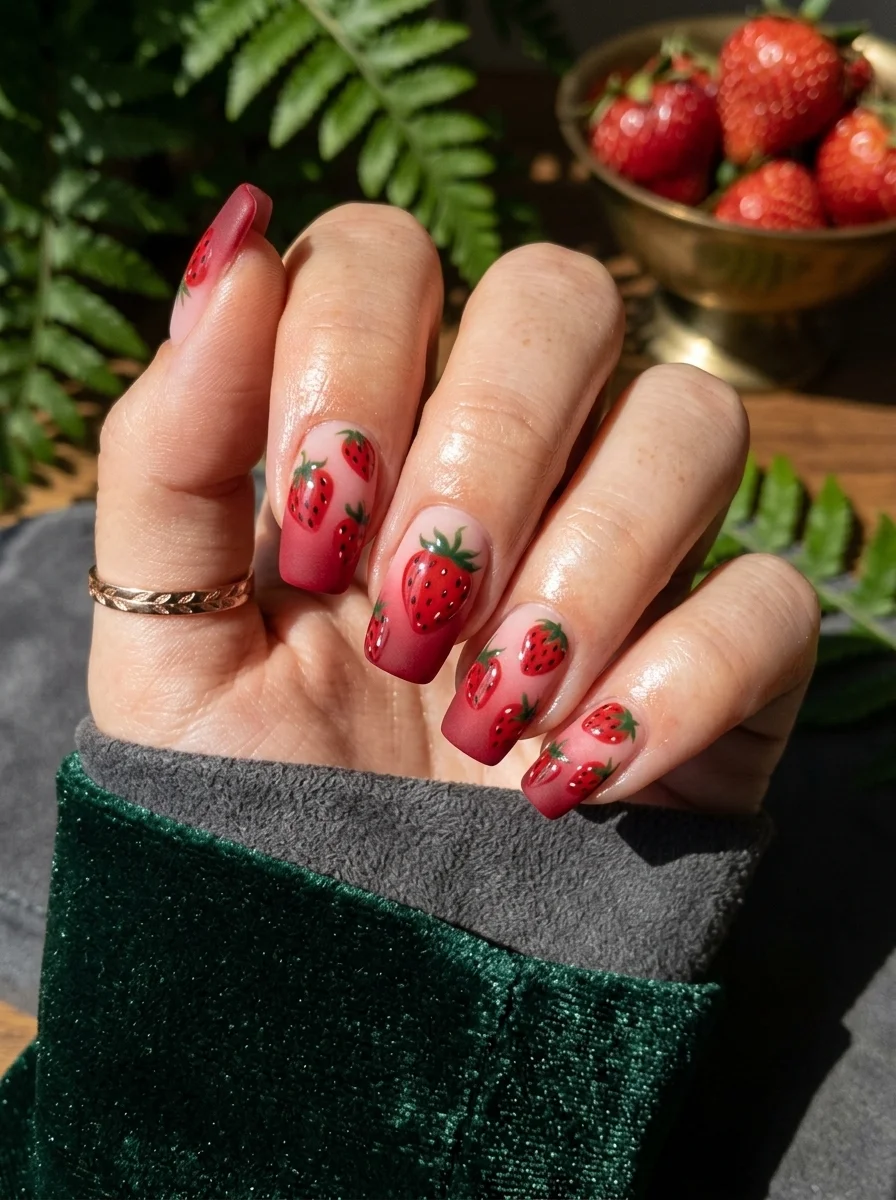
A rich, saturated gradient with berry art that feels like late summer harvest.
Overview:
This ombre goes darker than the typical strawberry gradient. The tips are a deep, saturated pink-red that reads as ripe berry rather than pastel fruit. Fading into nude at the cuticle creates a natural transition that makes the nails look like they're blushing from the tips down.
The strawberries painted over the gradient sit at different angles and sizes, which creates the illusion of berries tumbling across the nails. Some are large and detailed, others are small and suggested. This variety prevents the design from looking like a repeated stamp and gives it the organic quality of actual fruit scattered on a surface.
The deep pink-red at the tips is the hardest color to get right in a gradient. Too much pigment and it overpowers the nude. Too little and it looks washed out. Build the color gradually with three to four sponge passes rather than loading the sponge heavily on the first try.
Design Breakdown:
Deep gradient with illustrative art layered on top. The two techniques serve different purposes.
Base Color: White undercoat for opacity. The gradient transitions from deep pink-red at the tips to nude at the cuticle.
Nail Shape: Long coffin. The extended length gives the deep gradient room to develop.
Design Element: Sponge-applied deep berry-to-nude ombre. Hand-painted strawberries with green leaves scattered across all nails at varying sizes and angles.
Finish: High-gloss top coat to intensify the gradient colors.
Get The Look at Home:
Build the gradient color gradually. Three thin sponge passes produce better results than one heavy application.
- White base: Two coats of opaque white. Let dry fully.
- Sponge setup: Paint a stripe of deep pink-red and a stripe of nude side by side on a makeup sponge. Dab on paper first.
- Build the gradient: Press the sponge onto the nail with the red at the tip. Three to four passes builds better opacity than one heavy press.
- Dry completely: Wait at least ten minutes before adding art.
- Strawberries: Paint red strawberry shapes with green leaves across all nails. Vary the sizes and angles for an organic feel.
- Seal: Two coats of top coat to smooth the sponge texture and blend the gradient.
32 Bright & Fun Summer Toe Nail Designs (2026)
24.Pink Gingham Picnic Set
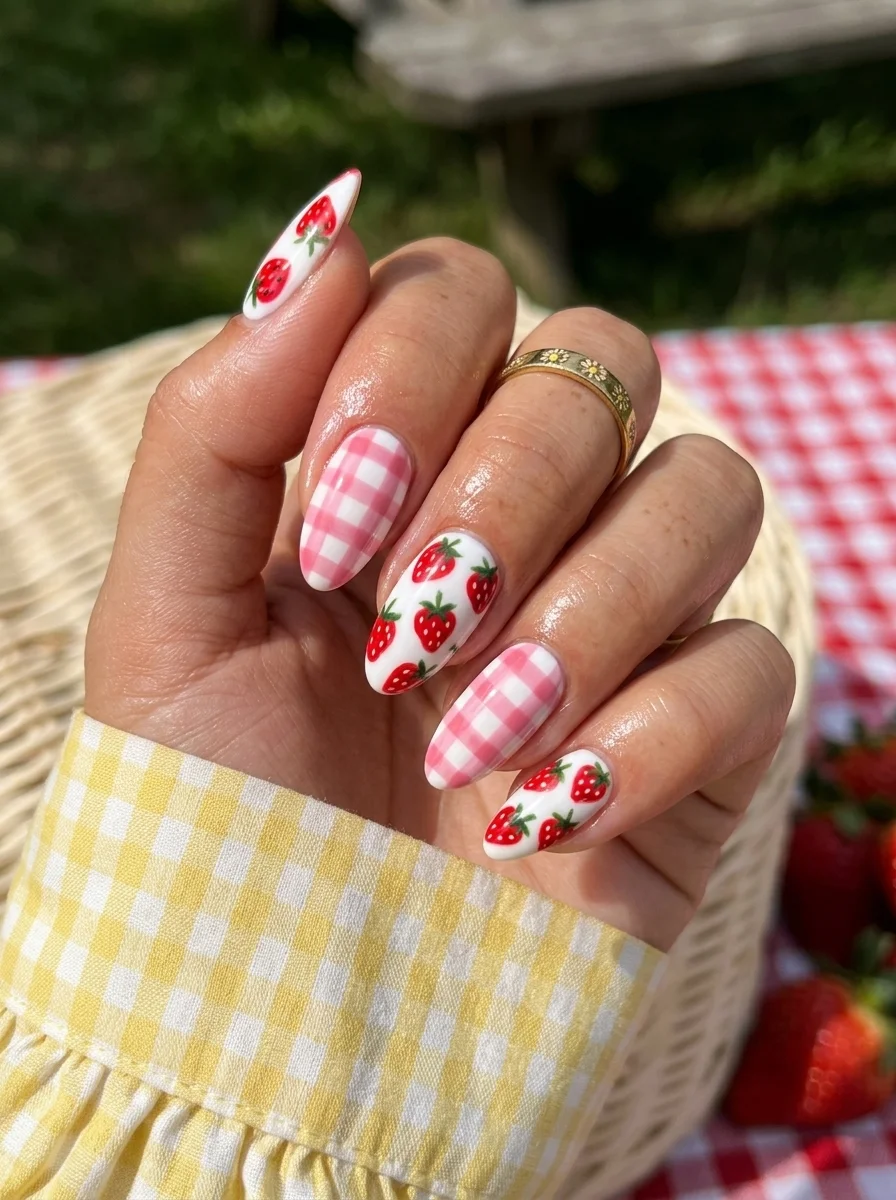
The ultimate picnic blanket aesthetic with strawberries scattered between the checks.
Overview:
Gingham nails live or die on the grid. If the lines are slightly crooked, the whole thing reads as off. This design works because it limits the gingham to every other nail, which reduces the number of grids that need to be precise. The alternating white nails with strawberries provide visual breathing room between the patterned nails.
The pink gingham and the strawberry art share the same color story, which is why the alternation feels natural rather than random. The pink of the gingham matches the pink undertone of the strawberries, and the white background on the fruit nails mirrors the white in the check pattern. Every color in the design appears in both nail types.
A satin or semi-matte top coat works better here than high-gloss. Gingham is a fabric reference, and high shine undercuts the textile illusion. A finish that sits between matte and gloss creates the right sheen for a woven pattern.
Design Breakdown:
Alternating pattern and illustration. The two nail types share a color palette but use different techniques.
Base Color: White base on all nails. Pink gingham grid on alternating nails. Solid white with strawberry art on the remaining nails.
Nail Shape: Medium almond. The curved shape softens the rigid geometry of the gingham.
Design Element: Pink and white gingham pattern on alternating nails. Hand-painted red strawberries with green leaves on the white nails.
Finish: Satin-gloss top coat. Full matte makes the pink look chalky; full gloss removes the fabric association.
Get The Look at Home:
The gingham grid is the hardest part. Use striping tape for clean lines if freehand isn't your strength.
- White base: Two coats of opaque white on all nails. Let dry fully.
- Gingham nails: Using striping tape, mask horizontal lines spaced 3mm apart. Paint pink over the tape. Peel while wet. Repeat vertically.
- Strawberry nails: On the remaining white nails, paint red strawberries with green leaves. Scatter them across the nail.
- Check balance: Compare the gingham across all patterned nails. The line width should feel consistent.
- Finish: One coat of satin top coat over everything. Avoid going back over any area twice.
25.Strawberry Shortcake Nostalgia
A nostalgic, character-themed set that brings childhood favorites to your fingertips.
Overview:
Character nail art is polarizing. Done well, it looks like a tiny portrait gallery on your hands. Done badly, it looks like a sticker that won't peel off. The key is scale: the character needs to be large enough to read as a face, but small enough to fit on a nail without losing detail. This design threads that needle.
The mix of designs across the hand is what makes this set feel curated rather than chaotic. The character nail is the focal point, the polka dot nails provide pattern, the tiny strawberry nails add theme, and the chrome lavender accent adds texture. Each nail type serves a specific role, and together they tell a cohesive story.
The chrome lavender accent nail is an unexpected choice that modernizes the nostalgic theme. Without it, the design would feel purely retro. The metallic shift adds a contemporary edge that keeps the set from looking like a costume.
Design Breakdown:
Multiple design types across the hand, each serving a different role in the overall composition.
Base Color: Varies by nail: pink, white, chrome lavender, and sheer nude.
Nail Shape: Medium almond. The curved shape suits the playful, feminine aesthetic.
Design Element: One character nail (Strawberry Shortcake face), pink nails with tiny strawberries, white nails with lilac polka dots, and a chrome lavender accent nail.
Finish: High-gloss top coat on most nails. Chrome finish on the accent nail.
Get The Look at Home:
The character nail is the hardest part. Use a reference photo and paint the outline first before filling in color.
- Base colors: Paint each nail its designated base color. Two coats each.
- Character outline: On the feature nail, use a thin liner brush and black polish to outline the character's face and hat.
- Character fill: Fill in the outline with the appropriate colors. Red for the hat, peach for the face, green for the leaves.
- Polka dots: On the designated nails, place white or lilac dots using a dotting tool.
- Tiny strawberries: On the pink nails, add micro strawberries with a toothpick.
- Seal: One coat of top coat over everything. Avoid coating the chrome nail if it's already finished.
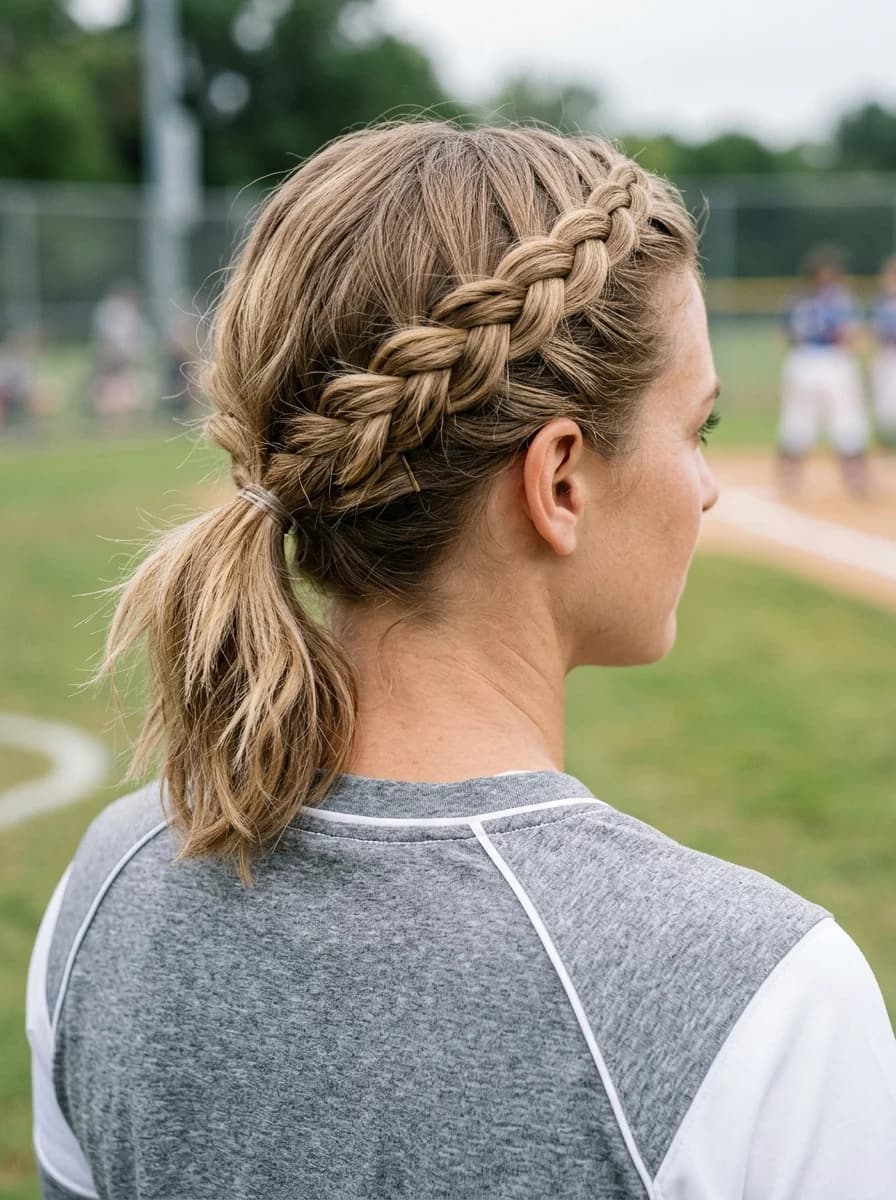
28 Stunning Softball Hairstyle Ideas with Braids for 2026 🥎✨
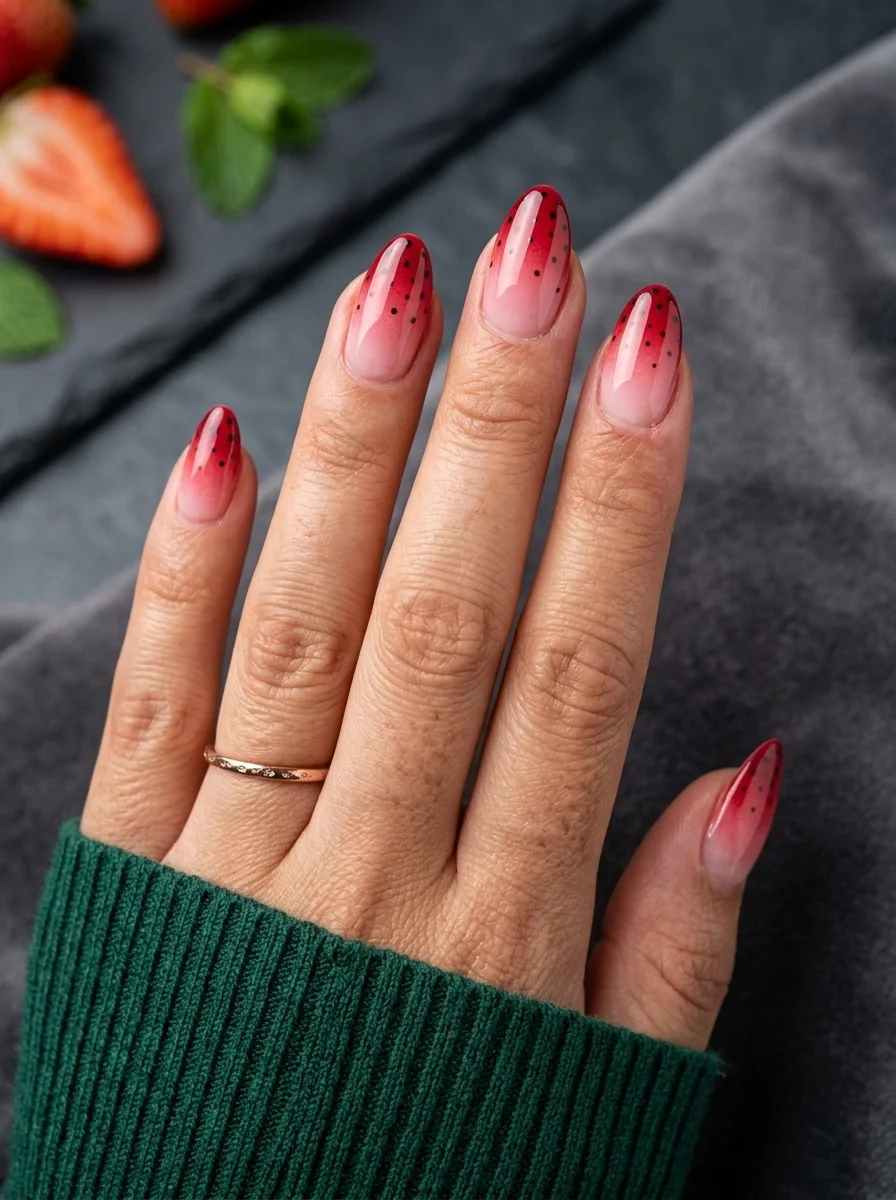
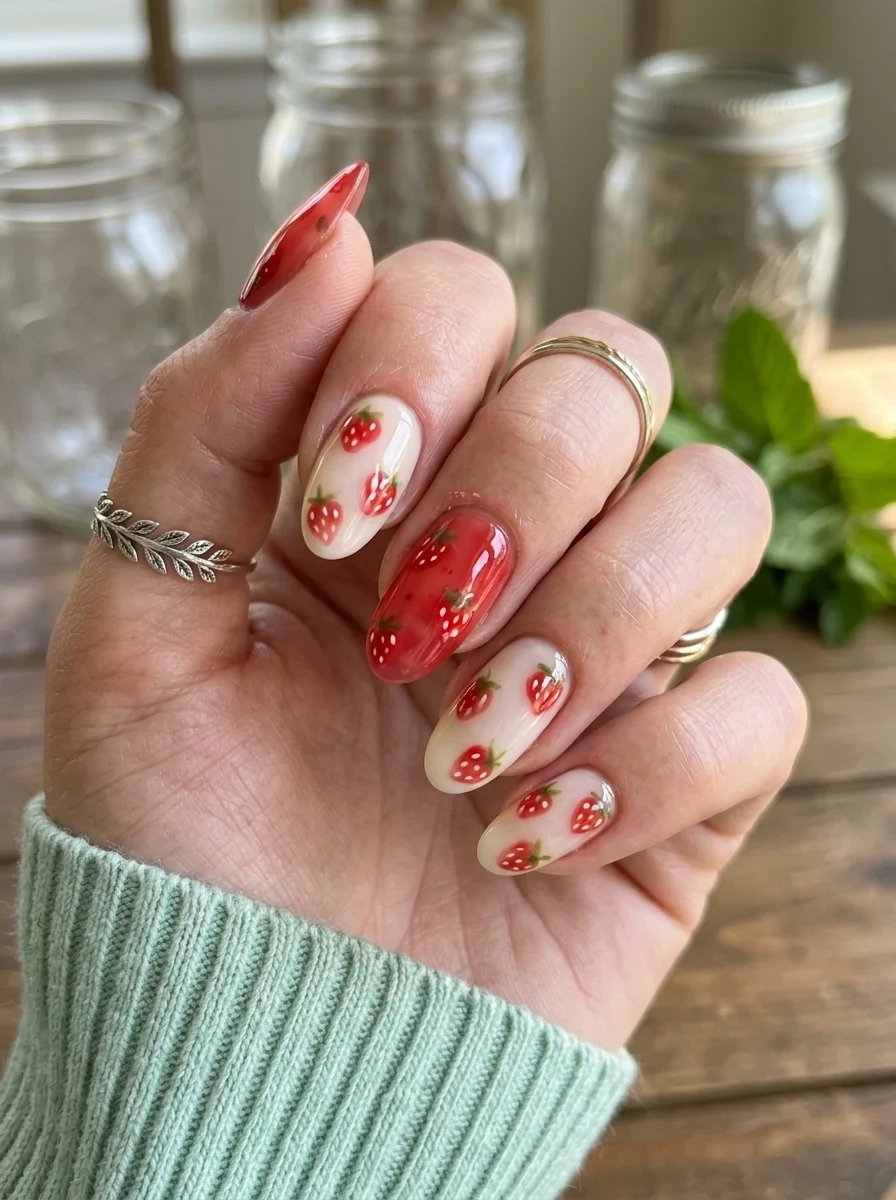
26.Strawberry Seed French Fade
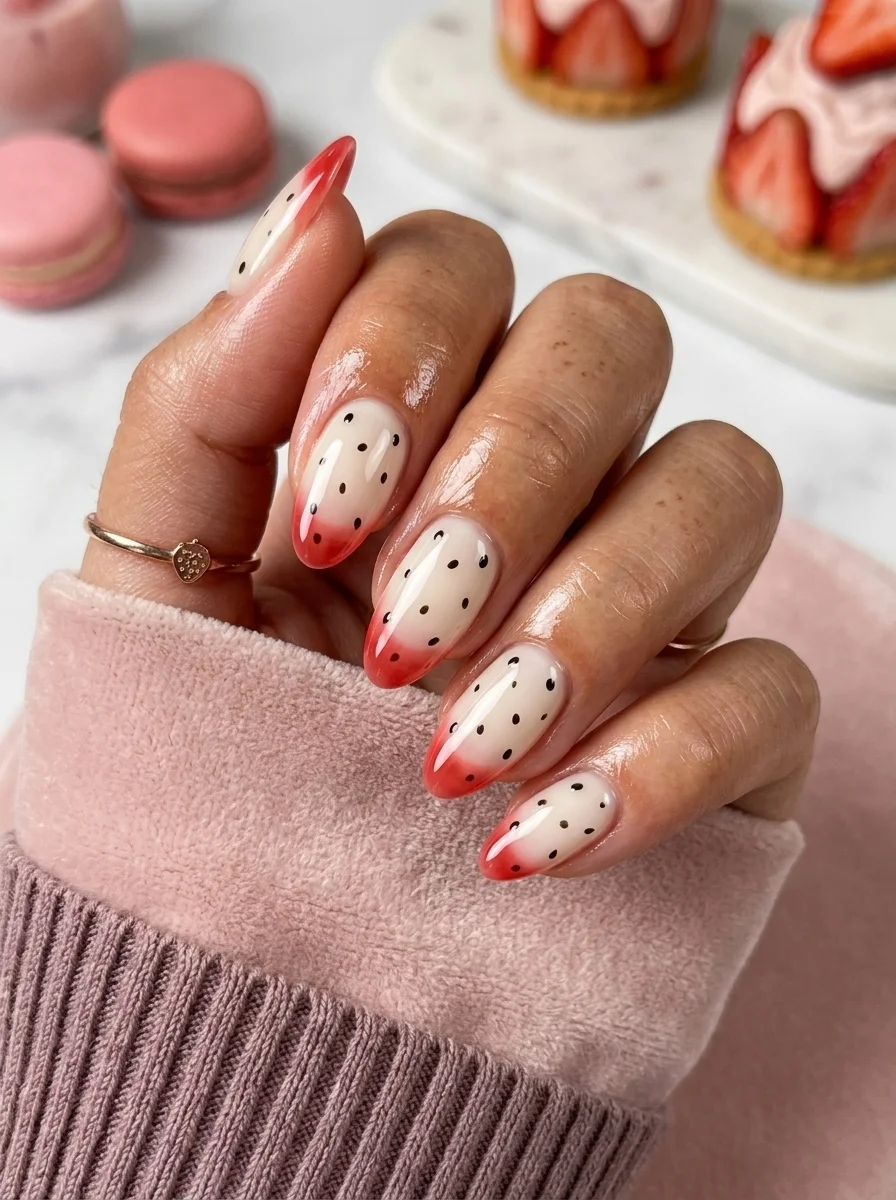
A subtle strawberry-inspired gradient that reads as French tip from a distance.
Overview:
This design uses a gradient rather than a hard French line to create the red-to-cream transition. The result is softer and more organic than a traditional French tip, which makes the strawberry reference feel more like a color impression than a literal illustration. The black dots scattered across the surface echo strawberry seeds without committing to actual fruit art.
The gradient is the design's most important element, and it needs to be smooth. A visible line where the red meets the cream breaks the illusion entirely. The sponge technique creates the best blend, but each layer needs to dry before the next goes on, or the colors mix into a muddy pink instead of a clean transition.
This is a good design for people who want to participate in the strawberry trend without committing to hand-painted fruit. The color story does the work, and the dots add just enough texture to keep the design from reading as a basic ombre.
Design Breakdown:
Gradient transition with graphic dots. Two simple techniques combined for a more complex effect.
Base Color: Cream or off-white at the cuticle, deep red at the tips. The two colors blend in the middle.
Nail Shape: Medium almond. The tapered tip gives the gradient a natural direction.
Design Element: Sponge-applied red-to-cream gradient. Scattered black polka dots across all nails.
Finish: High-gloss top coat to blend the gradient and saturate the colors.
Get The Look at Home:
The gradient needs to be fully dry before the dots go on. Any tackiness will drag the red into the black.
- Cream base: Two coats of opaque cream. Let dry fully.
- Sponge setup: Paint a stripe of deep red and a stripe of cream on a makeup sponge. Dab on paper first.
- Build the gradient: Press the sponge with the red at the tip. Three to four passes builds opacity. Let each pass dry for thirty seconds.
- Dry completely: Wait at least ten minutes before adding dots.
- Dots: Using a small dotting tool and black polish, place scattered dots across the gradient. Space them irregularly.
- Seal: Two coats of top coat to smooth the sponge texture and blend the gradient.
27.Vintage Berry Market Mix
An autumn-toned, mixed-pattern set that feels like browsing a farmer's market.
Overview:
Mixed-design sets are the hardest to execute well because every nail needs to feel like part of the same story. This design achieves cohesion through a warm, earthy color palette that ties the different patterns together. The dusty rose, sage green, and terracotta solids share the same muted saturation level, which prevents any single color from dominating.
The gingham and strawberry art nails carry the theme, while the solid color nails provide visual rest. Without the solids, the set would feel busy. Without the patterned nails, it would feel safe. The balance between the two is what makes the design work.
The vintage quality comes from the specific color choices. These aren't bright, saturated versions of pink, green, and orange. They're muted, slightly dusty tones that read as aged or sun-faded, which gives the set a nostalgic, lived-in quality that modern brights can't replicate.
Design Breakdown:
Multiple nail types unified by a warm, muted color palette. The solids balance the patterns.
Base Color: Varies by nail: cream with art, dusty rose, sage green, and terracotta as solid colors.
Nail Shape: Medium square. The flat surface suits both the pattern work and the solid colors.
Design Element: Cream nails with hand-painted strawberries and gingham accents. Solid dusty rose, sage green, and terracotta on the remaining nails.
Finish: High-gloss top coat across all nails to unify the different colors.
Get The Look at Home:
Map your layout before painting. Decide which nails get which color and which get the pattern work.
- Solid colors: Paint the designated nails in dusty rose, sage green, and terracotta. Two coats each for full opacity.
- Cream base: Apply cream polish on the remaining nails. Let dry fully.
- Gingham: On select cream nails, paint a pink gingham grid using a striper brush. Keep the lines thin.
- Strawberries: On the remaining cream nails, paint small red strawberries with green leaves.
- Check balance: Hold both hands at arm's length. The colors should feel evenly distributed.
- Seal: One coat of glossy top coat to unify the finish.

27 Elegant Wedding Guest Nail Designs for Family in 2026 💍
28.Strawberry Patch French
A classic French tip upgraded with berry art that turns every nail into a mini garden.
Overview:
Red French tips are already a step beyond the classic white. Adding strawberries on top transforms the design from "colored French" into something with actual personality. The key is keeping the strawberries small enough that they don't overwhelm the French structure. They should sit in the negative space between the tip and the cuticle, functioning as accent details rather than the main event.
The milky nude base is essential. It keeps the overall look clean and provides a neutral canvas for both the red tips and the fruit art. On a colored or opaque base, the French line would lose its crispness and the strawberries would compete with the background.
The mix of French tips and scattered berries across different fingers prevents the design from feeling too matchy. Some nails get just the French tip, others get the berries, and some get both. This asymmetry adds a layer of intentionality that a uniform set would lack.
Design Breakdown:
Classic French structure with botanical art layered into the negative space.
Base Color: Sheer milky nude or pink. The natural nail should be visible through the base.
Nail Shape: Medium almond. The tapered tip complements the organic fruit shapes.
Design Element: Red French tips on most nails. Hand-painted strawberries with green leaves placed in the negative space between the tip and cuticle.
Finish: High-gloss top coat to protect the art and sharpen the French line.
Get The Look at Home:
Do the French tips first, then add the strawberry art in the remaining space.
- Sheer base: Two coats on all nails. Let dry fully.
- Red tips: Using a French liner brush and bright red, paint the smile line from sidewall to center. Two thin coats for opacity.
- Strawberries: In the nude space between the tip and cuticle, paint small red strawberries with green leaves. One or two per nail.
- Detail check: Compare the French tips across all nails. If one is noticeably thicker, fix it now.
- Cleanup: An angled brush dipped in acetone sharpens the French smile line.
- Seal: One thick coat of top coat to smooth the raised art and protect the French line.
29.Red Moon Berry & Stars
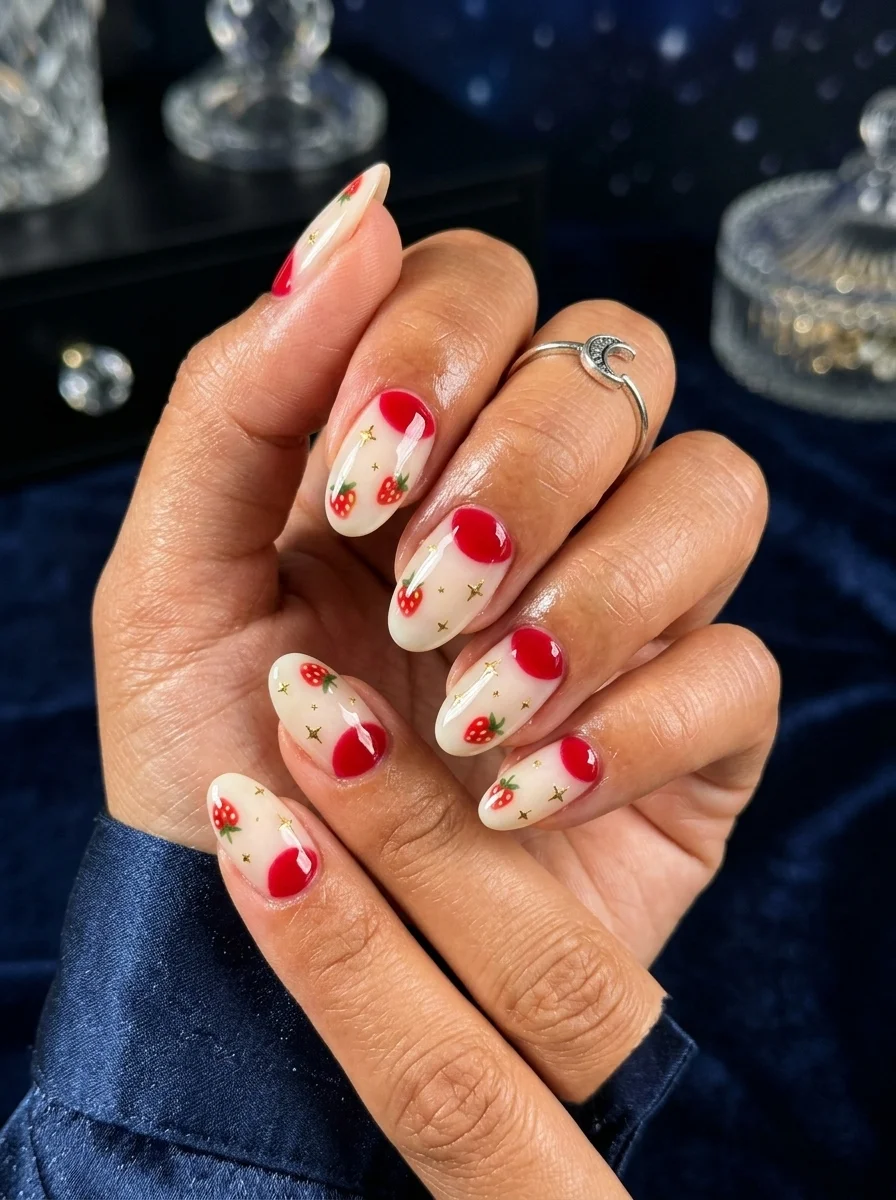
A whimsical, celestial twist on strawberry art with moons, berries, and stars.
Overview:
The half-moon manicure dates back to the 1920s, when leaving the lunula exposed was considered the height of elegance. This design modernizes it by filling the half-moon with red polish instead of leaving it bare. The result is a geometric frame at the cuticle that contrasts with the organic strawberry art scattered across the cream base.
The tiny gold stars scattered among the strawberries add a celestial quality that elevates the design from "fruit art" to something with more narrative. The stars suggest a night sky, which pairs surprisingly well with the berry theme. It's the kind of unexpected combination that makes people look twice.
The red half-moons require precision. The curve needs to follow your natural cuticle line, which varies from finger to finger. An angled brush dipped in acetone can sharpen the curve after painting, but getting the initial shape right saves significant cleanup time.
Design Breakdown:
Geometric cuticle accent with illustrative art and metallic details. Three distinct elements sharing one palette.
Base Color: Cream or off-white on the nail body. Red on the half-moon at the cuticle.
Nail Shape: Medium almond. The curved shape mirrors the half-moon curve.
Design Element: Red half-moons at the cuticle. Hand-painted strawberries with green leaves scattered across the cream base. Tiny gold star accents.
Finish: High-gloss top coat to unify the different elements.
Get The Look at Home:
The half-moon is harder than it looks. Follow your natural cuticle line rather than trying to create a perfect arc.
- Cream base: Two coats on all nails. Let dry fully.
- Half-moons: Using a small brush and red polish, paint a semi-circle at the base of each nail. Follow the natural curve of your cuticle.
- Strawberries: In the cream space above the half-moon, paint small red strawberries with green leaves. Scatter them randomly.
- Gold stars: Using a dotting tool and gold metallic polish, place tiny star shapes in the open spaces. Two or three per nail.
- Symmetry check: Compare both hands side by side. The half-moons should be roughly the same depth on corresponding nails.
- Seal: One coat of top coat to level the texture difference between the red half-moon and the cream base.

25 Stunning Summer Vacation Hairstyles for 2026 ☀️🌊
30.Sunset Swirl Fruit Pop
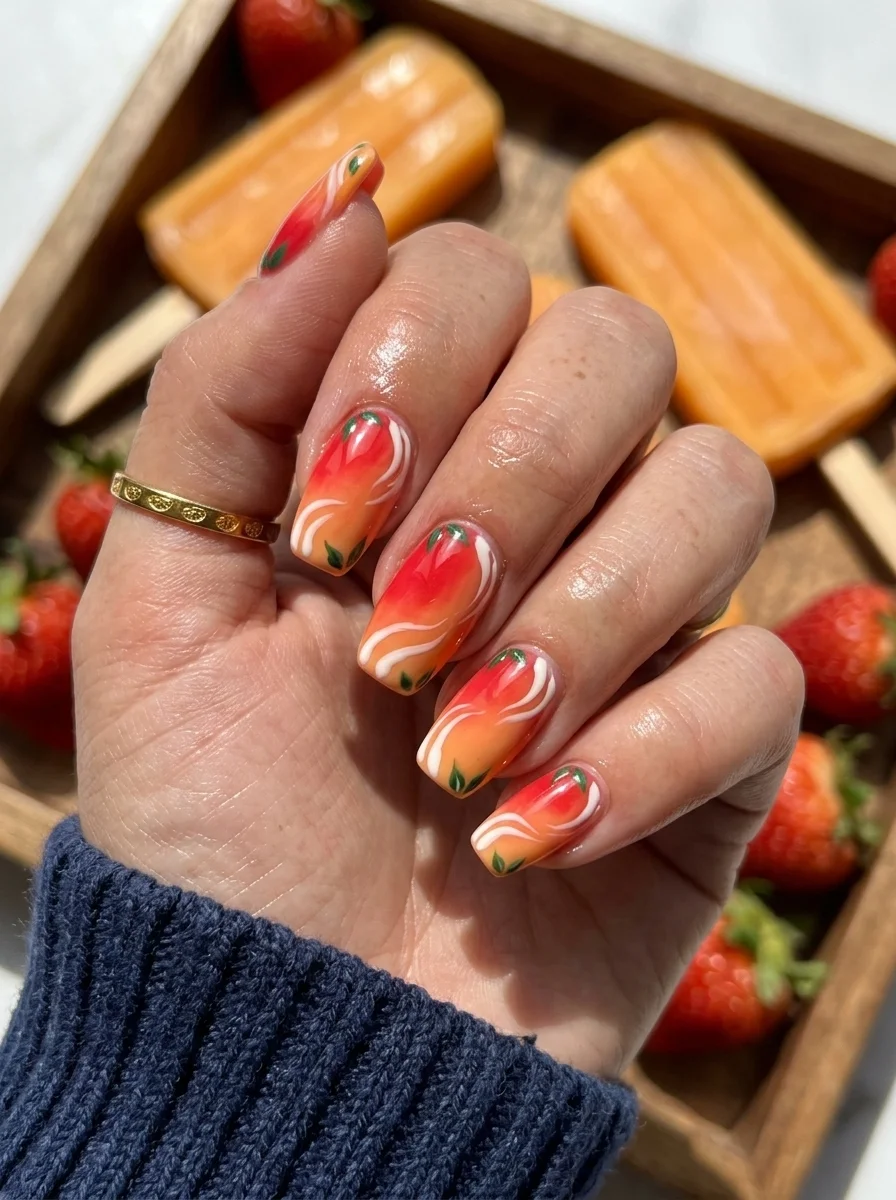
A fruity, abstract swirl that channels summer popsicles and berry smoothies.
Overview:
Abstract swirl nails use a wet-on-wet technique where multiple colors are dragged into each other before they dry. The result is organic, fluid patterns that look like stirred paint or marble. This orange-red-peach swirl reads as fruity without being literal, which makes it a versatile option for people who want berry-inspired color without hand-painted fruit art.
The white swirl lines running through the warm base colors add definition and prevent the design from reading as a muddy blend. They create the visual equivalent of cream stirred into a fruit smoothie, which reinforces the fruity theme without committing to illustration. The tiny green leaf accents scattered throughout complete the suggestion.
The wet-on-wet technique is more forgiving than it looks. The key is working into a still-tacky base so the colors drag naturally into each other. Over-mixing is the most common mistake: three or four drags per nail, maximum. You want to see individual colors in the swirl, not a muddy blend.
Design Breakdown:
Abstract wet-on-wet swirl in a fruity color palette. The technique creates organic, unrepeatable patterns.
Base Color: Orange, red, and peach swirled together with white accent lines. No single base color dominates.
Nail Shape: Long coffin. The flat surface gives the swirl patterns room to flow naturally.
Design Element: Abstract drag swirls in warm fruit tones. White swirl lines for definition. Tiny green leaf accents scattered throughout.
Finish: High-gloss top coat to smooth the surface and intensify the warm tones.
Get The Look at Home:
Pre-mix your swirl colors on foil before touching the nail. This isn't a design you build on the nail surface.
- Base layer: Apply one coat of peach or orange. Let dry.
- Wet layer: Apply a second thin coat. Do NOT wait for it to dry, you're working into this wet surface.
- Drop colors: Place small dots of red, orange, and white directly onto the wet nail. Space them randomly.
- Drag, don't swirl: Use a toothpick or detailing brush to pull the dots in S-shaped curves. Three or four drags per nail, maximum. Over-mixing creates mud.
- Leaf accents: While the swirl is still wet, add tiny green leaf strokes using a toothpick.
- Dry time: Wait at least ten minutes before top coating. The wet-on-wet technique needs extra time to set.
- Seal: Two coats of thick top coat to smooth the textured swirls and create a glassy surface.
DIY Strawberry Nails: A Step-by-Step Home Guide
Recreating sweet strawberry nail art at home is surprisingly simple and requires only a few basic tools. You don't need professional-grade drawing skills to achieve a gorgeous result; instead, focus on clean layering and using the right tools to control the shapes.
To get started, make sure you have a bright poppy red for the berry body, a sage or olive green for the leafy crown, and a soft pastel yellow or white for the seeds. A fine-tipped detail brush or a wooden toothpick will act as your precision drawing tool.
🍓 The 5-Step Strawberry Tutorial
- Base Layer: Apply two coats of a sheer nude or milky white base and let it dry completely.
- Paint the Berries: Dip a fine detailing brush or toothpick in red polish. Paint small, rounded, upside-down teardrop shapes.
- Crown with Leaves: With a green polish, draw two or three tiny upward strokes from the top of each red base to form the leafy crowns.
- Press the Seeds: Using yellow or white polish and your thinnest tool, tap micro-dots onto the red bodies. Space them irregularly for a natural, organic look.
- Seal the Design: Apply a generous layer of high-gloss top coat to secure the artwork, add shine, and smooth out any surface texture.
Coordinating Your Look: Styling & Aesthetics
Strawberry nails are more than just a manicure—they are a core element of the trendy "Strawberry Girl" and cottagecore aesthetics. Because the designs feature bright reds and soft pinks, they naturally draw attention and can be styled to elevate your everyday outfits.
For a casual, daytime look, pair your strawberry manicure with light-wash denim and a crisp white linen shirt. The contrast between the bright red berries and the clean white fabric makes the nail art pop beautifully. If you have opted for designs featuring gold foil or gold leaf highlights, complete the look with delicate gold rings and bracelets to tie the gold accents together.
If you are leaning into the cottagecore aesthetic, strawberry nails pair wonderfully with gingham sundresses, woven straw bags, and soft, natural makeup featuring rosy cheeks and glossy lips. For the edgy midnight berry designs, dark leather jackets or monochrome black outfits create a striking, moody contrast that feels modern and chic.
And there you have it, a full berry basket of strawberry nail designs ranging from barely-there French tips to full-on chocolate-drip dessert art. Whether you want something subtle enough for the office or bold enough for a night out, there is a strawberry-inspired set in this collection that fits.
Pin your favorites to your Pinterest boards so you have them ready when you sit down in the salon chair. Doing this in advance saves you from scrolling through your phone while your nail tech waits.
No matter which one you choose, your nails are going to look incredible. Sweet berry vibes only.