Nail Trends
30 Bold Goth Nail Designs for a Dark & Moody Aesthetic (2026)
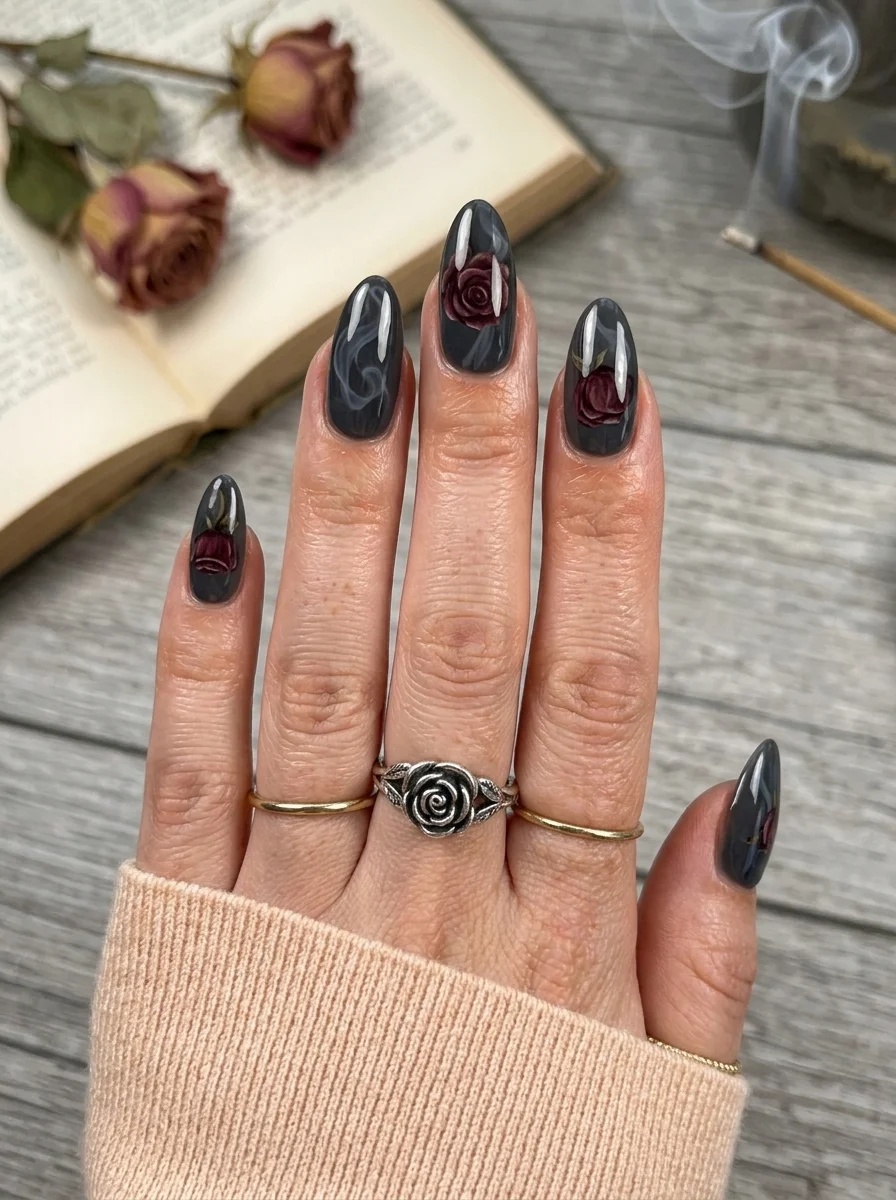
Goth nails are so much more than plain black polish—they are a statement of mystery, rebellion, and refined dark aesthetics. Whether you love deep velvet textures, intricate metallic barbed wire, smoky marble swirls, or iridescent beetle-shell shifts, dark manicures offer endless creative depth for any season.
Mastering Dark & Moody Manicures: Finishes & Shape Pairings
Working with ultra-pigmented dark polishes requires attention to prep and finish. Opaque black, deep burgundy, and midnight green show every brush stroke and cuticle flaw if not applied carefully. Start with a smooth, ridge-filling base coat, and build opacity with thin coats rather than one thick layer.
Pairing your nail shape with the design enhances the gothic vibe. Sharp coffin and stiletto shapes complement dramatic line work, chrome accents, and long marble swirls by giving patterns room to stretch. Meanwhile, short square or oval shapes keep velvet magnetic polish and high-gloss jet black looking sleek, modern, and wearable for everyday elegance.
1.Black and Green Smoke Swirl
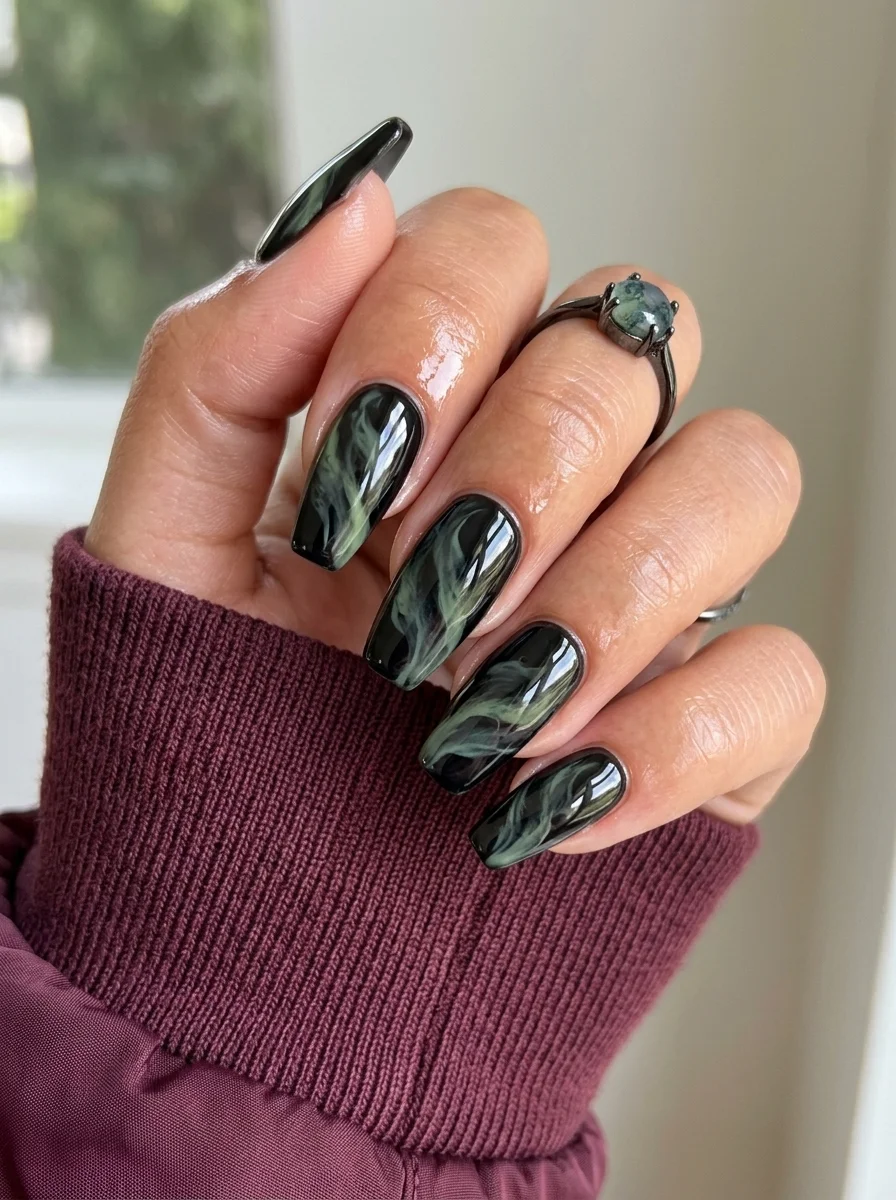
A moody, dimensional take on marble nails that shifts between dark and mystical.
Overview:
Black marble nails usually lean monochrome, which can read flat after a while. Adding green smoke swirls into the black base creates depth that pure black-on-black can't achieve. The green doesn't overpower; it surfaces in wispy, organic streaks that look like something pooling under glass.
The coffin shape works in this design's favor. The flat tip and long sides give the swirl pattern room to develop without getting cramped. On shorter nails, the marble effect compresses into muddy patches instead of the flowing, smoke-like movement you see here.
One thing worth knowing: the swirl technique is wet-on-wet, which means you're working against the clock. If the base coat starts setting before you drag the green through it, the colors won't blend and you'll end up with hard lines instead of soft smoke. Work one nail at a time, and keep your acetone-dampened cleanup brush close.
Design Breakdown:
Wet-on-wet marble technique. The green should look like it's emerging from within the black, not painted on top.
Base Color: Opaque black as the foundation. Something like OPI "Black Onyx" or Essie "Licorice" that covers fully in two coats.
Nail Shape: Long coffin. The extended surface area lets the marble pattern breathe and develop organic movement.
Design Element: Dark forest green dragged through wet black polish to create wispy, smoke-like swirls. The green should vary in intensity across each nail.
Finish: High-gloss top coat. The shine creates the illusion of depth, making the swirls look submerged rather than flat.
Get The Look at Home:
Speed matters here. Have everything ready before you start painting, because the wet-on-wet window is short.
- Black base: Apply one coat of black polish. Let it dry completely. You'll apply a second wet coat that serves as the working surface.
- Second wet coat: Apply a generous second coat of black. Do NOT let it dry.
- Green drops: Immediately place small drops of dark green polish onto the wet black using a dotting tool or brush.
- Drag the swirl: Using a thin liner brush or toothpick, drag through the green drops in loose S-curves. Three to four drags per nail, then stop. Overworking kills the smoke effect.
- Clean edges: Use a flat brush dipped in acetone to clean the cuticle line before the polish sets.
- Seal: Wait five minutes, then apply two coats of high-gloss top coat to smooth the surface and amplify the depth.

22 Best Graduation Day Hairstyles for 2026 🎓✨
2.Barbed Wire Black
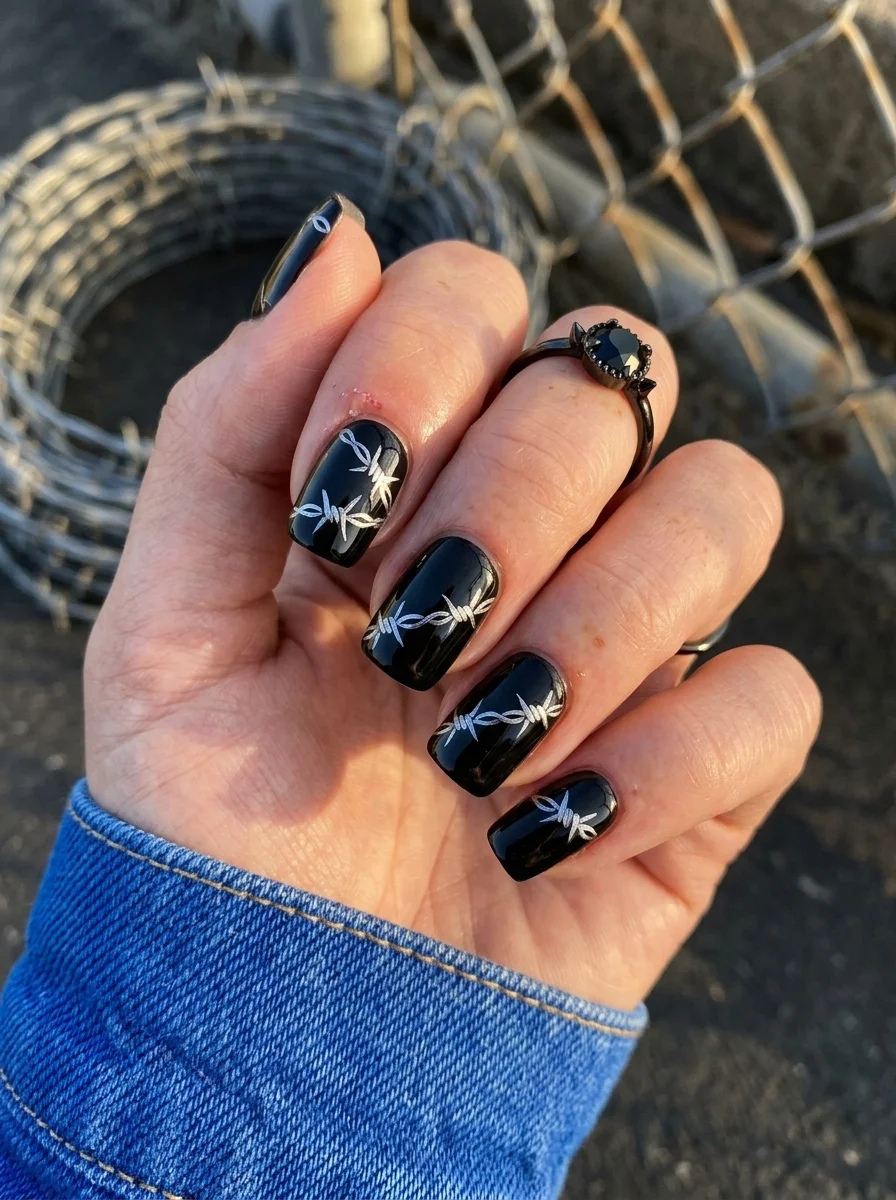
Edgy, graphic nail art that looks like it belongs on a punk album cover.
Overview:
Barbed wire on nails is the kind of design that sounds aggressive but reads as surprisingly refined when executed well. The white line work against the black base creates a stark graphic contrast that catches attention without overwhelming the hand. It's gothic without being costume-y.
The short square shape is the right call for this design. Long stiletto nails with barbed wire would tip into Halloween territory. Shorter nails keep the pattern proportional and wearable. The flat tip also gives the horizontal wire lines a clean anchor point.
The design works because it's simpler than it looks. Each "barb" is just two short diagonal strokes crossing a horizontal line. You don't need steady hands or special tools. A thin striper brush and a bit of patience will get you there. The imperfection actually adds to the handmade, punk aesthetic.
Design Breakdown:
Graphic line art on a solid dark base. The contrast does all the work.
Base Color: True, opaque black. Two coats minimum for full coverage with no translucency showing at the edges.
Nail Shape: Short square. The flat edges complement the horizontal wire pattern and keep the design grounded.
Design Element: White barbed wire lines painted horizontally across each nail, with small diagonal "barb" strokes at regular intervals.
Finish: High-gloss. The shine makes the white pop against the black base.
Get The Look at Home:
A thin striper brush is essential here. Regular polish brushes are too thick for clean wire lines.
- Black base: Two coats of opaque black on all nails. Let each dry fully. Any tackiness will drag the white line work.
- Horizontal lines: Using a long striper brush and white polish, draw one horizontal line across the middle of each nail. Keep the line as straight as possible.
- Barb strokes: Add small diagonal strokes crossing the horizontal line at regular intervals. Two short lines forming an "X" shape at each barb point.
- Vary the spacing: Keep the barbs roughly 3-4mm apart. Perfect uniformity isn't the goal; the slight irregularity adds to the design's edge.
- Seal: One thick coat of top coat to protect the line work and create a unified surface.
3.Emerald Snake Scale
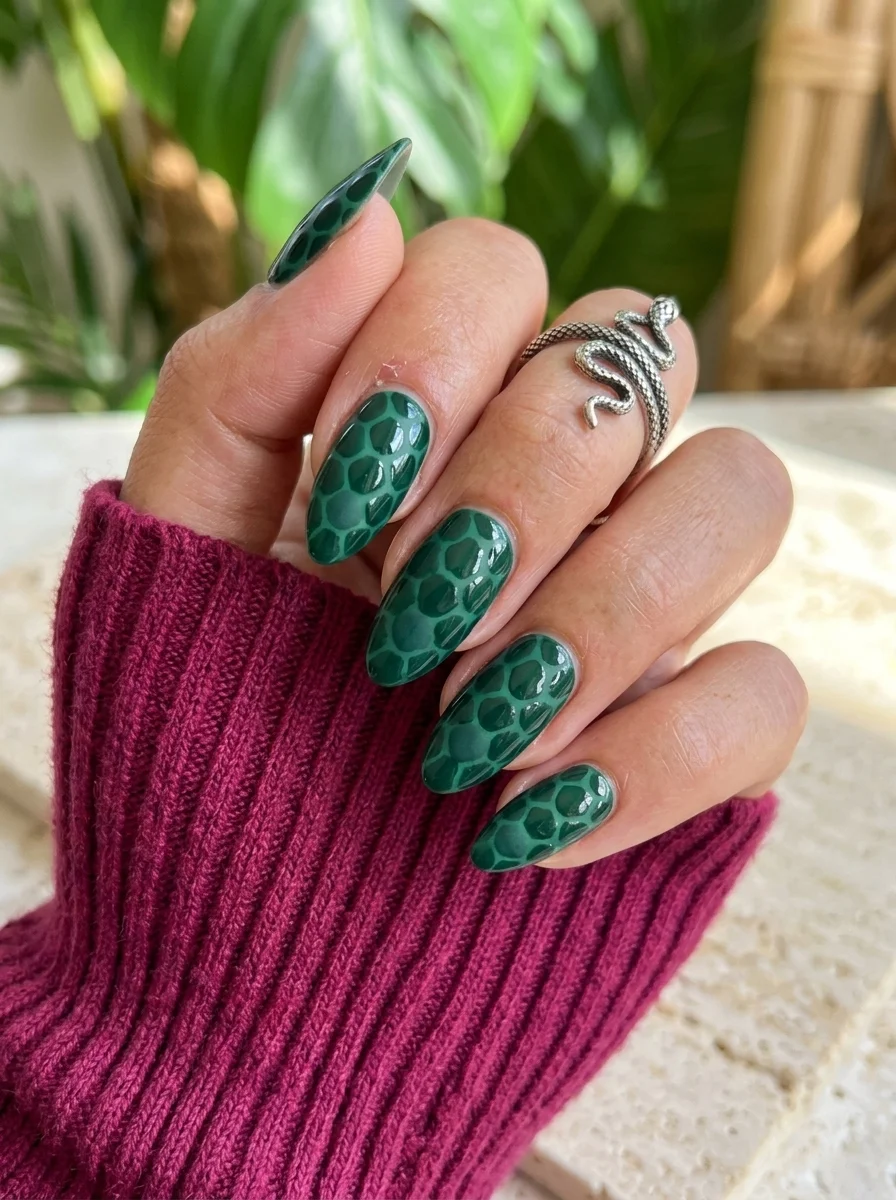
A reptilian texture that looks expensive and reads as bold, not costume.
Overview:
Snake scale patterns on nails have a narrow execution window. Too geometric and it looks like chicken wire. Too organic and it looks like a failed marble attempt. This design nails the balance by using slightly rounded hexagons in a darker green over a medium green base. The tonal difference between the two greens creates dimension without introducing a second color.
The almond shape is critical. The curved tip echoes the organic curves of actual snake scales, while the pointed end adds the edge that the design needs. On a round or square shape, the pattern would lose its reptilian quality and start looking like a generic honeycomb.
The glossy finish creates an almost wet, leather-like sheen that reinforces the snake reference. Matte would flatten the pattern and make the two green tones harder to distinguish. The high shine is doing real work here.
Design Breakdown:
Tonal green-on-green pattern. The scale shapes create texture through color depth, not physical dimension.
Base Color: A rich, medium emerald green. Opaque in two coats with a slight blue undertone.
Nail Shape: Long almond. The tapered point reinforces the reptilian aesthetic.
Design Element: Hexagonal scale pattern painted in a darker forest green over the base. The scales should be slightly rounded at the edges, not sharp geometric shapes.
Finish: Ultra-glossy top coat. The shine creates the leather texture illusion.
Get The Look at Home:
The scale pattern is repetitive but meditative. Work in horizontal rows across each nail.
- Green base: Two coats of emerald green. Let dry fully.
- First row: Using a small dotting tool and darker green, place a row of small hexagons across the nail near the cuticle. Round the corners of each shape.
- Offset rows: Place the next row of hexagons so they sit in the gaps between the first row, like bricks in a wall. Continue until you reach the tip.
- Vary the size: Scales near the cuticle can be slightly smaller than those near the tip. This creates a natural taper.
- Seal: Two coats of high-gloss top coat to smooth the raised texture of the painted scales.
36 Trendy FIFA World Cup Nail Designs (2026)
4.Liquid Chrome Mirror
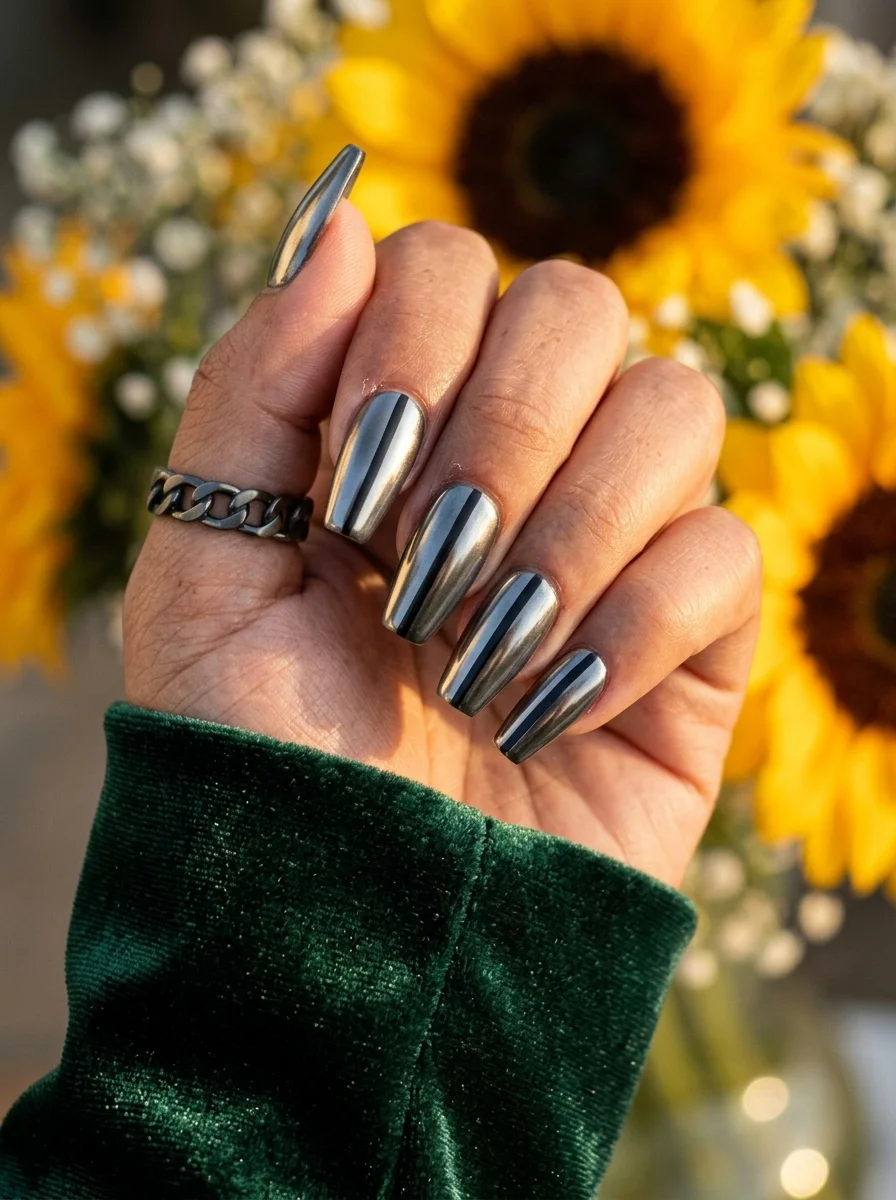
Liquid metal vibes that catch every light source in the room.
Overview:
Chrome nails look effortless in photos, but achieving that mirror-smooth finish requires specific products and technique. This isn't regular silver polish. It's chrome powder buffed into a no-wipe gel top coat, and the difference between a mediocre chrome job and this level of reflectivity is all in the preparation.
The coffin shape serves the chrome finish perfectly. The flat tip creates a wide, unbroken reflective surface that reads as a solid sheet of metal. On almond or stiletto shapes, the chrome curves around the tip and breaks the mirror effect into fragmented reflections.
Worth noting: chrome powder shows every fingerprint, smudge, and surface imperfection. If your gel top coat has any texture or bumps before the powder goes on, the chrome will amplify them. The base needs to be absolutely smooth. One coat of builder gel underneath the top coat can help level out any ridges.
Design Breakdown:
Single-finish design. The chrome powder IS the art. No additional patterns or accents needed.
Base Color: Black gel polish underneath the chrome creates the deepest, most mirror-like reflection. Silver chrome over white reads as metallic; over black, it reads as actual mirror.
Nail Shape: Long coffin. The flat surface maximizes the reflective area.
Design Element: Chrome powder buffed into a no-wipe gel top coat. The powder creates the mirror finish.
Finish: The chrome itself is the finish. Seal with a thin layer of no-wipe top coat to protect the powder from rubbing off.
Get The Look at Home:
This is a gel-only design. Regular polish won't give the chrome powder anything to adhere to properly.
- Black gel base: Apply two coats of black gel polish, curing each coat under a UV/LED lamp. The black base determines the depth of the chrome reflection.
- No-wipe top coat: Apply a thin, even coat of no-wipe gel top coat. Cure it fully. The surface should feel smooth and slightly tacky.
- Chrome application: Using a silicone applicator or eyeshadow sponge, pick up a small amount of silver chrome powder. Rub it onto the cured top coat in small circular motions. The surface should immediately turn mirror-reflective.
- Buff to shine: Continue buffing until the surface is uniformly reflective with no dull spots. Use a clean applicator to remove excess powder.
- Seal: Apply one thin coat of no-wipe top coat over the chrome. Cure. This locks the powder in place and prevents it from rubbing off on clothes.
5.Stained Glass Cathedral
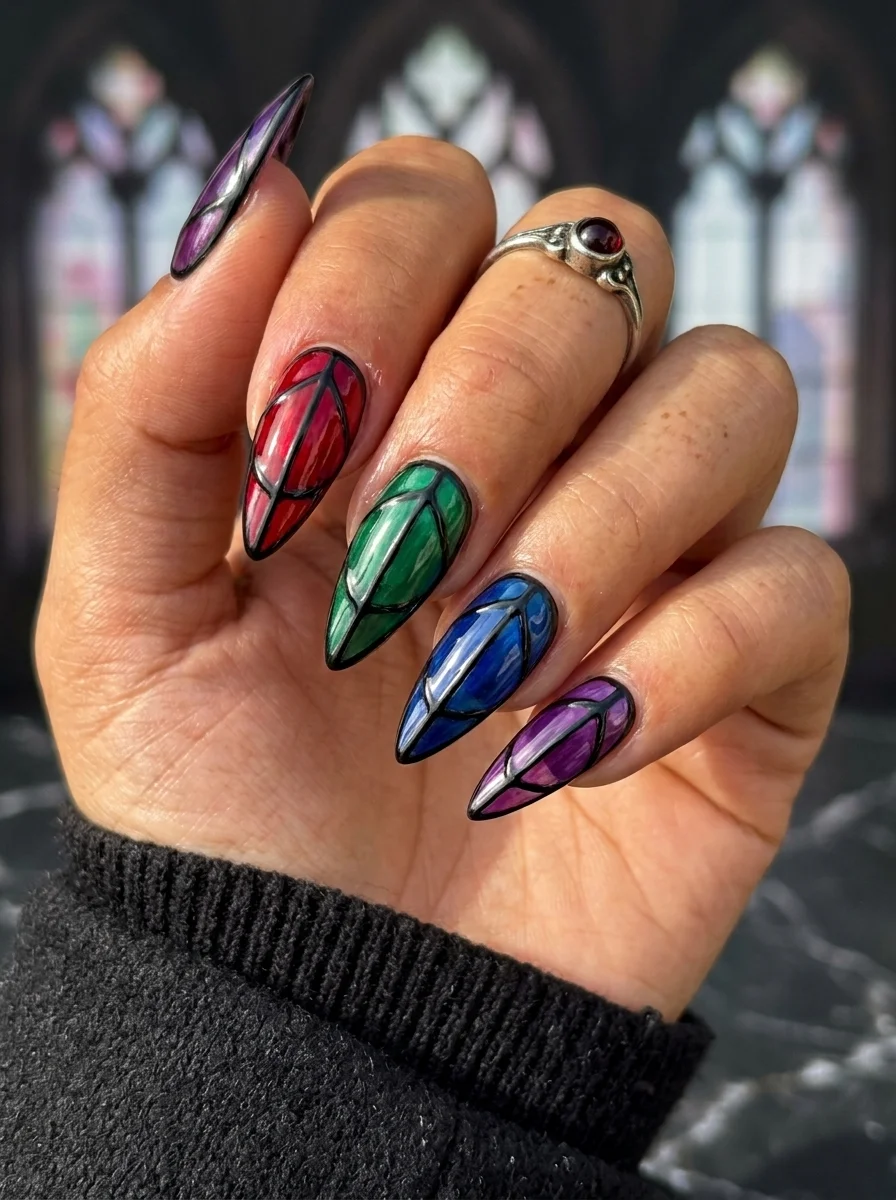
Gothic cathedral windows translated into wearable nail art.
Overview:
Stained glass nails are a study in controlled chaos. Each nail gets a different jewel tone (red, green, blue, purple), and the black "leading" lines between the color sections create the illusion of individual glass panes. The effect is dramatic without being random because the black framework unifies every nail into one cohesive set.
The long almond shape gives each "window" enough surface area to develop actual pane detail. On shorter nails, the leading lines compress and the individual color sections become too small to read as stained glass. You'd end up with something that looks more like a cracked phone screen than a cathedral window.
The translucent quality of the color sections is what sells the illusion. These aren't opaque blocks of color. They're applied in thin, slightly sheer layers that let light pass through, creating that characteristic glow. If you use full-coverage opaque polish, the stained glass effect disappears entirely.
Design Breakdown:
Jewel-toned translucent sections separated by black leading lines. Each nail is a different color but shares the same technique.
Base Color: Clear or very sheer nude. The "glass" sections need to look translucent, so a heavy base defeats the purpose.
Nail Shape: Long almond. The tapered shape frames each window section and gives the leading lines room to curve.
Design Element: Black leading lines creating pane divisions, filled with translucent jewel-tone polish (ruby red, emerald green, sapphire blue, amethyst purple).
Finish: High-gloss top coat to create the glass-like sheen.
Get The Look at Home:
The black leading goes on first. The color fills come second. This order matters because the black defines the boundaries.
- Base coat: One coat of clear or sheer nude on all nails. Let dry fully.
- Leading lines: Using a thin liner brush and black polish, draw curved lines that divide each nail into irregular sections. Think lead cames in actual stained glass: organic, not perfectly geometric.
- Color fill: Using a small brush, fill each section with a different translucent jewel tone. Thin the polish slightly with clear if needed to maintain the glass effect.
- One color per nail (or mix): You can do one color per nail for a uniform look, or mix multiple colors on each nail for more complexity.
- Reinforce leading: Once the color is dry, go back over the black lines to sharpen any areas where the color bled over.
- Seal: Two coats of top coat to smooth the texture and create the glass sheen.
28 Effortless Hot Weather Day Hairstyles for Women 2026 ☀️💇♀️
6.Graveyard Gate Smoke
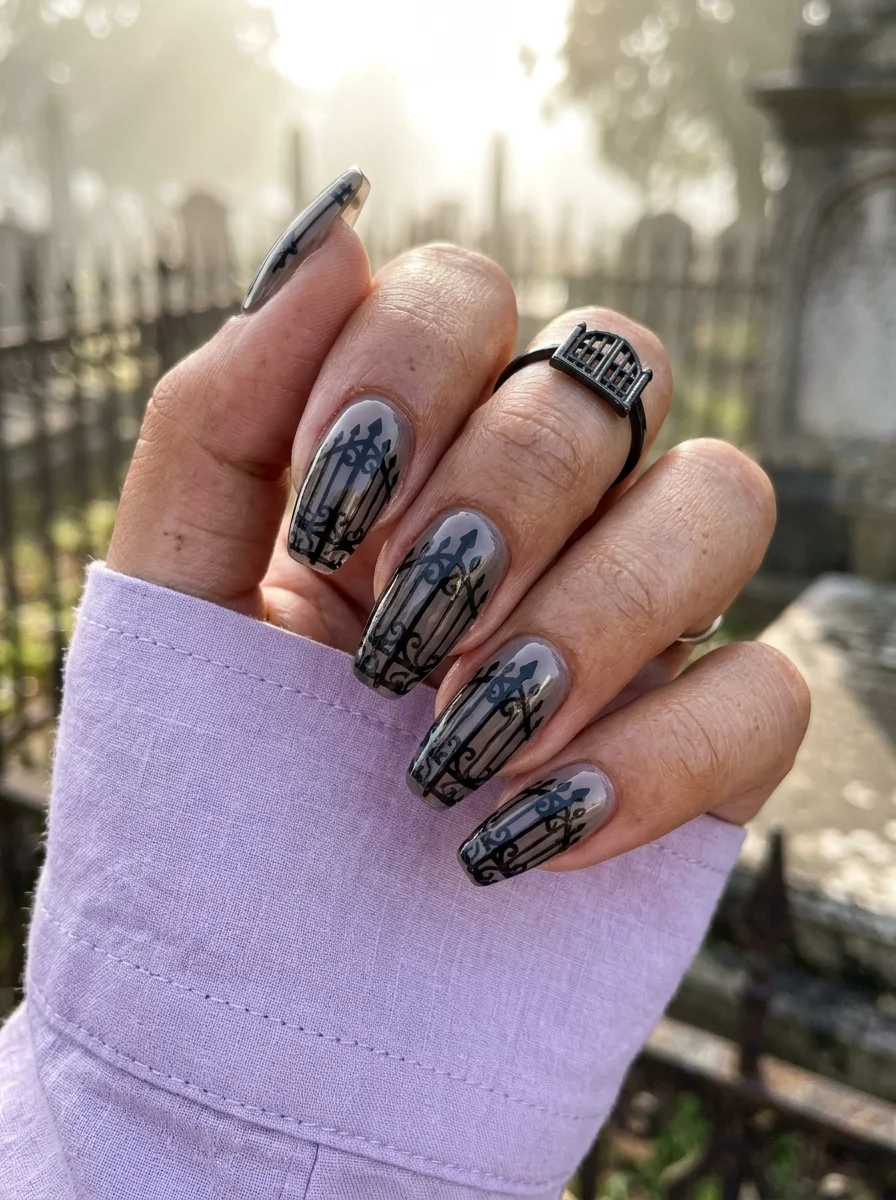
Victorian ironwork meets foggy graveyard atmosphere.
Overview:
This design creates atmosphere through two distinct layers: a smoky, translucent grey base that reads as fog, and black ornate gate patterns painted on top. The grey base isn't solid; it's sheer enough that your natural nail shows through in places, which gives the whole thing a ghostly, ethereal quality.
The gate artwork is what elevates this beyond "grey nails with black doodles." The ornate scrollwork at the top of each gate section references actual Victorian ironwork, which gives the design a specific historical reference rather than a generic "spooky" vibe. The detail work rewards close inspection while the overall grey-and-black palette keeps things readable from a distance.
The sheer base is both the design's strength and its maintenance challenge. Because the grey is translucent, any chips or wear show immediately against the natural nail color underneath. Budget for touch-ups every three to four days if you want to keep the fog effect looking intentional.
Design Breakdown:
Layered illustration over a sheer atmospheric base. The two elements serve different purposes: mood and detail.
Base Color: A sheer, smoky grey. Build opacity with thin layers until you hit the right translucency.
Nail Shape: Long coffin. The flat tip gives the gate design a defined top edge to anchor to.
Design Element: Black ornate iron gate patterns with scrollwork details, painted over the sheer grey base. Each nail shows a different section of the gate.
Finish: High-gloss top coat to smooth the painted texture and enhance the foggy depth.
Get The Look at Home:
Build the grey base to the right opacity before starting the gate art. The translucency level determines whether this reads as "fog" or "bad grey manicure."
- Grey base: Apply one coat of sheer grey. Let dry. Add a second coat only if you need more opacity. The nail should be visible through the polish.
- Gate posts: Using a thin liner brush and black polish, paint two vertical lines on each nail representing the gate's side posts.
- Top rail: Connect the posts with a horizontal line near the tip. Add scrollwork above the rail using curved strokes.
- Gate details: Fill the space between the posts with vertical bars and ornamental curves. Vary the pattern slightly on each nail for visual interest.
- Seal carefully: Float the top coat over the art without dragging. The fine line work smears easily if the brush catches.
7.Obsidian Cat Eye
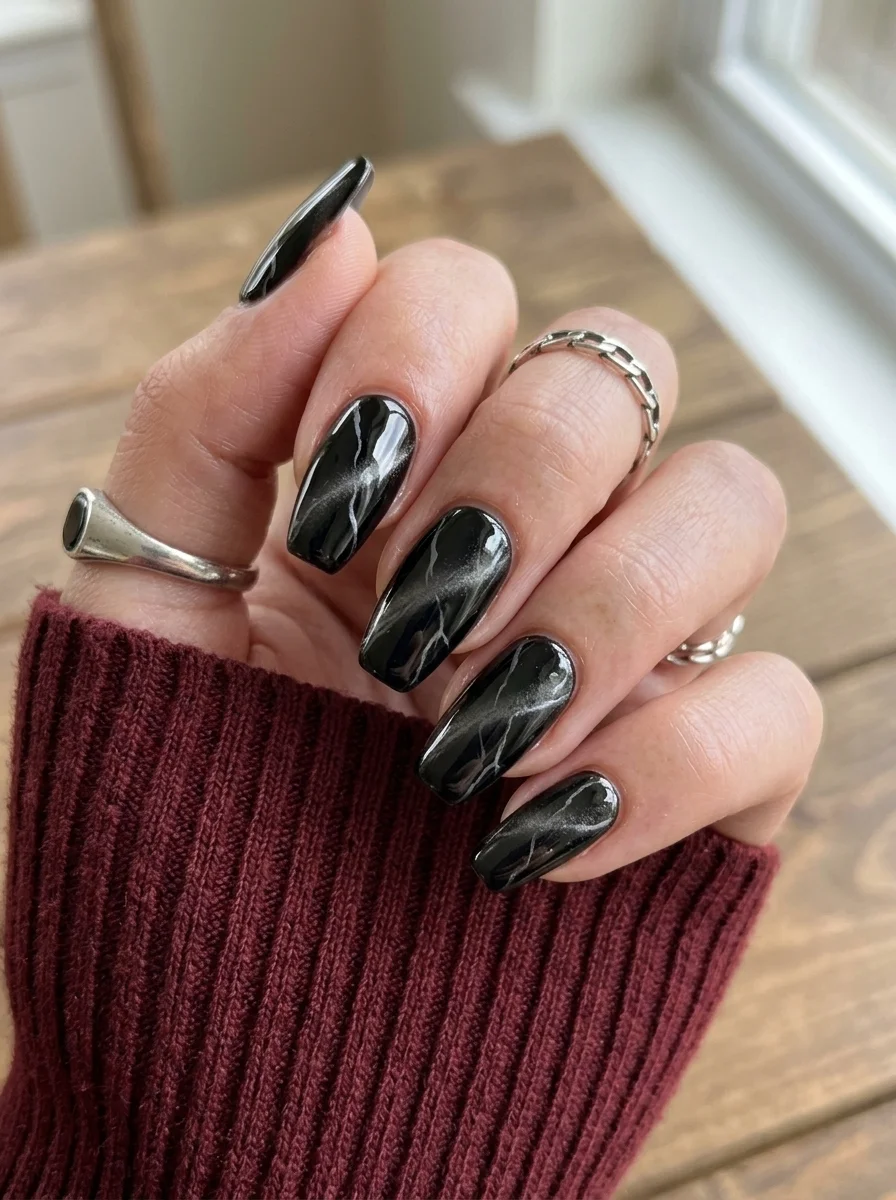
A magnetic polish that creates a living, shifting highlight across each nail.
Overview:
Cat eye polish uses magnetic particles suspended in the formula to create a concentrated band of light that moves as you tilt your hand. On a black base, the silver particles read as a sharp diagonal streak that looks like it's lit from within. It's one of the few nail effects that genuinely looks better in person than in photos.
The diagonal placement of the cat eye band matters more than people realize. Straight horizontal lines look static. Diagonal lines create movement and make the nail look longer. The angle should run from one sidewall to the opposite tip, which is the natural axis your eye follows when looking at a hand.
Magnetic polish has a learning curve. The magnet needs to hover close to the wet polish (about 5mm) for 10-15 seconds without touching it. If you hold it too far away, the particles don't concentrate and the effect looks like regular shimmer. If you touch the polish with the magnet, you've ruined the layer and need to start over.
Design Breakdown:
Magnetic particle effect on a dark base. The physics of the magnet create the design, not your brush.
Base Color: Opaque black. The darker the base, the more dramatic the cat eye band appears.
Nail Shape: Long coffin. The extended surface area gives the diagonal band room to travel across the nail.
Design Element: Silver or white cat eye magnetic polish applied over black, with the magnet held diagonally to concentrate the particles into a sharp band.
Finish: High-gloss top coat. The shine amplifies the dimensionality of the magnetic effect.
Get The Look at Home:
Practice holding the magnet steady before you start. Shaky hands produce blurry bands.
- Black base: Two coats of opaque black. Let dry fully.
- Cat eye coat: Apply one generous coat of silver cat eye magnetic polish over the black. Work one nail at a time.
- Magnet time: Immediately hold the magnet diagonally across the wet nail, about 5mm above the surface. Hold steady for 10-15 seconds. You'll see the particles concentrate into a bright band.
- Repeat if needed: If the band isn't sharp enough, reapply the magnetic polish and try again. The effect is reversible while wet.
- Flash cure (gel only): If using gel cat eye polish, flash cure each nail under the lamp immediately after magnetizing to lock the particles in place.
- Seal: Two coats of top coat to protect the magnetic effect and add depth.
32 Bright & Fun Summer Toe Nail Designs (2026)
8.Victorian Lock and Key
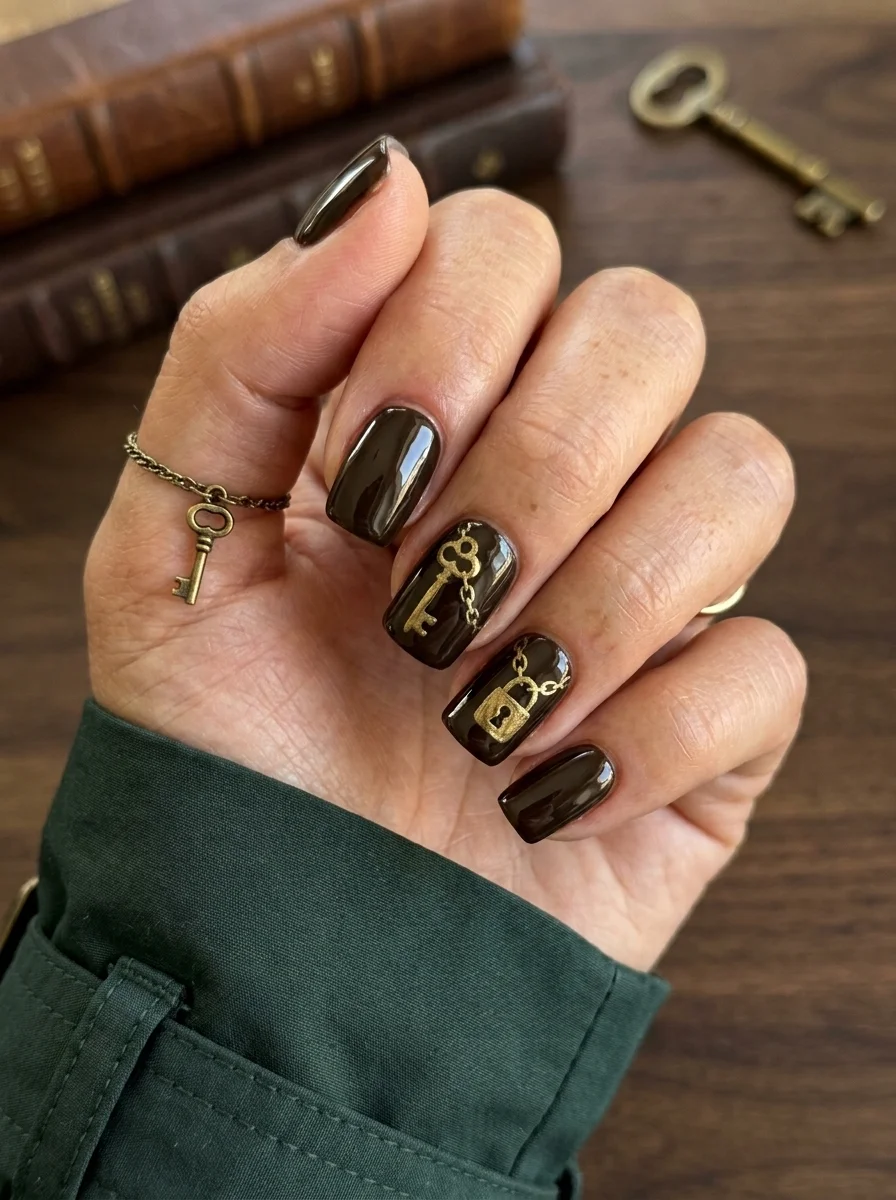
Antique gold hardware painted onto a glossy black base.
Overview:
Lock and key motifs have a specific gothic-romantic quality that separates them from generic "spooky" nail art. The antique gold against the black base evokes old jewelry boxes and Victorian keepsakes rather than Halloween decorations. That distinction matters if you want goth nails that work year-round.
The accent nail approach is smart design here. Putting a lock on one nail and a key on another creates a narrative across the hand. Your eye connects the two elements and fills in the story. Scattered lock and key shapes on every nail would dilute that storytelling into a random pattern.
Short square nails are the right canvas for this. The flat surface provides stable ground for the detailed lock and key illustrations, and the shorter length keeps the ornate gold work from looking busy. Long nails with this much detail per square millimeter would start to feel cluttered.
Design Breakdown:
Illustrated hardware on a solid dark base. The two accent nails carry the entire design narrative.
Base Color: Deep, opaque black. The gold needs maximum contrast to read as metallic.
Nail Shape: Short square. Clean edges complement the geometric precision of the lock and key shapes.
Design Element: Hand-painted antique gold lock on one accent nail, ornate key on another. Remaining nails are solid black.
Finish: High-gloss top coat to make the gold look lacquered.
Get The Look at Home:
The lock and key are painted in stages: base shapes first, then detail lines, then highlight dots.
- Black base: Two coats of opaque black on all nails. Let dry fully.
- Lock shape: On the lock accent nail, paint a small gold rectangle near the cuticle. Add a smaller gold circle on top for the keyhole plate.
- Key shape: On the key accent nail, paint a thin gold shaft with a circular bow (the ornate top part) and small teeth at the tip.
- Detail lines: Using black polish and a fine liner brush, add definition lines inside the lock body and key teeth.
- Highlight: A tiny dot of bright gold or yellow on the lock's keyhole and the key's bow creates the illusion of dimensional metal.
- Seal: One thick coat of top coat to smooth the raised paint and unify the surface.
9.Dark Plum Dagger
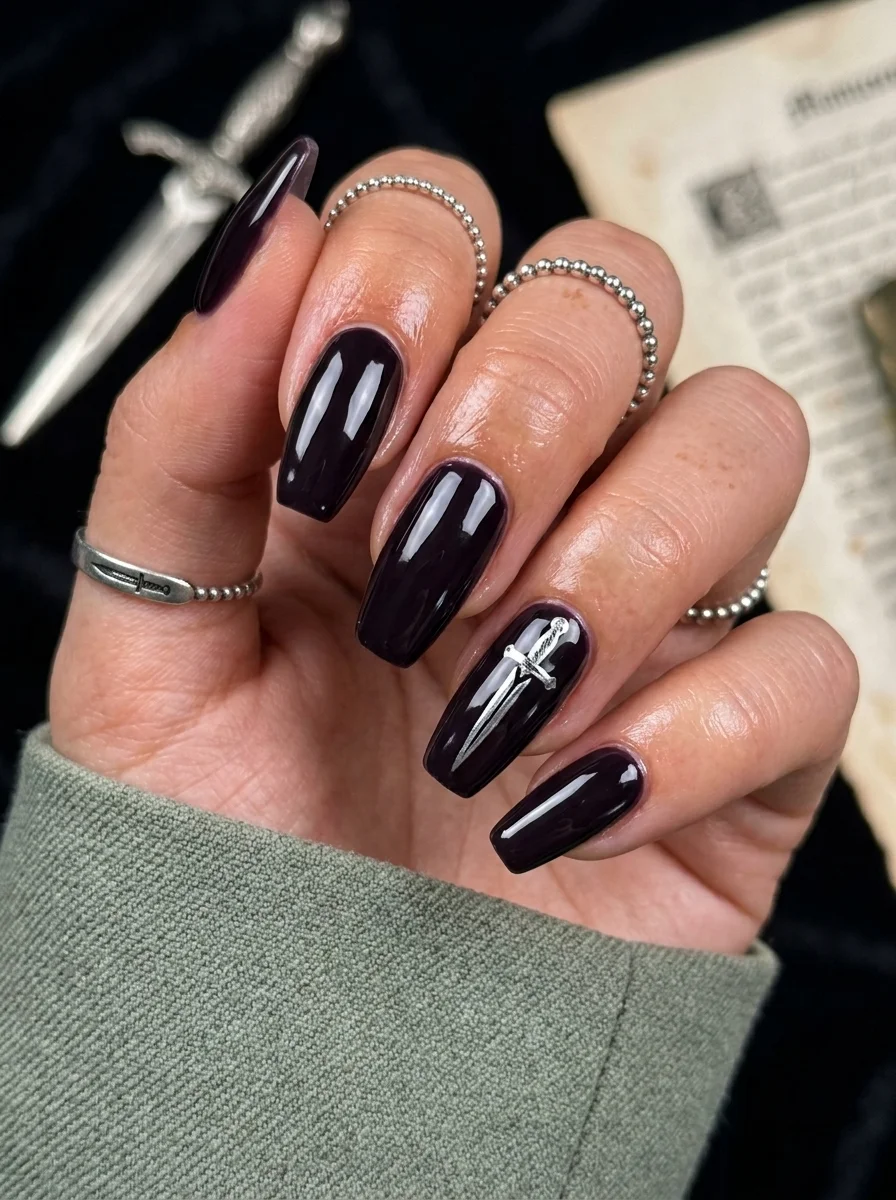
Moody purple meets sharp metallic detail on a single statement nail.
Overview:
Deep plum purple sits in an interesting color space. It's dark enough to read as goth, but the purple undertone gives it a richness that pure black lacks. Under warm lighting, it pulls redder. Under cool lighting, it reads more violet. That chameleon quality makes it more versatile than black for everyday wear.
The single silver dagger accent nail is the design's anchor. Without it, this is a beautiful solid purple manicure. With it, the set becomes a deliberate statement. The dagger is painted in metallic silver with enough detail (crossguard, blade edge, pommel) to read as a weapon, not a generic silver shape.
The high-gloss finish does double duty here. It makes the purple look wet and saturated, and it gives the silver dagger a reflective quality that mimics actual metal. A matte finish would flatten both the color and the illustration.
Design Breakdown:
Solid deep color with a single metallic accent illustration. Restraint is the design principle.
Base Color: A rich, opaque plum or deep eggplant purple. Two coats for full, streak-free coverage.
Nail Shape: Long coffin. The flat surface frames the dagger illustration and gives the purple room to show its depth.
Design Element: Solid purple on four nails. One accent nail with a detailed silver dagger painted vertically from cuticle to tip.
Finish: Ultra-glossy top coat for maximum color saturation and metallic shine.
Get The Look at Home:
The dagger is painted in layers: silver base shape first, then black detail lines, then white highlight edges.
- Purple base: Two coats on all nails. Let dry fully.
- Dagger base shape: On the accent nail, paint a thin vertical silver line from cuticle to tip for the blade. Add a shorter horizontal silver line near the cuticle for the crossguard.
- Blade detail: Using black polish and a fine liner brush, outline one edge of the blade to create dimension. Add a small silver dot at the cuticle end for the pommel.
- Highlight: A thin white line along the un-outlined edge of the blade creates the illusion of a sharpened edge.
- Seal: Two coats of top coat to smooth the raised paint and amplify the metallic sheen.

30+ Chic Pool Party Hairstyles for Summer 2026 🌊👙
10.Bruised Purple Gradient
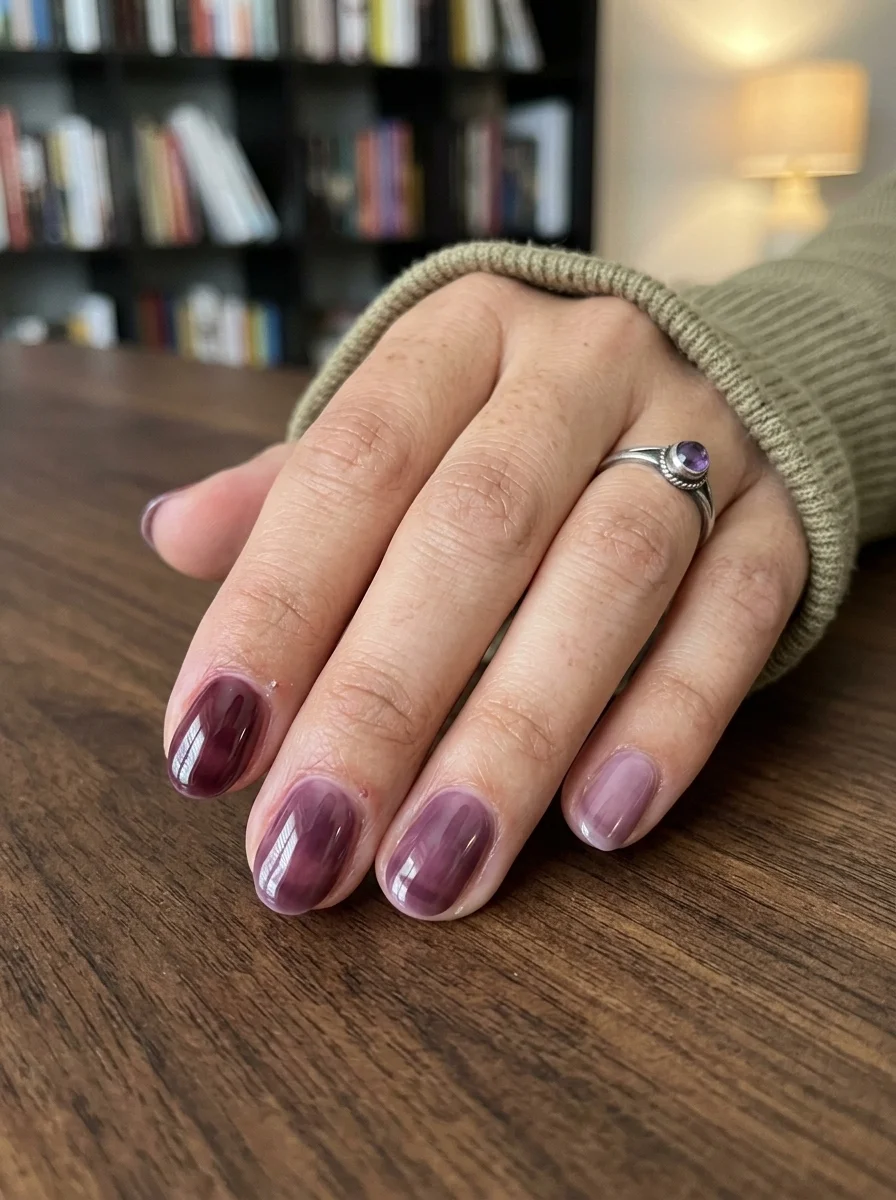
A moody ombre that transitions from dark to light without harsh lines.
Overview:
Purple ombre nails have a specific advantage over black-to-grey gradients: the color itself does the atmospheric work. The transition from deep plum at the tips to a soft mauve at the cuticles reads as bruised, moody, and intentional all at once. It's goth without being stark.
The gradient technique here is forgiving by design. Because both colors share the same purple family, even a slightly uneven blend looks like a deliberate tonal shift rather than a failed ombre. The sponge method works best for this: you're dabbing color on, not painting smooth strokes, so imperfection reads as organic.
Short round nails keep this wearable. The rounded shape softens the gradient's visual weight and prevents the dark tips from looking heavy. On long stiletto nails, the same purple gradient would read as dramatic evening wear. On short rounds, it reads as an interesting color choice.
Design Breakdown:
Tonal gradient within a single color family. The sponge creates the blend.
Base Color: Deep plum purple at the tips, transitioning to a lighter mauve or dusty rose at the cuticles.
Nail Shape: Short round. The curved shape complements the soft gradient transition.
Design Element: Sponge-applied vertical ombre using two shades of purple. No additional art or accents.
Finish: High-gloss top coat to blend the gradient and saturate the colors.
Get The Look at Home:
Yellow and purple pigments behave differently on sponges. Purple covers more easily, so use less product than you think you need.
- Light base: Apply two coats of the lighter mauve shade. Let dry fully.
- Sponge setup: Paint a stripe of deep plum and a stripe of mauve side by side on a makeup sponge. Dab on paper first to remove excess.
- Build the gradient: Press the sponge onto the nail with the plum concentrated at the tip. Three to four dabs builds opacity gradually.
- Blend the transition: Reposition the sponge slightly so the colors overlap in the middle. Two light dabs in the overlap zone smooths the transition.
- Dry completely: Wait at least ten minutes before top coating. Sponge texture needs time to level.
- Seal: Two coats of top coat to smooth the sponge texture and unify the gradient.
11.Copper Ember Fade
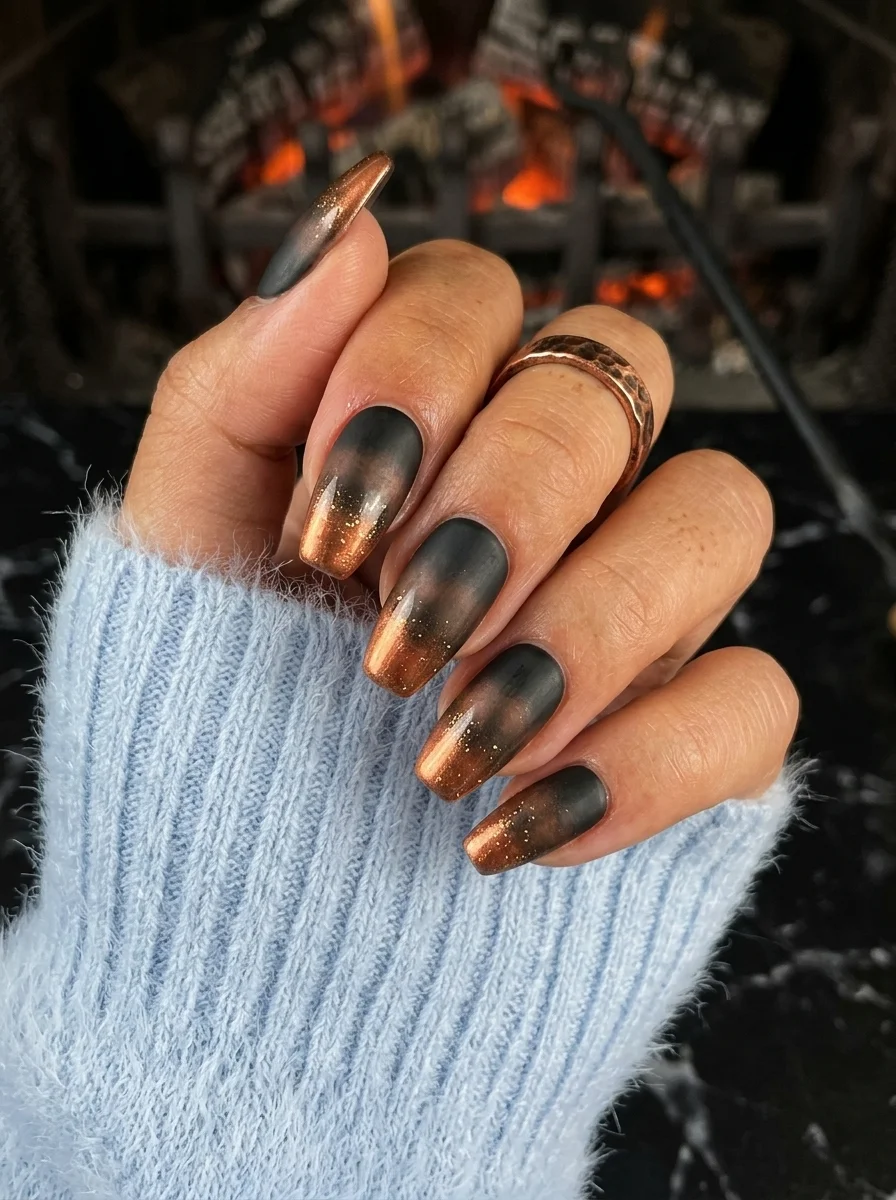
Embers dying out across your fingertips in the best possible way.
Overview:
Black-to-copper glitter gradients look like embers fading into ash. The matte black at the tips transitions into warm, sparkling copper that catches light differently depending on the angle. It's one of those designs that rewards movement: a static photo captures one moment, but tilting your hand reveals new sparkle patterns.
The glitter density matters. Too sparse and the gradient reads as black nails with a few stray glitter particles. Too dense and the transition line becomes harsh. The sweet spot is concentrated glitter at the cuticle that thins out gradually toward the center, where the black takes over completely.
One practical note: glitter gradients are harder to remove than solid colors. The particles grip the nail plate and resist acetone. A peel-off base coat underneath saves you twenty minutes of scraping at the end of your wear period.
Design Breakdown:
Dark-to-metallic gradient using loose glitter concentrated at the cuticle. The sparkle does the heavy lifting.
Base Color: Matte black on the tips transitioning to bare nail or sheer nude at the cuticles, where the glitter sits.
Nail Shape: Long coffin. The extended length gives the gradient room to develop from full glitter to solid black.
Design Element: Copper and rose gold glitter concentrated at the cuticles, fading toward the center. Black polish at the tips fading upward.
Finish: High-gloss top coat to encapsulate the glitter and create a smooth surface.
Get The Look at Home:
Apply the glitter while the base is still slightly tacky so the particles embed into the surface rather than sitting on top.
- Sheer base: One coat of sheer nude on all nails. Let dry.
- Black tips: Using a makeup sponge, dab black polish onto the tip of each nail, fading toward the center. Build in thin layers.
- Glitter placement: While the black-to-nude transition is still slightly tacky, press loose copper glitter onto the cuticle area using a sponge or finger.
- Concentrate at cuticle: Add more glitter near the cuticle and less toward the center. The gradient should feel like embers dying out.
- Encapsulate: Apply two thick coats of top coat to smooth the glitter texture. Run your finger over the nail after each coat; if you feel grit, add another layer.
34 Cutest Butter Yellow Nail Designs for 2026 🧈
12.Lunar Phase Symbols
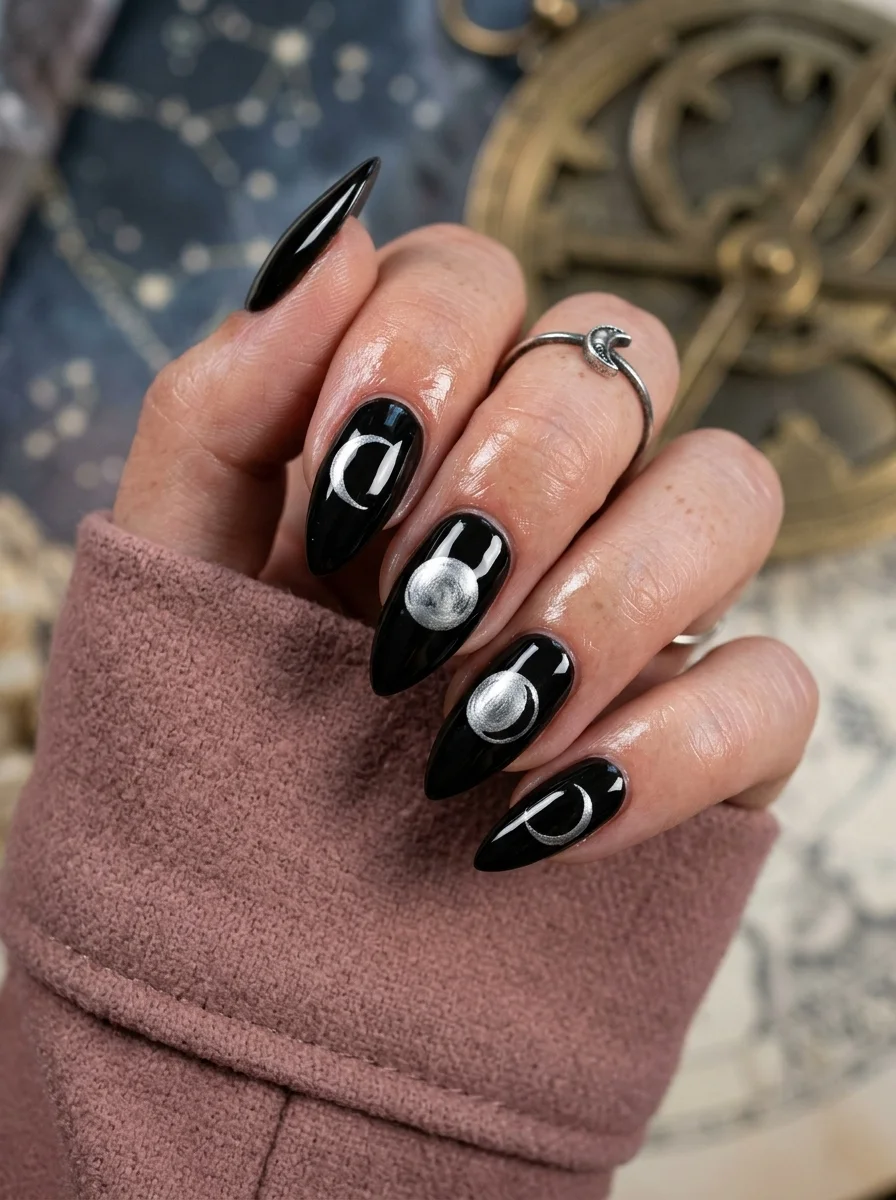
Celestial goth meets minimal iconography on a dark canvas.
Overview:
Moon phase nails work because the symbols are universally recognized and visually simple. A crescent is two curved lines. A full moon is a circle. The challenge isn't drawing them; it's spacing them across multiple nails so the phases read as a sequence rather than random shapes.
The silver-on-black palette keeps this firmly in goth territory. Gold moon phases would shift the mood toward bohemian. Silver maintains the cool, nocturnal energy that makes the celestial reference feel appropriately dark.
Long almond is the ideal shape for this design. The tapered tip echoes the crescent form, and the extended length gives each moon phase enough space to be individually recognizable. On shorter nails, the phases compress and start looking like abstract silver blobs instead of specific celestial symbols.
Design Breakdown:
Minimal celestial icons on a solid dark base. The symbols are simple; the arrangement creates the story.
Base Color: True, opaque black. The silver needs maximum contrast to read as metallic.
Nail Shape: Long almond. The curved shape complements the circular moon forms.
Design Element: Silver moon phases (new moon, crescent, half-moon, gibbous, full) distributed across the nails in sequence.
Finish: High-gloss top coat to protect the silver and create depth.
Get The Look at Home:
Plan the phase sequence across all nails before you start painting. Decide which nail gets which phase.
- Black base: Two coats of opaque black. Let dry fully.
- Full moon: On one nail, use a dotting tool and silver polish to paint a complete circle. This is your reference for size.
- Crescent moons: On other nails, paint a silver circle and then cover part of it with black to create the crescent shape. Alternatively, paint the crescent directly using a curved brush stroke.
- Half and gibbous: Fill in portions of the circle to create the intermediate phases. Each phase should be visibly different from the others.
- Star accents: Optional: add tiny silver dots around the moon phases for a starfield effect.
- Seal: One thick coat of top coat to smooth the raised silver paint.
13.Tortoiseshell Noir
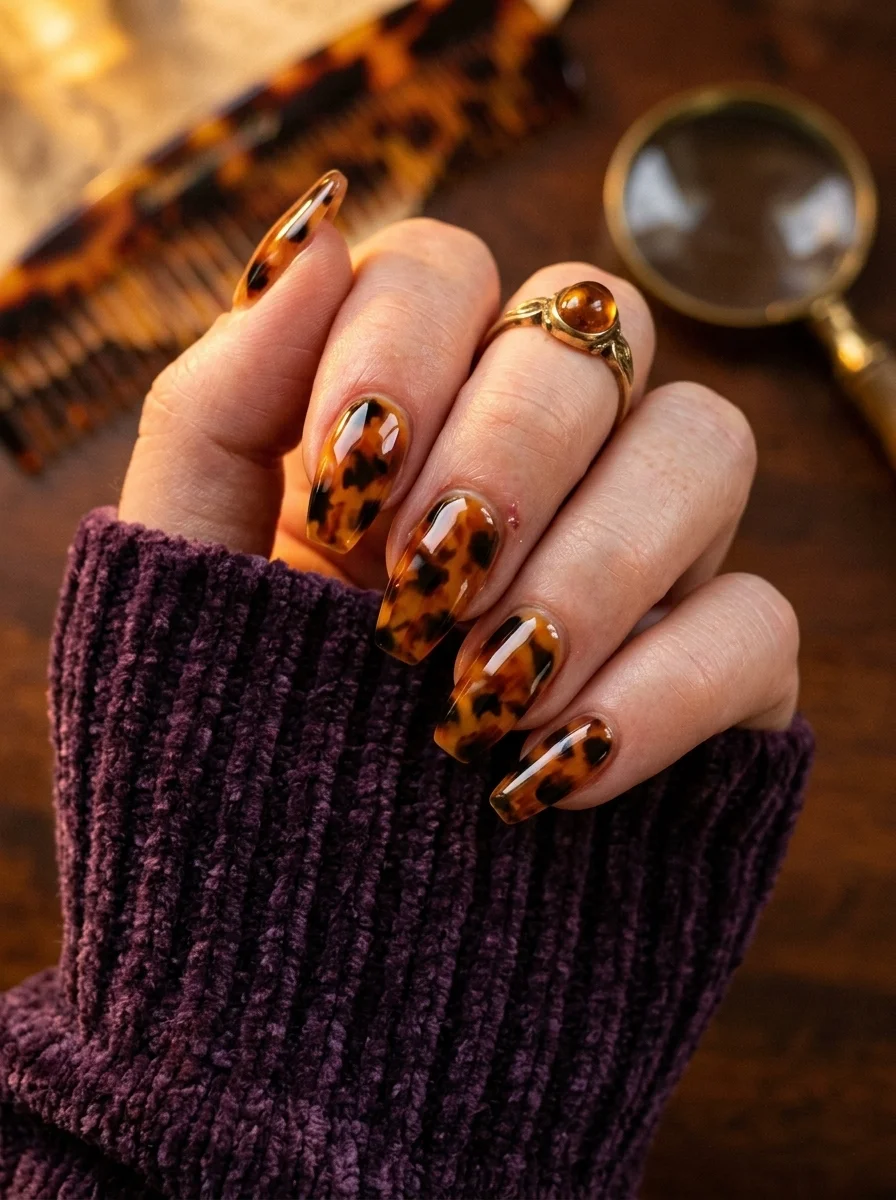
Warm, vintage-inspired pattern that reads as sophisticated goth.
Overview:
Tortoiseshell is usually filed under "preppy" or "autumnal," but the pattern's dark amber-and-brown palette fits comfortably within goth aesthetics when the nail shape carries enough edge. Long coffin nails transform tortoiseshell from "grandmother's reading glasses" to "something you'd see in a Tim Burton film."
The technique is wet-on-wet, similar to marble, but with a tighter color range. You're working within amber, brown, and black, dropping darker spots into a wet amber base and letting them spread naturally. The organic spread is what creates the realistic tortoiseshell look. Trying to paint precise spots produces a polka-dot effect instead.
The translucent quality of the amber base is essential. If the base is too opaque, the dark spots sit on top and look stamped on. A semi-sheer amber lets the dark brown sink into the color, creating the layered depth that makes tortoiseshell look like an actual material rather than a pattern.
Design Breakdown:
Wet-on-wet technique using a narrow warm palette. The organic spread of the dark spots creates the pattern.
Base Color: A translucent amber or honey brown. Sheer enough that light passes through.
Nail Shape: Long coffin. The flat surface gives the pattern room to develop its organic spots.
Design Element: Dark brown and black spots dropped into wet amber base, allowed to spread organically. No two nails should look identical.
Finish: High-gloss top coat to create the polished resin illusion.
Get The Look at Home:
Work one nail at a time. The spots need to be placed while the base is still wet, and you can't wait for multiple nails to be ready at once.
- Amber base: Apply one generous coat of translucent amber. Do NOT let it dry.
- Dark spots: While the amber is wet, use a dotting tool to place irregular spots of dark brown and black. Let them spread naturally.
- Don't overwork: Three to five spots per nail is enough. The negative amber space between spots is what makes it look like tortoiseshell.
- Layer for depth: Once the first layer is dry, apply another sheer amber coat and repeat the spotting. This creates the layered depth of real tortoiseshell.
- Seal: Two coats of top coat to smooth the surface and create the polished resin shine.

24 Stunning Festival Hairstyle Ideas for Music Concert Nights 2026 🎶✨
14.Black Marble Silver Veins
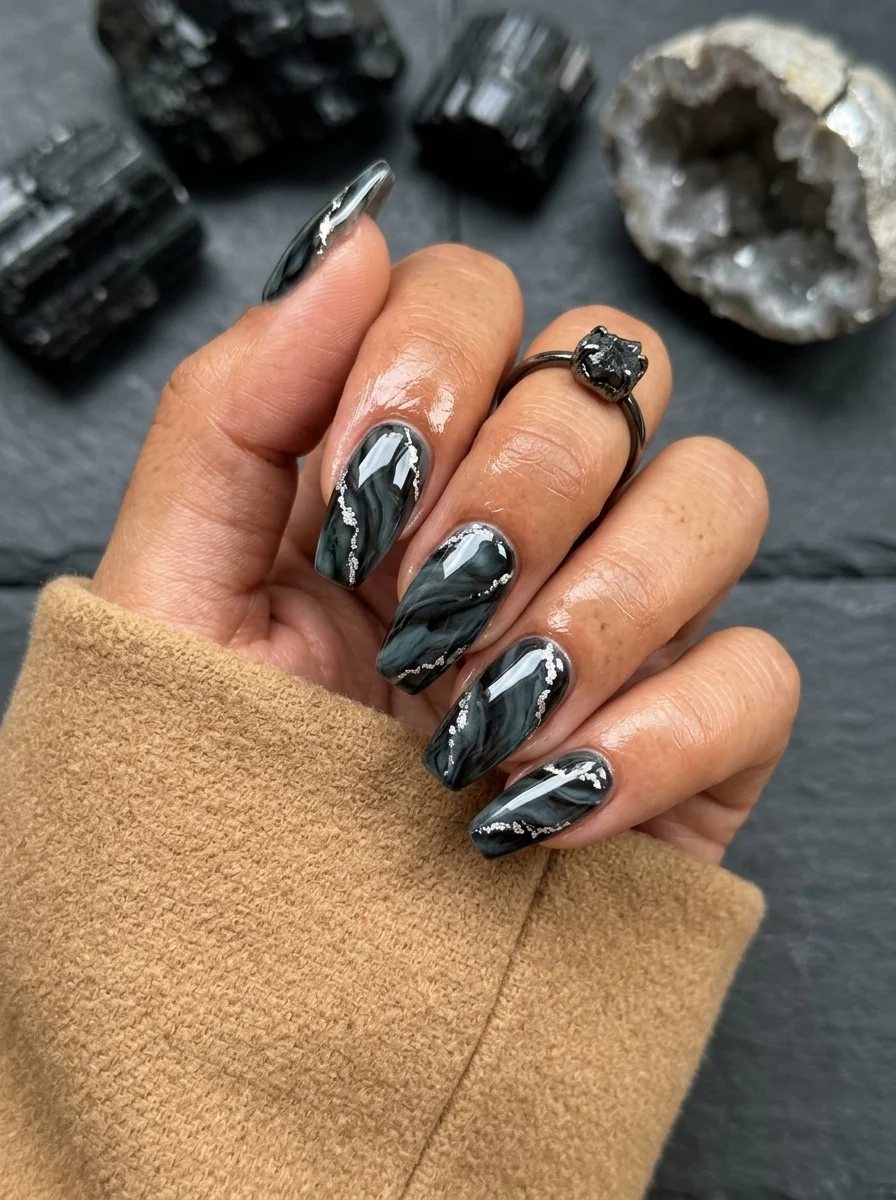
Dark marble with metallic veins that catch the light like actual stone.
Overview:
Black marble with silver veining is the goth equivalent of white Carrara marble: it takes a material association that people already find beautiful and shifts it into a darker register. The silver veins catch light in a way that pure white marble veins don't, which adds a metallic dimension that elevates the design beyond simple marble art.
The glitter accents scattered along the veins are a subtle addition that makes a noticeable difference. Without them, the silver lines read as painted-on stripes. With them, the veins look like they contain mineral deposits, which reinforces the stone reference. The glitter should be sparse, concentrated along the vein lines rather than scattered across the entire nail.
The wet-on-wet marble technique is forgiving here because marble is inherently irregular. Your "mistakes" are just natural variation. The key is limiting your drags to three or four per nail. Overworking blends the silver into the black and produces muddy grey instead of sharp veins.
Design Breakdown:
Marble technique with metallic accent veins. The silver creates the geological reference.
Base Color: Opaque black. The silver veins need maximum contrast.
Nail Shape: Long almond. The curved surface mimics the natural contours of stone.
Design Element: Silver and white veins dragged through wet black polish, with fine silver glitter concentrated along the vein lines.
Finish: High-gloss top coat to create the polished stone surface.
Get The Look at Home:
Have your silver polish and glitter ready before you start. The wet-on-wet window is short.
- Black base: Apply one coat of black. Let dry. Apply a second wet coat as your working surface.
- Silver drops: While the second coat is wet, place small drops of silver polish along one side of each nail.
- Drag the veins: Using a thin brush, drag through the silver drops in organic, branching lines. Two to three drags per nail, then stop.
- Add glitter: While still wet, press fine silver glitter along the vein lines using a small brush.
- Dry completely: Wait at least ten minutes before top coating.
- Seal: Two coats of top coat to smooth the texture and create the stone surface.
15.Iridescent Beetle Shell
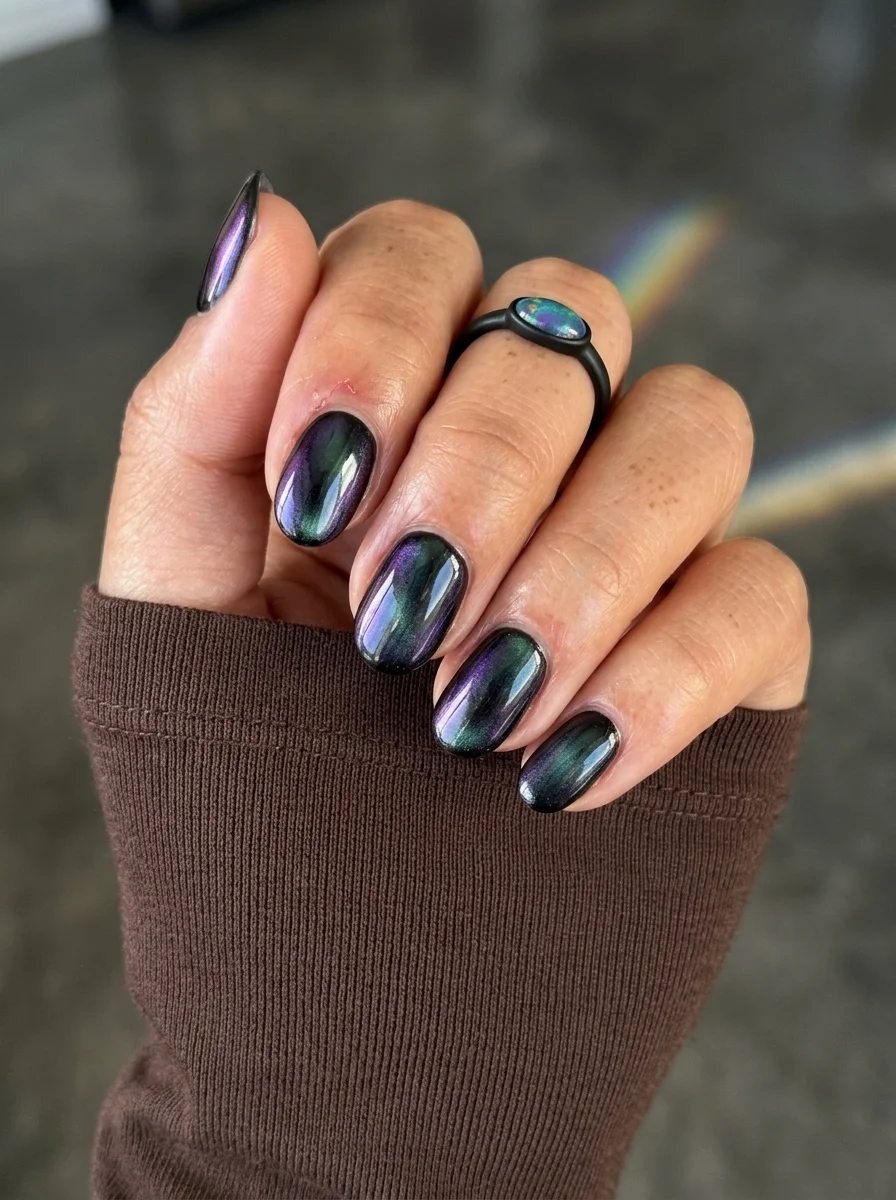
Color-shifting polish that changes personality with every angle.
Overview:
Iridescent or "chameleon" polish uses interference pigments that reflect different wavelengths of light depending on the viewing angle. On these nails, the color shifts between deep purple and forest green, which happens to be a gothic color combination that reads as sophisticated rather than costume.
The simplicity of the design is its strength. No accent nails, no painted art, no embellishments. The polish itself is the entire statement. This is one of the rare designs where "less" genuinely produces more visual interest than adding elements would.
Short oval nails keep the focus on the color shift rather than the nail shape. The curved surface actually helps the iridescence work better: the color transitions happen more dramatically on a curved surface because the angle of light changes across the nail. Flat nails would show less shift.
Design Breakdown:
Single-product design. The interference pigment creates all the visual complexity.
Base Color: Black as an undercoat amplifies the color shift. The chameleon pigment is semi-sheer, so a dark base deepens the reflected colors.
Nail Shape: Short oval. The curved surface maximizes the iridescent shift.
Design Element: Two coats of purple-green chameleon polish over a black base. No additional art.
Finish: High-gloss top coat to amplify the color shift and create depth.
Get The Look at Home:
The black undercoat is non-negotiable. Without it, chameleon polish looks washed out and the color shift barely registers.
- Black base: Two coats of opaque black. Let dry fully. This is the foundation that makes the color shift visible.
- Chameleon coat 1: Apply one coat of purple-green interference polish. It will look sheer and uneven. That's normal.
- Chameleon coat 2: Apply a second coat for full color saturation. The purple and green shifts should both be visible when you tilt your hand.
- Check the shift: Tilt your hand under light to confirm both colors appear. If it only shows one color, add a third coat.
- Seal: Two coats of top coat. The gloss surface enhances the interference effect.
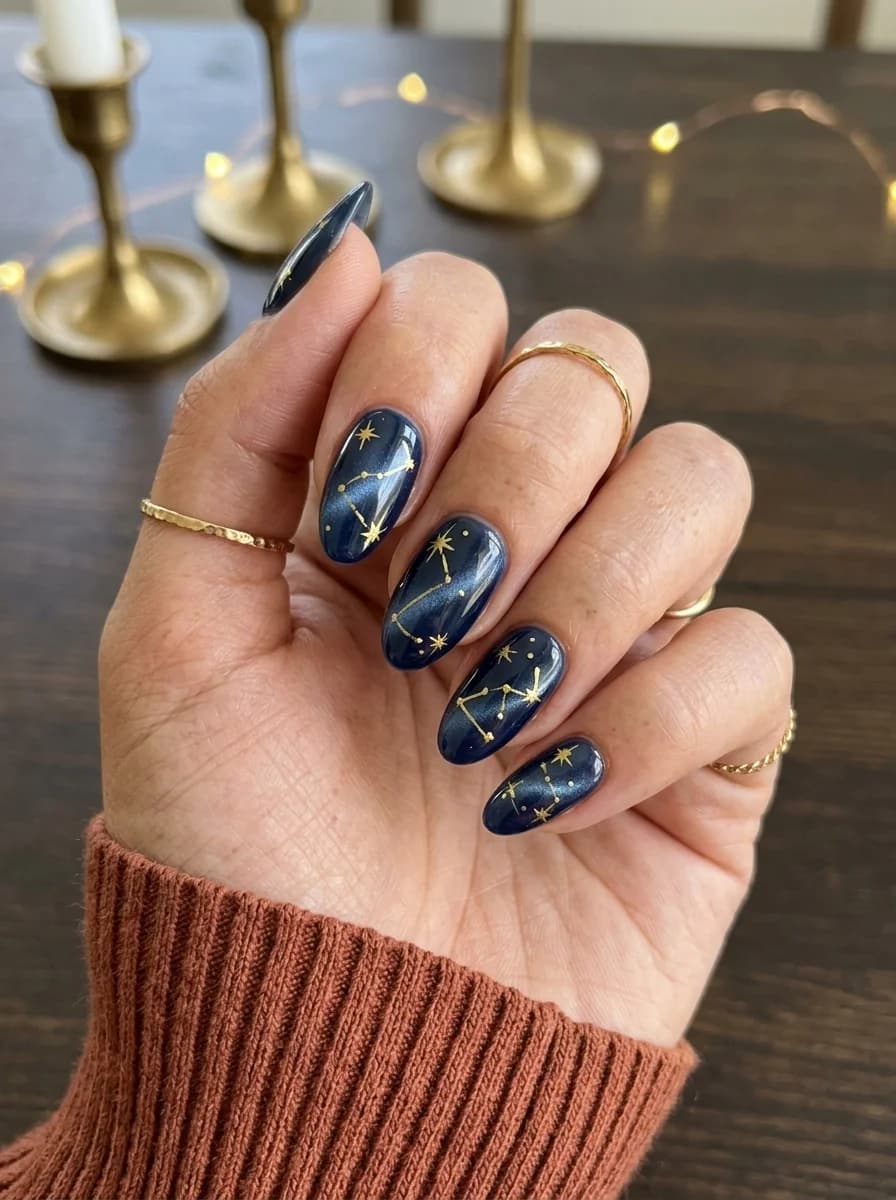
35 Cat Eye Nail Designs That You'll Love (2026)
16.Black Lace Veil
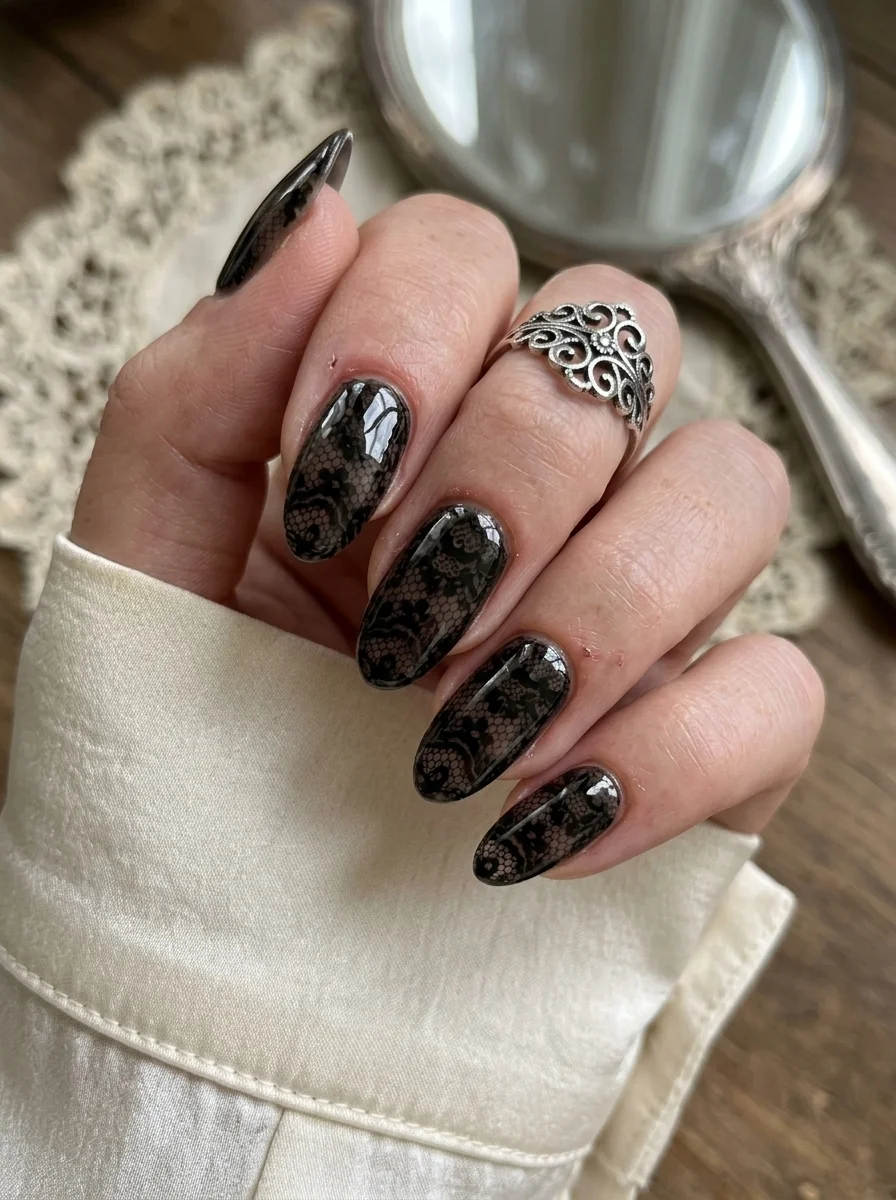
Delicate lacework that transforms your nails into Victorian mourning jewelry.
Overview:
Black lace nails sit at the intersection of goth and elegance. The design uses fine black lines to create lace-like patterns over a sheer or nude base, mimicking the look of actual lace fabric draped across the nail. The transparency of the base is what makes this work: the lace appears to float on top of your natural nail rather than sitting on an opaque surface.
The long almond shape enhances the lace reference. Real lace drapes and curves, and the tapered almond silhouette mirrors that softness. On square or coffin shapes, the same pattern would look more like a cage or fence than delicate fabric. The shape influences the design's personality more than you'd expect.
The pattern itself is less complicated than it appears. Each "lace" element is built from basic shapes: small circles for the floral centers, thin curved lines for the petals, and connecting threads between them. The complexity comes from repetition and density, not from any single element being difficult to paint.
Design Breakdown:
Intricate line art over a sheer base. The negative space between the lace elements is as important as the black lines themselves.
Base Color: Sheer nude or clear. The lace needs to read as floating over the natural nail.
Nail Shape: Long almond. The curved silhouette echoes the organic flow of lace fabric.
Design Element: Black lace pattern with floral motifs, connecting threads, and scalloped edges painted across the full nail surface.
Finish: High-gloss top coat to create a veil-like sheen over the lace.
Get The Look at Home:
Work from the center outward. Establish the main floral motifs first, then connect them with the thread lines.
- Sheer base: One or two coats of sheer nude or clear polish. Let dry fully.
- Floral centers: Using a small dotting tool and black polish, place small circles scattered across the nail. These are the centers of your lace flowers.
- Petal lines: Using a thin liner brush, paint small curved lines radiating from each center circle. Three to four petals per flower.
- Connecting threads: Draw thin, wavy lines between the flowers to create the lace webbing. Keep these lines thin and organic.
- Scalloped edge: Along the cuticle line or tip, paint small connected arcs to create the scalloped lace border.
- Seal: One careful coat of top coat, floated over the design without dragging the fine lines.
17.Obsidian Glitter Crust
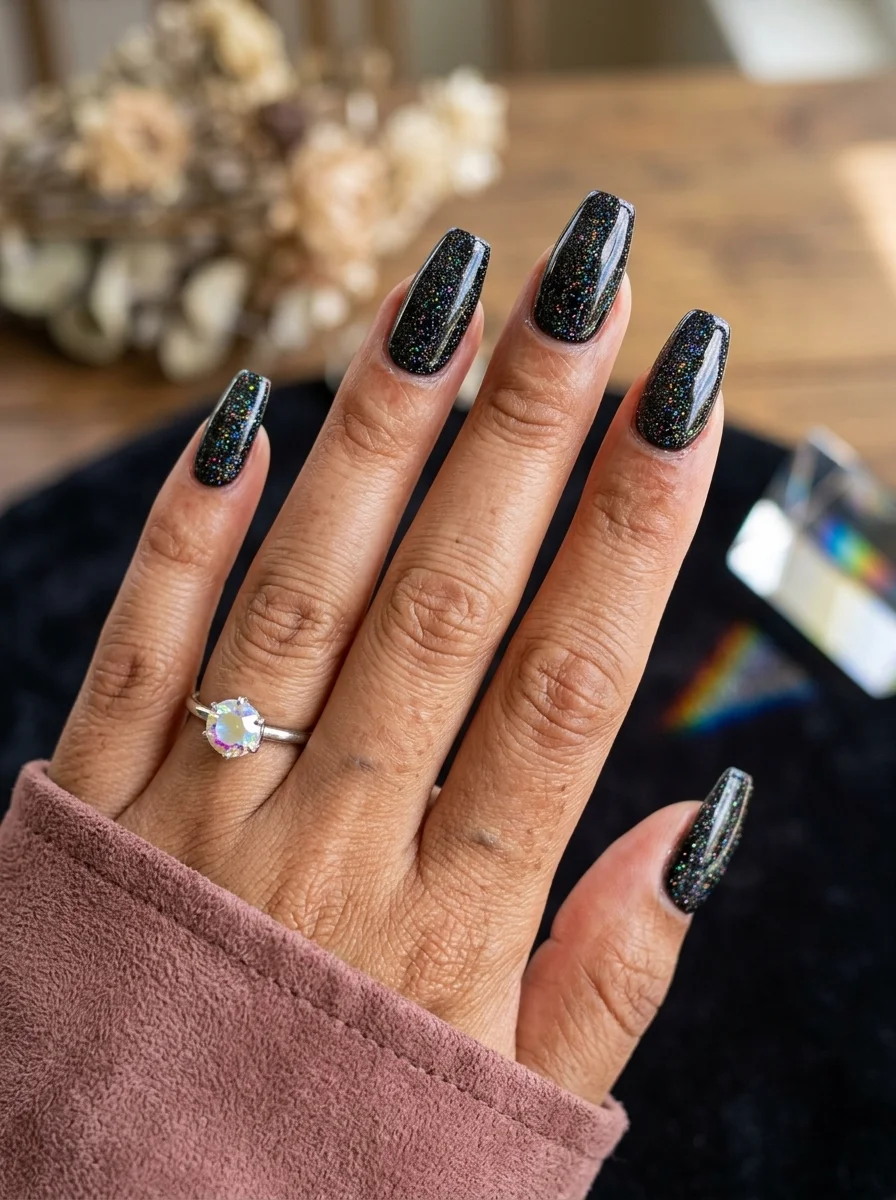
All-over glitter that catches light like crushed obsidian stones.
Overview:
Full-coverage glitter nails in black are deceptive. From a distance, they look like regular black polish. Up close, the glitter particles catch light and create a depth that flat black can't achieve. The effect is like looking at a night sky where the stars are black instead of white—subtle, dimensional, and slightly unsettling in the best way.
The density of the glitter determines the design's character. Sparse glitter over black reads as "black nails with some sparkle." Full coverage, where the glitter completely obscures the base, reads as a textured material. The goal is that second look: a surface that appears to be made of ground gemstone rather than painted on.
One consideration: chunky glitter creates a rough texture that catches on fabric and hair. Fine micro-glitter gives you the same visual depth without the tactile annoyance. If you do use chunky particles, invest in a thick leveling top coat that can encapsulate the texture into a smooth surface.
Design Breakdown:
Full-coverage glitter over a dark base. The particle density creates the texture illusion.
Base Color: Black underneath ensures no bald spots show through between glitter particles.
Nail Shape: Long coffin. The flat surface area maximizes the glitter's light-catching potential.
Design Element: Dense black glitter applied in multiple layers until the base is completely covered. Fine micro-glitter preferred for smooth finish.
Finish: Multiple coats of thick top coat to encapsulate the glitter and create a smooth, glassy surface.
Get The Look at Home:
Layering is key. One coat of glitter over black won't achieve full coverage. Plan for three to four coats.
- Black base: Two coats of opaque black. Let dry fully. This prevents any nail plate from showing through gaps in the glitter.
- Glitter coat 1: Apply one coat of black glitter polish. It will look sparse. That's expected.
- Glitter coat 2: Apply a second coat, concentrating on any thin spots. The coverage should be building toward opaque.
- Glitter coat 3: A third coat for full, dense coverage. Each nail should look like it's made of crushed gemstone.
- Leveling: Let the glitter dry for fifteen minutes. The surface will feel rough. This is normal.
- Encapsulate: Apply two to three thick coats of top coat, letting each dry before the next. Run your finger over the nail after the final coat; if you still feel grit, add another layer.

26 Best Hiking Hairstyles That Survive the Trail and Look Good in Photos
18.Black and Gold Serpentine
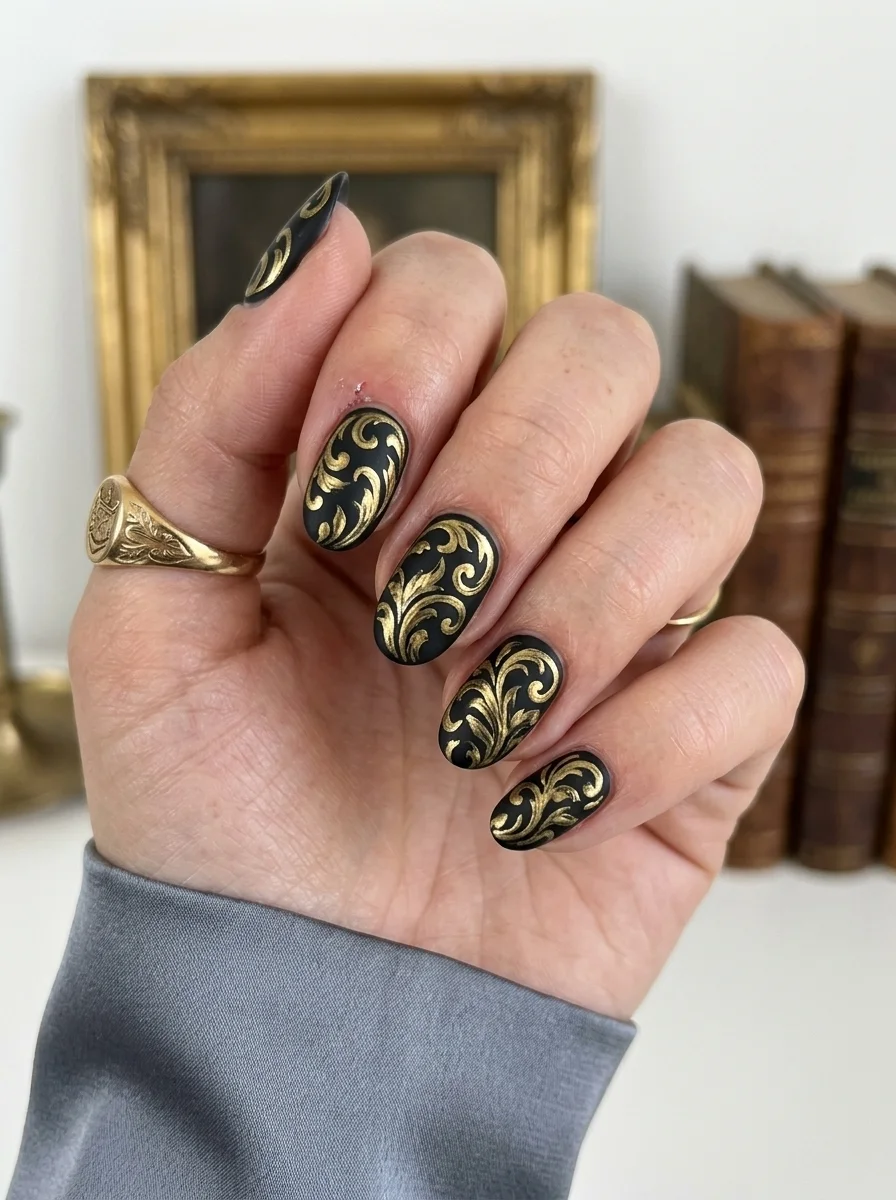
Liquid gold winding through darkness like a serpent through shadows.
Overview:
Black and gold swirls create an immediate sense of luxury that most goth nail designs deliberately avoid. The combination reads as "expensive goth" rather than "punk goth," which broadens the design's wearable range. You could wear these to a gallery opening or a rock concert and feel equally appropriate.
The swirl technique here is controlled rather than chaotic. Unlike the wet-on-wet marble in design one, these gold swirls are painted onto a dry black base, which gives you complete control over the line width, direction, and density. The gold sits on top of the black as a distinct layer rather than blending into it.
The metallic quality of the gold is what sells this design. Flat yellow-gold paint would look like mustard squeezed onto black nails. Chrome or metallic gold polish reflects light and creates the illusion of actual molten metal flowing across the surface. The finish matters as much as the color.
Design Breakdown:
Metallic line art on a solid dark base. The swirls create movement across a static background.
Base Color: Opaque, high-gloss black. The gold needs maximum contrast and a smooth surface to reflect properly.
Nail Shape: Long coffin. The extended surface gives the swirl lines room to curve and develop.
Design Element: Gold chrome or metallic polish painted in flowing serpentine swirls across each nail. Lines vary in thickness from thin threads to wider bands.
Finish: High-gloss top coat to amplify the gold's reflectivity and protect the line work.
Get The Look at Home:
The swirls should feel organic and flowing, not geometric or rigid. Let your hand move naturally as you paint.
- Black base: Two coats of opaque black. Let dry fully. The surface must be completely smooth for the gold to reflect properly.
- Map the swirl: Before painting, visualize the swirl path across each nail. Plan for two to three main curves per nail.
- Gold lines: Using a thin liner brush and gold chrome polish, paint flowing S-curves across the nail. Start thin, widen in the middle of each curve, and taper at the ends.
- Vary thickness: Alternate between thin accent lines and wider main swirls. The variation creates visual rhythm.
- Connect across nails: On adjacent nails, continue the swirl direction so the pattern flows across the entire hand.
- Seal: Two coats of top coat to protect the metallic lines and unify the surface.
19.Royal Purple Marble
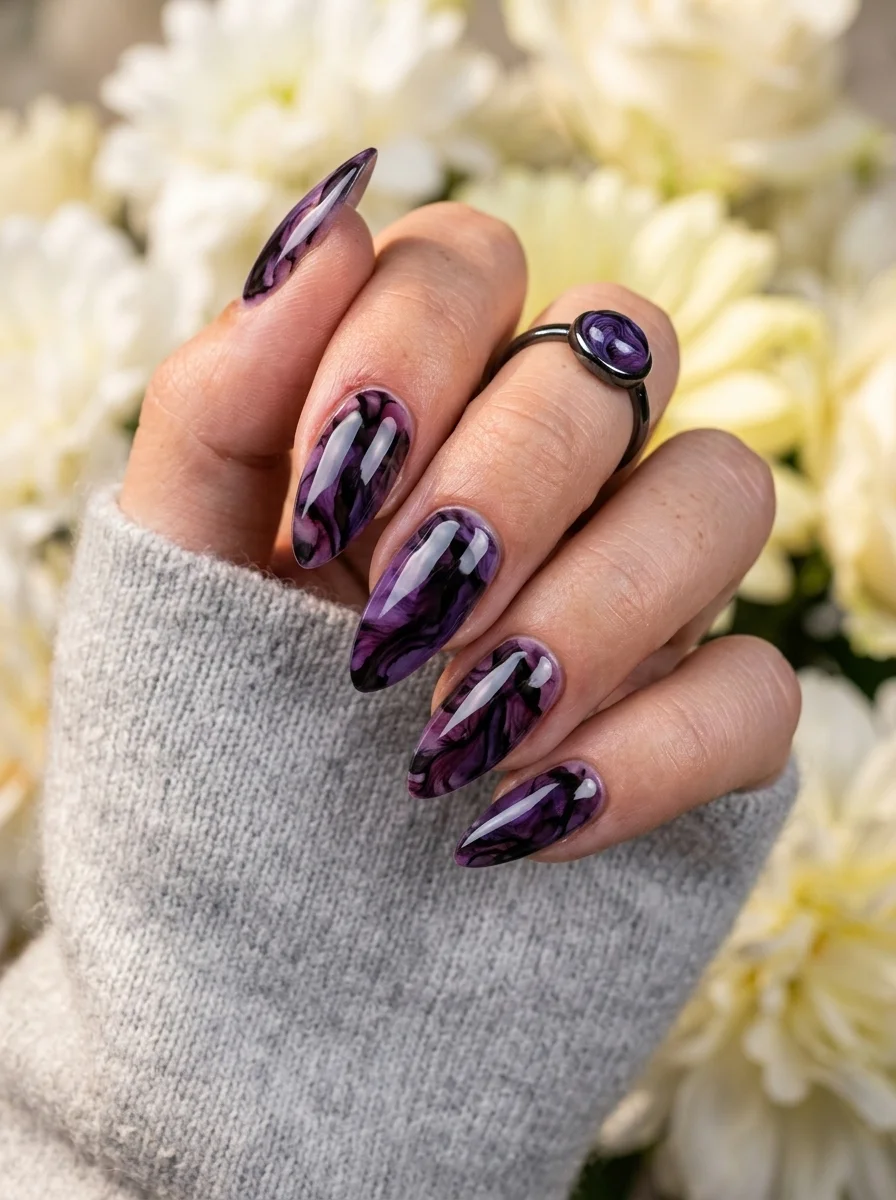
Amethyst geode energy captured in a flowing marble technique.
Overview:
Purple marble nails evoke the interior of an amethyst geode: deep violet swirling through darker channels with lighter crystalline areas catching light. Unlike the black-and-green marble in design one, this version uses purple as both the base and the accent, creating a monochromatic depth that feels regal rather than smoky.
The wet-on-wet technique works particularly well with purple because the color family has natural tonal range. Deep plum, bright violet, and pale lavender all share the same hue but read differently depending on saturation. When you drag these shades through each other while wet, they create organic gradients that look like actual stone rather than painted swirls.
The almond shape complements marble art because marble itself forms in organic, curved patterns. Straight-edged nail shapes create a visual tension with the flowing marble lines. The almond's natural curves let the pattern develop without fighting the nail's geometry.
Design Breakdown:
Tonal marble within a single color family. Multiple purple shades create depth through saturation variation.
Base Color: Deep plum purple as the foundation, with medium violet and pale lavender for the marble veins.
Nail Shape: Long almond. The organic curve mirrors the flowing nature of marble formation.
Design Element: Wet-on-wet marble using three shades of purple dragged through each other to create organic, stone-like patterns.
Finish: High-gloss top coat to create the polished gemstone surface.
Get The Look at Home:
Have all three purple shades ready and open before you start. The wet-on-wet window gives you about sixty seconds per nail.
- Dark base: Apply one generous coat of deep plum. Do NOT let it dry.
- Violet drops: Place small drops of medium violet onto the wet plum using a dotting tool. Three to four drops per nail.
- Lavender accents: Add smaller drops of pale lavender in the gaps between the violet drops.
- Drag the marble: Using a thin brush or toothpick, drag through all three colors in loose, organic curves. Two to three drags per nail. Stop before the colors fully blend.
- Let the colors settle: Give the marble a few seconds to self-level. The colors will continue shifting slightly as they dry.
- Seal: Two coats of top coat to smooth the surface and amplify the gemstone depth.
30 Stunning Beach Nail Ideas for the Best Vacation in 2026 🌊
20.Cutout Heart Negatives
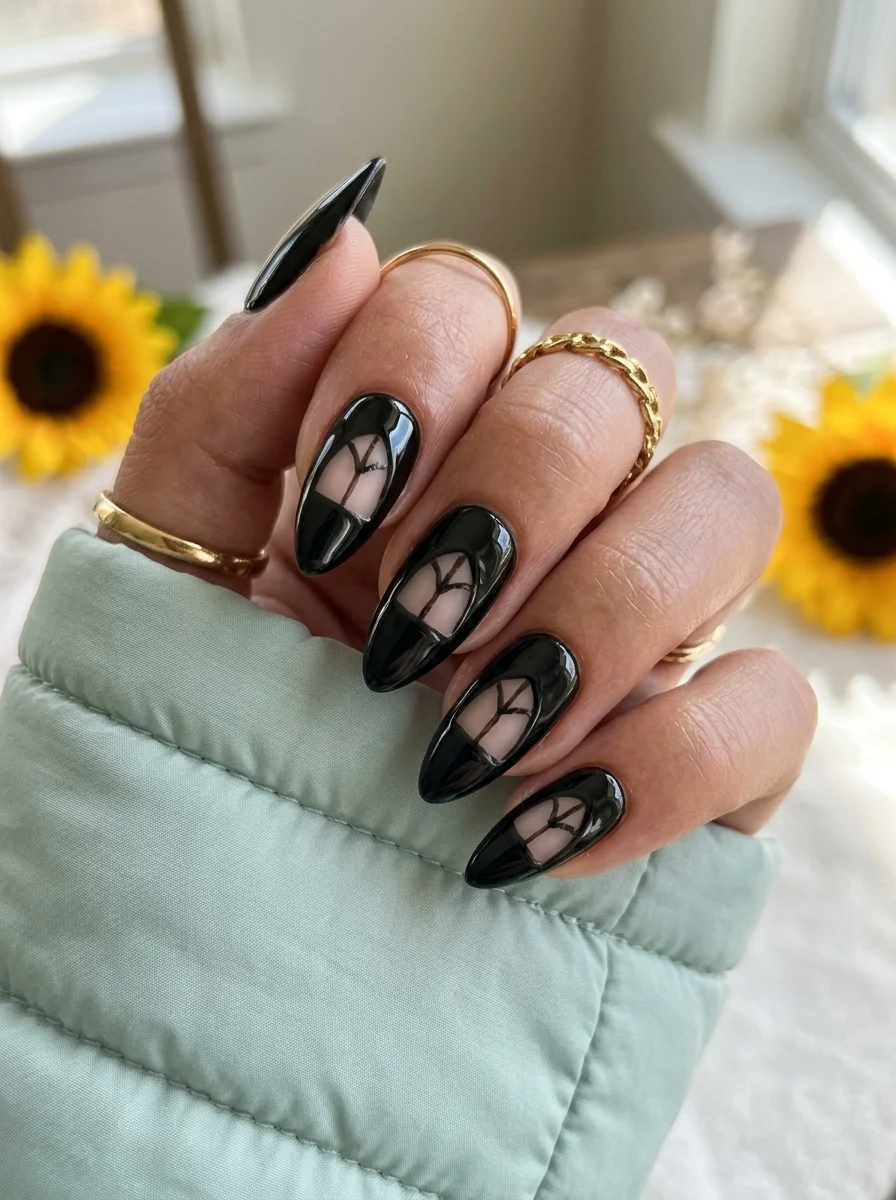
Romance through absence—the hearts exist because of what's been removed.
Overview:
Negative space nail art uses the natural nail as a design element rather than covering it completely. In this case, heart-shaped sections are left unpolished (or painted with clear coat) while the surrounding area is solid black. The hearts read as luminous voids carved into darkness, which is a more poetic take on heart nail art than painting red hearts on black.
The technique requires more planning than freehand painting. You need to map out where each heart sits before applying the black, because the negative space is defined by what you paint around, not what you paint on. Vinyl heart stickers or stencil tape make this much easier than trying to paint the heart shape in reverse.
The coffin shape works well here because the flat tip provides a stable reference line for heart placement. Each heart can sit centered on the nail with even black borders on all sides, creating a framed effect that makes the negative space feel intentional rather than like a missed spot.
Design Breakdown:
Negative space technique using the natural nail as the design element. The absence creates the art.
Base Color: Clear coat over the heart areas, opaque black everywhere else. The contrast between bare and painted creates the design.
Nail Shape: Long coffin. The flat surface gives the heart shape room to be symmetrical and centered.
Design Element: Heart-shaped negative spaces surrounded by solid black. The natural nail color shows through the hearts.
Finish: High-gloss top coat over the entire nail to unify the black and negative space surfaces.
Get The Look at Home:
Heart stencils or vinyl stickers are your best friend here. Freehand hearts are possible but require steady hands and patience.
- Prep: Apply a clear base coat over all nails. Let dry fully.
- Heart placement: Stick small heart-shaped vinyl stickers or stencils onto each nail where you want the negative space hearts. Press edges firmly to prevent bleed-under.
- Black coat 1: Paint black polish over the entire nail, covering the stencil and surrounding area. Let dry.
- Black coat 2: Apply a second coat for full opacity. Let dry completely.
- Remove stencils: Using tweezers, carefully peel each heart stencil off while the polish is slightly tacky but not wet. Pull at a low angle to get clean edges.
- Clean up: Use a small brush dipped in acetone to sharpen any edges where the black bled under the stencil.
- Seal: Two coats of top coat to smooth the transition between the black and negative space.
21.Midnight Constellation Map
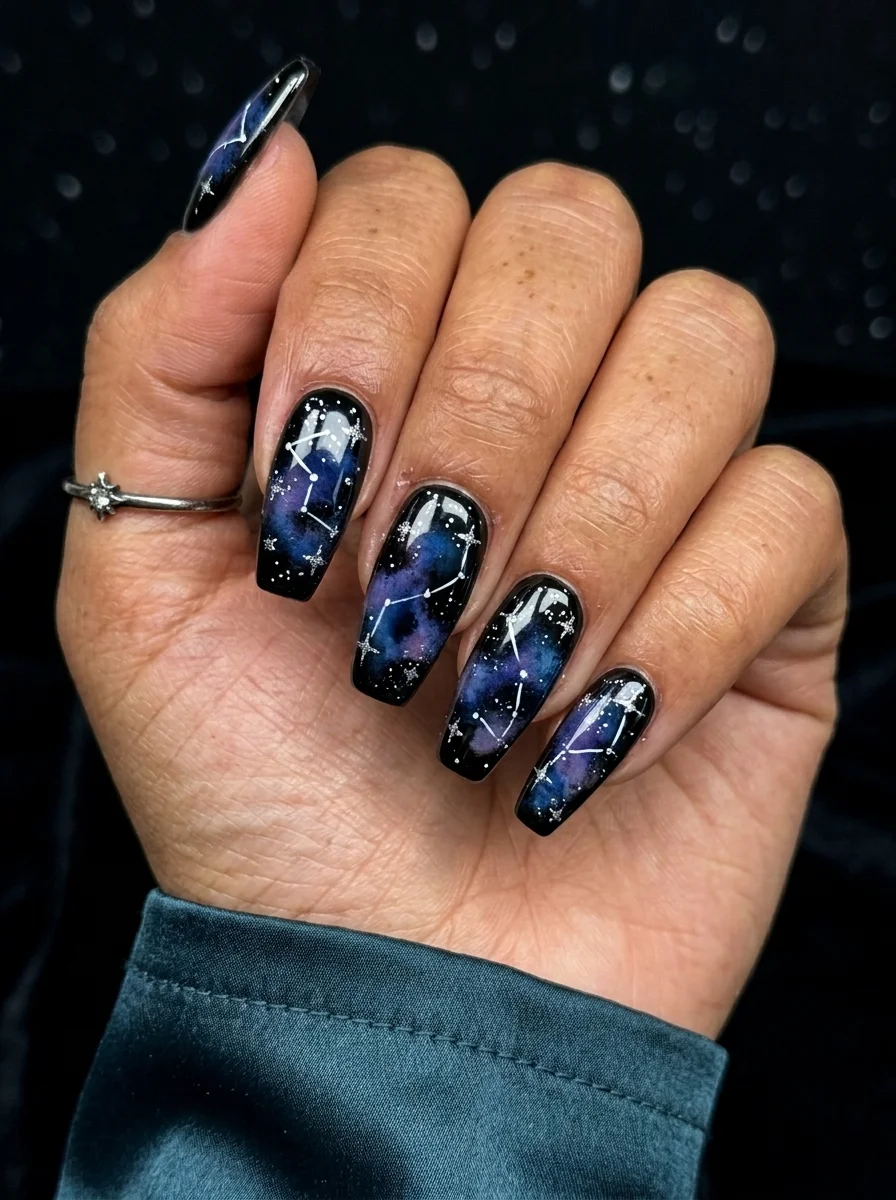
Your own private sky mapped across five fingertips.
Overview:
Constellation nails combine two trends that goth aesthetics already love: dark gradient bases and minimal silver iconography. The gradient shifts from deep navy to pure black, creating the illusion of looking up into an actual night sky. The constellations, painted as small silver dots connected by thin lines, transform the dark base from "pretty colors" into something with narrative and specificity.
The gradient base is what separates constellation nails from simply painting stars on black. The navy undertone at the cuticle creates atmospheric depth—like the sky is brighter near the horizon and darker overhead. This subtle shift makes the flat black portions feel like genuine darkness rather than just a paint color.
Accuracy in the constellation patterns rewards close inspection, but it's not mandatory. The design works just as well with invented constellation patterns as it does with real ones. What matters is consistent dot sizing and even spacing between the connecting lines. Irregular dots read as random splatter rather than intentional star maps.
Design Breakdown:
Dark gradient base with minimal dot-and-line constellation patterns. The atmospheric base creates the sky; the silver creates the story.
Base Color: Deep navy at the cuticles blending into pure black at the tips. Sponge-applied gradient.
Nail Shape: Long almond. The tapered shape mimics looking upward into a night sky.
Design Element: Silver dots representing stars, connected by thin silver lines to form constellation patterns. Two to three constellations per nail.
Finish: High-gloss top coat to create the glassy night sky surface.
Get The Look at Home:
Build the gradient first and let it dry completely before adding the constellation details. Silver dots on wet gradient will sink and blur.
- Navy base: Apply two coats of deep navy. Let dry fully.
- Black gradient: Using a makeup sponge, dab black polish onto the tips, fading toward the center. Build in thin layers until the transition looks seamless.
- Star dots: Using a small dotting tool and silver polish, place dots in constellation patterns. Keep dots uniform in size.
- Connecting lines: Using a thin liner brush, draw straight silver lines between the star dots to connect them into constellations.
- Extra stars: Add a few scattered silver dots between the constellations for depth. Keep these smaller than the main stars.
- Seal: Two coats of top coat to protect the fine line work and create the glassy sky surface.
31 Stunning Summer Birthday Party Hairstyles for 2026 🎂☀️
22.Amethyst Cat Eye Veins
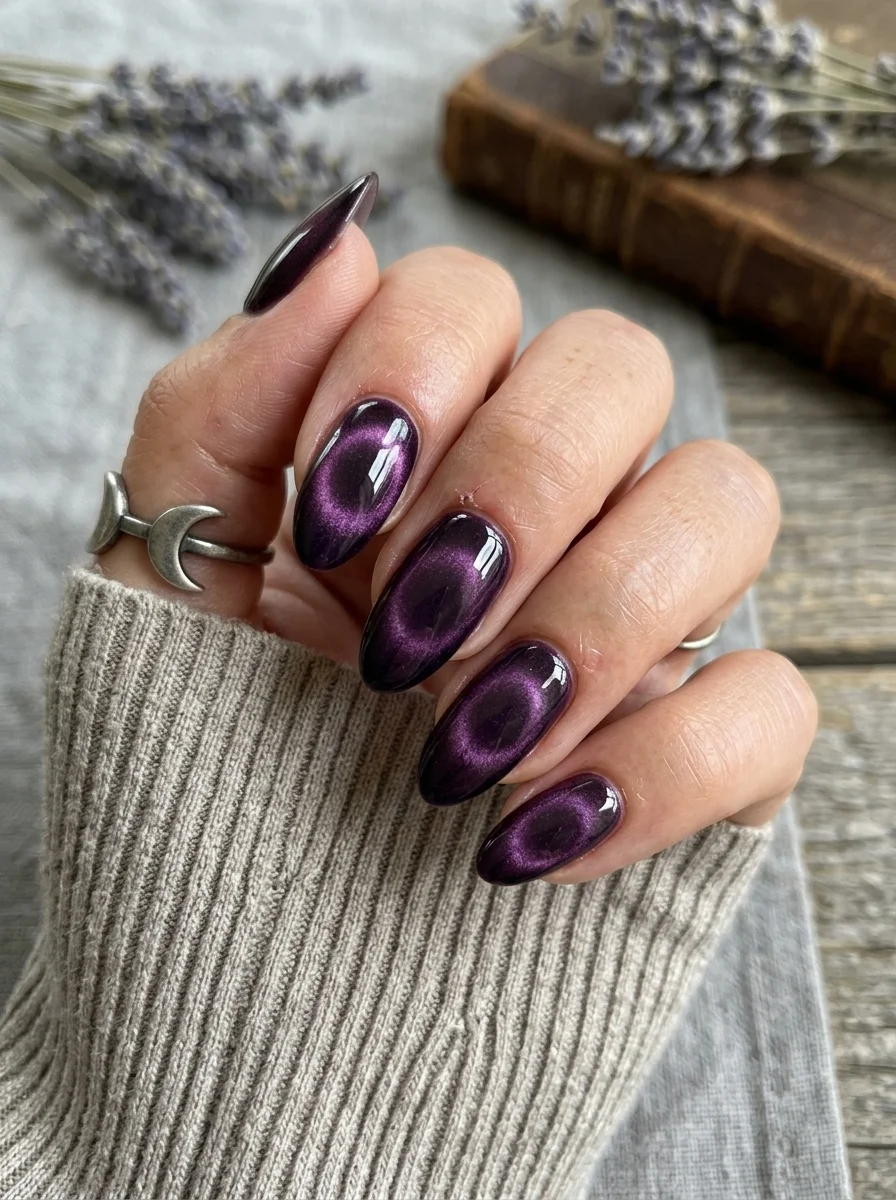
Purple magnetic polish that looks like light trapped inside a dark gemstone.
Overview:
Purple cat eye polish behaves differently than silver over black. The purple magnetic particles create a lighter violet band against the deeper purple base, producing a tonal shift that looks like light refracting through an amethyst crystal. The effect is more subtle than high-contrast silver cat eye but rewards sustained attention because the color depth changes with the viewing angle.
The coffin shape serves this design well because the flat surface creates a wide canvas for the diagonal magnetic band. On curved nail shapes, the cat eye band wraps around the edges and fragments. On a flat coffin tip, the band stays sharp and reads as a single, unbroken line of concentrated light.
Purple cat eye polish is more forgiving than high-contrast versions because the tonal difference between the base and the magnetic band is narrower. Even if your magnet technique isn't perfect, the result still reads as a dimensional purple rather than a failed cat eye effect. It's a good entry point for magnetic polish beginners.
Design Breakdown:
Tonal magnetic effect within a single color family. The magnet creates light concentration rather than color contrast.
Base Color: Deep purple gel or regular polish. The base should be one to two shades darker than the cat eye polish's magnetic particles.
Nail Shape: Long coffin. The flat surface maintains the integrity of the diagonal magnetic band.
Design Element: Purple cat eye magnetic polish applied over the dark base, with the magnet held diagonally to concentrate the particles into a bright violet band.
Finish: High-gloss top coat to amplify the gemstone depth and protect the magnetic effect.
Get The Look at Home:
The technique is identical to silver cat eye, but the results are more subtle. Don't expect a dramatic contrast.
- Purple base: Two coats of deep purple. Let dry fully.
- Cat eye coat: Apply one generous coat of purple cat eye magnetic polish. Work one nail at a time.
- Magnet time: Hold the magnet diagonally across the wet nail, about 5mm above the surface. Hold steady for 10-15 seconds. The lighter purple band should appear.
- Adjust the angle: If the band isn't positioned where you want it, you can re-magnetize while the polish is still wet by holding the magnet at a different angle.
- Flash cure (gel only): Cure each nail immediately after magnetizing to lock the particles.
- Seal: Two coats of top coat to protect the magnetic effect and create gemstone depth.
23.Matte Black Cutout Geometry
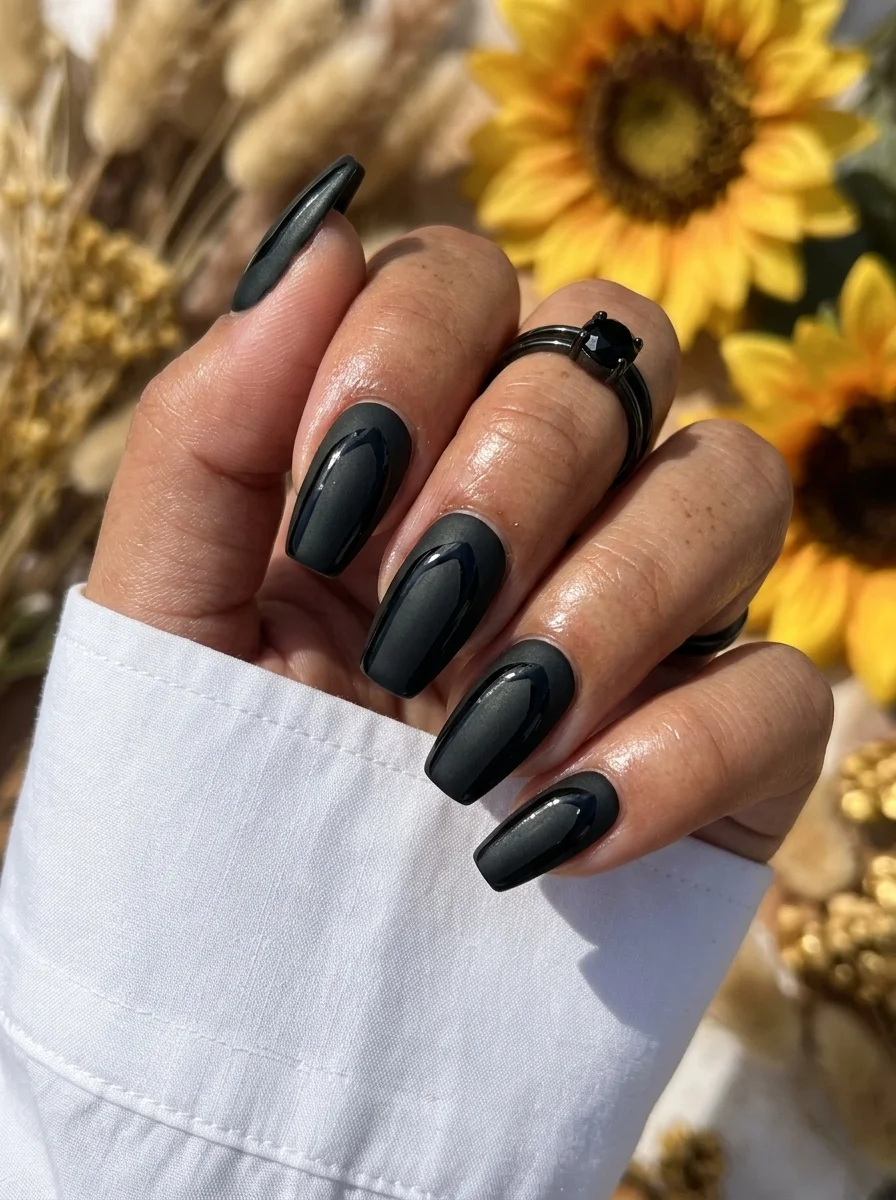
Architectural negative space that turns your nails into gothic window frames.
Overview:
Matte black nails with geometric cutouts invert the usual relationship between polish and nail. Instead of the polish being the design, the absence of polish becomes the focal point. The matte finish is critical here: glossy black with cutouts would read as a mistake. Matte black with cutouts reads as deliberate architecture.
The geometric shapes—triangles, diamonds, thin rectangular channels—create an almost structural quality, like looking through the windows of a gothic cathedral or the negative space in brutalist architecture. The natural nail showing through the cutouts provides the only color variation, which keeps the design firmly in minimalist territory despite its visual complexity.
The coffin shape amplifies the geometric language. The flat tip and straight sides create reference lines that the cutout shapes can align with. On round or oval nails, the same geometric cutouts would look out of place because there are no straight edges to echo. The shape and the design speak the same visual language.
Design Breakdown:
Negative space geometry with a matte finish. The absence of polish creates the pattern.
Base Color: Matte black surrounding geometric cutout shapes. The natural nail provides the "fill" color.
Nail Shape: Long coffin. The straight edges and flat tip complement the geometric cutout language.
Design Element: Triangles, diamonds, and thin channels left unpainted while the surrounding area is coated in matte black.
Finish: Matte top coat over the black sections. The cutout areas remain bare or sealed with clear matte coat.
Get The Look at Home:
Use thin tape or vinyl stencils to create the geometric cutout shapes. Freehand geometry is extremely difficult to keep clean.
- Clear base: Apply one coat of clear matte base coat over all nails. Let dry.
- Tape the geometry: Using thin nail tape or cut vinyl stencils, create your geometric shapes (triangles, diamonds, channels) on each nail. Press edges firmly.
- Black coat 1: Paint black polish over the entire nail, covering the tape and exposed areas. Let dry.
- Black coat 2: Apply a second coat for full opacity. Let dry completely.
- Remove tape: Carefully peel the tape off using tweezers. Pull at a low angle for clean geometric edges.
- Matte top coat: Apply matte top coat over the entire nail. The black areas will turn matte while the cutouts remain clear.
30 Sweet Strawberry Nail Art Designs for Every Season (2026) 💅
24.Serpent and Stars
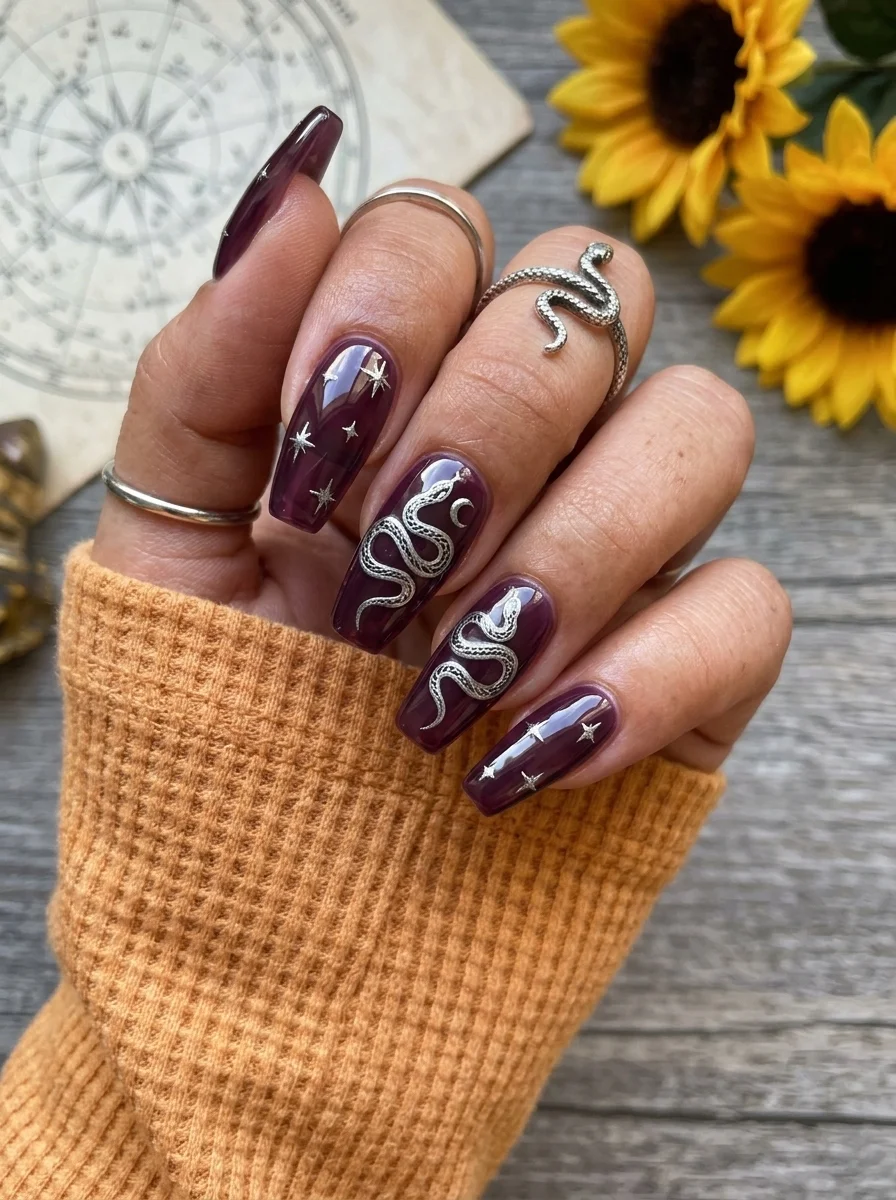
Occult symbolism meets hand-painted illustration on a moody purple canvas.
Overview:
This design layers two distinct gothic motifs—a coiling serpent and scattered stars—over a deep purple base. The snake winds vertically up the accent nail while small silver stars populate the surrounding nails, creating a visual narrative that references occult symbolism without being literal about it. The design reads as mysterious and intentional rather than randomly assembled.
The deep purple base serves both motifs equally well. It's dark enough to make the black snake read as a shadowy figure, but colorful enough to make the silver stars pop. A pure black base would swallow the snake silhouette. A lighter purple would dilute the gothic atmosphere. This specific shade threads the needle.
The illustration quality matters here more than in most designs on this list. A sloppy snake reads as a worm. Sloppy stars read as random dots. The design rewards steady hands and thin brushes, though the imperfection of hand-painted art is part of what gives it character compared to stamped or sticker-based alternatives.
Design Breakdown:
Hand-painted illustration on a solid dark base. The snake and stars work as a complementary pair.
Base Color: Deep, opaque purple. Dark enough for goth atmosphere, colorful enough to support both black and silver art.
Nail Shape: Long coffin. The flat surface gives the snake illustration room to coil and the stars room to scatter.
Design Element: Black snake coiling up one accent nail, with small silver five-pointed stars scattered across the remaining nails.
Finish: High-gloss top coat to make the purple look wet and the silver stars reflective.
Get The Look at Home:
Paint the snake in sections: body first, then head, then detail lines. Stars can be painted with a dotting tool and liner brush.
- Purple base: Two coats of deep purple on all nails. Let dry fully.
- Snake body: On the accent nail, paint a wavy black line winding from cuticle to tip. Vary the thickness to suggest a coiling body.
- Snake head: At the top of the body line, paint a small triangular head with a tiny forked tongue.
- Snake details: Using a thin liner brush, add scale texture along the body with small diagonal strokes. A thin white line along one edge creates the belly.
- Stars: On the remaining nails, paint small five-pointed stars using silver polish. Use a dotting tool for the center and pull outward with a liner brush for the points.
- Seal: Two coats of top coat to smooth the raised illustration and protect the fine details.
25.Velvet Rose Noir
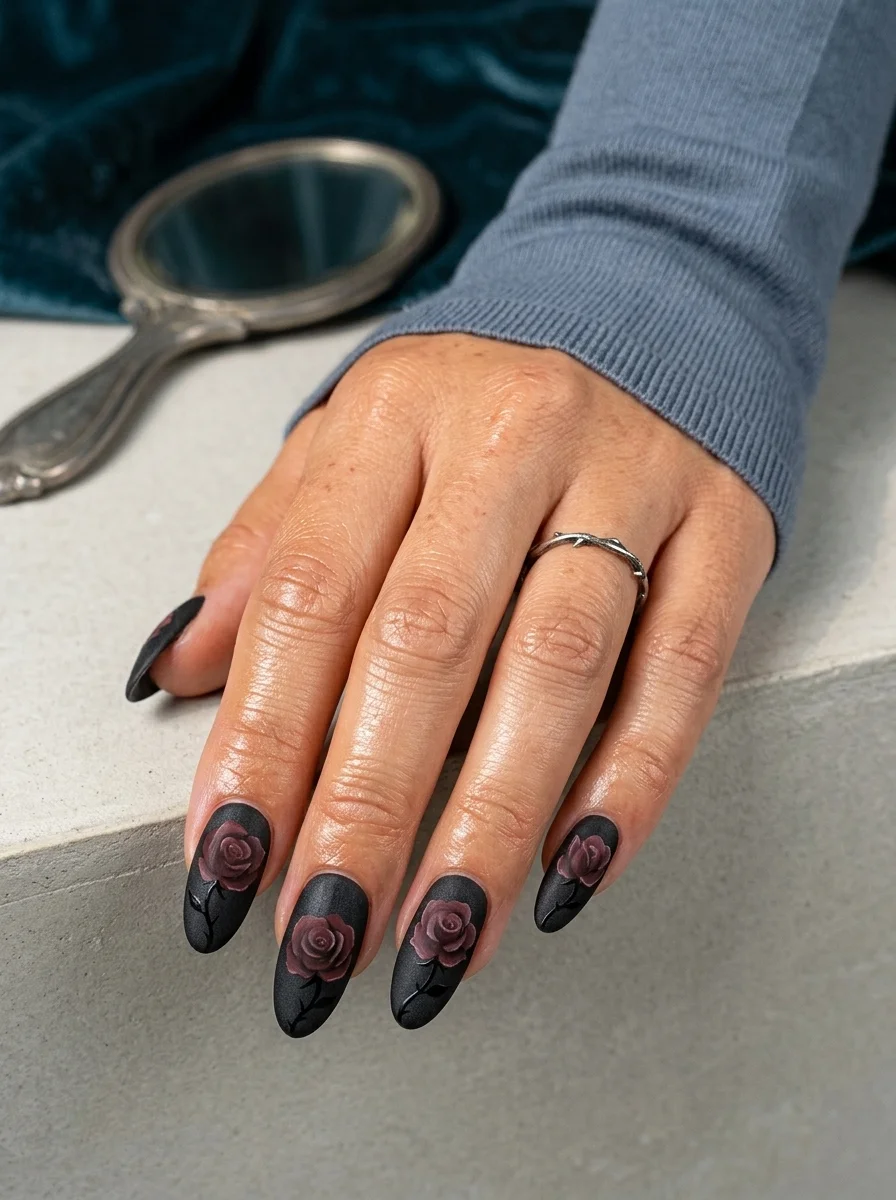
Dark romance: red roses blooming from matte black darkness.
Overview:
Red roses on black nails is a gothic romance staple, but the execution determines whether the result reads as elegant or Halloween-costume. These roses are painted in deep, desaturated reds—more burgundy than fire engine—with layered petals that create actual dimension. The matte black base absorbs light, which makes the roses appear to glow from within the darkness.
The matte finish is essential to this design's mood. Glossy black with red roses would look like a tattoo parlor flash sheet. Matte black with the same roses looks like a Victorian oil painting. The finish transforms the context entirely, which is a powerful reminder that surface texture is as much a design choice as color and pattern.
The accent nail approach prevents the roses from becoming overwhelming. One or two nails with detailed rose illustrations, surrounded by solid matte black, creates a focal point that draws the eye. Every nail covered in roses would flatten the design's visual hierarchy and make it harder to appreciate the detail work.
Design Breakdown:
Hand-painted floral illustration on a matte dark base. The contrast between matte black and dimensional roses creates the drama.
Base Color: Matte black on all nails. The flat finish creates the darkness that the roses emerge from.
Nail Shape: Long coffin. The flat surface provides a canvas large enough for detailed rose illustration.
Design Element: Deep red roses with layered petals painted on one or two accent nails. Remaining nails are solid matte black.
Finish: Matte top coat over the entire nail. The roses retain a slight sheen from the paint layers, creating a subtle texture contrast against the flat black.
Get The Look at Home:
Build the roses from the outside in: outer petals first, then inner petals, then the darkest center.
- Black base: Two coats of black on all nails. Let dry fully.
- Rose outline: On the accent nail(s), using a thin brush and deep burgundy, paint the outermost petal shapes in a loose circle.
- Inner petals: Using a slightly brighter red, paint smaller curved shapes inside the outer ring. Overlap them slightly.
- Rose center: Using the darkest red or black, paint a small spiral in the center to create depth.
- Highlights: A tiny touch of lighter red or pink on the petal edges creates the illusion of dimension.
- Leaves: Optional: add small dark green leaves around the roses for additional botanical detail.
- Matte top coat: Apply matte top coat over the entire design. The roses will retain slight texture while the black goes completely flat.

20 Stunning Half Up Half Down Hairstyles for Prom Night 2026 💃✨
26.Emerald Butterfly Wings
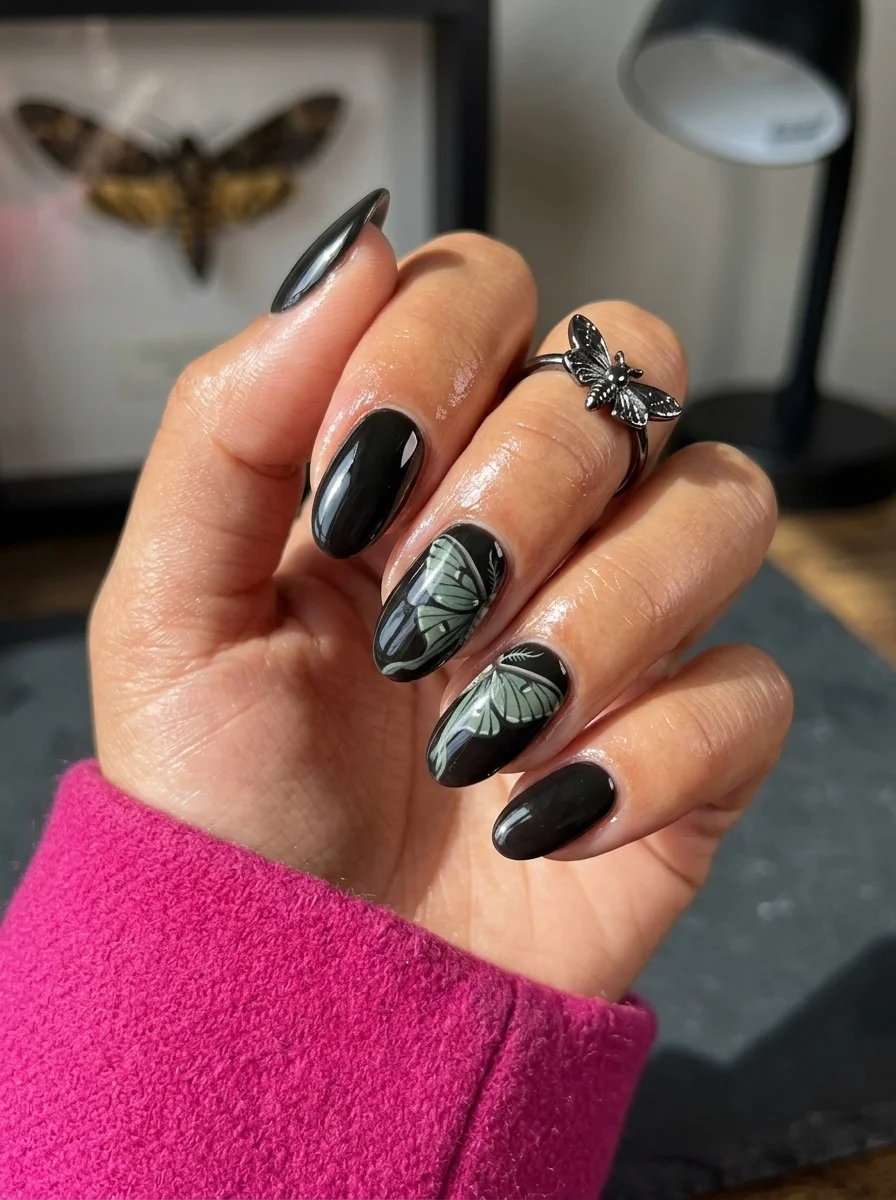
Dark lepidoptera: butterfly wing patterns rendered in gothic jewel tones.
Overview:
Butterfly wing nail art usually skews cute and colorful. This version inverts that expectation by using a black base with deep emerald green wing patterns, creating something that reads more like a moth from a dark fairy tale than a children's sticker. The wing veins are painted in thin black lines over the green, creating the characteristic stained-glass-panel look of actual butterfly wings.
The accent nail approach works best here because butterfly wing detail at this scale requires concentration and space. Spreading the pattern across all nails would compress the wing sections and make the vein work look cramped. One or two nails dedicated to the full wing illustration, surrounded by solid black, lets the design breathe.
The emerald green against black creates an almost holographic quality even without holographic polish. The high contrast between the deep green panels and the black veins produces a visual vibration that makes the wings appear to shimmer. A high-gloss top coat amplifies this effect by creating a glassy surface over the entire design.
Design Breakdown:
Hand-painted wing illustration with vein detail. The black base and black veins frame the green panels.
Base Color: Opaque black. The green wing panels need maximum contrast to read as luminous.
Nail Shape: Long coffin. The flat surface accommodates the full wing span illustration.
Design Element: Emerald green butterfly wing panels outlined and divided by thin black veins, painted on accent nails. Remaining nails are solid black.
Finish: High-gloss top coat to create the glassy, wing-like sheen.
Get The Look at Home:
Paint the green panels first, then add the black veins on top. The veins define the shape, so the green placement determines the wing outline.
- Black base: Two coats of opaque black on all nails. Let dry fully.
- Wing outline: On the accent nail, paint the outer shape of a butterfly wing using emerald green. The wing should fill most of the nail surface.
- Wing panels: Within the wing outline, paint individual panels in emerald green, leaving thin gaps between them. These gaps will become the veins.
- Black veins: Using a thin liner brush and black polish, paint thin lines over the gaps between the green panels. These create the wing's structural veins.
- Edge detail: Add small white or silver dots along the wing's outer edge for the characteristic butterfly border pattern.
- Seal: Two coats of top coat to smooth the raised paint and create the glassy wing surface.
27.Thorned Vine Wrap
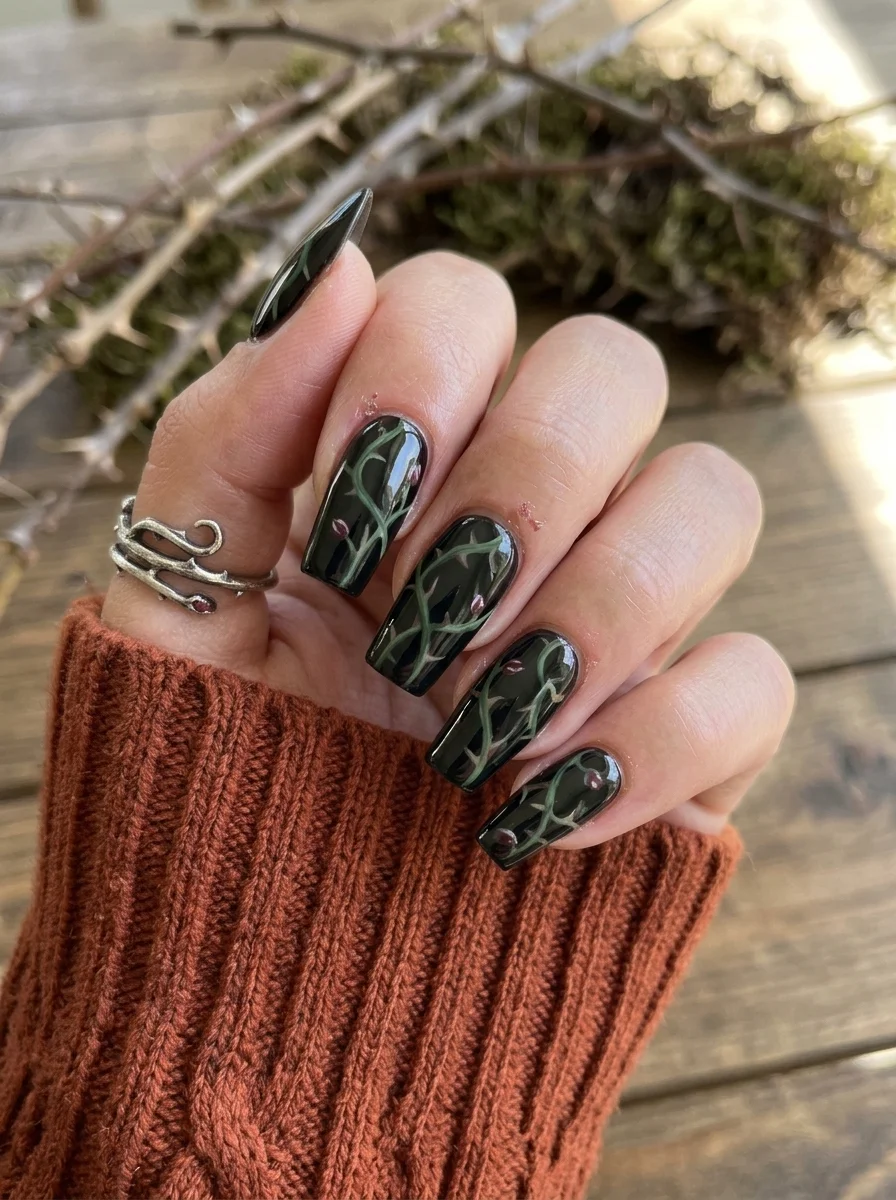
Bramble thorns crawling across a dark landscape—beautiful and dangerous.
Overview:
Thorned vine nail art taps into the same dark botanical energy as black rose designs, but the vine format creates movement across the nail that a single flower can't. The vines wrap and coil around each nail, with small thorns protruding at irregular intervals. The effect is organic, slightly aggressive, and visually continuous—the pattern could theoretically extend forever.
The dark green against black creates a tonal contrast that's subtle enough to read as cohesive but distinct enough to see the vine pattern clearly. This isn't bright green on black; it's forest green on jet black, which keeps the palette firmly in goth territory. Under low lighting, the vines almost disappear into the base. Under bright light, they emerge with surprising clarity.
The almond shape enhances the vine reference. Vines naturally curve and taper, and the almond's pointed tip creates a natural termination point for the vine pattern. The vine appears to grow from the cuticle toward the tip, following the nail's natural taper. On coffin or square shapes, the same vine pattern would look truncated and artificial.
Design Breakdown:
Organic line art on a dark base. The vines create directional movement from cuticle to tip.
Base Color: Opaque black. The dark green vines need enough contrast to be visible but not so much that they look neon.
Nail Shape: Long almond. The tapered tip gives the vine a natural endpoint.
Design Element: Dark green vines wrapping from cuticle to tip with small thorn protrusions at irregular intervals. Vines vary in thickness.
Finish: High-gloss top coat to create a wet, living look for the botanical elements.
Get The Look at Home:
Paint the main vine stem first, then add branches, then thorns. Work from the cuticle toward the tip.
- Black base: Two coats of opaque black. Let dry fully.
- Main stem: Using a thin liner brush and dark green, paint a slightly wavy line from cuticle to tip. This is the vine's main stem.
- Branches: Add smaller curved lines branching off the main stem at irregular intervals. Two to three branches per nail.
- Thorns: Using the same green or slightly darker, paint small sharp triangular protrusions along the stems and branches. Keep them irregular—thorns in nature aren't uniform.
- Leaf accents: Optional: add tiny leaf shapes at some branch endpoints for additional botanical detail.
- Seal: Two coats of top coat to smooth the raised paint and create the living-vine sheen.
28 Trendy May Nail Designs for 2026 💅
28.Dark Rose Smoke
Roses emerging from cigarette smoke in a dimly lit room.
Overview:
This design combines two atmospheric elements—smoky gradient bases and dark red roses—into a single cohesive mood piece. The gradient shifts from charcoal grey at the cuticle to deep black at the tips, creating a fog-like atmosphere. The roses, painted in deep crimson, appear to materialize out of the smoke rather than sitting on top of the nail.
The smoke-wet-on-wet technique used in the gradient is different from the hard-edged marble swirls in other designs. Here, the grey and black blend into each other through soft, feathered transitions that look genuinely atmospheric. The key is working with thinned polish and light sponge dabs rather than heavy brush strokes.
The roses are painted over the dried gradient, which means they exist in a different visual plane than the smoky background. This layering creates depth: the smoke feels distant and atmospheric while the roses feel present and dimensional. That spatial separation is what makes the design feel like a scene rather than a pattern.
Design Breakdown:
Layered design: atmospheric gradient base with illustrative roses on top. The two elements occupy different visual depths.
Base Color: Charcoal grey at the cuticles blending into jet black at the tips. Smoky, atmospheric gradient.
Nail Shape: Long coffin. The flat surface gives both the gradient and the rose illustration room to develop.
Design Element: Deep red roses with layered petals painted on accent nails over the smoky gradient. Remaining nails show the gradient only.
Finish: High-gloss top coat to create a glassy, atmospheric depth over both the gradient and the roses.
Get The Look at Home:
Complete the entire gradient on all nails first, let it dry, then add the rose illustrations. The layers must be separate.
- Grey base: Apply two coats of charcoal grey. Let dry.
- Black gradient: Using a makeup sponge, dab black polish onto the tips, fading toward the center. Build gradually in thin layers.
- Smoke blending: While the gradient is still slightly workable, use a clean sponge to dab the transition zone, softening any harsh lines.
- Let dry completely: Wait at least fifteen minutes. The gradient must be fully set before painting roses.
- Rose petals: On accent nails, paint outer petal shapes using deep burgundy. Build inward with slightly brighter red for inner petals.
- Rose center: Add a dark spiral in the center for depth, and tiny lighter highlights on petal edges.
- Seal: Two coats of top coat to create the glassy atmosphere and protect both layers.
29.Ash and Bone Ombre
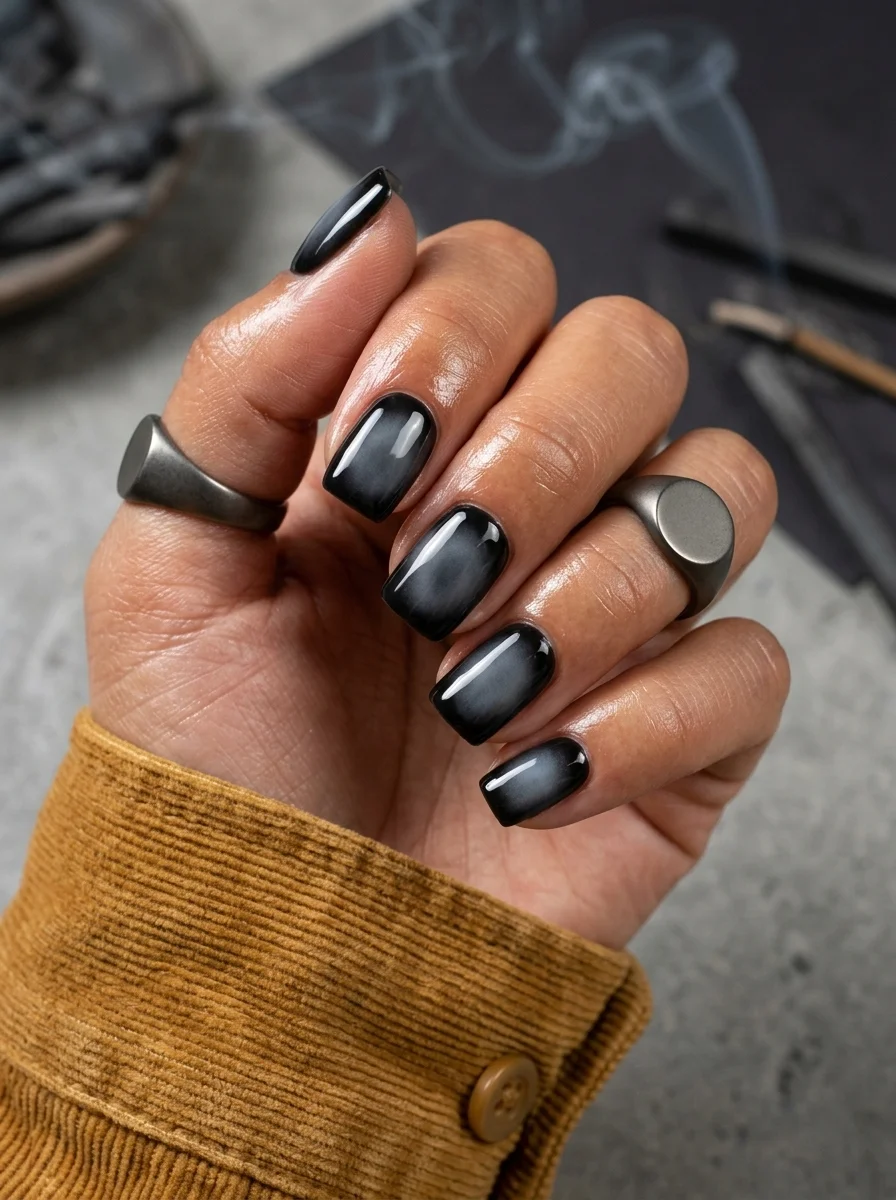
The full spectrum of darkness to light compressed into a single nail.
Overview:
Black-to-white ombre is the most dramatic gradient possible because it spans the entire value range. There are no mid-tones to soften the transition; the design moves from absolute darkness to absolute light in one continuous sweep. The result reads as stark, graphic, and deliberately unsettling—exactly the emotional register goth aesthetics aim for.
The gradient zone—where black meets white and creates grey—is where the design's quality is determined. A clean, smooth transition reads as professional and intentional. A blotchy, uneven transition reads as a failed manicure. The sponge technique helps, but the grey zone requires the lightest touch: too much blending and you get a flat grey middle; too little and you get a harsh line.
The coffin shape amplifies the gradient's drama. The flat tip provides a wide, clean white terminus that contrasts sharply against the black cuticle area. On round nails, the gradient curves around the tip and loses the stark value contrast that makes this design impactful. The straight edges of the coffin contain the gradient within a defined frame.
Design Breakdown:
Maximum-contrast gradient spanning the full black-to-white value range. The grey transition zone is the technical challenge.
Base Color: White at the tips blending through grey into black at the cuticles. Full gradient coverage.
Nail Shape: Long coffin. The flat tip creates a clean white endpoint for the gradient.
Design Element: Sponge-applied vertical gradient from black (cuticle) to white (tip). No additional art or accents.
Finish: High-gloss top coat to smooth the gradient and eliminate sponge texture.
Get The Look at Home:
Apply the gradient in thin, building layers. One heavy application will create a muddy mess. Patience is non-negotiable.
- White base: Apply two coats of opaque white. Let dry fully. This is the foundation for the gradient.
- Sponge setup: Paint a stripe of black and a stripe of white side by side on a makeup sponge. The overlap zone creates the grey.
- First pass: Dab the sponge onto the nail with black at the cuticle and white at the tip. Use light pressure. The first pass will look blotchy. That's expected.
- Build layers: Repeat the dabbing three to four times, repositioning the sponge slightly each time to build opacity gradually. The grey zone should smooth out with each pass.
- Clean the transition: If the grey zone looks muddy, use a clean section of sponge to dab just the transition area, blending more gently.
- Dry completely: Wait at least fifteen minutes before top coating. The gradient needs time to level.
- Seal: Two coats of top coat to smooth the sponge texture and unify the gradient.
37 Best Fall Hair Trends for 2026 🍂
30.Silver Web Cascade
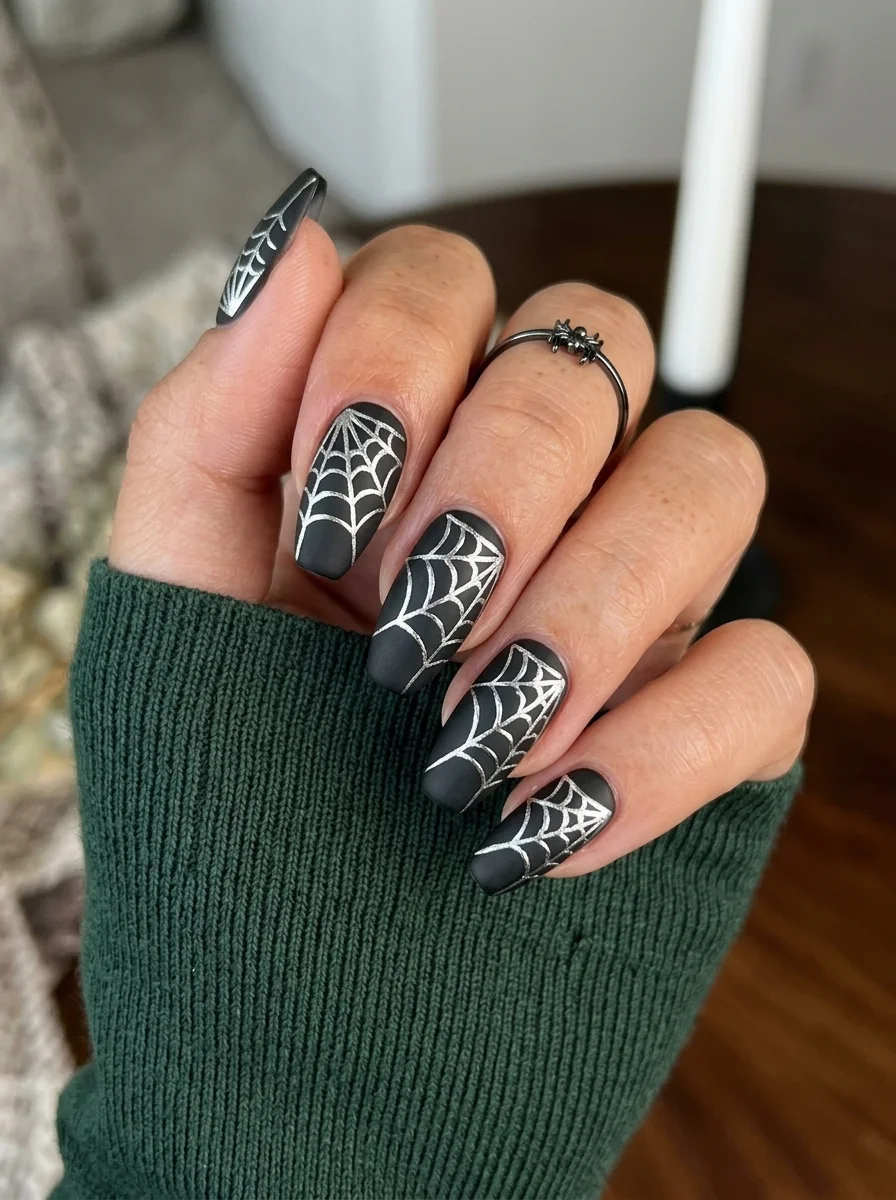
Spiderwebs frozen in silver thread across a void of matte darkness.
Overview:
Spiderweb nail art is one of the most recognizable gothic motifs, but it's also one of the most commonly executed poorly. The difference between "spooky Halloween nails" and "elegant gothic web art" comes down to three things: line consistency, radial symmetry, and finish. This design nails all three by using silver over matte black with precise, thin lines.
The radial web pattern originates from a single point—usually the cuticle or one corner of the nail—and expands outward in concentric rings connected by radial spokes. The mathematical regularity of the pattern is what makes it look architectural rather than random. Each ring should be roughly equidistant from the last, and the spokes should fan out at consistent angles.
Silver over matte black creates the highest possible contrast for web art. Glossy black would compete with the silver for light reflection, making the web lines harder to see. Matte black absorbs all light, which makes the silver lines appear to float above the surface like actual spider silk catching moonlight. The finish choice transforms the design from "silver doodles on black" to something genuinely atmospheric.
Design Breakdown:
Radial line art over a matte dark base. The geometric precision of the web pattern creates the architectural quality.
Base Color: Matte black. The flat finish absorbs light and makes the silver web lines pop.
Nail Shape: Long coffin. The flat surface accommodates the radial web pattern without distortion.
Design Element: Silver spiderweb radiating from the cuticle area, with radial spokes connected by concentric curved rings. Each nail shows a full or partial web.
Finish: Matte top coat over the entire nail. The silver lines retain slight metallic sheen against the flat black background.
Get The Look at Home:
Paint the radial spokes first, then connect them with the concentric rings. The spokes establish the framework.
- Black base: Two coats of black on all nails. Let dry fully.
- Matte coat: Apply matte top coat over all nails. Let dry. The web will be painted over this matte surface.
- Radial spokes: Using a thin liner brush and silver polish, paint three to five straight lines radiating from the cuticle area toward the tip. Space them evenly.
- Concentric rings: Using the same thin brush, paint curved lines connecting the spokes. Start near the cuticle with small arcs and increase the arc size toward the tip.
- Web center: At the origin point near the cuticle, paint a small silver dot or spiral to anchor the web.
- Seal carefully: Apply one thin coat of matte top coat over the web. Float the brush—don't drag it, or the silver lines will smear.
From subtle matte black tips to head-turning smoky chrome art, goth nails prove that dark manicures are versatile, sophisticated, and endlessly customizable.
Do yourself a favor and make sure to pin your absolute favorite designs straight to your Pinterest boards right now so you have them ready to show your nail tech!
Whether you're gearing up for fall, attending a concert, or expressing your everyday alternative style, these dark nail designs are guaranteed to make a bold statement. Stay fierce, stay bold, and enjoy your manicure!