Hair Trends
37 Best Fall Hair Trends For 2026 That Are Worth Copying
Fall is when hair gets interesting again. After a summer of salt spray, air-drying, and hoping for the best, the cooler months give you permission to actually do something with it. The low humidity means styles hold better, braids stay tighter, and updos don't melt off your head by lunchtime. It's the season where effort actually pays off.
This guide pulled together thirty-seven fall hair trends that range from quick five-minute morning styles to more involved looks worth your Sunday afternoon. Some use accessories you already own. Others are about technique and texture. Every single one is built for real fall conditions, not just a styled photo shoot.
The Autumn 2026 Vibe: Quiet Luxury, High Shine & Soft Warmth
This fall, hair trends are shifting away from high-maintenance contrast and over-processed finishes toward quiet luxury—focused on rich depth, health, and natural shine. Whether you're refreshing your cut or upgrading your daily styling routine, here are the key elements shaping this season's hair aesthetic:
- "Expensive" Tonal Depth: Monochromatic shades are making a massive comeback. Deep espresso brunettes, honeyed "Bessette" vanilla blondes, and soft spiced auburns prioritize gloss and silkiness over harsh contrast.
- Ghost Layering & Fluid Motion: Heavy, choppy layers are replaced by subtle internal layering (ghost layers) that creates natural movement, body, and swing without sacrificing fullness at the ends.
- Tactile Hair Accessories: From velvet ribbons and tortoiseshell barrettes to minimalist gold pins, fall accessories add a cozy, touchable texture that pairs effortlessly with chunky knitwear and trench coats.
- Hydrated "Glass" Finishes: As the air turns crisp, weightless hair oils and glossing treatments keep hair looking liquid-sleek, touchably soft, and static-free all day.
1.Braided Updo with Gold Leaf Pins
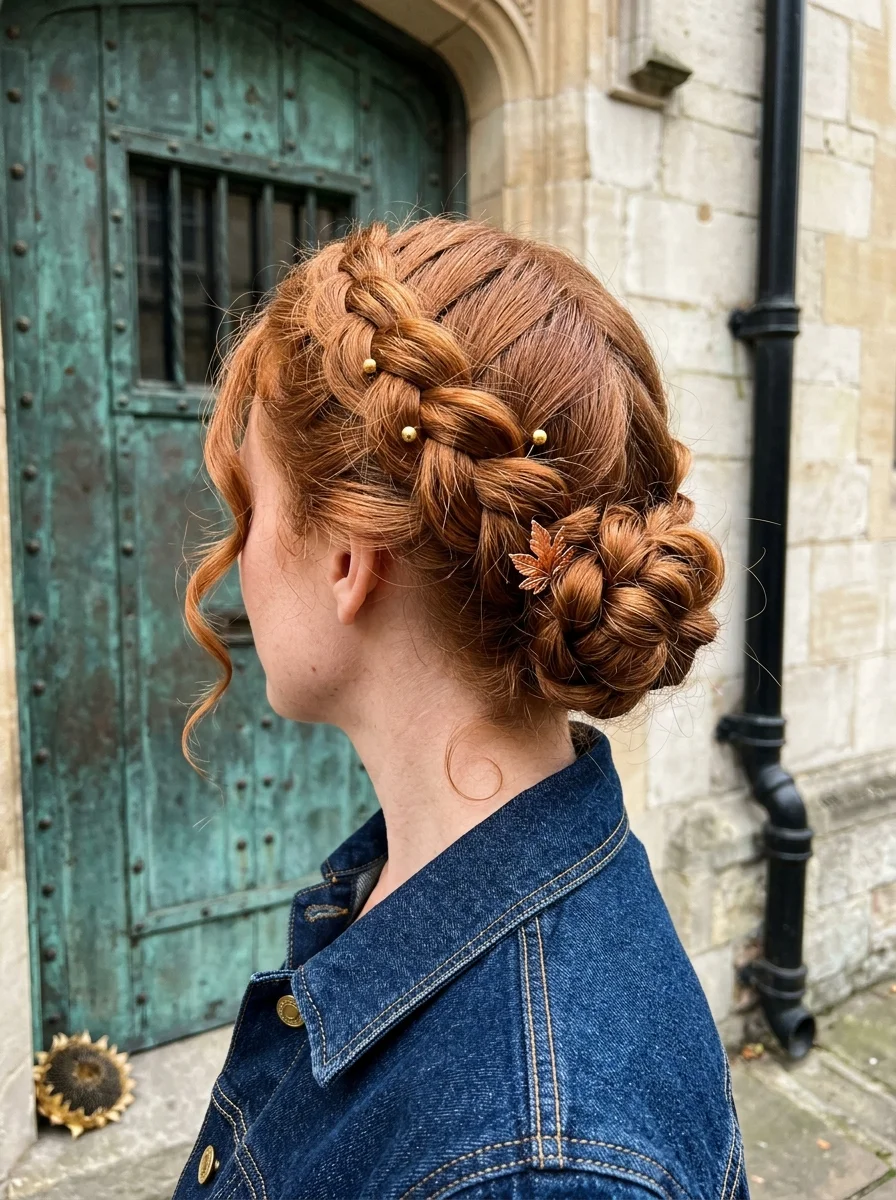
The overview: Medium to long-length copper hair worked into a Dutch braid that sweeps along the side of the head and feeds into a low twisted bun at the nape. Small gold bead pins line the braid, and a copper leaf-shaped accessory anchors the bun. One soft curled tendril frames the face.
The Dutch braid creates a raised, three-dimensional texture that stands out against the copper tones, especially in fall's softer light. The gold pins catch the warmth of the season without overdoing it. This is the kind of updo that works with a denim jacket on a Saturday and with a blazer on Monday.
Why this look is popular: The side-swept braid gives the classic updo more visual interest than a plain bun, and the leaf-shaped accessory nods to autumn without being costume-y. It's the balance between polished and relaxed that people are gravitating toward.
Where this look is suitable: Weekend brunches, apple orchard visits, casual dinner dates, and any setting where you want to look put-together without looking like you tried too hard.
Step by step:
- Prep for grip. Apply texturizing spray to second-day hair for better braid hold. Freshly washed hair is too slippery for this style.
- Start the Dutch braid. Begin above one ear and braid along the side of the head, crossing strands under to create the raised effect. Add small sections as you go.
- Gather at the nape. Once the braid reaches the back, gather all remaining hair into a low ponytail at the nape.
- Twist into a bun. Twist the ponytail and coil it into a bun shape. Pin with bobby pins in an X pattern for maximum hold.
- Add the accessories. Place gold bead pins along the braid at even intervals. Slide the leaf accessory into the bun's edge.
- Frame the face. Pull one small tendril from in front of each ear and curl loosely with a 1-inch iron.
Tips and tricks: The Dutch braid needs consistent tension throughout, or it will look uneven. Use a boar bristle brush to smooth each section before adding it to the braid. The gold pins should be pushed deep enough that only the bead heads are visible.
22 Best Graduation Day Hairstyles for 2026 🎓✨
2.Textured Low Chignon
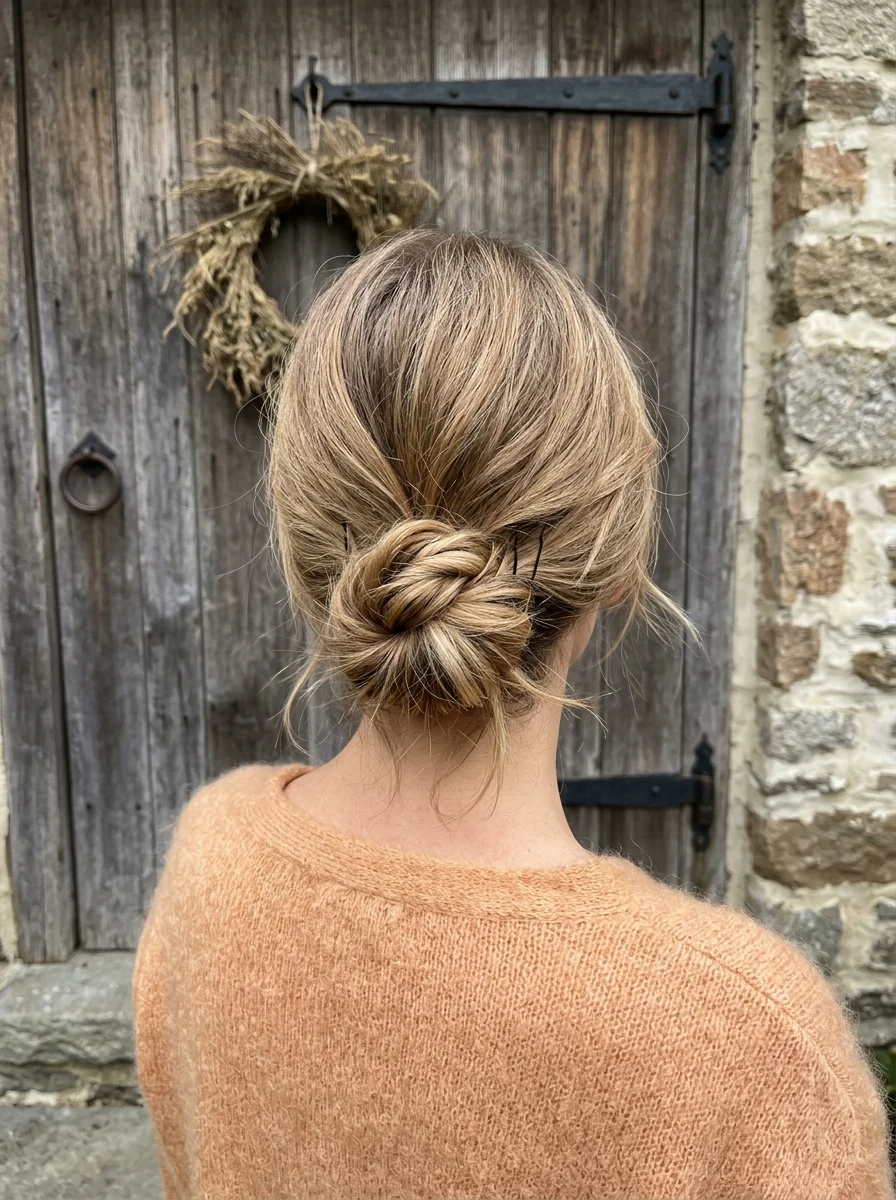
The overview: Medium-length hair gathered into a low, textured bun at the nape. Twisted sections are artfully pinned, creating dimension and movement in what could otherwise be a flat, forgettable style. Loose wisps soften the edges.
This is the anti-perfection bun. The texture comes from deliberate imperfection, letting pieces overlap and twist in directions that feel organic rather than calculated. Against a cozy orange sweater and a weathered wooden door, it looks like something out of a countryside editorial.
Why this look is popular: The textured chignon works because it doesn't demand precision. You don't need mirror-perfect placement or invisible bobby pins. The style rewards a relaxed approach, which is exactly what fall mornings call for.
Where this look is suitable: Farmers' markets, coffee shop mornings, casual office days, and any setting where understated elegance beats overdone glamour.
Step by step:
- Prep with volume. Apply a volumizing mousse to damp hair and blow-dry rough, focusing on the crown for lift.
- Gather low. Collect all hair at the nape. Don't make it tight; let the surface have natural texture.
- Twist and pin. Take sections of the ponytail, twist them loosely, and pin them against the head in overlapping directions.
- Adjust for texture. Pull gently at the bun's surface to create raised sections and visible movement.
- Release wisps. Tug small pieces around the ears and temples to soften the overall shape.
Tips and tricks: Fine hair benefits from dry shampoo applied at the roots before gathering. The chignon sits best when it's not perfectly centered; a slight tilt toward the heavier side of your part adds natural asymmetry.
3.French Twist with Pearl Hair Stick
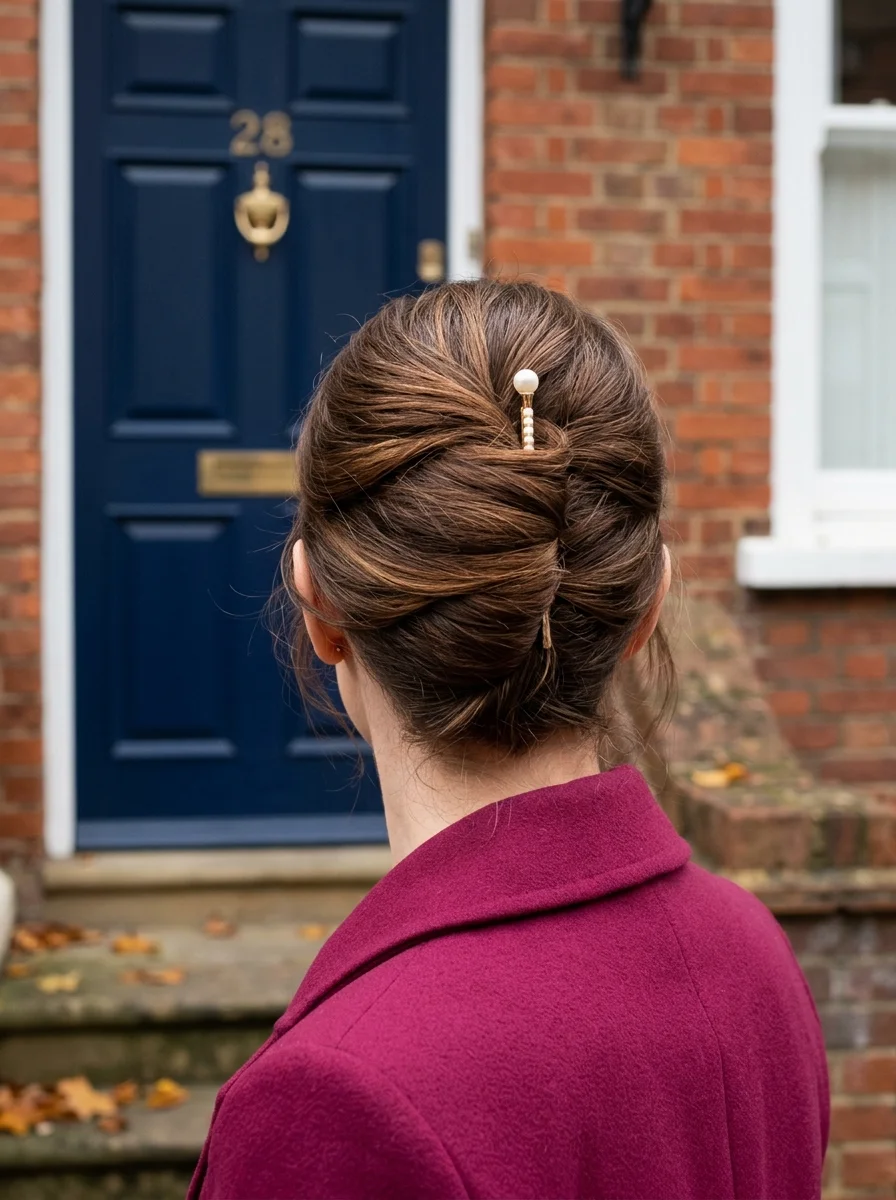
The overview: Medium to long hair smoothed into a classic French twist, with sections folded over each other and secured at the back of the head. A pearl-topped hairpin holds the structure in place, adding a vintage detail to an already timeless silhouette.
The French twist is one of those styles that people assume requires a professional. In reality, it's just gathering hair to one side and rolling it upward. The pearl pin serves a dual purpose: it anchors the twist from below and draws the eye to the nape, which is an underrated area for visual interest in updos.
Why this look is popular: The French twist works in fall because it's structured enough for layering under scarves and coats. Unlike loose styles that get crushed by outerwear, the twist stays intact and looks intentional from every angle.
Where this look is suitable: Date nights, gallery openings, formal dinners, and any evening where polished beats casual.
Step by step:
- Smooth the hair. Blow-dry or flat-iron until completely smooth. Apply a light anti-frizz serum from mid-lengths to ends.
- Gather to one side. Sweep all hair to the left side of the head. Hold it in place with your left hand at the center back.
- Create the anchor. Place 4-5 bobby pins in a vertical line up the center back. These create a track the twist will grip to.
- Roll the twist. Take the hair and fold it over the pin line toward the right. Roll it inward, creating a smooth vertical cylinder.
- Pin the twist. Insert U-shaped hairpins horizontally through the twist and into the pin track. Space them every inch from bottom to top.
- Add the pearl stick. Slide the pearl hair pin through the twist at the nape, pushing deep enough that only the pearl is visible.
Tips and tricks: U-shaped hairpins hold a French twist significantly better than bobby pins because they grip in two directions instead of one. For the smoothest finish, wrap the completed twist in a silk scarf for ten minutes before heading out.
30 Stunning July Nail Designs for Summer 2026 💅
4.Voluminous Layered Blowout with Tortoiseshell Clip
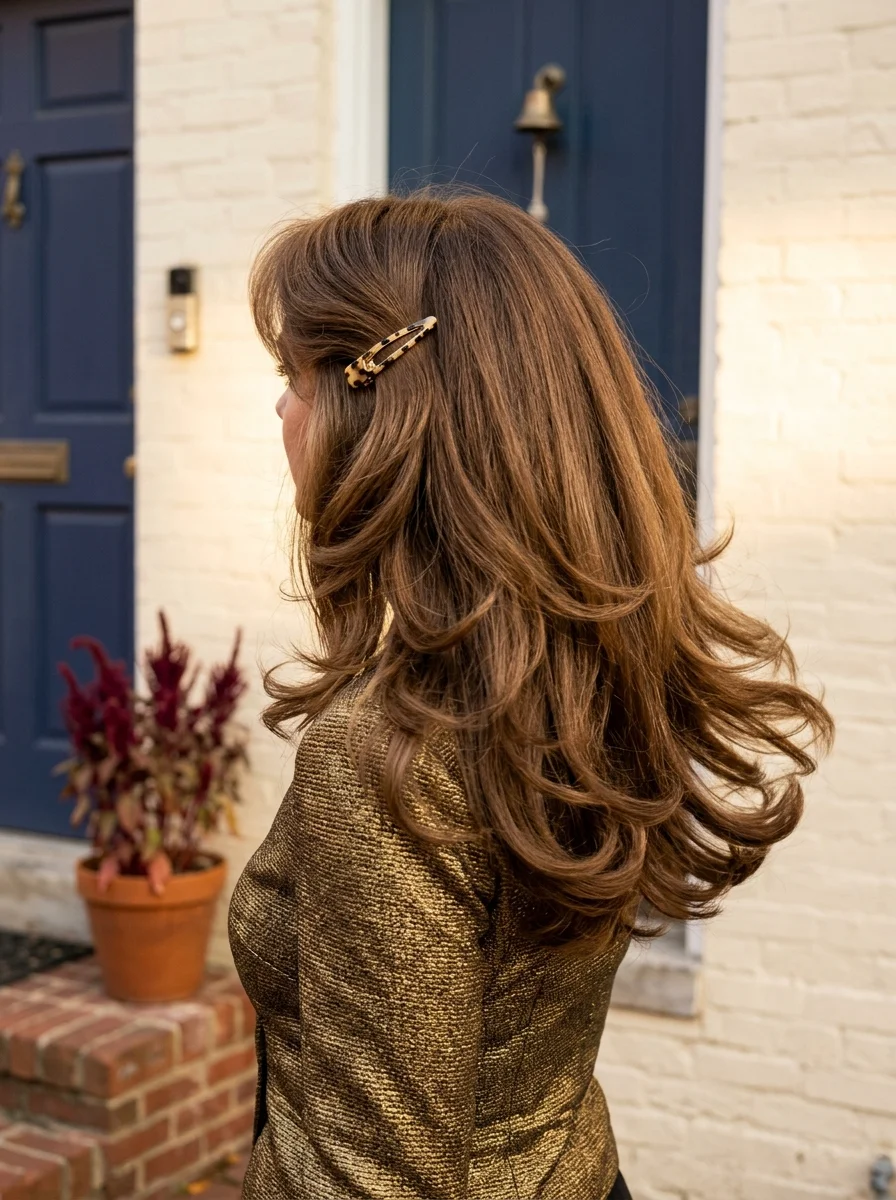
The overview: Long, layered hair blown out into large, bouncy curls at the ends. The hair is swept to one side and secured with a tortoiseshell clip, creating a glamorous silhouette with movement throughout. The chestnut brown with golden balayage catches light beautifully.
This is the hairstyle that makes people ask what you did differently. The volume comes from the layered cut working with a round brush during blow-drying, not from backcombing or product. The tortoiseshell clip adds warmth that complements the golden highlights perfectly.
Why this look is popular: The layered blowout is having a major resurgence because it's the most flattering style for most face shapes. The layers create movement that keeps long hair from looking heavy, and the side clip adds asymmetry that photographs well.
Where this look is suitable: Dinner parties, date nights, autumn weddings, and any setting where you want your hair to be a statement piece.
Step by step:
- Apply heat protectant. Distribute evenly through damp hair. This is non-negotiable when using this much heat.
- Rough-dry to 80%. Use a blow dryer without a brush until hair is mostly dry but still slightly damp at the roots.
- Section and round-brush. Work in 2-inch sections, wrapping each around a medium round brush. Direct the dryer nozzle downward along the brush for smoothness.
- Curl the ends. Roll each section away from the face and hold for five seconds before releasing. This creates the bouncy finish.
- Cool shot. Hit each section with the dryer's cool setting while still on the brush for three seconds to lock in the shape.
- Clip and finish. Sweep hair to one side and secure with the tortoiseshell clip. Apply a pea-sized amount of shine serum to the ends.
Tips and tricks: The round brush size matters: a 2-inch barrel creates medium curls, while a 3-inch barrel creates softer waves. For fine hair, a volumizing spray at the roots before blow-drying adds lasting body that survives the afternoon.
5.Sleek Half-Up with Pearl Pins
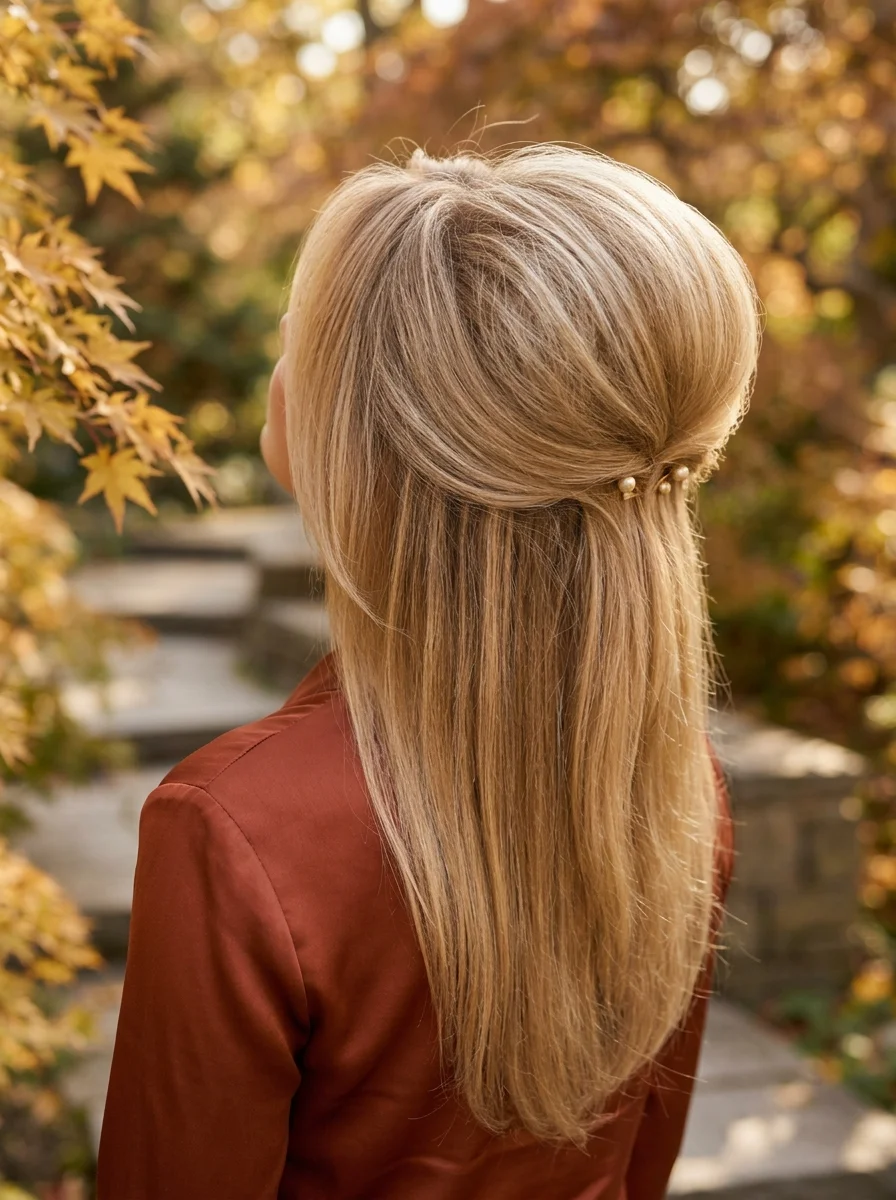
The overview: Long, straight platinum blonde hair pulled into a clean half-up style, with the top sections secured at the back of the crown with small pearl pins. The remaining hair falls straight and sleek down the back.
The contrast between the icy platinum and the warm rust blazer is striking, but what makes this style work is the simplicity. No twists, no braids, no complicated architecture. Just smooth hair gathered back with pearl pins that catch the light without demanding attention.
Why this look is popular: The sleek half-up is the most low-effort style that still looks intentional. It takes under five minutes, keeps hair off your face, and works for virtually every occasion from office to evening.
Where this look is suitable: Professional settings, gallery openings, and any occasion where clean lines and minimalism beat ornate styling.
Step by step:
- Straighten thoroughly. Use a flat iron from root to tip on each section. The sleekness is the entire point.
- Apply smoothing serum. Work a lightweight serum through the lengths to eliminate frizz and add shine.
- Gather the top section. Take hair from each temple and smooth it back toward the crown. Keep the surface flat and controlled.
- Secure with pearl pins. Place 3-4 pearl pins at the back of the head where the gathered section meets. Space them evenly.
- Smooth the lengths. Run a fine-tooth comb through the loose hair to ensure every strand lies flat.
Tips and tricks: Pearl pins work best on straight hair because they sit flat against the surface. On curly or wavy hair, they tend to angle outward. For the sleekest finish, wrap a silk scarf around your head for five minutes after styling to set everything in place.
38 Trending Bandana Hairstyles for Women (2026)
6.Side-Pinned Waves with Pearl Barrette
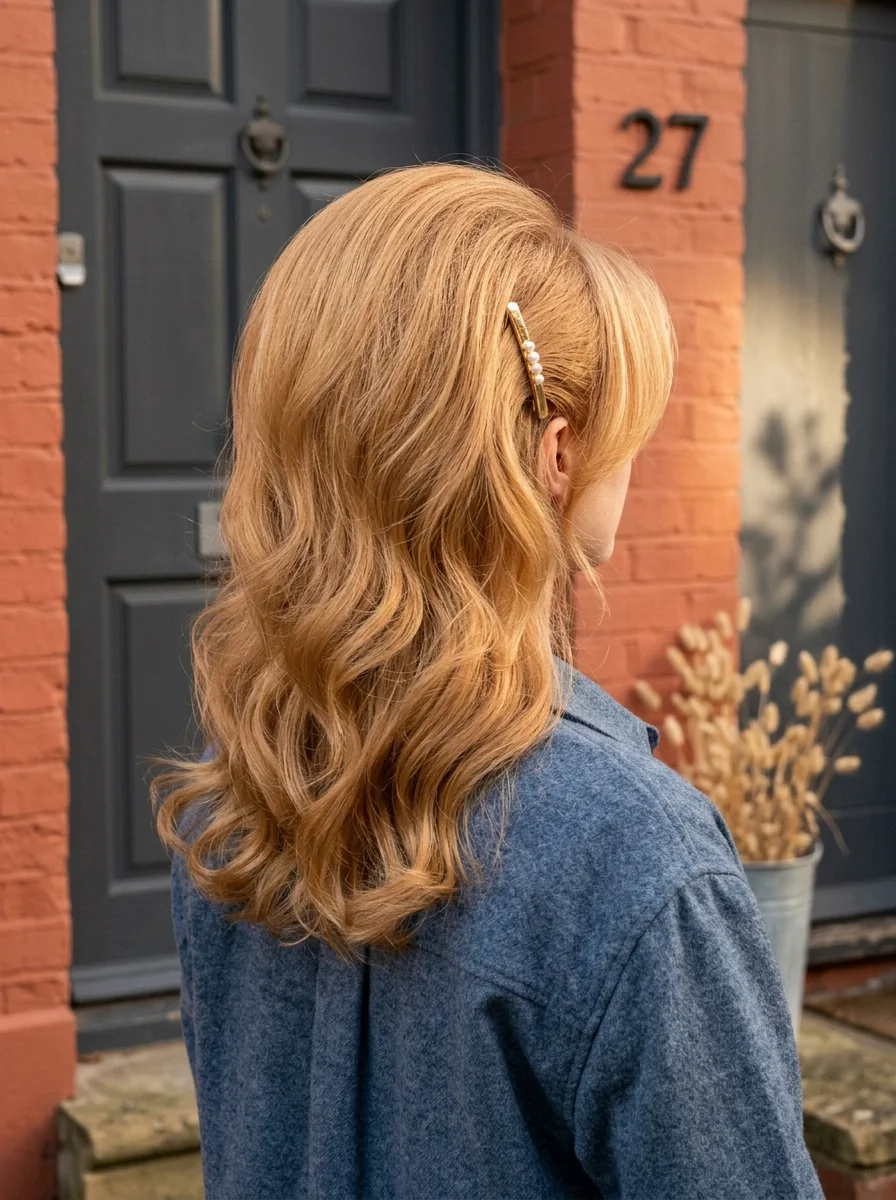
The overview: Medium-long hair with soft, romantic waves, one side pinned back with a pearl and gold barrette. The waves are loose and defined, falling naturally around the face with gentle movement.
The side-pinned wave is the most practical way to wear your hair down in fall. It keeps one side controlled while letting the other fall freely, creating asymmetry that looks deliberate. The pearl barrette adds just enough detail to signal that you thought about it.
Why this look is popular: The tuck-and-clip technique requires zero skill but delivers immediate polish. It's the kind of style that makes people assume you spent twenty minutes on your hair when it took three.
Where this look is suitable: Weekend errands, casual dinners, coffee dates, and any setting where effortless beats overdone.
Step by step:
- Create waves. Use a 1.25-inch curling wand on 1-inch sections, leaving the ends straight. Break up with fingers.
- Choose the pin side. Tuck the heavier side of your part behind the ear. This creates the asymmetry.
- Clip with barrette. Secure the tucked section with the pearl barrette just above the ear.
- Adjust the waves. Shake the loose waves on the other side for natural volume and separation.
- Set lightly. A mist of texturizing spray through the mid-lengths enhances the lived-in quality.
Tips and tricks: The barrette should sit flat against the head. If it angles outward, the clamp needs adjusting. Gold hoop earrings complement the barrette for a cohesive metallic accent.
7.Sleek High Ponytail with Hair Wrap
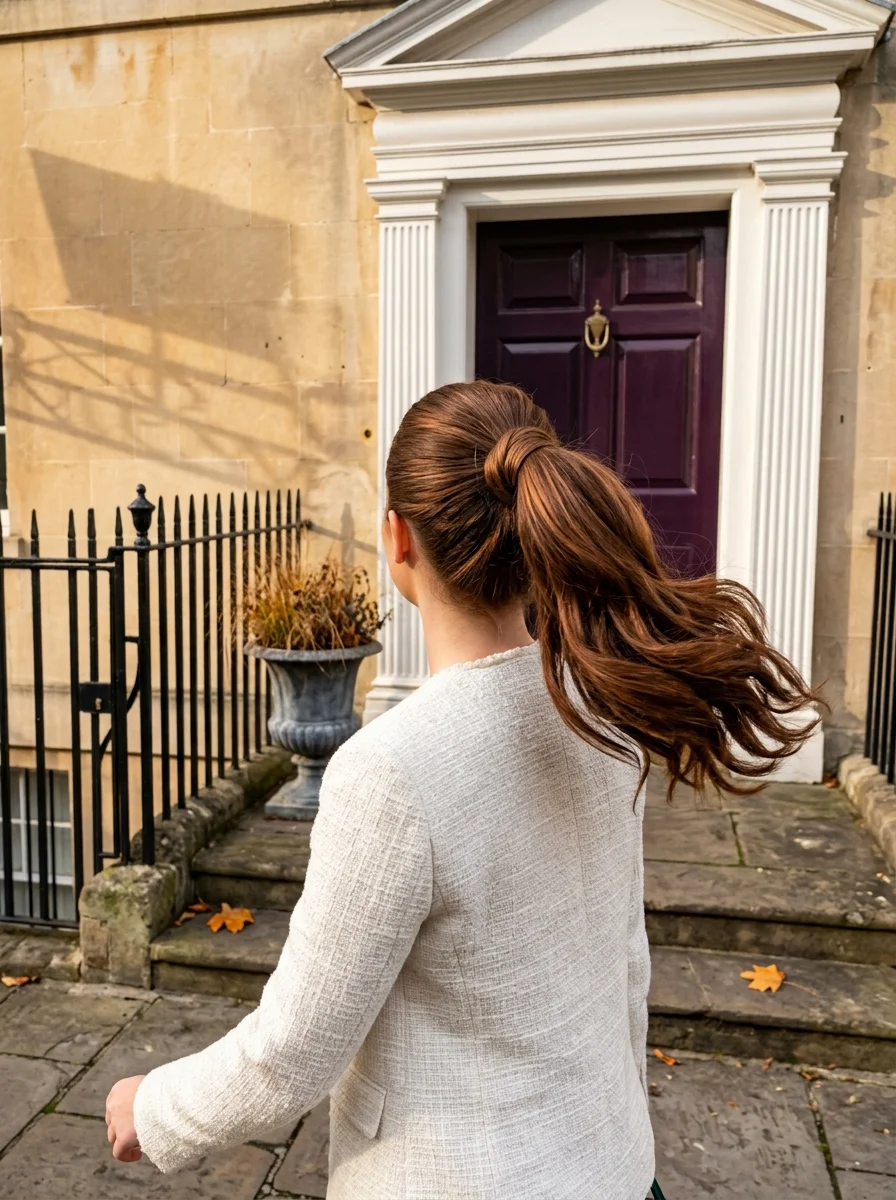
The overview: Long auburn hair pulled into a polished high ponytail with a strand of hair wrapped around the base to conceal the elastic. The crown is smooth and controlled, while the ponytail tail falls in soft waves.
The high ponytail is having a moment because it reads as both youthful and sophisticated. The hair wrap around the base is the detail that separates this from a gym ponytail. Against the white textured blazer and the purple door background, it looks intentional and editorial.
Why this look is popular: The high ponytail elongates the face and neck, which works particularly well with fall's higher necklines and layered outerwear. The wrapped base adds polish without accessories.
Where this look is suitable: Office settings, after-work drinks, casual Fridays, and any situation where you want to look put-together without being formal.
Step by step:
- Smooth the crown. Apply smoothing serum to damp hair and blow-dry straight, focusing on the top and sides.
- Gather high. Collect all hair at the crown. Use a boar bristle brush to eliminate bumps.
- Secure tightly. Use a strong elastic that matches your hair color. The ponytail should feel firm.
- Wrap the base. Take a thin strand from the underside of the ponytail, wrap it around the elastic 2-3 times, and pin the end underneath.
- Add waves to the tail. Use a curling wand on the ponytail sections for soft movement.
Tips and tricks: The ponytail height matters: directly at the crown creates the most flattering angle. Too far forward looks juvenile; too far back flattens the crown. A light mist of hairspray on the wrapped strand keeps it from loosening.
27 Elegant Wedding Guest Nail Designs for Family in 2026 💍
8.Bubble Ponytail with Gold Cuffs
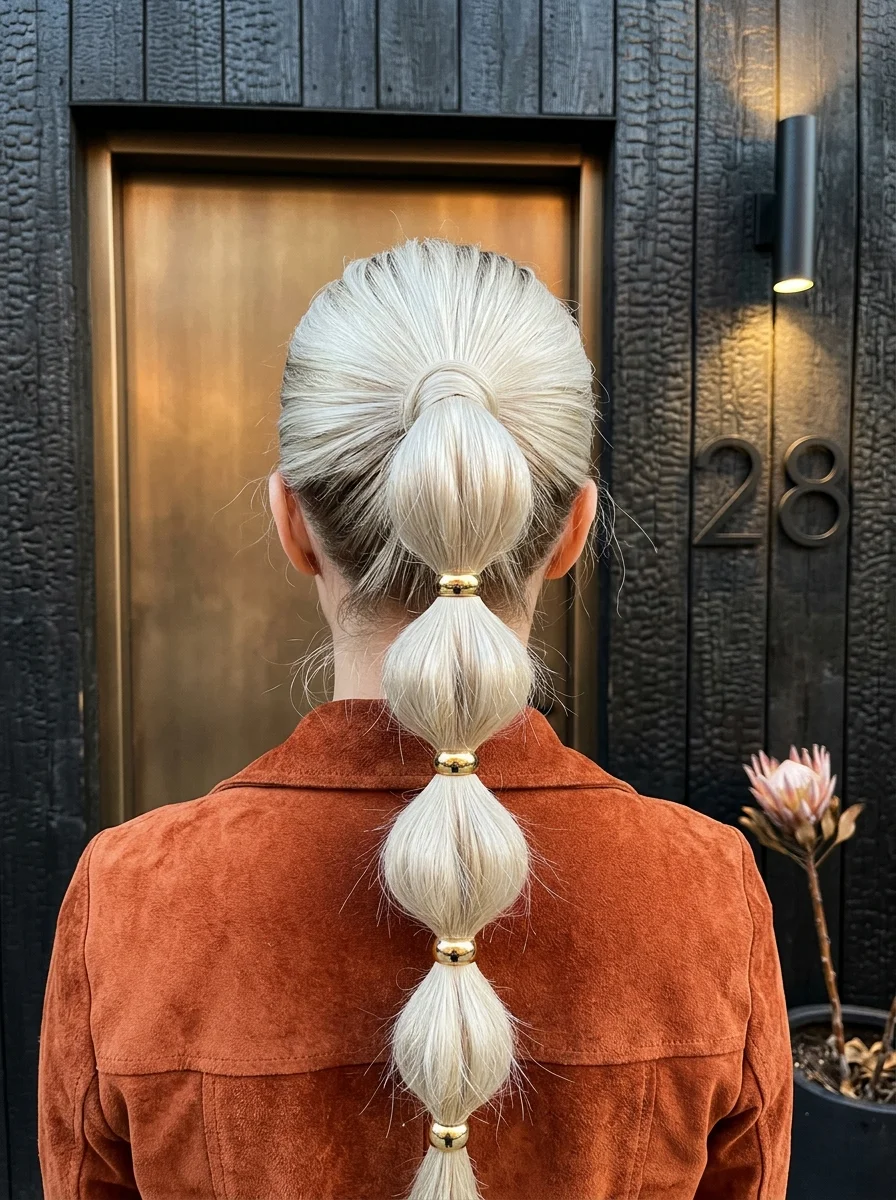
The overview: Very long platinum blonde hair pulled into a high ponytail, then sectioned into four distinct bubbles down the length. Gold metal cuff bands secure each bubble, creating a graphic, modern silhouette.
The bubble ponytail is visually rhythmic and photographically striking. Each bubble is rounded and full, creating a segmented effect that looks more complex than it actually is. The gold cuffs add metallic warmth against the cool platinum, and the burnt orange suede jacket completes the fall color story.
Why this look is popular: Bubble braids are easier than actual braiding; you're just tying elastics and pulling sections apart. The result looks more involved than the effort required, which is exactly the kind of style people want for fall.
Where this look is suitable: Autumn festivals, outdoor events, weekend outings, and any setting where the playful, graphic quality will be appreciated.
Step by step:
- Smooth the base. Apply smoothing serum to damp hair and blow-dry straight for a polished crown.
- Create the high ponytail. Gather all hair at the crown and secure tightly with a strong elastic.
- Create bubbles. Tie gold cuffs at 3-inch intervals down the ponytail. Gently pull each section apart to create rounded bubbles.
- Adjust for symmetry. Ensure each bubble is roughly the same size for a balanced look.
- Set lightly. A mist of flexible-hold hairspray keeps the bubbles defined without stiffness.
Tips and tricks: Day-old hair provides better grip for creating defined bubbles. For finer hair, backcomb each section slightly before adding the cuff for extra volume. The gold cuffs should be proportional to the bubble size; too small and they get lost.
9.Wavy Bob with Tortoiseshell Clip
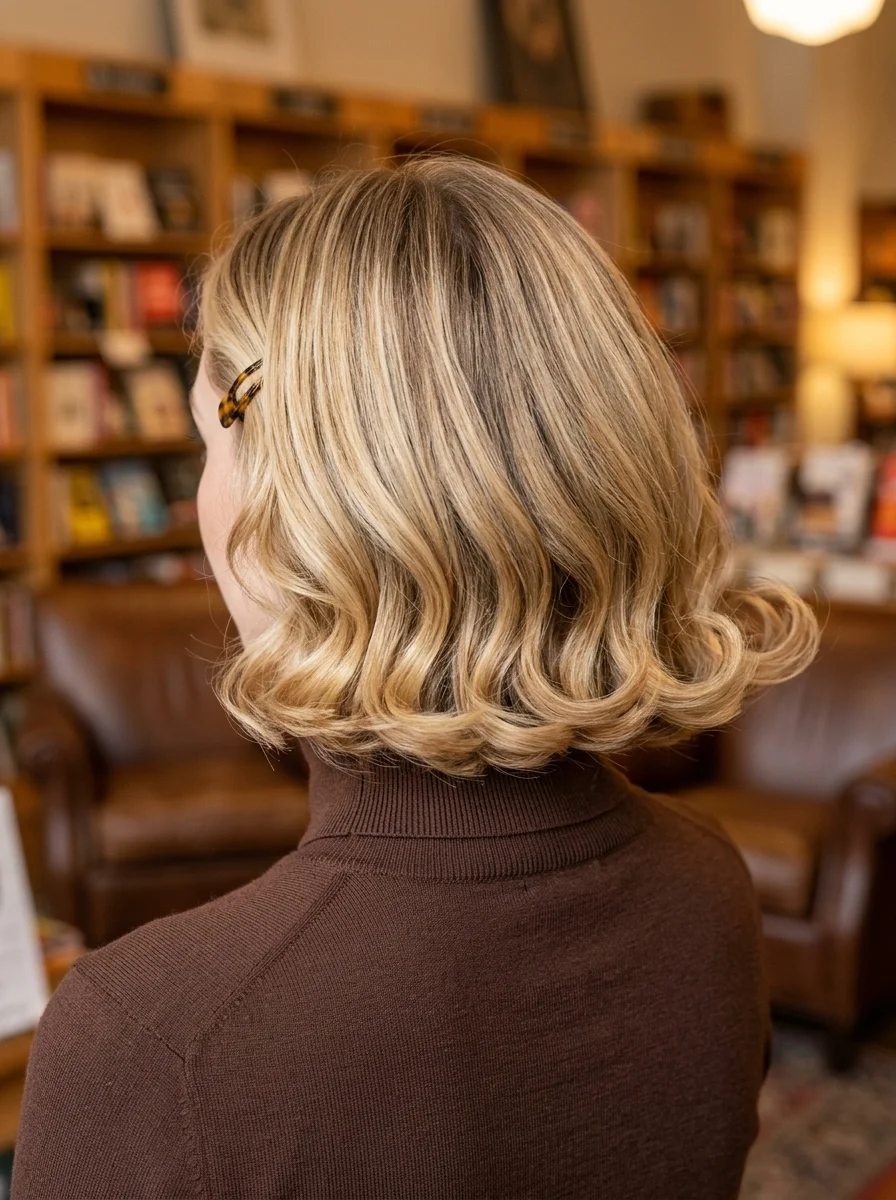
The overview: Chin-length bob with soft, brushed-out waves. Side-parted with one side clipped back with a tortoiseshell clip. The multi-tonal blonde blends ash and golden tones, creating depth that reads as expensive.
The textured bob is the most practical fall cut because it survives layering under scarves and hat brims without becoming a tangled mess. The waves add movement that keeps the bob from looking stiff, and the tortoiseshell clip adds warmth against the cool blonde.
Why this look is popular: The bob requires almost no styling. The cut does the work, and the clip adds personality without requiring multiple accessories. It's the ultimate low-maintenance fall style.
Where this look is suitable: Library afternoons, coffee shop visits, casual office days, and any cozy fall setting where the warm aesthetic complements the atmosphere.
Step by step:
- Wash and towel-dry. Squeeze out excess water with a microfiber towel. Don't rub.
- Apply texturizing product. Work sea salt spray or matte paste through the mid-lengths and ends.
- Rough-dry. Use your fingers, not a brush, to rough-dry. A diffuser on low heat works too.
- Piece out the texture. Once dry, use your fingers to separate and define individual pieces.
- Tuck and clip. Take the heavier side of your part, tuck it behind the ear, and secure with the tortoiseshell clip.
Tips and tricks: Ask your stylist for a bob with point-cut ends that create natural texture without blunt lines. Maintenance trims every six to eight weeks keep the shape sharp. For extra volume, flip your head upside down and blast the roots with a blow dryer for thirty seconds.
25 Top Curly Hairstyle Trends for 2026 ➰✨
10.Long Waves with Curtain Bangs
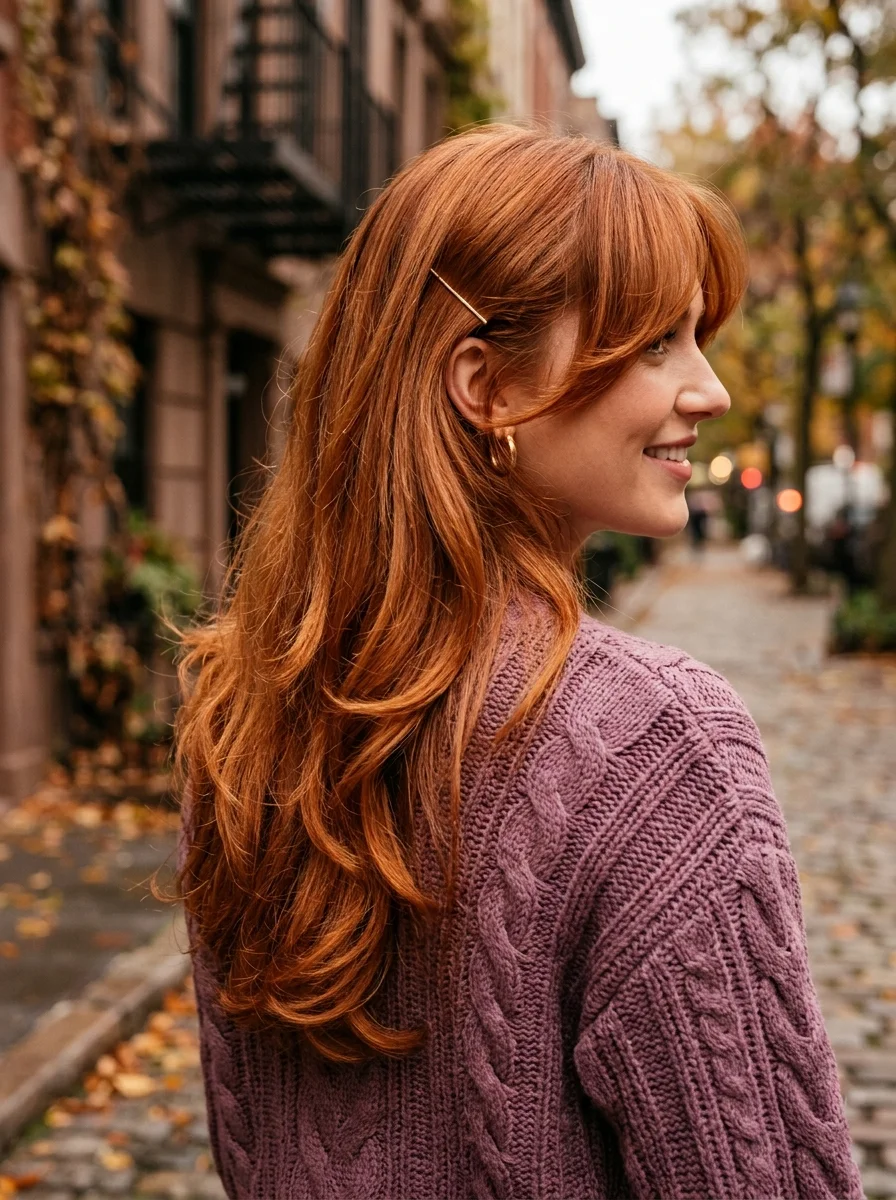
The overview: Long, flowing loose waves with curtain bangs that blend seamlessly into face-framing layers. The copper-red color is rich and autumnal, catching warm light from every angle. Side-parted, natural, and relaxed.
Curtain bangs are the most forgiving fringe you can get because they grow out gracefully. Unlike blunt bangs that require weekly trims, curtain bangs can go weeks without maintenance and still look intentional. The waves add movement that keeps the length from looking heavy.
Why this look is popular: The combination of copper-red hair and curtain bangs is the most requested fall color and cut pairing. The warm tones complement the season's palette, and the bangs frame the face without the commitment of a full fringe.
Where this look is suitable: Autumn city walks, cobblestone strolls, coffee shop mornings, and any setting where the relaxed, romantic aesthetic fits.
Step by step:
- Apply curl cream. Work a lightweight curl cream through damp hair, focusing on the mid-lengths and ends.
- Diffuse on low heat. Cup sections in the diffuser and hold against the scalp for ten to fifteen seconds each.
- Shape the bangs. While slightly damp, use a round brush to blow the bangs away from the face on each side.
- Break up the waves. Once dry, run your fingers through the hair to separate curls into softer waves.
- Add shine. A few drops of lightweight oil on the ends adds polish without weighing the hair down.
Tips and tricks: Curtain bangs need to be styled when damp; once they dry straight, they won't cooperate. A round brush and thirty seconds of blow-drying is all they need. For the copper color, use a color-depositing shampoo once a week to maintain vibrancy between salon visits.
11.Bubble Braid with Gold Leaf Clip
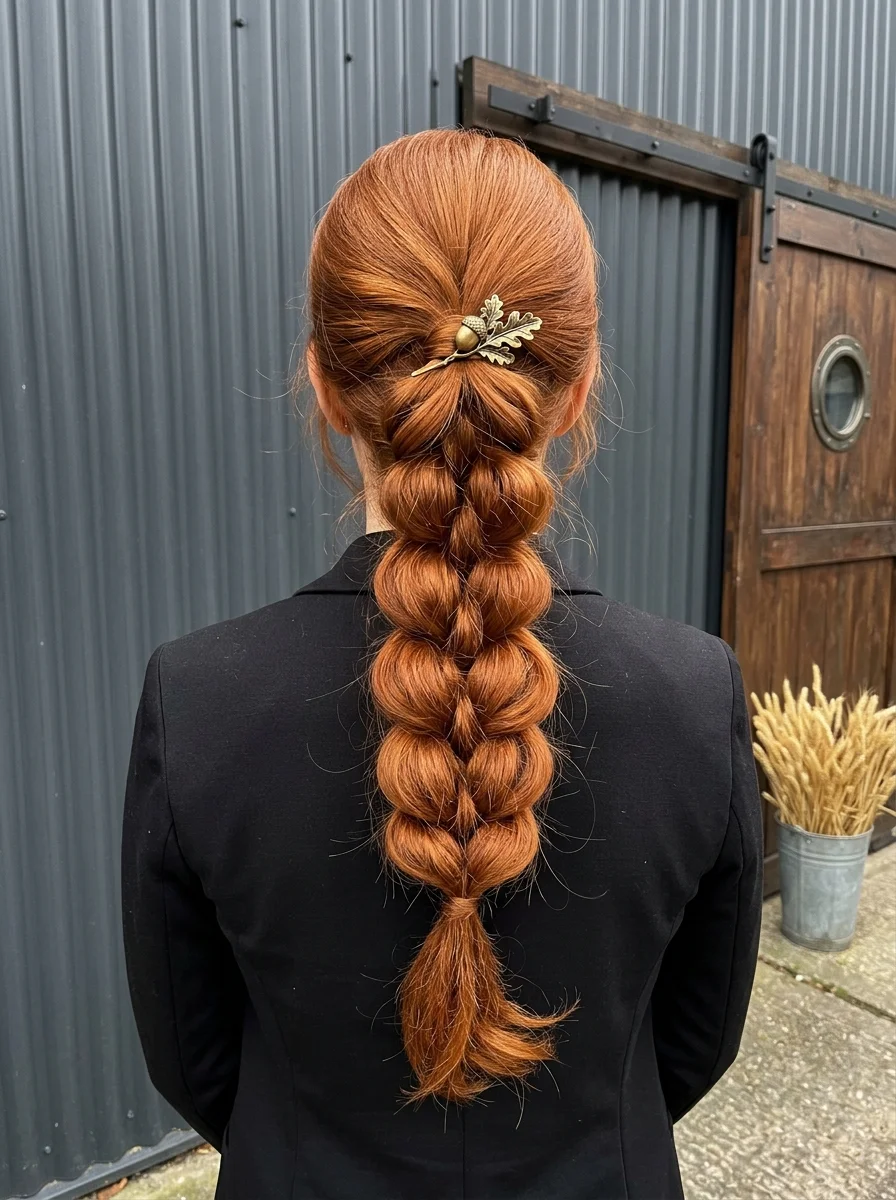
The overview: Vibrant copper-red hair pulled into a smooth high ponytail, then segmented into voluminous bubbles down the length. A gold leaf-shaped clip sits at the base of the ponytail, adding an autumnal detail.
Copper-red hair in a bubble braid is a fall power move. The warm tones catch the season's golden light, and the bubble segments create a graphic silhouette that stands out against the dark corrugated metal backdrop. The leaf clip is the finishing touch that ties the whole autumn aesthetic together.
Why this look is popular: The bubble braid works on almost every hair texture because you're creating the structure with elastics, not relying on natural curl pattern. On smooth, straight hair, the bubbles look especially polished and intentional.
Where this look is suitable: Fall festivals, outdoor markets, daytime events, and any setting where the playful, warm-toned aesthetic fits the atmosphere.
Step by step:
- Smooth the crown. Apply smoothing serum and blow-dry straight. Eliminate all bumps at the roots.
- Gather high. Collect all hair at the crown and secure with a strong elastic.
- Create bubbles. Tie clear elastics at 3-inch intervals down the ponytail. Gently pull each section apart to create rounded bubbles.
- Add the clip. Slide the gold leaf clip through the base of the ponytail, just above the elastic.
- Adjust volume. Ensure each bubble is roughly equal in size for a balanced silhouette.
Tips and tricks: For the smoothest bubbles, apply a small amount of styling wax to each section before pulling it apart. The wax prevents flyaways and keeps the bubble shape clean. Day-old hair holds the bubbles better than freshly washed hair.
34 Cutest Butter Yellow Nail Designs for 2026 🧈
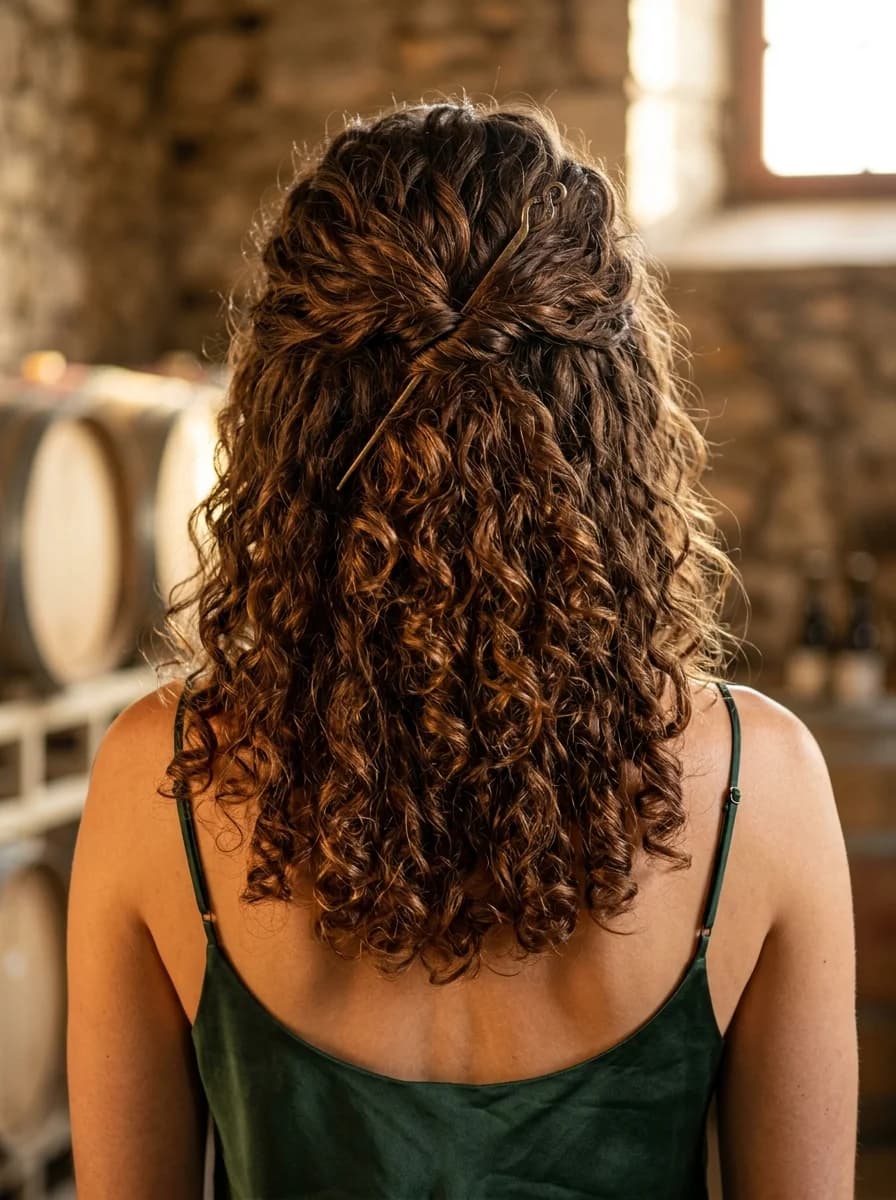
12.Curly Half-Updo with Gold Leaf Pins
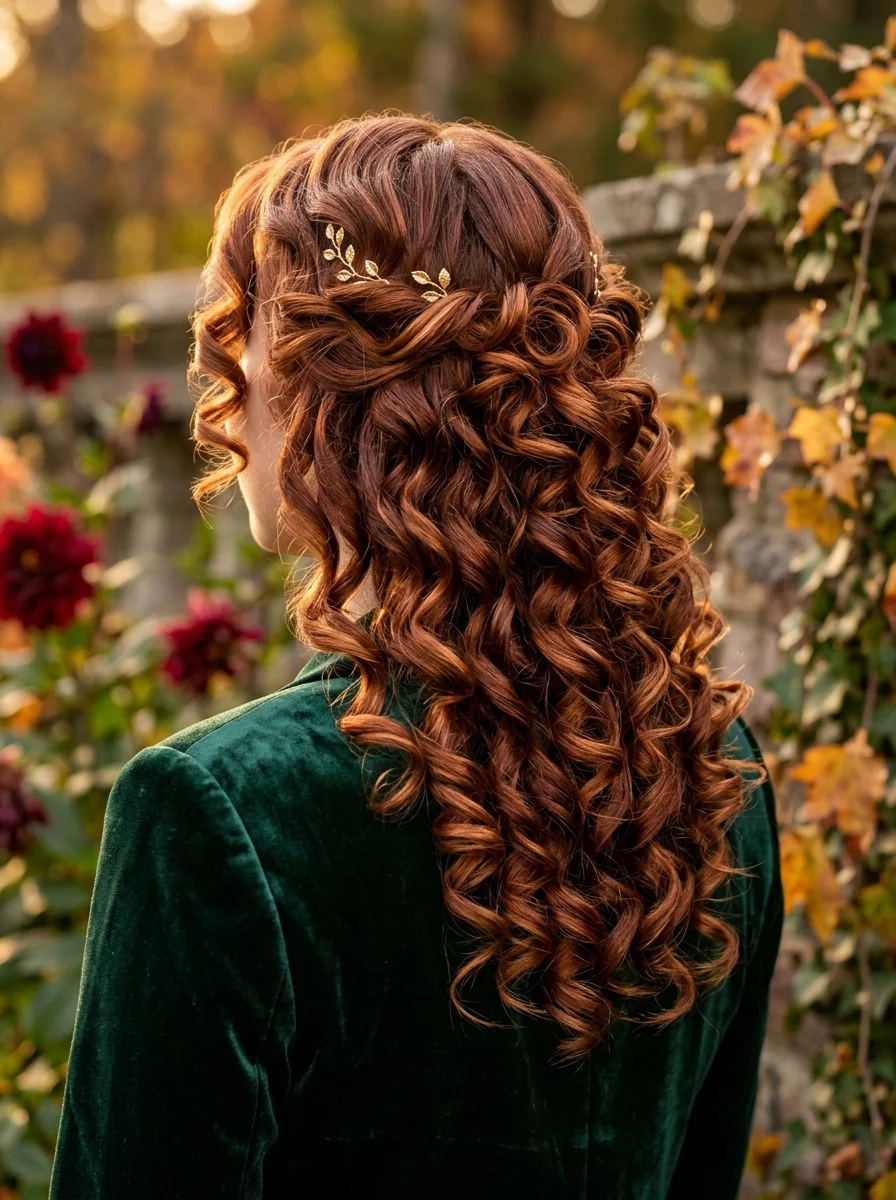
The overview: Long auburn hair with tightly defined spiral curls, pulled into a half-up style. Sections are twisted and pinned back at the crown with small gold leaf vine hair pins, while the rest cascades in bouncy ringlets.
The curly half-updo solves a specific problem: wearing curly hair fully down means constantly pushing it out of your face; wearing it fully up means losing the volume that makes curls beautiful. The half-up compromise lets the top section stay controlled while the curls do what they do best.
Why this look is popular: The gold leaf pins add a fall-specific detail without being costume-y. They catch the light against the auburn curls and create a focal point at the crown that elevates the style from everyday to occasion-worthy.
Where this look is suitable: Garden parties, autumn weddings, golden-hour photo sessions, and any setting where the romantic, curl-forward aesthetic shines.
Step by step:
- Define curls first. Apply curl cream to soaking wet hair, scrunching upward. Follow with a lightweight gel for definition. Diffuse on low heat.
- Identify the half-up section. Take hair from temple to temple, following the top of the ear as a guide.
- Twist and pin. Lift the top section, twist it once, and pin against the head with two bobby pins in an X.
- Add the leaf pins. Slide gold leaf vine pins along the twisted section at irregular intervals.
- Shape the curls. Separate any clumped curls with your fingers. A few drops of shine serum on the ends adds polish.
Tips and tricks: Plop your curls in a microfiber towel after defining them to reduce frizz and speed drying. The gold pins should be pushed deep enough that only the leaf detail is visible. For humidity-heavy days, a gel over the curl cream creates a stronger cast that lasts longer.
13.Half-Up Curly Style with Star Pins
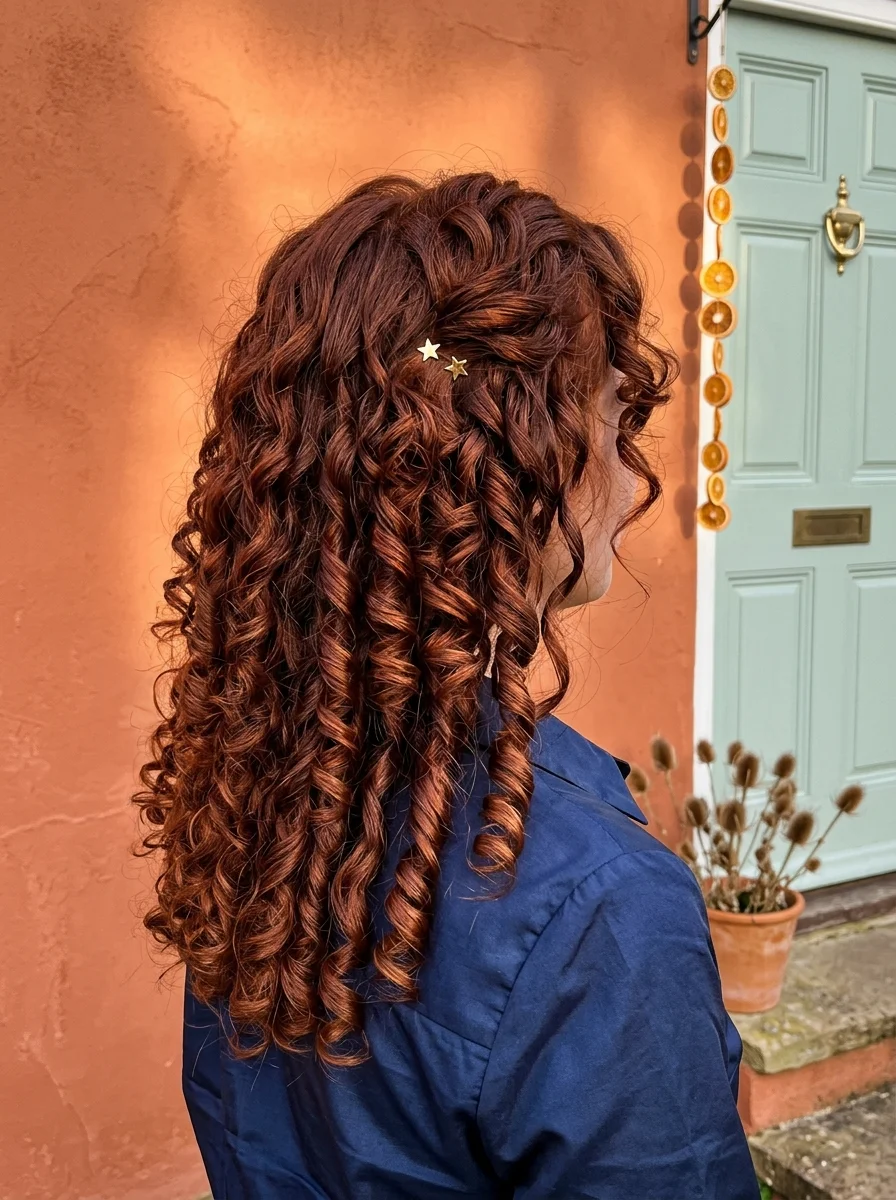
The overview: Deep copper curls with a small twisted section pulled back from one side, secured with two gold star-shaped hair pins. The rest of the curls flow loose and voluminous.
The star pins add a whimsical, celestial detail that contrasts nicely with the structured navy shirt. The half-up section keeps the curls controlled on one side while letting them cascade freely on the other. It's asymmetry that feels organic rather than forced.
Why this look is popular: Small hair accessories are having a moment because they add personality without requiring commitment. The star pins are subtle enough for everyday wear but distinctive enough to catch attention.
Where this look is suitable: Casual outings, coffee dates, weekend errands, and any setting where playful accessories complement the relaxed atmosphere.
Step by step:
- Define curls. Apply curl cream to wet hair, scrunching upward. Air-dry or diffuse on low heat.
- Select the side. Choose the side with more volume or where your natural part falls.
- Twist and pin. Take a 2-inch section from the hairline, twist it loosely, and pin it back with the star pins.
- Adjust the curls. Separate any clumped curls and fluff the roots for volume.
Tips and tricks: The star pins work best when placed at slightly different heights along the twisted section. This creates a scattered, organic arrangement rather than a rigid line. For tighter curls, apply the pins while the hair is still slightly damp for better grip.
25 Trendy Beach Day Hairstyles for Vacation 2026 ☀️🌊
14.Crown Braid with Pearl Accent
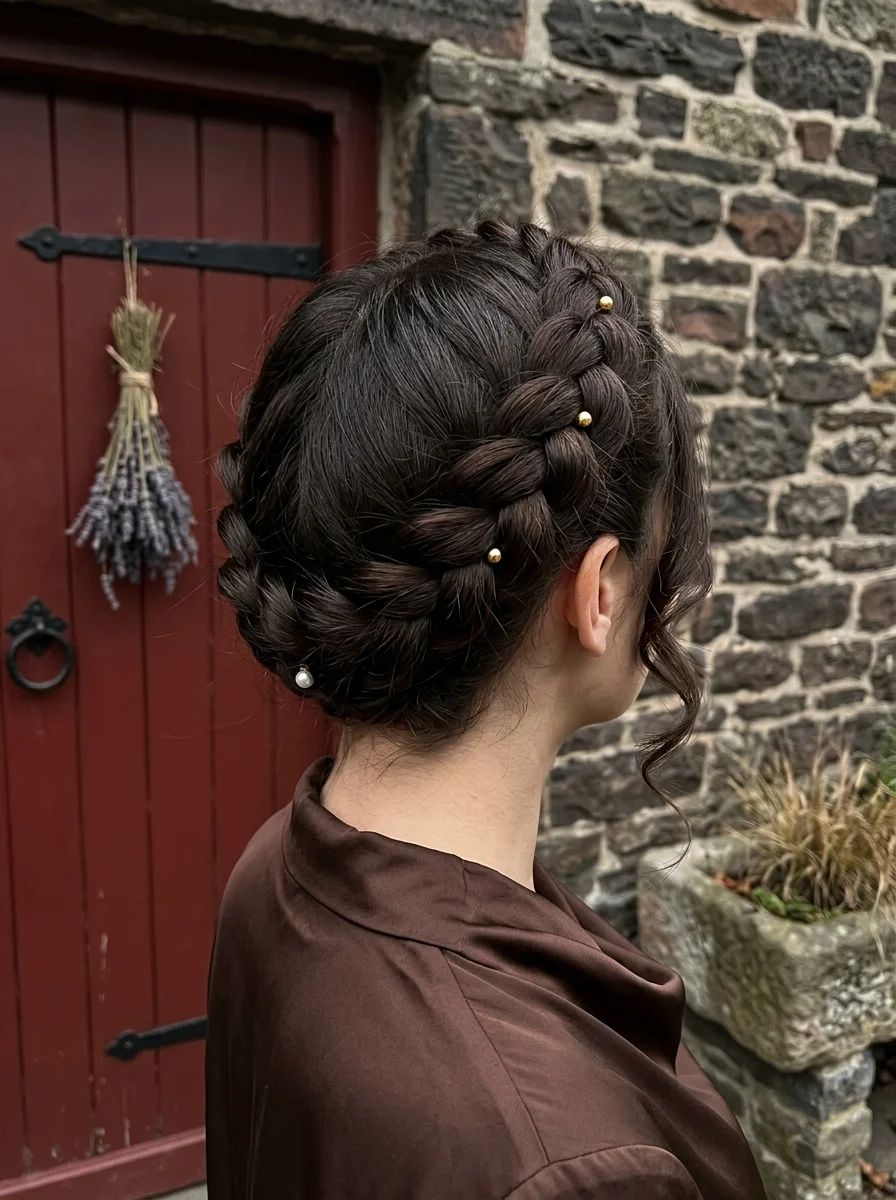
The overview: Dark espresso brown hair worked into a crown braid (milkmaid style) with Dutch braids wrapped around the head. The ends are tucked and pinned, with a soft curl tendril left loose near the ear. Gold bead pins and a white pearl pin add detail.
The crown braid is one of the more technically demanding styles on this list, but it creates a result that no other hairstyle replicates. The braid functions as a built-in headband, keeping every strand contained while creating 360-degree visual interest.
Why this look is popular: Crown braids have a specific autumn appeal that summer styles don't. They pair naturally with higher necklines, scarves, and the structured silhouettes of fall fashion. The pearl pin adds a vintage touch.
Where this look is suitable: Formal dinners, harvest celebrations, autumn weddings, and any setting where the romantic, vintage aesthetic fits the mood.
Step by step:
- Prep for grip. Apply a strong-hold mousse or braid gel from roots to ends. Day-two hair provides better texture.
- Start above one ear. Take a section and divide it into three strands. Begin a Dutch braid heading backward along the hairline.
- Follow the hairline. Continue the braid around the back of the head, always adding hair from the crown side.
- Complete the circle. Once the braid returns to the starting point, continue braiding the tail as a standard three-strand braid.
- Tuck and pin. Lift the beginning of the braid and tuck the tail underneath. Pin with 3-4 bobby pins.
- Add accessories. Insert gold bead pins at irregular intervals along the braid. Place the pearl pin at the back near the tuck point.
Tips and tricks: The back of the head is where most crown braids loosen. Pull each cross slightly tighter in this section. A fine-tooth comb smooths each section before braiding to eliminate bumps. Odd numbers of pins (five or seven) look more natural than even numbers.
15.Modern Shag with Tortoiseshell Clip
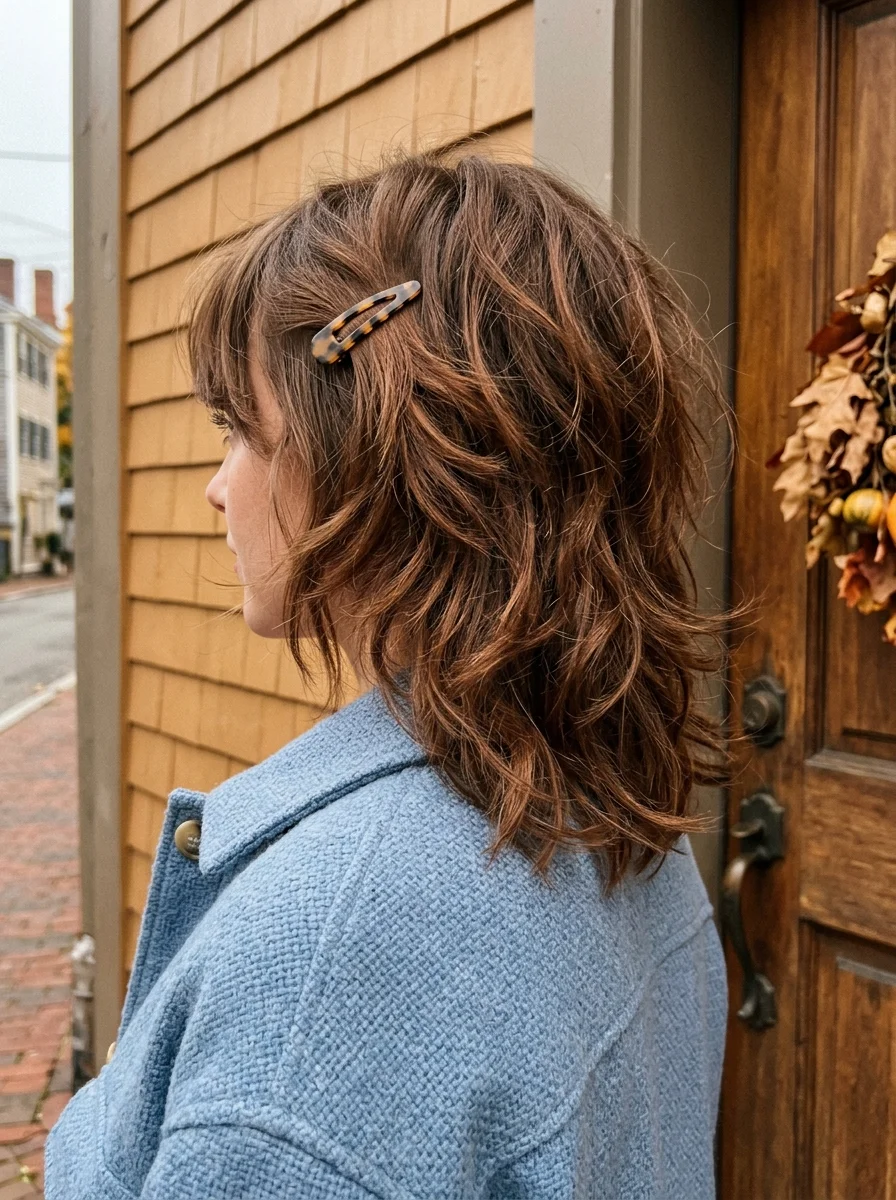
The overview: Shoulder-length hair cut into a modern shag with choppy layers, wispy curtain bangs, and piecey undone waves. One side is pinned back with a tortoiseshell clip. The texture is deliberately messy.
The shag haircut is the most low-maintenance cut you can get because the layers do the work. The choppy texture means you don't need to style it perfectly; the whole point is that it looks better slightly undone. The curtain bangs frame the face without the commitment of a full fringe.
Why this look is popular: The shag is having a major revival because it works with natural texture instead of against it. Fall's lower humidity means the layers fall into place with minimal effort, and the clip adds polish when you need it.
Where this look is suitable: Weekend outings, casual meetings, creative workplaces, and any setting where the relaxed, slightly edgy aesthetic fits.
Step by step:
- Wash and towel-dry. Squeeze out excess water. Don't rub, as this creates frizz in the layers.
- Apply texturizing product. Work a matte paste or sea salt spray through the mid-lengths and ends.
- Rough-dry. Use your fingers to lift and separate the layers while drying. A diffuser on low heat works too.
- Piece out the texture. Once dry, use your fingers to separate individual pieces and define the shag texture.
- Clip one side. Take the heavier side, tuck it behind the ear, and secure with the tortoiseshell clip.
Tips and tricks: Ask your stylist for "point-cut ends" that create natural texture without blunt lines. Maintenance trims every six to eight weeks keep the layers from growing out into a shapeless mass. The shag works best on second-day hair.
35 Cute & Trendy Short Summer Nails for 2026 ☀️
16.Low Twisted Bun with Pearl Hair Stick
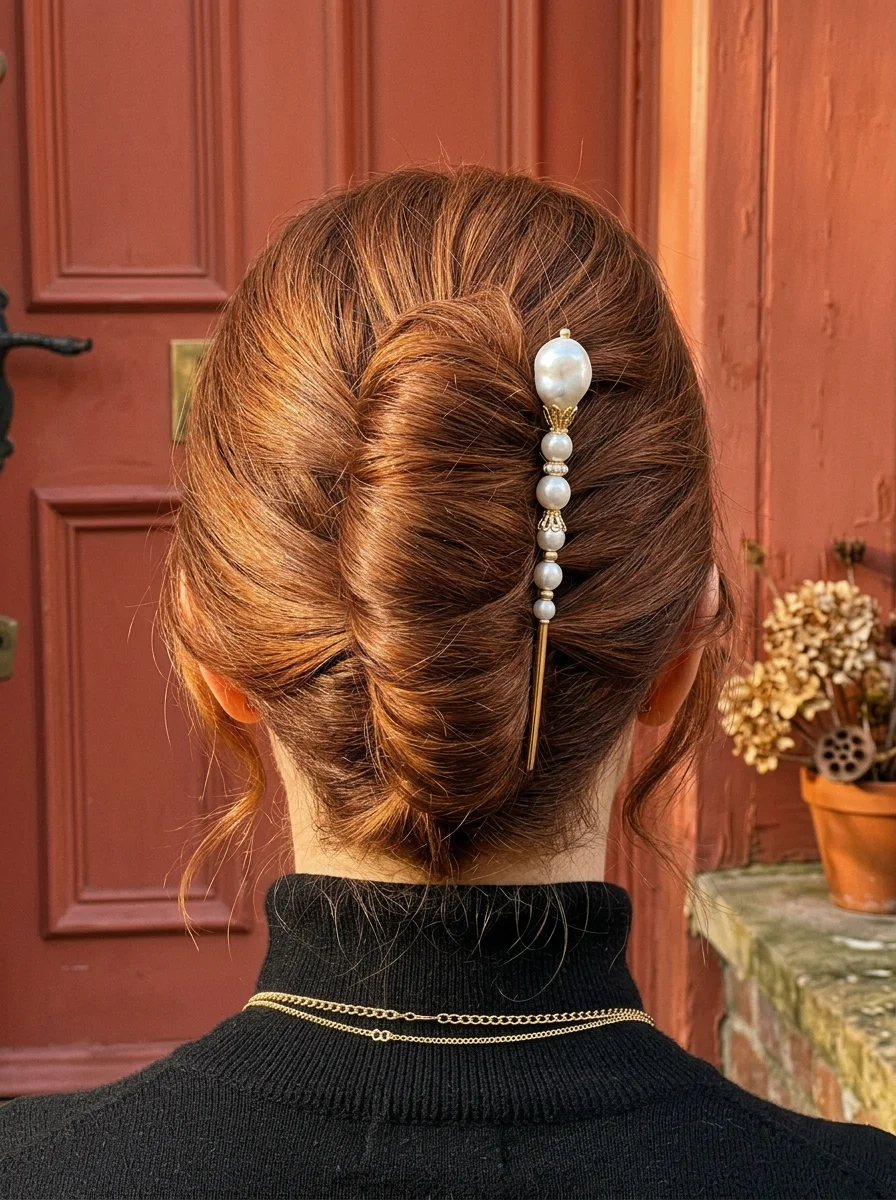
The overview: Long copper hair smoothly swept up and twisted into an elegant vertical roll at the nape. Two small face-framing tendrils are left loose. A pearl hair stick with graduated pearls secures the updo from above.
The French twist is the hairstyle that people assume requires professional hands. In practice, it's one of the simpler updos. What makes the difference between elegant and messy is the prep work: smoothing the hair before twisting, maintaining even tension during the roll, and using the right hardware.
Why this look is popular: The pearl hair stick adds a vintage detail that elevates the entire look. Against the black turtleneck and gold chain necklace, it creates a sophisticated fall silhouette that reads as editorial.
Where this look is suitable: Evening dinners, formal events, gallery openings, and any setting where polished elegance is the goal.
Step by step:
- Smooth the hair. Blow-dry or flat-iron until completely smooth. Apply anti-frizz serum from mid-lengths to ends.
- Gather to one side. Sweep all hair to the left side. Hold at the center back with your left hand.
- Create the anchor. Place 4-5 bobby pins in a vertical line up the center back.
- Roll the twist. Fold the hair over the pin line and roll inward, creating a smooth vertical cylinder.
- Pin with U-pins. Insert U-shaped hairpins horizontally through the twist and into the pin track.
- Add the pearl stick. Slide the graduated pearl stick through the top of the twist, angling slightly downward.
Tips and tricks: The pearl stick should be inserted at a slight angle, not straight down. This creates a more secure hold and a more interesting visual line. For the smoothest finish, wrap the completed twist in a silk scarf for ten minutes before heading out.
17.Sculpted Hair Bow with Pearl Cluster
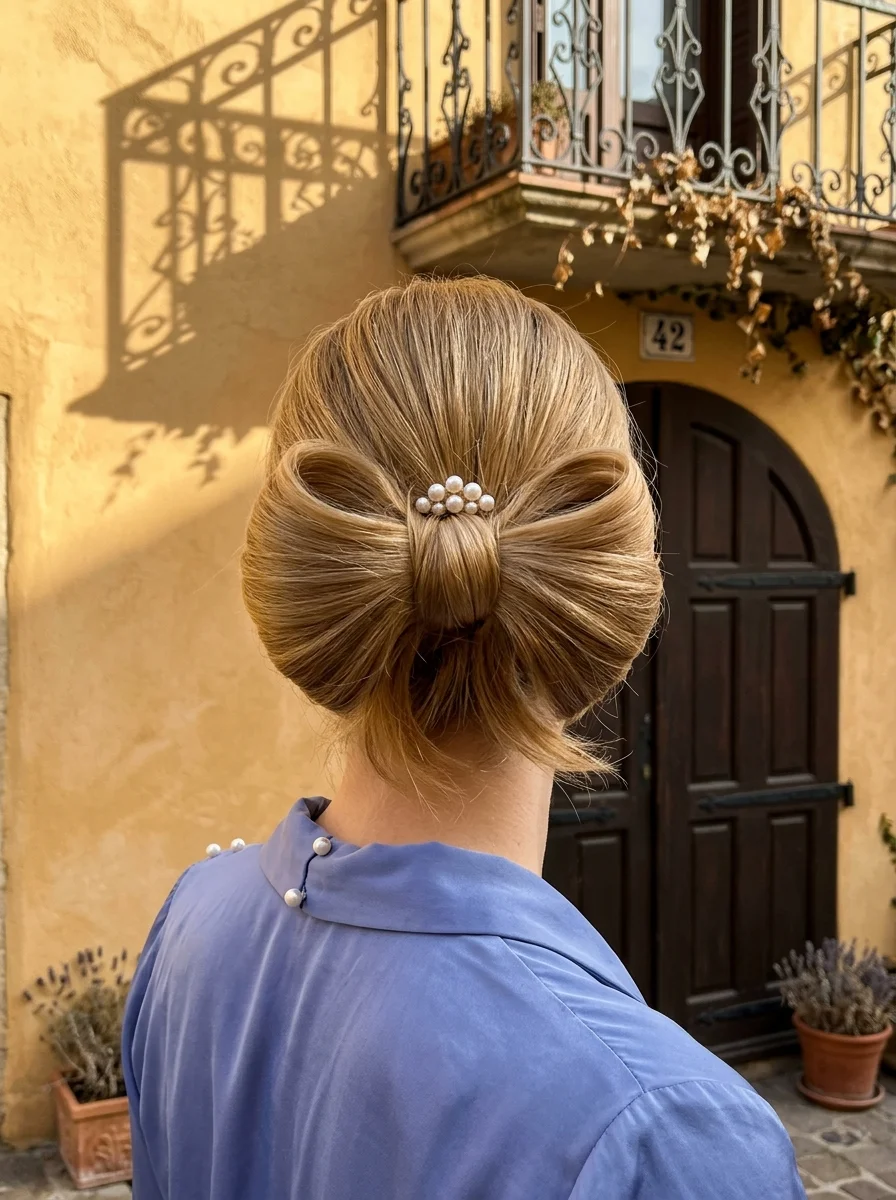
The overview: Long honey blonde hair shaped into a large sculpted bow at the back of the head. The knot is formed by wrapped hair, with a cluster of small white pearls at the center. The structure is highly polished and artistic.
The hair bow is one of those styles that looks impossible but is actually just a series of loops and pins. The key is smooth, straight hair that can be shaped without flyaways interfering. The pearl cluster at the center draws the eye and conceals the structural mechanics.
Why this look is popular: The hair bow is a statement style that photographs beautifully from every angle. It's the kind of hairstyle that makes people stop and look, which is exactly the point for special fall occasions.
Where this look is suitable: Formal dinners, holiday parties, special occasions, and any setting where the dramatic, sculptural aesthetic makes sense.
Step by step:
- Straighten thoroughly. Every section should be smooth. Flyaways will ruin the bow's clean lines.
- Create a high ponytail. Gather all hair at the crown and secure tightly.
- Form the bow loops. Split the ponytail into two sections. Loop each section outward and pin the ends back at the base.
- Create the knot. Take a thin section from the remaining tail, wrap it over the center of the loops, and pin it underneath.
- Add the pearls. Cluster small pearl pins at the center knot, pushing them deep enough that only the pearl heads are visible.
- Smooth the surface. Use a fine-tooth comb and a light mist of hairspray to eliminate any flyaways on the bow's surface.
Tips and tricks: This style requires long, thick hair to create a proportional bow. Fine hair can use a padding insert at the base for volume. A strong-hold hairspray is essential; the bow needs to maintain its shape throughout the event.
31 Flattering Summer Hairstyles for Women Over 40 (2026)
18.Voluminous Half-Up Pouf with Gold Dome Clip
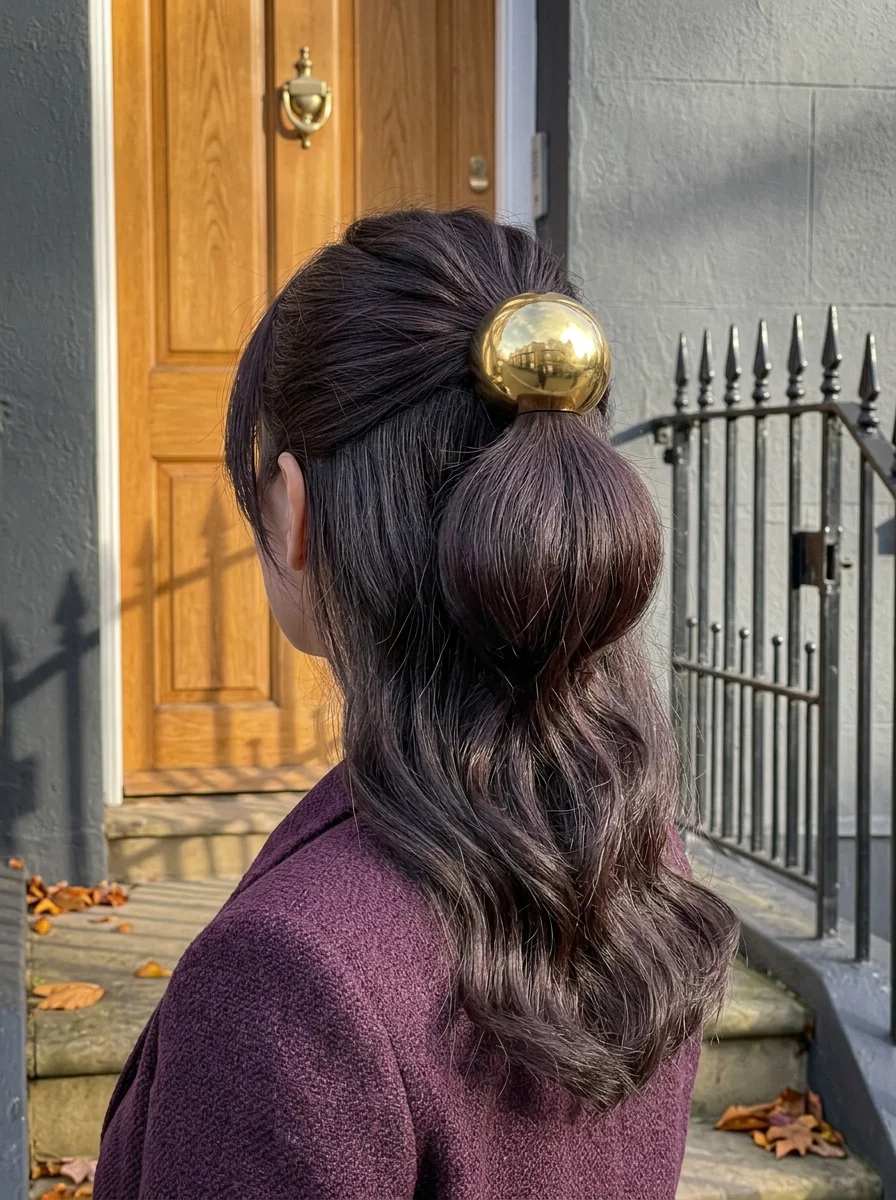
The overview: Very dark brown hair pulled into a half-up style with a large, rounded puff secured with a polished gold dome clip. The remaining hair falls in loose waves below the shoulders.
The half-up pouf is the modern take on volume. Instead of backcombing the entire crown, you're gathering just the top section and creating height at one point. The gold dome clip adds a statement accessory that catches light against the dark hair.
Why this look is popular: The half-up pouf creates the illusion of volume at the crown without requiring teasing or product buildup. It's a clean, polished look that pairs well with the structured blazers and outerwear of fall fashion.
Where this look is suitable: Professional settings, after-work events, dinner dates, and any occasion where polished volume beats flat sleekness.
Step by step:
- Add volume at the roots. Apply volumizing mousse to damp hair at the crown and blow-dry upward for lift.
- Gather the top section. Take hair from each temple and smooth it back toward the crown, creating a pouf.
- Backcomb slightly. Tease the underside of the gathered section for extra height before smoothing the top layer.
- Clip with the dome clip. Secure the pouf at the back of the crown with the gold dome clip.
- Wave the remaining hair. Use a curling wand on the loose sections for soft movement.
Tips and tricks: The pouf height should be proportional to your face shape. Longer faces benefit from less height; rounder faces benefit from more. The gold clip should be large enough to grip all the gathered hair; if it slips, the section is too thick.
19.Natural Curls with Pearl Bobby Pins
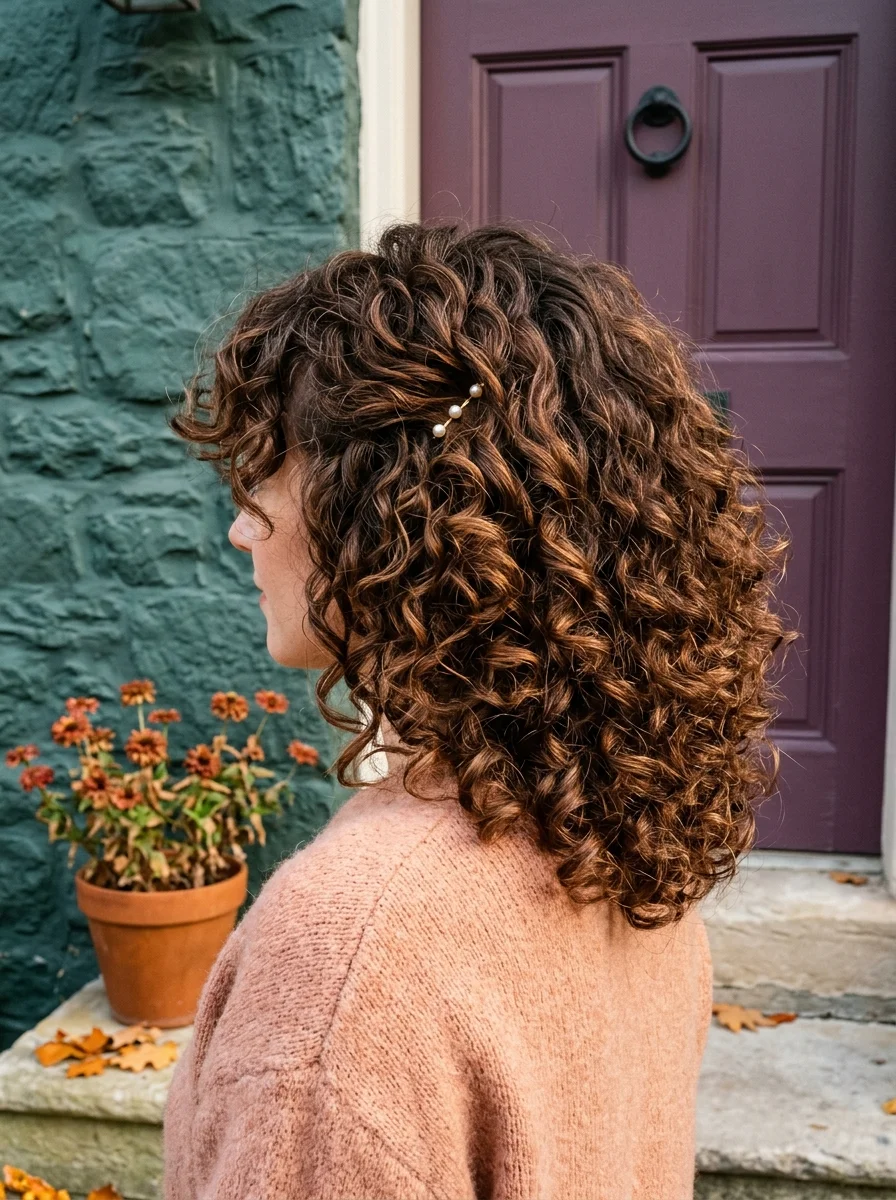
The overview: Medium-long hair with tight, natural ringlet curls worn loose with a small section pinned back on one side with three pearl bobby pins. Soft bangs frame the face.
Natural curls don't need much to look incredible. The pearl pins add a subtle detail that catches the light without competing with the curl pattern. The dusty pink sweater complements the warm brown tones beautifully.
Why this look is popular: The pearl bobby pin trend is everywhere because it adds polish to the simplest styles. Three pins on one side creates an asymmetric accent that looks intentional without being overdone.
Where this look is suitable: Casual outings, coffee dates, weekend mornings, and any setting where natural texture is the star.
Step by step:
- Define curls. Apply curl cream to soaking wet hair, scrunching upward. Follow with gel for definition.
- Diffuse on low heat. Cup sections in the diffuser and hold against the scalp. Don't touch while drying.
- Select the pin side. Choose the side where your natural part falls or where volume is heavier.
- Pin back the section. Take a 2-inch section from the hairline and secure it with three pearl bobby pins at slightly different heights.
- Shape the curls. Separate any clumped curls and fluff the roots for volume.
Tips and tricks: The pearl pins work best on curls that are fully dry. If you're defining your curls, let them dry completely before adding the pins, or they'll stick to the damp hair and look uneven. For the best curl definition, apply products to soaking wet hair.
27 Stunning Graduation Day Nail Ideas for 2026 🎓
20.Half-Up Double Twist with Gold Pearl Pins
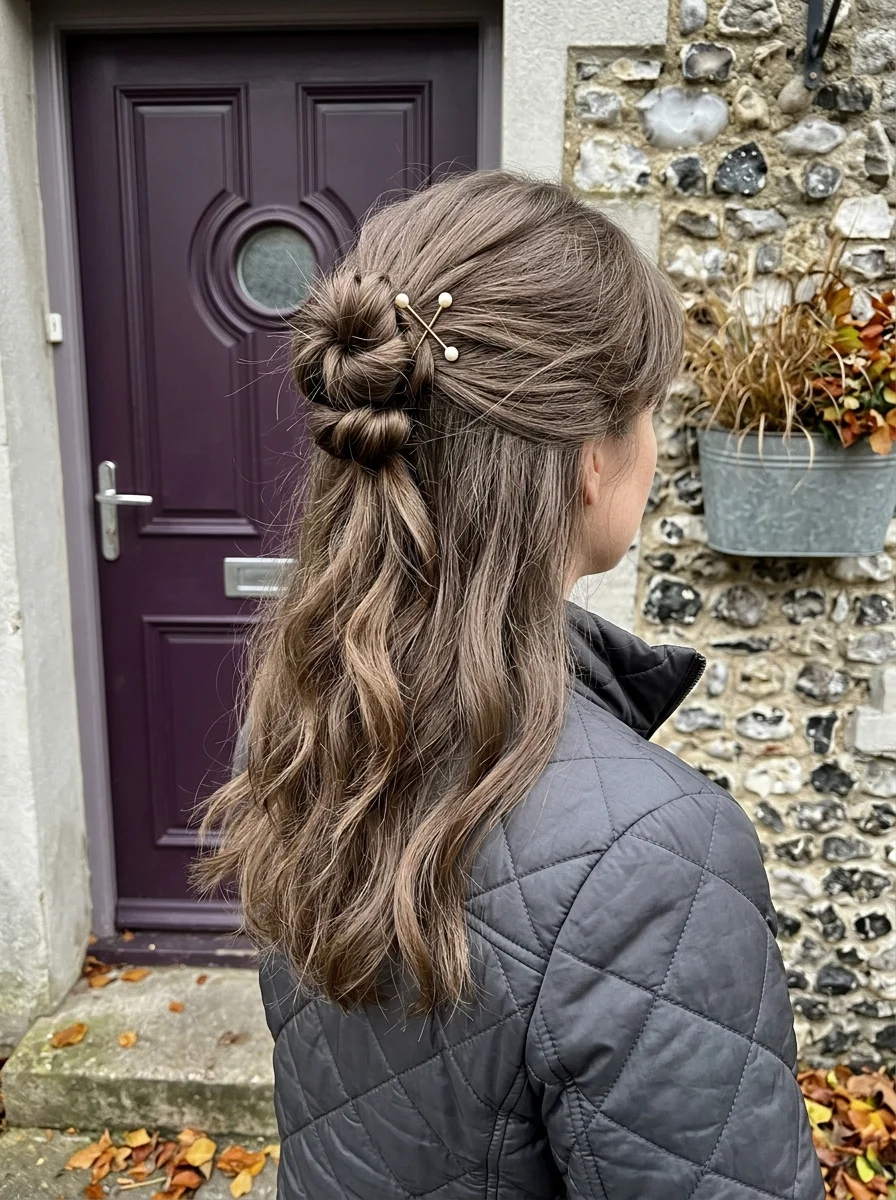
The overview: Ash brown hair with two sections from the front twisted and looped into a small knot at the back of the crown. Two crossed gold bobby pins with pearl tips secure the twist. The remaining hair flows in soft waves.
The double twist creates a more interesting half-up style than a simple gather-and-clip. The two twisted sections add dimension and movement at the crown, while the crossed gold pins add a metallic detail that catches the light.
Why this look is popular: The twisted half-up is versatile enough for everyday wear but detailed enough for occasions. The pearl-tipped pins add a vintage touch that complements fall's richer textures and deeper colors.
Where this look is suitable: Cottage-style settings, outdoor dining, casual gatherings, and any setting where the relaxed, romantic aesthetic fits.
Step by step:
- Create waves. Use a curling wand on 1-inch sections, leaving the ends straight. Break up with fingers.
- Section the front. Take a 2-inch section from each temple.
- Twist each section. Twist each section away from the face, keeping the tension loose.
- Meet at the back. Bring both twisted sections to the back of the crown and cross them over each other.
- Pin with crossed pins. Secure the twist with two gold pearl-tipped bobby pins in an X pattern.
Tips and tricks: The twists should be loose enough to show texture but tight enough to hold their shape. If they unravel, apply a small amount of texturizing spray before twisting. The crossed pins create a stronger hold than parallel pins.
21.Low Ponytail with Braid Wrap
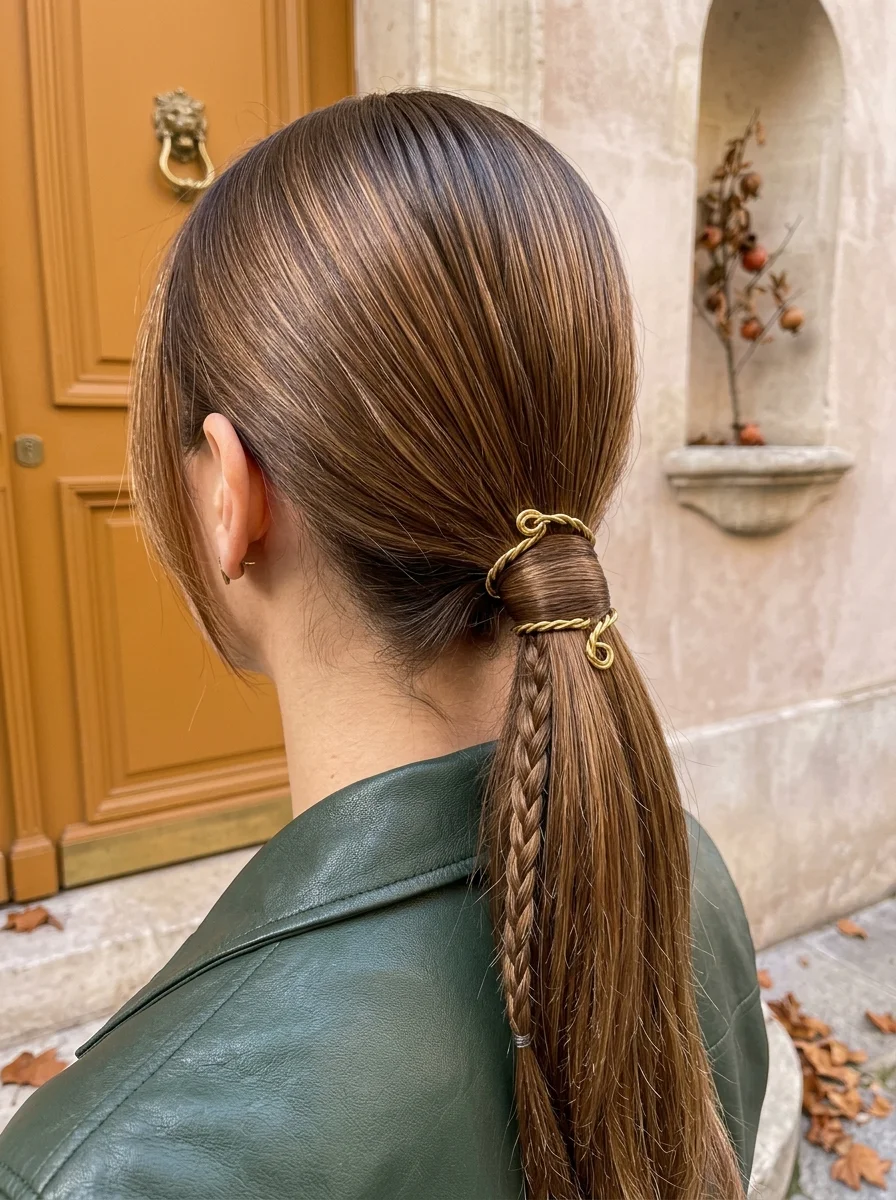
The overview: Long brown hair with warm caramel highlights pulled into a sleek low ponytail. A small three-strand braid is wrapped around the base of the ponytail, secured with gold twisted rope hair ties. The ponytail itself is smooth and polished.
The braid wrap transforms a basic ponytail into something with visual interest. Instead of a visible elastic or a simple hair strand wrap, the braid adds texture and dimension at the base. The gold rope ties add metallic warmth that complements the caramel highlights.
Why this look is popular: The low ponytail is the most practical fall style because it sits below most coat collars and scarf lines. Adding the braid wrap elevates it from "I gave up" to "I chose this."
Where this look is suitable: Professional settings, casual Fridays, weekend errands, and any situation where practicality and polish need to coexist.
Step by step:
- Smooth the hair. Apply smoothing serum and blow-dry straight for a polished finish.
- Gather low. Brush all hair into a smooth ponytail at the nape. Secure with an elastic that matches your hair color.
- Create the braid. Take a 1-inch section from the ponytail and create a standard three-strand braid. Secure the end with a tiny elastic.
- Wrap the braid. Wind the braid around the elastic base, covering it completely.
- Secure with rope ties. Wrap gold twisted rope ties around the base for a decorative, secure finish.
Tips and tricks: The braid should be tight enough to hold its shape when wrapped but not so tight that it looks rigid. For fine hair, tease the ponytail slightly before wrapping for extra volume. The gold rope ties grip better than regular elastics on smooth hair.
25 Stunning Summer Vacation Hairstyles for 2026 ☀️🌊
22.Half-Up Curly Style with Nude Clip
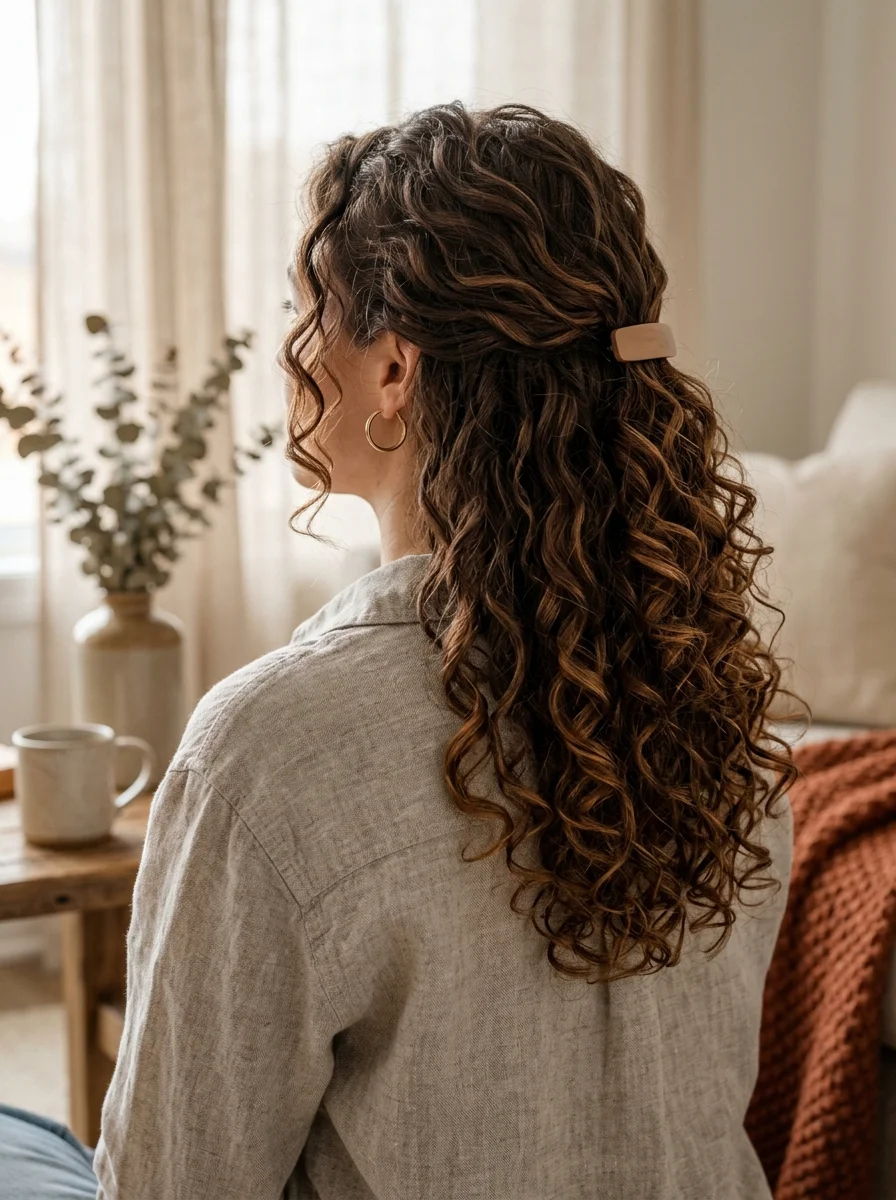
The overview: Long dark brown hair with tight, defined ringlet curls pulled into a half-up style. The top section is secured at the back with a small rectangular nude hair clip. The remaining curls cascade down the back.
The half-up curly style solves the practical problem of keeping curls out of your face while preserving the volume and movement that make curly hair beautiful. The nude clip is minimalist enough to disappear into the hair, letting the curl pattern be the focus.
Why this look is popular: Minimalist accessories are replacing statement pieces because they let the hair speak for itself. The nude clip is functional without being decorative, which works perfectly against the textured linen shirt and cozy setting.
Where this look is suitable: Cozy mornings at home, coffee shop visits, casual brunches, and any setting where relaxed comfort is the priority.
Step by step:
- Define curls. Apply curl cream to soaking wet hair, scrunching upward. Use a wide-tooth comb to distribute evenly.
- Diffuse or air-dry. Let curls dry naturally or use a diffuser on low heat. Don't touch them while they dry.
- Gather the half-up section. Take hair from each temple and pull it back to the crown, keeping the surface relaxed.
- Clip with the nude clip. Secure the gathered section at the back of the head.
- Shape the curls. Separate any clumped curls and fluff the roots for volume.
Tips and tricks: Curly hair should be gathered loosely, not tightly. Pulling curls too tight disrupts the curl pattern and creates frizz. The clip should be large enough to grip all the gathered section; if it slips, the section is too thick for that clip size.
23.Half-Up Waves with Champagne Satin Bow
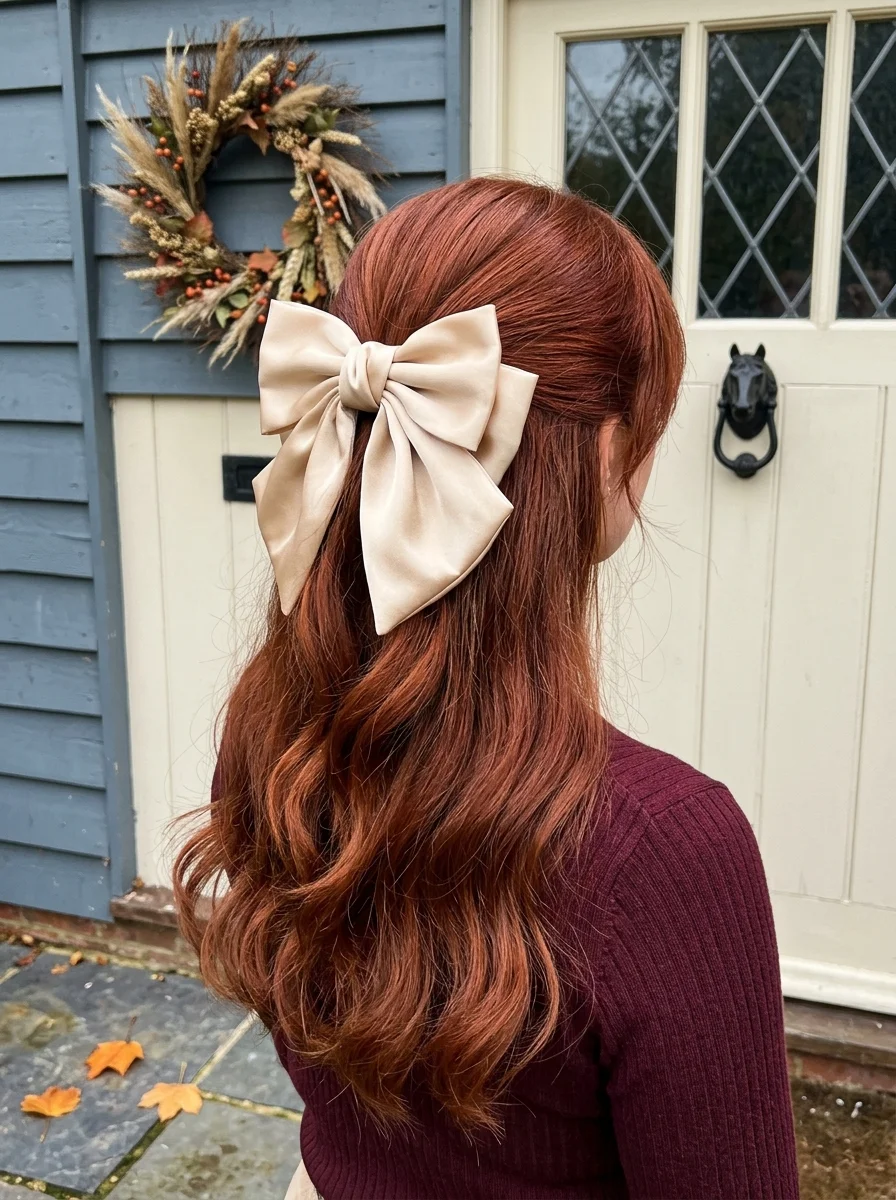
The overview: Rich auburn hair with the top section gathered at the back of the crown, secured with an oversized champagne satin bow. The remaining hair flows in soft waves with gentle movement.
The satin bow is the accessory that transforms a simple half-up into something special. Against the auburn tones and burgundy sweater, the champagne color creates a warm, autumnal contrast that photographs beautifully. The oversized scale makes it a statement piece.
Why this look is popular: Bows are having a fashion moment that extends to hair accessories. The satin finish adds luxury without being costume-y, and the half-up construction keeps hair controlled while showing off the wave pattern.
Where this look is suitable: Autumn weddings, harvest gatherings, romantic dinners, and any setting where the feminine, polished aesthetic fits.
Step by step:
- Create waves. Use a 1.25-inch curling wand on 1-inch sections, leaving the ends straight. Break up with fingers.
- Gather the top section. Take hair from each temple and smooth it back toward the crown.
- Tie with the bow. Secure the gathered section with an elastic, then tie the oversized champagne satin bow over it.
- Adjust the bow. Fluff the bow loops and straighten the tails for a polished finish.
- Set lightly. A mist of flexible-hold hairspray keeps the waves defined without stiffness.
Tips and tricks: The bow should be wide enough to create a visible statement. Skinny ribbon gets lost in thick hair. For a more relaxed look, tie the bow slightly off-center. A light steam from a garment steamer removes any creases in the satin before wearing.
28 Fall Nail Designs for an Autumn-Ready Manicure (2026) 💅
24.Low Ponytail with Padded Headband
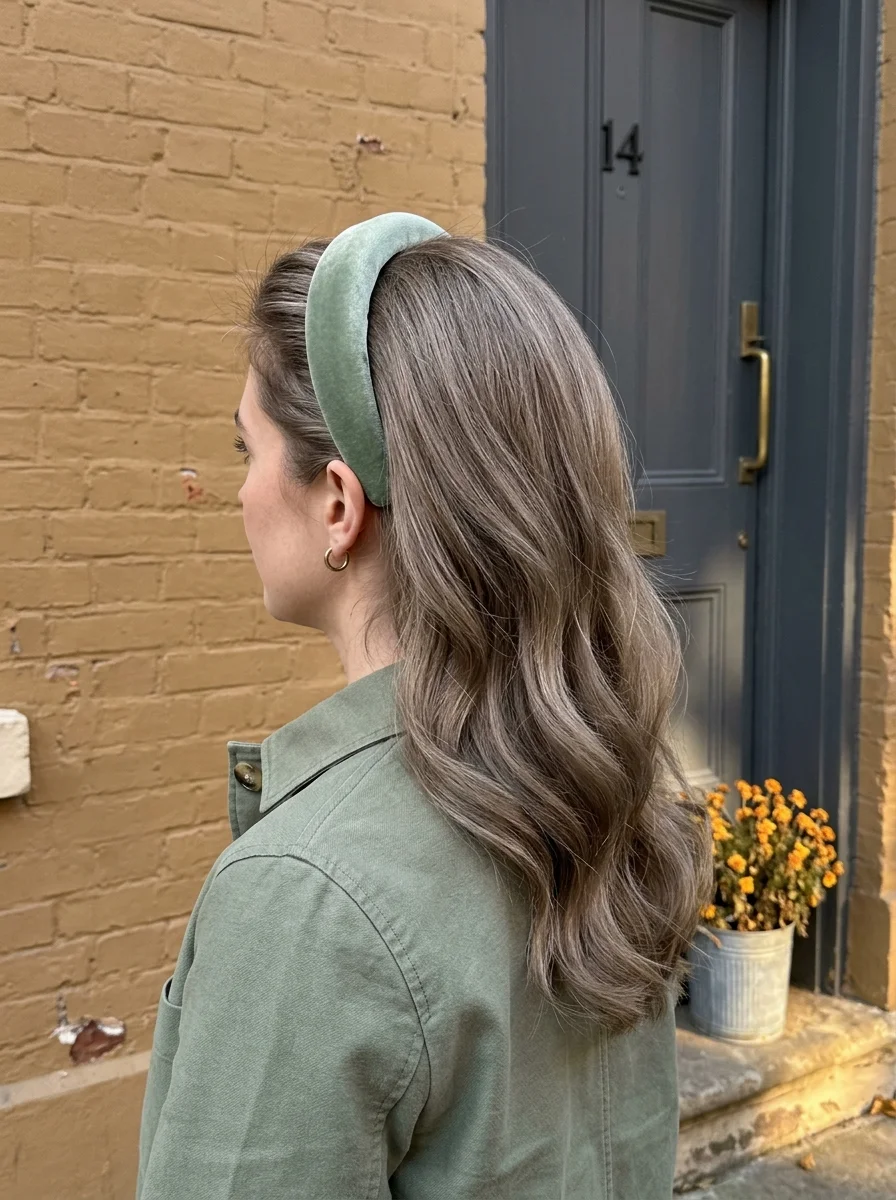
The overview: Cool-toned ash brown hair swept back and held by a wide padded velvet headband in sage green. The hair cascades from a low ponytail in full, bouncy waves. The headband adds height at the crown.
The padded headband is one of fall's most practical accessories because it controls flyaways while adding visual interest. The sage green velvet complements the olive utility jacket and creates a tonal fall palette that feels intentional.
Why this look is popular: Velvet headbands are having a moment because they add texture and color without requiring skill. The padded style creates height at the crown that elongates the face, and the low ponytail keeps everything contained.
Where this look is suitable: Outdoor markets, casual office days, weekend outings, and any setting where the earthy, polished aesthetic fits.
Step by step:
- Add volume. Apply volumizing mousse to damp hair at the roots and blow-dry for lift.
- Place the headband. Slide the padded velvet headband onto your head, positioning it about 2 inches back from the hairline.
- Gather the ponytail. Collect all remaining hair at the nape and secure with an elastic.
- Add waves. Use a curling wand on the ponytail sections for bouncy movement.
- Adjust the headband. Ensure it sits flat against the head and the padding creates even height across the crown.
Tips and tricks: The headband should sit about 2 inches back from the hairline. Too far back and it loses the crown-height effect; too far forward and it looks like a sweatband. For fine hair, backcomb slightly at the crown before placing the headband for extra lift.
25.Sleek Low Chignon with Pearl Pins
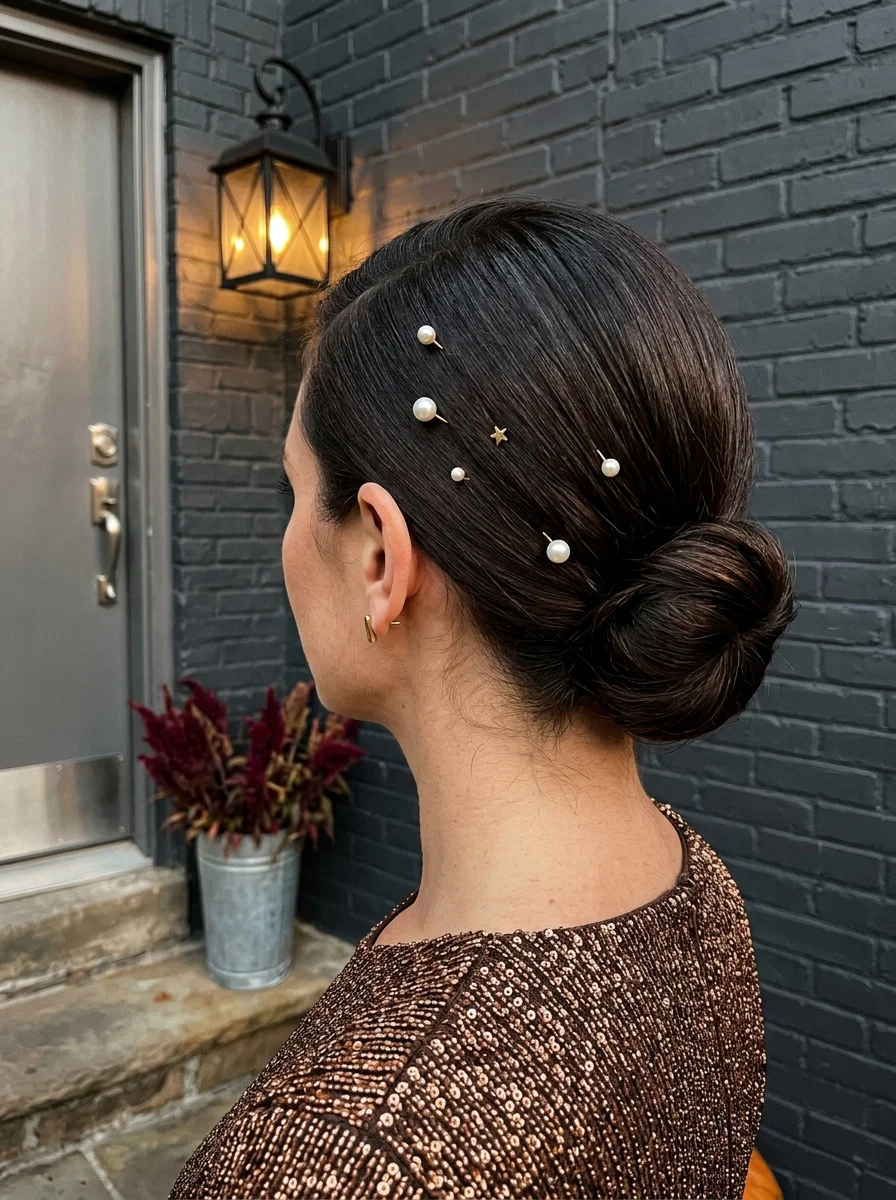
The overview: Very dark brunette hair smoothly pulled back into a sleek low chignon at the nape. Pearl-tipped pins and one small gold star pin are scattered artfully across the back of the head.
The sleek chignon is the most formal style on this list, and it earns that distinction through precision. Every strand is controlled, every surface is smooth, and the pearl pins add a constellation-like detail that catches the light.
Why this look is popular: The sleek chignon works for formal fall occasions because it pairs beautifully with sequins, metallics, and rich fabrics. The pearl pins add dimension to dark hair without requiring color or highlights.
Where this look is suitable: Holiday parties, formal dinners, black-tie events, and any evening where sophisticated elegance is the requirement.
Step by step:
- Create glass-smooth hair. Apply smoothing serum and flat-iron from root to tip. Every section should be sleek.
- Gather low. Brush all hair into a smooth ponytail at the nape. Use a boar bristle brush to eliminate every bump.
- Form the chignon. Twist the ponytail and coil it into a tight, flat bun against the head. Pin with bobby pins in an X pattern.
- Add the pins. Scatter pearl-tipped pins across the back of the head at irregular intervals. Place the gold star pin near the chignon.
- Set with hairspray. A light mist of medium-hold spray locks everything in place without creating visible residue.
Tips and tricks: The chignon should sit flat against the head, not projecting outward. If it protrudes, the coil is too loose. For the smoothest surface, wrap the completed style in a silk scarf for ten minutes before adding the pins.
26 Stunning Summer Braided Hairstyles for Women 2026 ☀️💇♀️
26.Bubble Ponytail with Emerald Velvet Bow
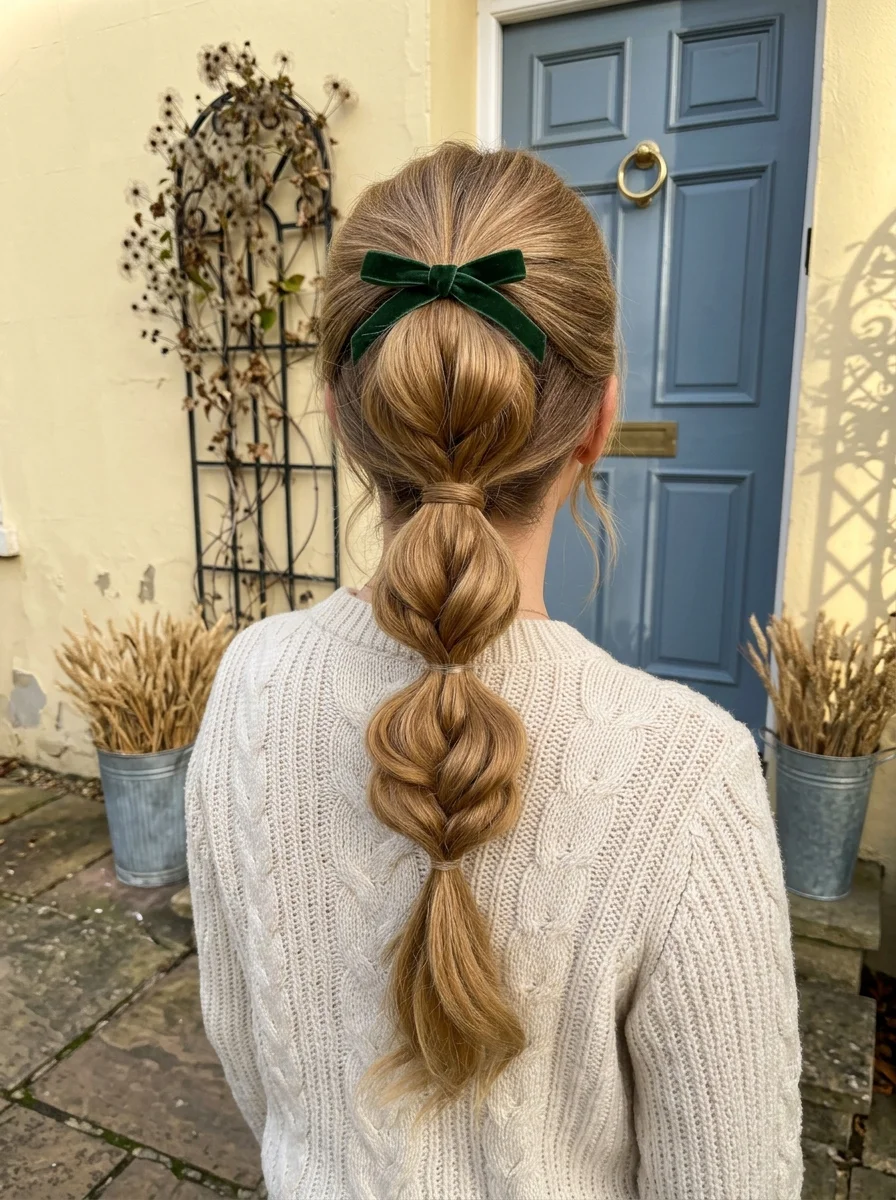
The overview: Warm golden blonde hair pulled into a high ponytail, segmented into voluminous bubbles down the length. A dark emerald green velvet bow is tied at the base of the ponytail, adding rich fall color.
The emerald bow against the golden blonde creates a complementary color contrast that feels autumnal without being predictable. The bubble segments add visual rhythm, and the velvet texture of the bow matches the cozy cable-knit sweater aesthetic.
Why this look is popular: The bubble ponytail with a statement bow combines two trends in one style. It's playful enough for daytime but polished enough for evening, especially with the rich velvet accessory.
Where this look is suitable: Holiday gatherings, outdoor markets, cozy brunches, and any setting where the warm, festive aesthetic fits.
Step by step:
- Smooth the base. Apply smoothing serum and blow-dry straight for a polished crown.
- Create the ponytail. Gather all hair at the crown and secure with a strong elastic.
- Tie the bow. Tie the emerald velvet bow around the elastic base, letting the tails hang alongside the ponytail.
- Create bubbles. Tie clear elastics at 3-inch intervals down the ponytail. Gently pull each section apart.
- Adjust for symmetry. Ensure each bubble is roughly equal in size for a balanced look.
Tips and tricks: The velvet bow should be tied tightly enough to hold its shape but not so tight that it crushes the ponytail base. For finer hair, backcomb each bubble section slightly before adding the elastic for extra volume. The bow tails should be trimmed to equal length for a clean finish.
27.Low Ponytail with Emerald Ribbon
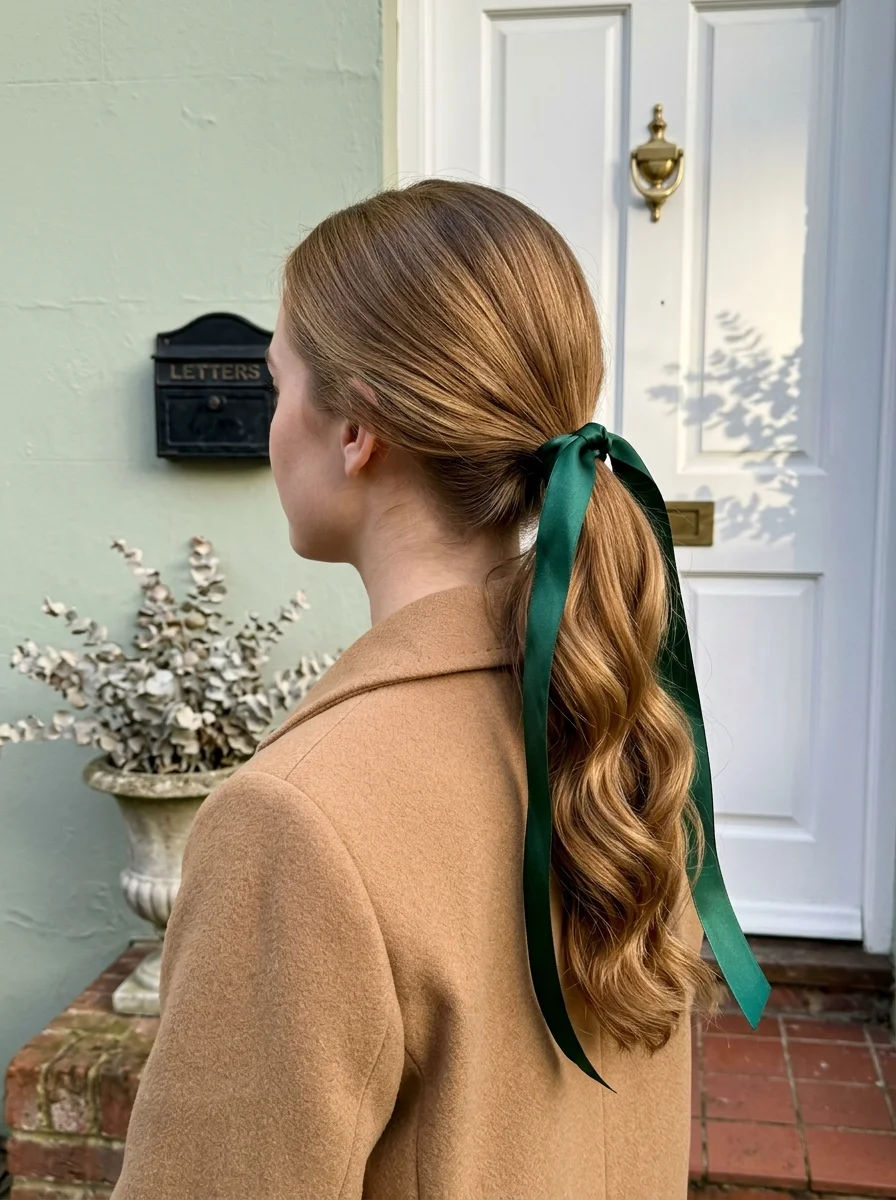
The overview: Golden blonde hair with soft, loose waves gathered into a low ponytail. A long emerald green satin ribbon is tied around the base, with the tails trailing down alongside the hair. The overall look is polished yet relaxed.
The emerald ribbon is a fall color accent that works against the camel coat without competing. The long trailing tails add movement and visual interest to what would otherwise be a basic low ponytail. The satin finish catches light beautifully.
Why this look is popular: Ribbons are replacing traditional hair accessories because they add color, texture, and movement in a single element. The emerald-on-camel combination is one of fall's most flattering color pairings.
Where this look is suitable: Countryside walks, farmers' markets, casual dinners, and any setting where understated elegance meets seasonal color.
Step by step:
- Create waves. Use a curling wand on 1-inch sections, leaving the ends straight. Break up with fingers for a soft finish.
- Gather low. Collect all hair at the nape and secure with a thin elastic.
- Tie the ribbon. Wrap the emerald satin ribbon around the elastic, tying it in a bow or knot. Let the tails hang freely.
- Adjust the tails. Ensure the ribbon tails are even in length and hang naturally alongside the ponytail.
- Set lightly. A mist of texturizing spray through the mid-lengths enhances the lived-in quality.
Tips and tricks: Choose satin over grosgrain for the ribbon; satin drapes better and catches light more beautifully. For fine hair, the ponytail should be loosely gathered to maintain volume. A light steam from a garment steamer removes any creases in the ribbon before wearing.
28 Cute & Sporty Baseball Game Nail Ideas for 2026 ⚾
28.Side Fishtail Braid with Gold Safety Pin Clips
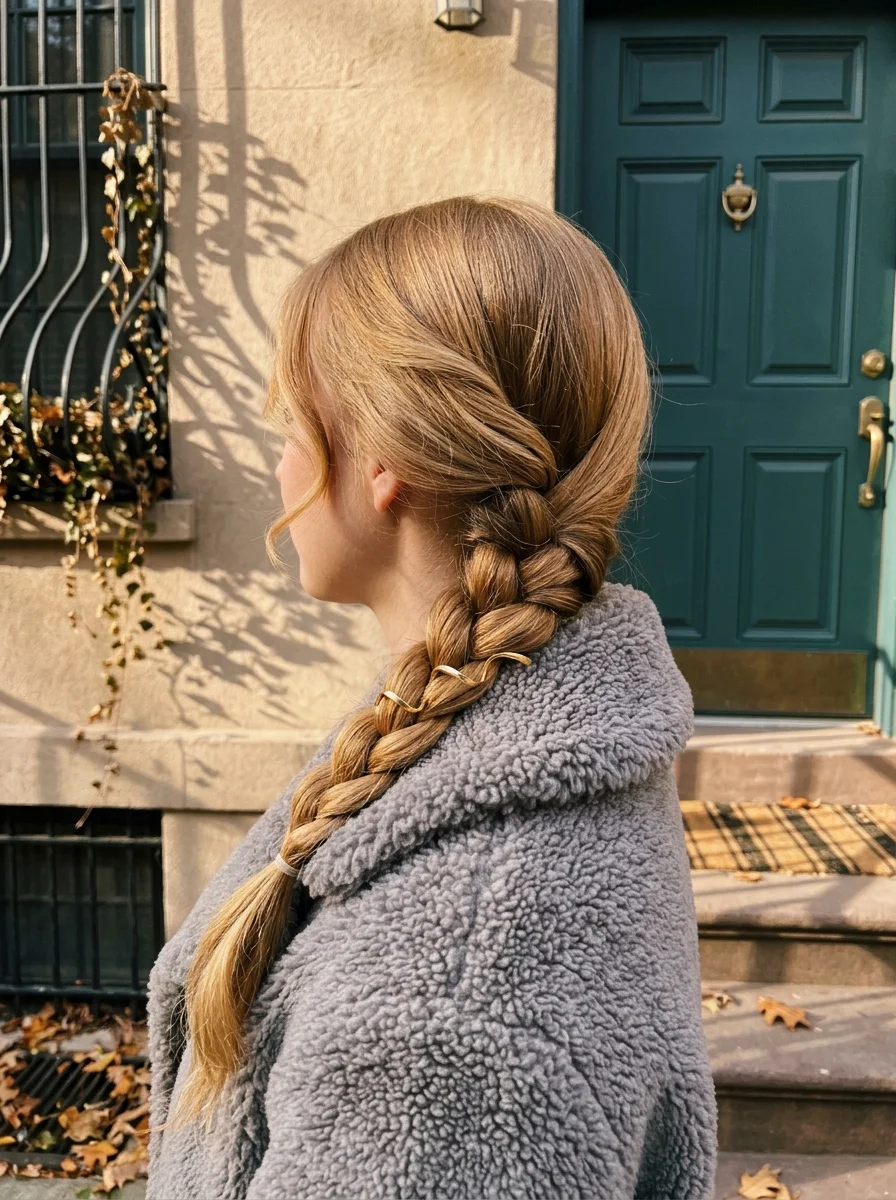
The overview: Long honey blonde hair woven into a loose fishtail braid that drapes over one shoulder. The braid starts loosely from a low side part and becomes tighter toward the ends. Small gold safety-pin-style hair clips are placed along the braid.
The fishtail braid's flat profile means it won't catch wind the way bulkier braids do, making it practical for fall's blustery days. The safety pin clips add an edgy, modern detail that contrasts nicely with the soft, romantic braid texture.
Why this look is popular: The fishtail braid has a woven texture that reads as far more complex than it actually is; two sections, small crosses, done. The safety pin clips add a fashion-forward edge.
Where this look is suitable: Casual outings, autumn walks, coffee shop visits, and any setting where the relaxed, slightly edgy aesthetic fits.
Step by step:
- Side-part the hair. Create a deep side part. This determines where the braid starts.
- Gather to one side. Pull all hair over one shoulder. Split into two sections for the fishtail.
- Fishtail braid. Cross small pieces from the outer edge of each section to the other. Work from root to ends.
- Secure the end. Tie off with a clear elastic approximately two inches from the bottom.
- Add the clips. Place gold safety pin clips along the braid at irregular intervals.
- Pancake the braid. Gently pull the outer edges to widen the braid for a fuller appearance.
Tips and tricks: Texturizing spray before braiding gives enough grip to hold the fishtail shape without unraveling. The safety pin clips should be placed at varying angles for a more organic, scattered look. For finer hair, pancaking is essential for creating the voluminous silhouette.
29.Half-Up Braided Crown with Gold Chain
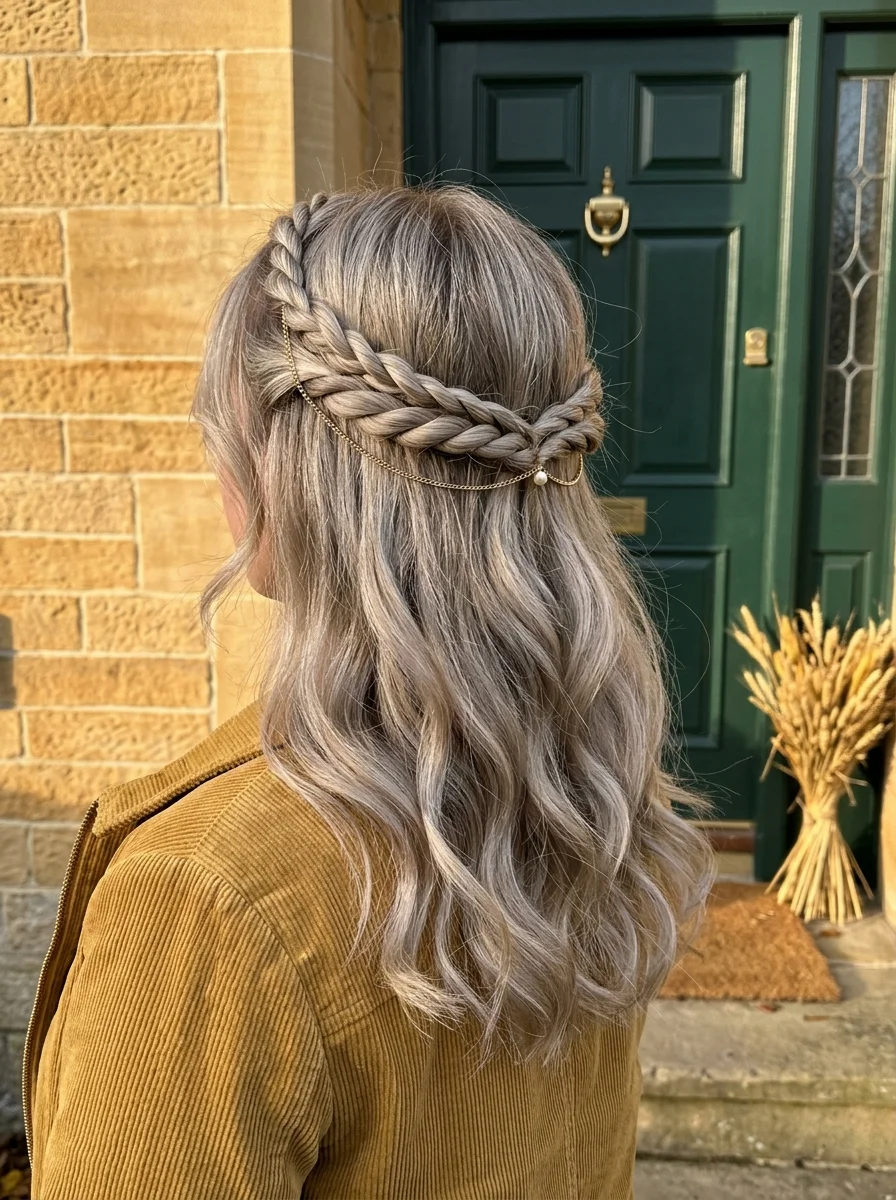
The overview: Cool ash blonde hair with a thick Dutch braid wrapping horizontally across the back of the head from side to side. A delicate gold chain with a small pearl charm is draped along the braid. The remaining hair falls in soft waves below.
The braided crown works because it creates a built-in headband effect while leaving enough length for movement. The gold chain adds a jewelry-like detail that catches the light against the cool blonde tones. The mustard gold jacket in the background creates a warm-cool contrast.
Why this look is popular: The half-up braided crown is more practical than a full crown braid because it requires less time and less hair length. The gold chain accessory adds luxury without being overdone.
Where this look is suitable: Autumn gatherings, countryside outings, and any setting where the romantic, slightly bohemian aesthetic fits.
Step by step:
- Prep for grip. Apply texturizing spray to second-day hair for better braid hold.
- Start the braid. Begin above one ear and create a Dutch braid (crossing strands under) that wraps horizontally across the back of the head.
- Complete to the other side. Continue the braid until it reaches the opposite ear. Secure the end with a tiny elastic.
- Tuck and pin. Tuck the braid's tail under the hair at the starting point. Pin with bobby pins.
- Add the chain. Drape the gold chain along the braid, securing it with small bobby pins at each end.
- Wave the remaining hair. Use a curling wand on the loose sections for soft movement.
Tips and tricks: The chain should be lightweight enough that it doesn't pull on the braid. Attach it with small bobby pins that match your hair color for invisible hold. For the best braid definition, keep consistent tension throughout; loose sections create gaps in the pattern.
26 Quick Hairstyles for a Waitress Job (2026)
30.Half-Up Claw Clip Style with Tortoiseshell
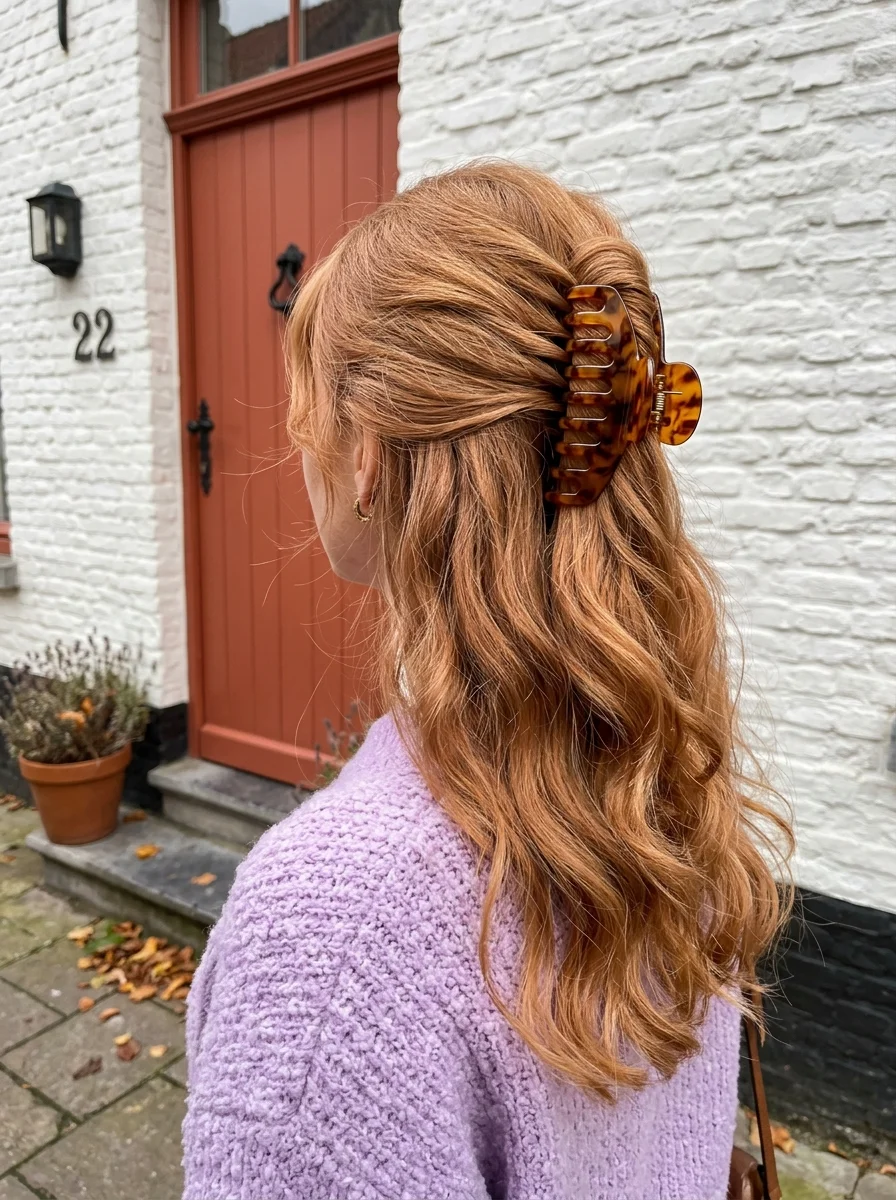
The overview: Medium-long strawberry blonde hair twisted up and secured with a large tortoiseshell claw clip at the back of the crown. The remaining hair cascades down in soft beachy waves.
The claw clip is the most practical fall accessory because it holds more hair than bobby pins, takes three seconds to use, and the tortoiseshell pattern adds warmth against the cool lavender sweater. The half-up construction keeps hair off your face while showing off the wave pattern.
Why this look is popular: The claw clip comeback shows no signs of slowing down because it transforms a basic style into something with visual interest. The tortoiseshell pattern is the most versatile choice because it works with every hair color.
Where this look is suitable: Weekend mornings, casual outings, coffee shop visits, and any setting where relaxed practicality is the goal.
Step by step:
- Create waves. Use a curling wand on 1-inch sections, leaving the ends straight. Break up with fingers.
- Gather the top section. Take hair from each temple and twist loosely toward the back of the head.
- Clip it. Secure the twist with the tortoiseshell claw clip at the back of the crown.
- Pull out face-framing pieces. Tug soft strands around the temples and ears for a relaxed frame.
- Adjust the waves. Shake the loose waves gently for natural volume and separation.
Tips and tricks: The claw clip should be large enough to grip all the gathered hair. If it slips, your section is too heavy for that clip size. Second-day hair holds this style better than freshly washed hair. Choose a clip with strong teeth that interlock firmly.
31.Low Fishtail Braid with Gold Diamond Clip
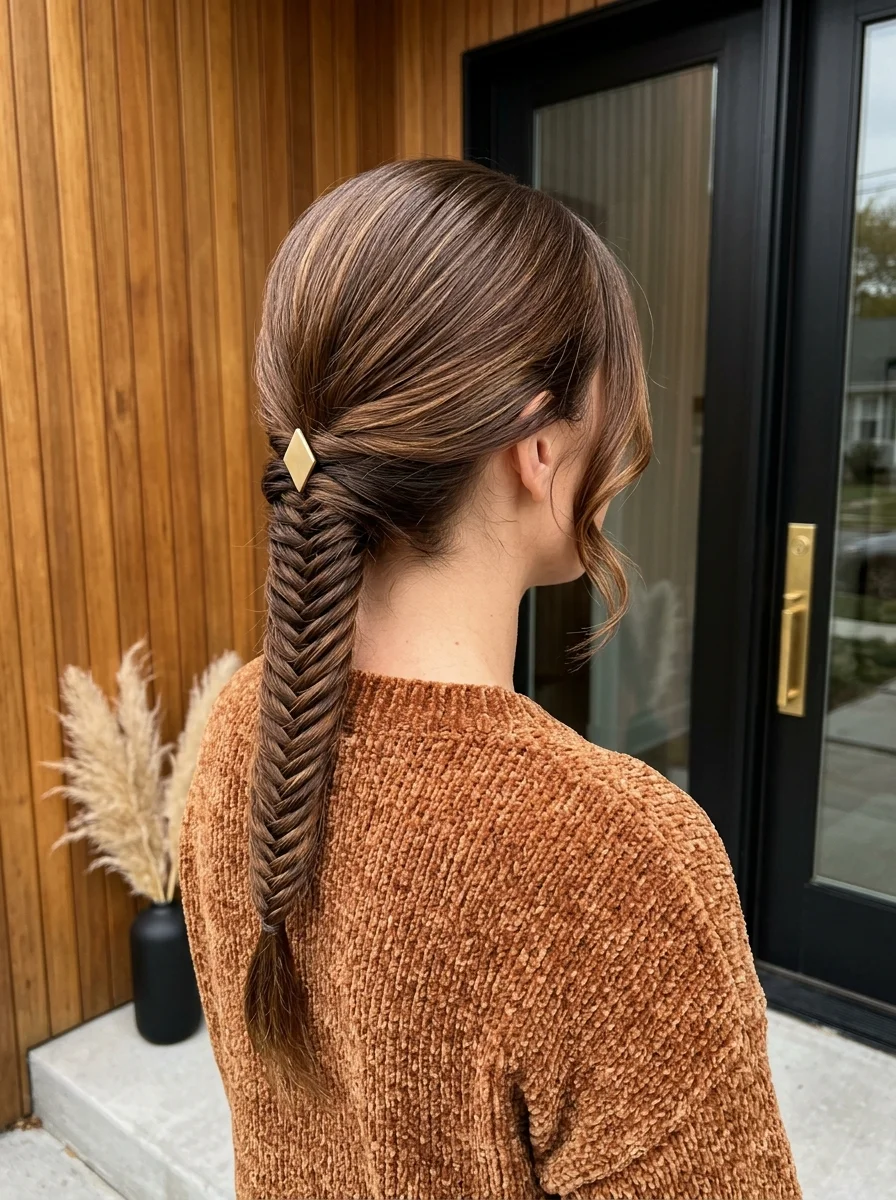
The overview: Light brown hair with warm caramel highlights gathered into a low fishtail braid at the nape. The top section is smoothly pulled back with a slight twist. A gold diamond-shaped clip secures the braid at the base, and a few curled tendrils frame the face.
The low fishtail is the most understated braid style because it sits close to the head and creates a flat, woven texture that doesn't project outward. The gold diamond clip adds a geometric detail that catches light against the warm hair tones.
Why this look is popular: The fishtail braid reads as more complex than it is. Two sections, small crosses, done. The low placement makes it practical for fall's high collars and scarves.
Where this look is suitable: Casual office days, weekend outings, coffee shop mornings, and any setting where understated elegance fits.
Step by step:
- Smooth the top. Apply smoothing serum and blow-dry the crown area straight for a polished surface.
- Gather low. Collect all hair at the nape. The top section should be smooth and controlled.
- Fishtail braid. Split the ponytail into two sections. Cross small pieces from the outer edge of each section to the other.
- Secure the end. Tie off with a clear elastic approximately two inches from the bottom.
- Add the clip. Slide the gold diamond clip through the braid at the base, just below the elastic.
- Frame the face. Pull small tendrils from in front of each ear and curl loosely with a 1-inch iron.
Tips and tricks: Keep consistent tension while fishtailing; uneven tension creates visible kinks in the braid pattern. The gold clip should be proportional to the braid thickness. For finer hair, gently pancake the braid after securing for a fuller appearance.
28 Trendy May Nail Designs for 2026 💅
32.Slicked Back High Bun with Gold Chain
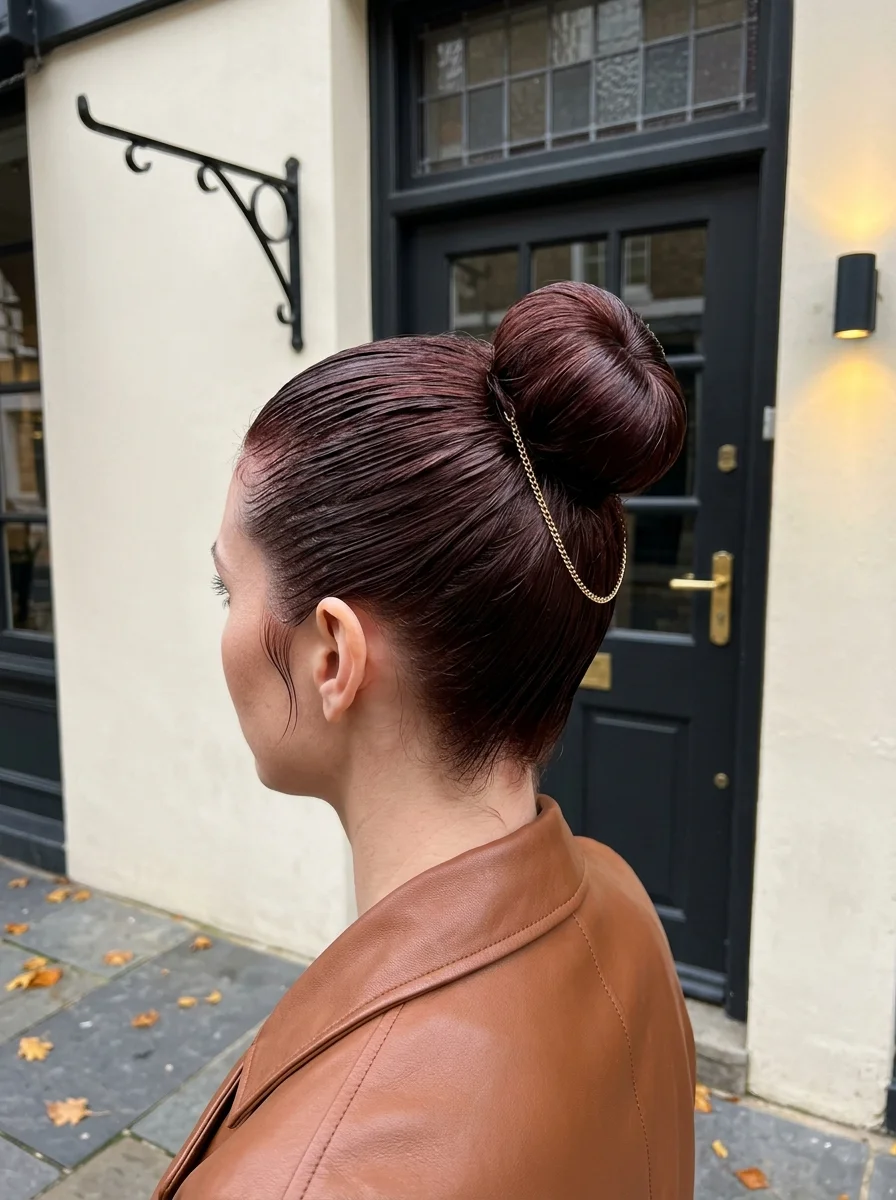
The overview: Deep burgundy hair slicked back tightly into a high, polished bun at the crown. Visible comb lines create a ribbed texture at the roots. A delicate gold chain is draped around the bun, hanging loosely at the back.
The slicked-back bun is the most editorial style on this list. Every strand is controlled, the surface is glass-smooth, and the gold chain adds a jewelry detail that elevates the entire look. Against the cognac leather blazer, it reads as fashion-forward and intentional.
Why this look is popular: The slicked-back bun is having a moment because it's the ultimate power style. It says "I know exactly what I'm doing" and pairs perfectly with fall's structured outerwear.
Where this look is suitable: Fashion events, evening outings, professional settings, and any situation where polished authority is the goal.
Step by step:
- Apply gel. Work a strong-hold gel through damp hair from roots to ends for maximum control.
- Slick back. Use a fine-tooth comb to direct all hair backward from the hairline. Create visible comb lines for texture.
- Gather high. Collect all hair at the crown and secure tightly with a strong elastic.
- Form the bun. Twist the ponytail and coil it into a tight, round bun. Pin with bobby pins pushed horizontally through.
- Add the chain. Drape the gold chain around the bun, letting it hang loosely at the back. Secure with a small pin if needed.
- Set with hairspray. A light mist of strong-hold spray locks everything in place.
Tips and tricks: The gel amount matters: too little and the hair won't stay slicked; too much and it looks wet and crunchy. Start with a walnut-sized amount and add more as needed. The bun should be positioned directly at the crown for the most flattering angle.
33.Romantic Low Twisted Updo with Pearl Drop
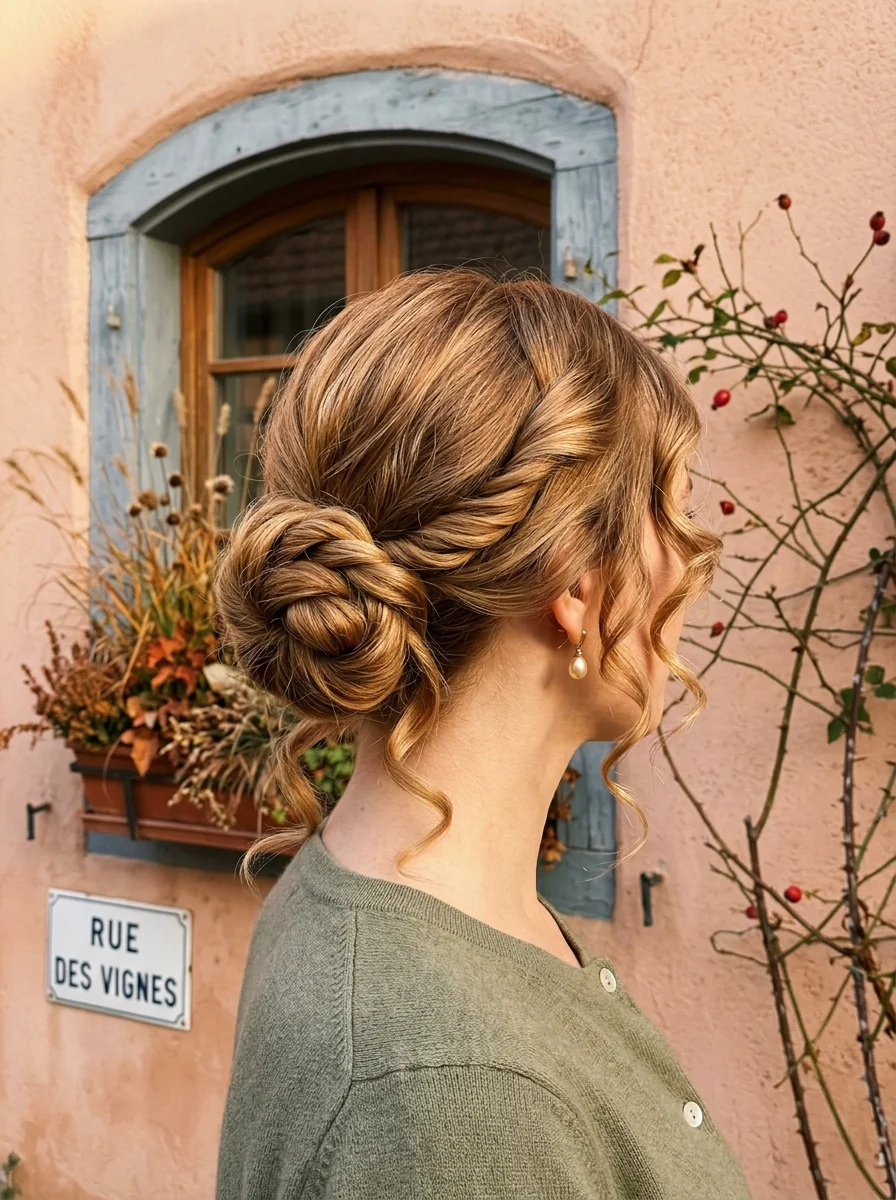
The overview: Golden brown hair with a chunky twist along the side feeding into a low twisted bun at the nape. Loose, soft spiral curls frame the face and neck. A pearl drop earring with a gold setting adds a delicate finishing touch.
The romantic twisted updo works because it balances structure with softness. The twisted sections add visual interest at the back, while the face-framing curls keep the style from looking too severe. The pearl drop earring complements the warm golden tones.
Why this look is popular: The romantic updo is the most versatile formal style because it works across a range of occasions, from daytime events to evening dinners. The face-framing curls soften the overall silhouette.
Where this look is suitable: European-style settings, romantic dinners, autumn weddings, and any setting where the soft, vintage aesthetic fits.
Step by step:
- Define curls. Apply curl cream to damp hair and diffuse on low heat. Let cool completely before styling.
- Create the side twist. Take a chunky section from one side and twist it loosely toward the back of the head.
- Gather the bun. Collect the twist and remaining hair at the nape. Secure with an elastic.
- Form the bun. Twist the ponytail and coil it into a low bun. Pin with bobby pins at 12, 3, 6, and 9 o'clock.
- Release face-framers. Pull 2-3 curls from the front, letting them fall alongside the face.
- Add the earring. Put on the pearl drop earring to complete the look.
Tips and tricks: The twist should be loose enough to show texture but tight enough to hold its shape. If it unravels, apply a small amount of texturizing spray before twisting. The face-framing curls should be individual strands, not clumps.
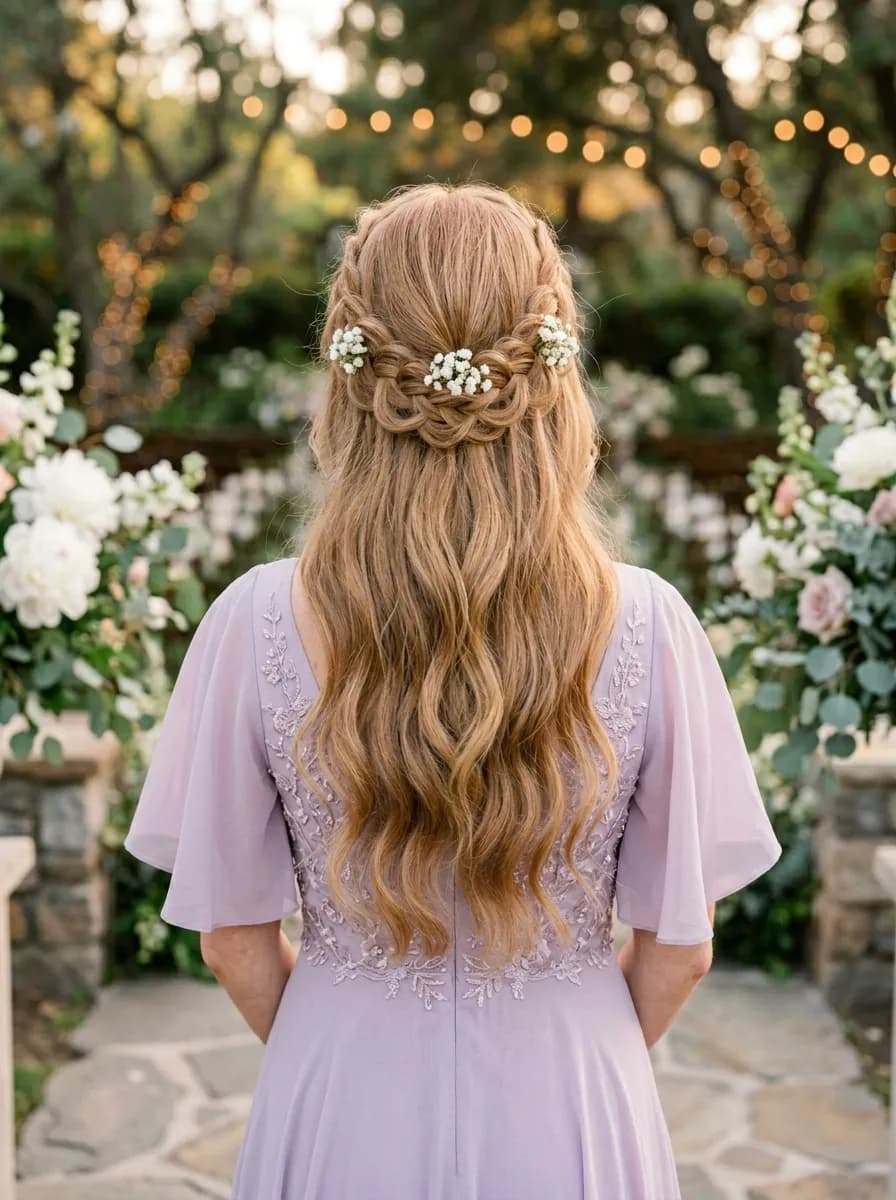
24 Stunning Bridesmaid Hairstyles for Weddings 2026 💍✨
34.Half-Up Waves with Gold Pearl Barrette
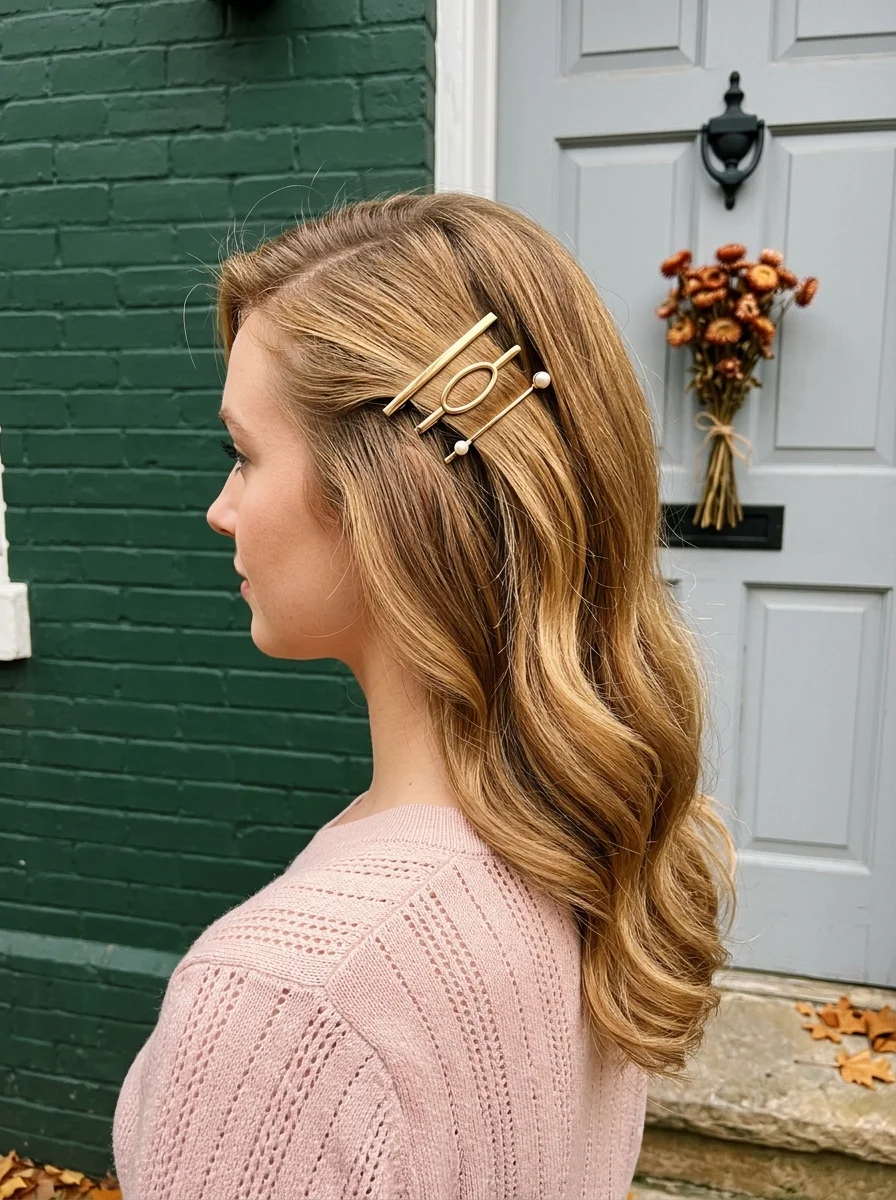
The overview: Golden blonde hair with the top section pulled back and secured with a large modern gold barrette featuring a geometric oval-and-bar design with two small pearls. The remaining hair falls in soft, loose waves.
The gold barrette is the kind of accessory that makes people ask where you got it. The geometric design with pearl accents adds a contemporary detail that catches light against the warm blonde tones. Against the soft pink sweater, it creates a feminine but not precious aesthetic.
Why this look is popular: Statement barrettes are the fastest way to elevate a simple half-up style. The gold-and-pearl combination works for virtually every occasion, from casual to formal.
Where this look is suitable: Weekend brunches, casual dinners, date nights, and any setting where the polished but relaxed aesthetic fits.
Step by step:
- Create waves. Use a 1.25-inch curling wand on 1-inch sections, leaving the ends straight. Break up with fingers.
- Gather the top section. Take hair from each temple and smooth it back toward the crown.
- Clip with barrette. Secure the gathered section with the gold pearl barrette at the back of the head.
- Adjust the waves. Shake the loose waves gently for natural volume and separation.
- Set lightly. A mist of texturizing spray through the mid-lengths enhances the lived-in quality.
Tips and tricks: The barrette should be proportional to your hair; slim barrettes work best on fine to medium hair, wider ones on thick. Gold hoop earrings complement the barrette for a cohesive metallic accent. For waves that last, apply heat protectant before curling and let each curl cool completely before touching.
35.Low Double Bun with Burgundy Velvet Bow
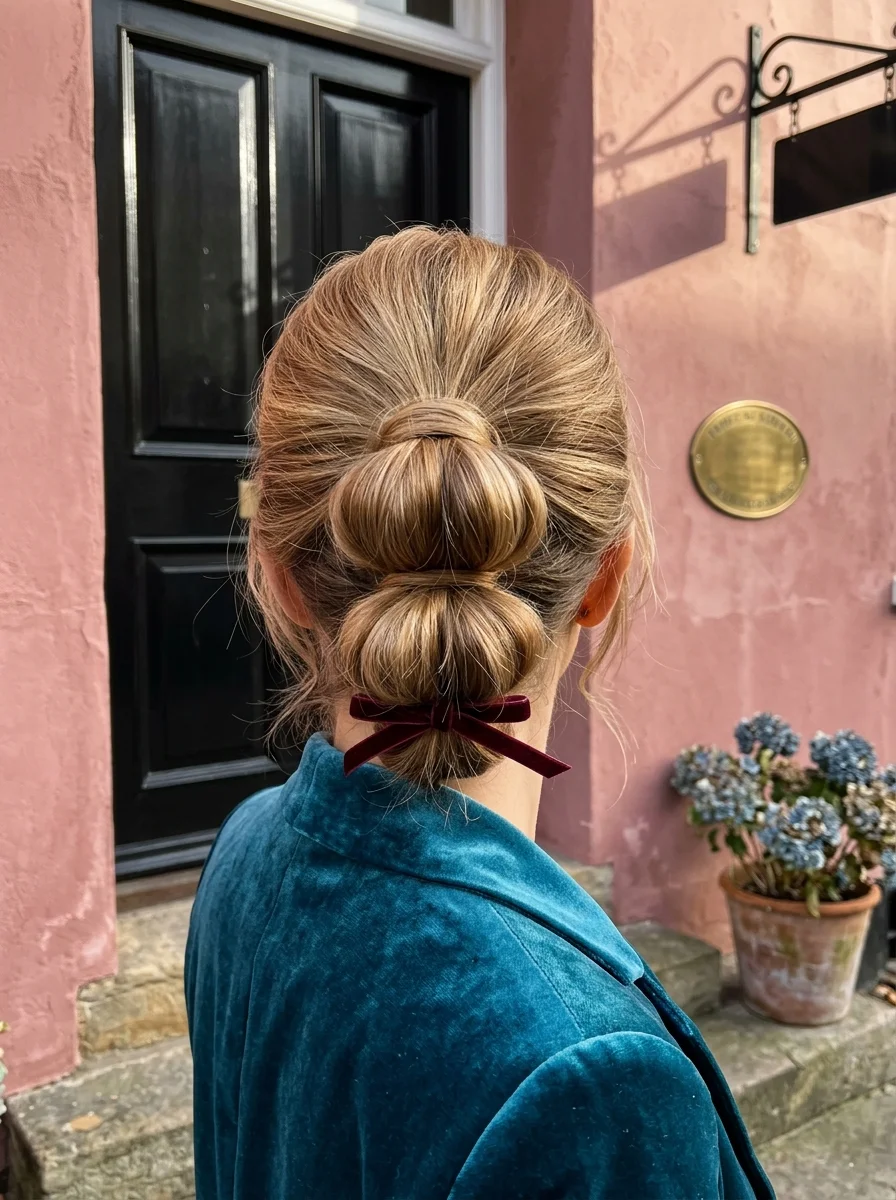
The overview: Honey blonde hair styled into a low double bun at the nape. Two rounded sections are stacked vertically, each wrapped with hair at the base to conceal the elastic. A small dark burgundy velvet bow is tied at the base of the lower bubble.
The double bun creates a more interesting silhouette than a single low bun. The two stacked sections add dimension and visual rhythm, while the velvet bow adds a rich fall color accent against the teal blazer.
Why this look is popular: The double bun is a fresh take on the classic low bun that feels modern without being overdone. The velvet bow adds a tactile, luxurious detail that complements fall's richer fabrics.
Where this look is suitable: Evening outings, holiday gatherings, and any setting where the elegant but playful aesthetic fits.
Step by step:
- Smooth the hair. Apply smoothing serum and blow-dry straight for a polished finish.
- Create the first section. Gather the top half of your hair at the nape and secure with an elastic.
- Form the top bun. Twist the section and coil it into a small bun. Pin with bobby pins.
- Create the second section. Gather the remaining hair directly below the first bun and secure with an elastic.
- Form the bottom bun. Twist and coil into a second bun. Pin securely.
- Add the bow. Tie the burgundy velvet bow at the base of the lower bun.
Tips and tricks: The two buns should be roughly equal in size for a balanced silhouette. If one is significantly larger, adjust the sectioning before forming the buns. The velvet bow should be small enough to not overwhelm the bun but large enough to be visible.
27 Stunning June Nail Ideas for 2026 💅
36.Low Twisted Updo with Gold Leaf Pin
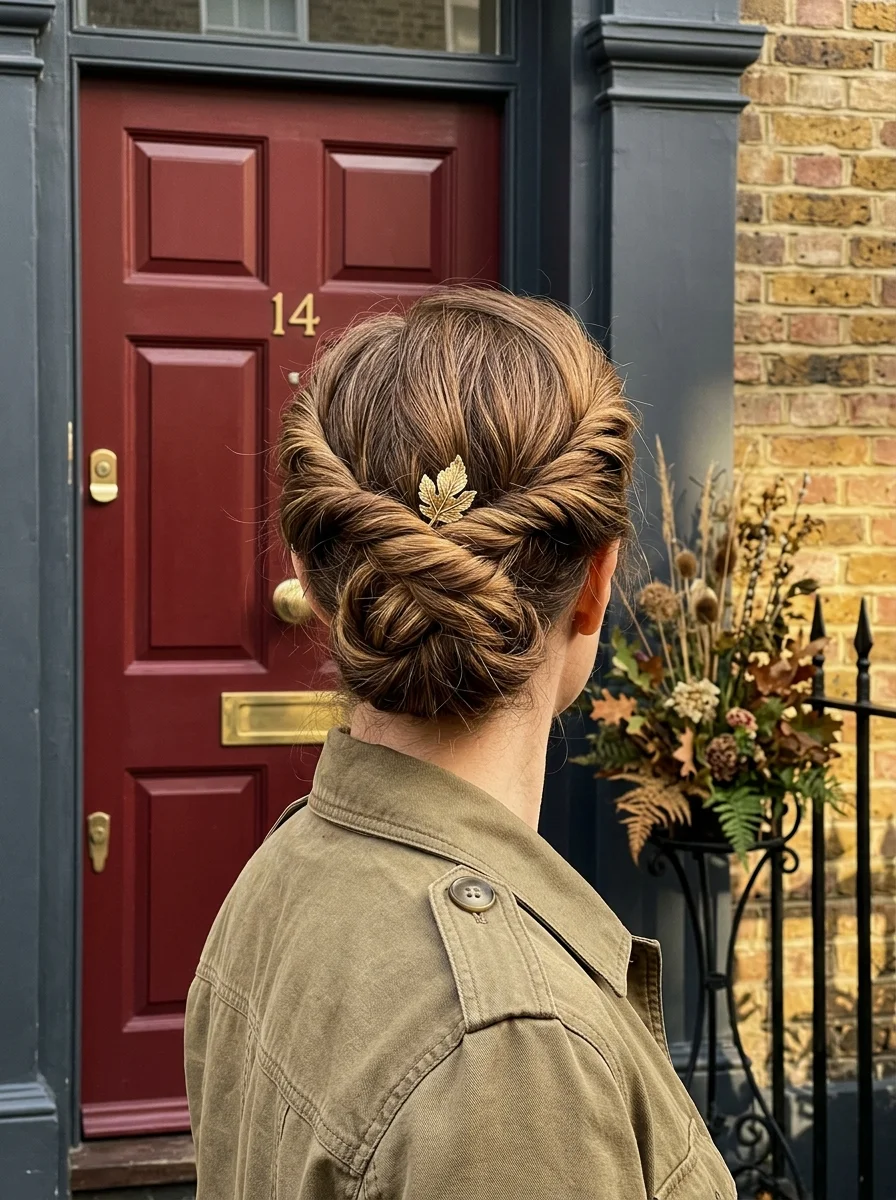
The overview: Medium brown hair with two thick sections twisted from each side, meeting in the center back and tucked into a neat low bun. A small gold leaf-shaped hair pin is placed at the center where the twists meet.
The twisted updo is the most practical formal style because it distributes the hair's weight evenly, creating a stable structure that survives hours of wear. The gold leaf pin adds an autumnal detail that catches light without being flashy.
Why this look is popular: The symmetrical twist creates a clean, polished silhouette that works with everything from blazers to evening dresses. The leaf pin adds seasonal character without being costume-y.
Where this look is suitable: Professional settings, formal dinners, autumn weddings, and any occasion where polished elegance is the requirement.
Step by step:
- Smooth the hair. Apply smoothing serum and blow-dry straight for a polished finish.
- Section the front. Take a 3-inch section from each temple, leaving the back hair loose.
- Twist each section. Twist each front section away from the face, maintaining consistent tension.
- Meet at the back. Bring both twists to the center back and cross them over each other.
- Gather the bun. Combine the twists with the remaining hair at the nape and secure with an elastic.
- Form the bun. Twist the ponytail and coil it into a neat bun. Pin with bobby pins.
- Add the leaf pin. Place the gold leaf pin at the center of the updo where the twists meet.
Tips and tricks: The twists should be tight enough to hold their shape but not so tight that they create tension at the hairline. If the twists loosen, apply a small amount of texturizing spray before twisting. The leaf pin should be pushed deep enough that only the leaf detail is visible.
37.Voluminous Natural Curls with Suede Headband
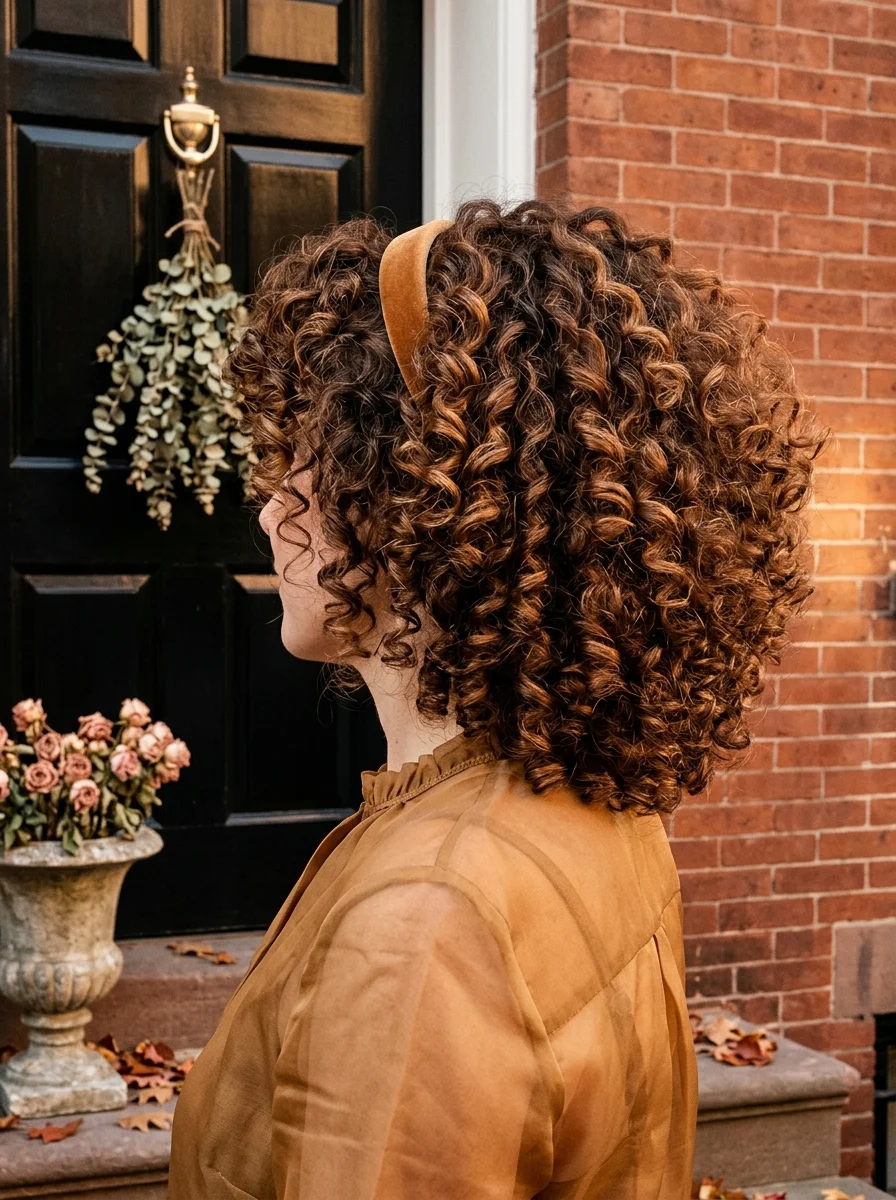
The overview: Medium-length chestnut brown hair with tight, defined ringlet curls worn in a full, rounded shape. A wide tan suede headband pushes the curls back from the face, creating height and volume at the crown.
The headband is the most practical accessory for curly hair because it controls the hairline without disrupting the curl pattern below. The suede texture adds a fall-appropriate tactile detail that complements the sheer organza blouse.
Why this look is popular: The headband-and-curls combination is the most low-maintenance fall style because the headband does the work of controlling the hairline while the curls provide natural volume and movement.
Where this look is suitable: Casual outings, coffee shop visits, weekend mornings, and any setting where natural texture is the star.
Step by step:
- Define curls. Apply curl cream to soaking wet hair, scrunching upward. Follow with gel for definition.
- Diffuse on low heat. Cup sections in the diffuser and hold against the scalp. Don't touch while drying.
- Place the headband. Slide the wide suede headband onto your head, pushing the curls back from the face. Position it about 2 inches back from the hairline.
- Shape the curls. Separate any clumped curls and fluff the roots for maximum volume.
- Adjust the headband. Ensure it sits comfortably and the curls fall naturally around it.
Tips and tricks: The headband should be wide enough to control the hairline without slipping. Suede grips better than satin or silk, making it ideal for curly hair. For maximum volume, flip your head upside down after placing the headband and shake the curls vigorously.
24 Stunning Festival Hairstyle Ideas for Music Concert Nights 2026 🎶✨
Fall Hair Accessories Worth Buying
The accessory game matters more in fall than any other season because your hair is competing with scarves, hats, and high collars. Here is what actually works.
Velvet headbands: The padded style creates crown height that survives under hats. Choose sage, burgundy, or emerald for the most versatile fall palette. Avoid silk; it slips. Velvet grips.
Tortoiseshell claw clips: The most practical fall accessory because they hold more hair than bobby pins and the warm pattern complements autumn colors. Choose clips with strong interlocking teeth.
The styling trick? Gold hair pins and chains add warmth that complements fall's richer tones. Scatter pearl pins through an updo or drape a gold chain along a braid for instant elevation. The key is restraint; three to five pins looks intentional, fifteen looks like a craft project.