Nail Trends
35 Stunning Cat Eye Nail Designs That'll Make Your Hands Look Like Gemstones (2026)
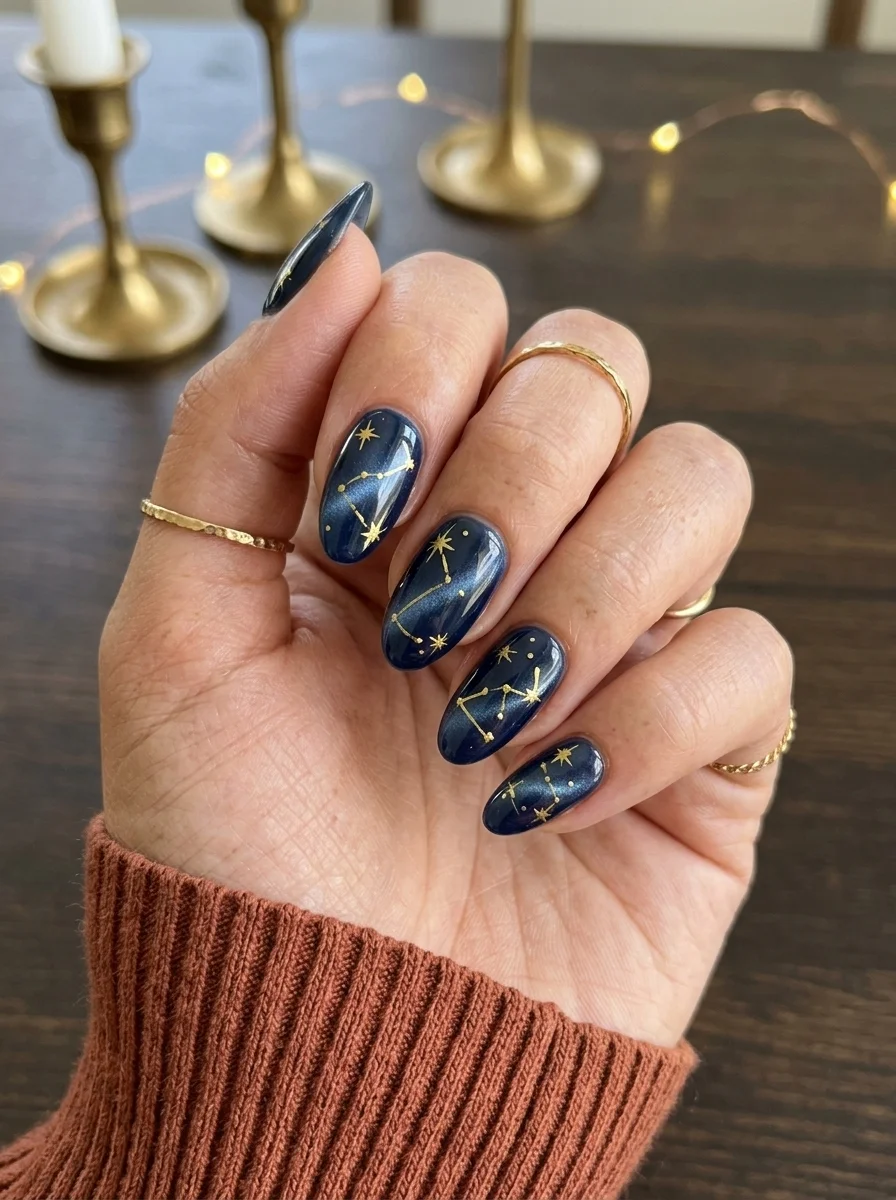
Cat eye nails use magnetic polish to create a stunning light-shifting effect that mimics the look of a cat's eye gemstone. The magnetic particles inside the polish respond to a magnet held over the wet nail, creating a luminous streak that shifts and moves depending on the angle of your hand. From soft sage green botanicals to deep bronze coffins, these 35 designs showcase the full range of this mesmerizing nail trend.
1.Sage Green Cat-Eye with White Leaf Art
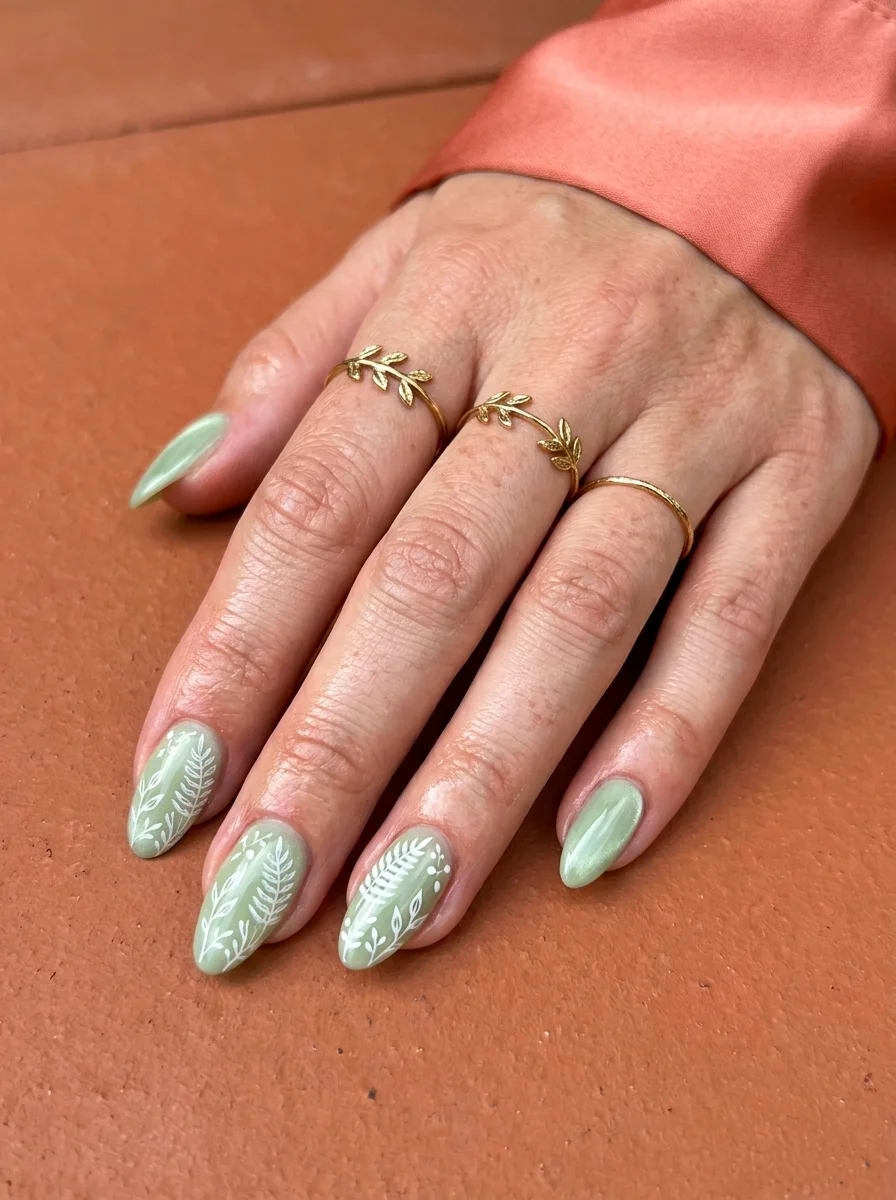
A soft, botanical take on the cat-eye trend with earthy tones.
Overview:
Sage green cat-eye polish is one of those colors that looks completely different depending on the light. In shade, it reads as a muted, almost grey-green. Under direct sunlight, the magnetic particles shift and create a luminous streak that makes the whole nail look like polished stone. This duality is what separates cat-eye from regular shimmer polish.
The white leaf art on the accent nails adds a botanical element that grounds the design. Without it, you have pretty green nails. With it, you have a deliberate aesthetic that feels curated rather than incidental. The white line work is delicate enough that it reads as texture from a distance, revealing its detail only up close.
One thing to know about sage green cat-eye formulas: they tend to be more sheer than darker cat-eye colors. You'll likely need three thin coats instead of two to achieve full opacity. The extra time is worth it. Sheer cat-eye looks patchy, not ethereal.
Design Breakdown:
Earthy tones meet magnetic shimmer. The botanical art keeps it from feeling too techy.
Base Color: A creamy sage green with fine magnetic particles. Avoid anything with a grey undertone that muddies the green.
Nail Shape: Medium almond. The tapered shape complements the organic leaf motifs.
Design Element: White hand-painted leaf and fern designs on two accent nails. Remaining nails are solid sage cat-eye.
Finish: High-gloss top coat to intensify the magnetic streak and protect the delicate line work.
Get The Look at Home:
The magnetic effect requires a specific technique. Regular polish application won't activate the cat-eye particles.
- Base prep: File into a soft almond shape. Apply a ridge-filling base coat.
- First coat: Apply a thin layer of sage green cat-eye polish. It will look sheer. That's normal.
- Magnetic activation: Hold the magnet about 5mm above the wet polish for 10-15 seconds. The particles will shift and create the characteristic light streak.
- Build opacity: Repeat the process for two more coats, activating the magnet each time. Three coats total.
- Leaf art: Using a thin liner brush and opaque white polish, paint delicate leaf shapes on the accent nails. Start with the central stem and add small leaves branching outward.
- Seal: One thick coat of high-gloss top coat. Float the brush over the leaf art to avoid smearing.
31 Stunning Summer Birthday Party Hairstyles for 2026 🎂☀️
2.Charcoal Cat-Eye with Silver Bow Accent
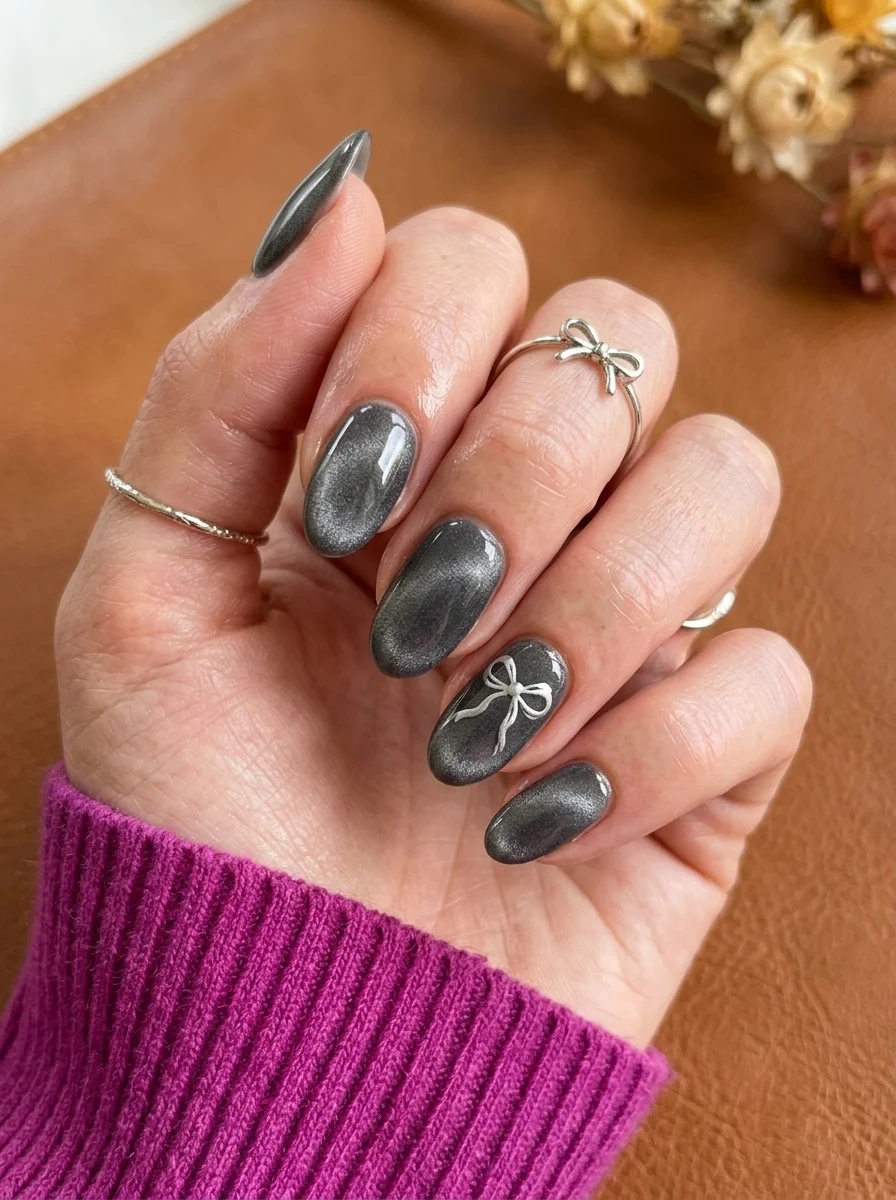
Dark and moody with a feminine twist that catches the light.
Overview:
Charcoal cat-eye occupies an interesting space between black and silver. It's dark enough to read as edgy but light enough that the magnetic shimmer is visible without direct sunlight. The result is a color that looks sophisticated in every lighting condition, which is more than most dark nail colors can claim.
The silver bow on the ring finger is the kind of detail that divides opinion. Some people will find it charming. Others will think it undercuts the moodiness of the charcoal. Both reactions are valid. What isn't debatable is the technical execution: the bow is hand-painted with a fine liner brush, and the loops are symmetrical, which requires a steady hand.
The practical reality of dark cat-eye polish: it shows every cuticle imperfection. Budget extra time for cleanup around the edges. An angled brush dipped in acetone is non-negotiable for getting crisp lines between the polish and your skin.
Design Breakdown:
Dark magnetic base with a single delicate accent. The contrast between moody and sweet is the design.
Base Color: A deep charcoal grey with silver magnetic particles. Not quite black, not quite silver.
Nail Shape: Medium almond. The curved shape softens the intensity of the dark color.
Design Element: Hand-painted silver bow on the ring finger only. Thin, precise linework.
Finish: Ultra-glossy. The shine makes the magnetic particles pop against the dark base.
Get The Look at Home:
The bow requires patience and a very thin brush. Practice the shape on paper first.
- Charcoal base: Three thin coats of charcoal cat-eye polish, activating the magnet each time. Let each coat dry fully.
- Bow outline: Using a thin liner brush and metallic silver polish, draw two small loops meeting at a center point on the ring finger.
- Bow tails: Add two short, angled lines extending downward from the center point.
- Center knot: A tiny dot of silver at the intersection of the loops completes the bow.
- Cleanup: Use an angled brush and acetone to clean the cuticle line. Dark polish stains skin.
- Seal: One thick coat of glossy top coat over everything.
3.Lavender Cat-Eye Shimmer
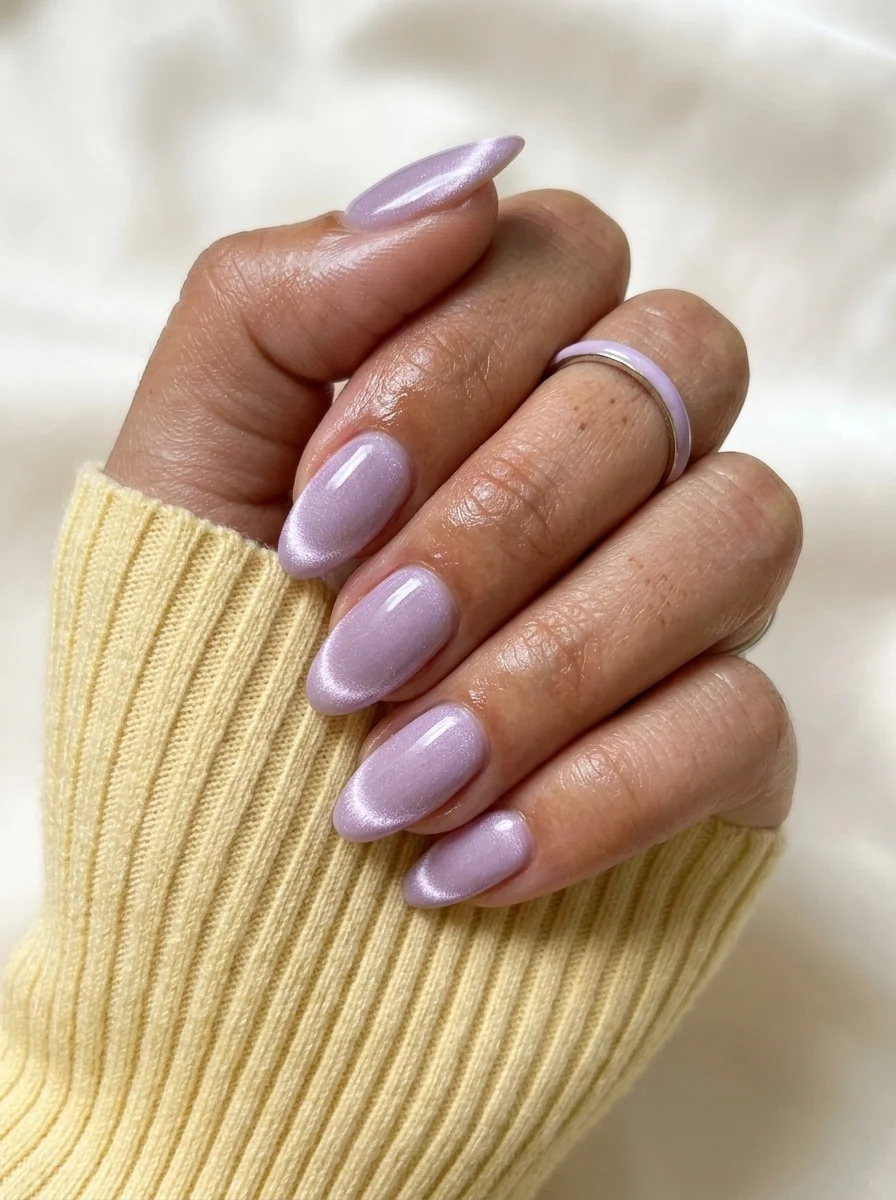
A dreamy, ethereal take on the cat-eye trend with a soft purple hue.
Overview:
Lavender cat-eye is the pastel version of a trend that usually skews dark. The magnetic particles in this shade are fine enough that they create a subtle, almost pearlescent shimmer rather than the dramatic streak you see in darker cat-eye colors. The effect is closer to a lit-from-within glow than a sharp line of light.
What makes this shade wearable is its versatility. It's soft enough for a professional setting but interesting enough that people will notice your nails. The color sits right between cool purple and warm pink, which means it flatters a wider range of skin tones than most pastels.
Pastel cat-eye formulas are notoriously inconsistent across brands. Some lean too grey, others too chalky. The sweet spot is a lavender with enough pink in its undertone to avoid looking washed out. Two to three thin coats usually achieves the right opacity.
Design Breakdown:
Single-color magnetic. The shimmer does all the work. No accent art needed.
Base Color: A soft, warm lavender with fine silver magnetic particles. Not too cool, not too pink.
Nail Shape: Medium almond. Classic and flattering.
Design Element: None. Solid coverage across all nails.
Finish: High-gloss top coat to bring out the pearlescent shift.
Get The Look at Home:
Pastel cat-eye needs proper layering to avoid looking patchy. Don't rush the coats.
- Base coat: Apply a smoothing base coat and let it dry completely.
- First coat: Thin layer of lavender cat-eye. It will look streaky. Ignore it.
- Magnet time: Hold the magnet 5mm above the wet polish for 15 seconds. The shimmer will gather into a soft line.
- Second coat: Repeat the application and magnetic activation. The color should be building now.
- Third coat if needed: If the color still looks uneven, add a third thin coat. Pastels are less forgiving than dark shades.
- Top coat: One generous coat of glossy top coat. Cap the free edge to prevent chipping.
29 Stunning Summer Almond Nails for Women in 2026 💅
4.Brown Cat-Eye with Copper Geometric Lines
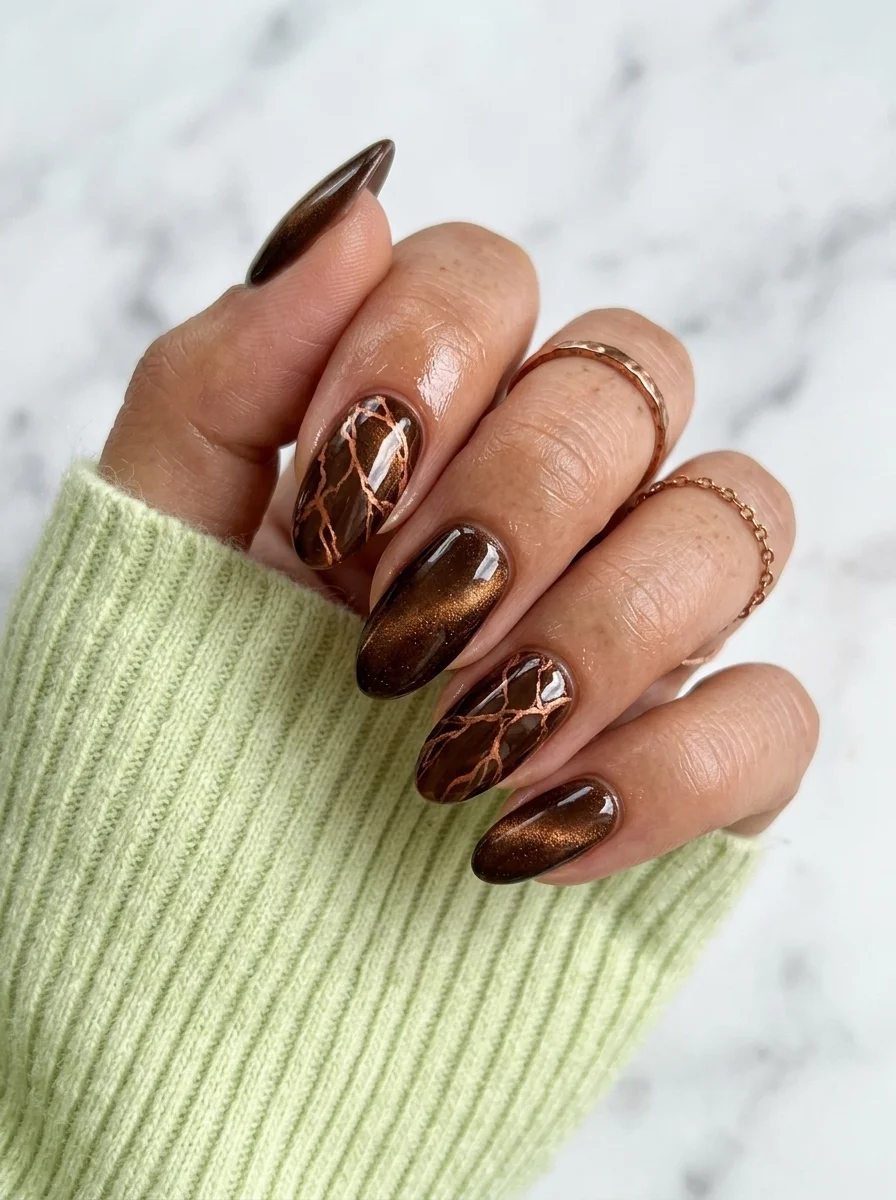
Warm, rich tones with an architectural edge that catches every light source.
Overview:
Brown cat-eye is the nail equivalent of a good leather jacket. It's warm, it's rich, and it makes everything else look more expensive. The magnetic particles in brown formulas tend to lean copper or gold, which gives the shimmer a warmth that silver-based cat-eye colors lack.
The copper geometric lines on the accent nails are what elevate this from "pretty brown nails" to a designed set. The lines look like cracked earth or veining in marble, which creates an organic-meets- architectural tension. The key is keeping the lines thin and slightly irregular. Perfectly uniform lines would look printed, not hand-painted.
This color reads as autumnal, but that's not a limitation. Brown cat-eye works year-round because the magnetic effect keeps it from looking flat. In summer, the copper shimmer picks up warm light. In winter, the dark base feels appropriately cozy.
Design Breakdown:
Warm magnetic base with metallic line art. The two textures create visual depth.
Base Color: A deep, warm brown with copper magnetic particles. Think espresso with gold leaf.
Nail Shape: Medium almond. The curved shape complements the organic line patterns.
Design Element: Copper metallic geometric lines on two accent nails. Irregular, vein-like patterns.
Finish: High-gloss top coat to unify the magnetic base and the metallic line work.
Get The Look at Home:
The geometric lines don't need to be precise. Organic irregularity is part of the aesthetic.
- Brown base: Three thin coats of brown cat-eye polish, activating the magnet each time.
- Line art: Using a thin liner brush and copper metallic polish, draw irregular intersecting lines on the accent nails. Think cracked earth, not grid paper.
- Vary the density: Some areas should have more lines than others. Uniform spacing looks mechanical.
- Let it dry: Metallic polish takes longer to set than cream formulas. Wait at least five minutes before top coating.
- Seal: Two coats of thick top coat to smooth the raised texture of the line work.
5.Rose Gold Cat-Eye with Geometric Line Art
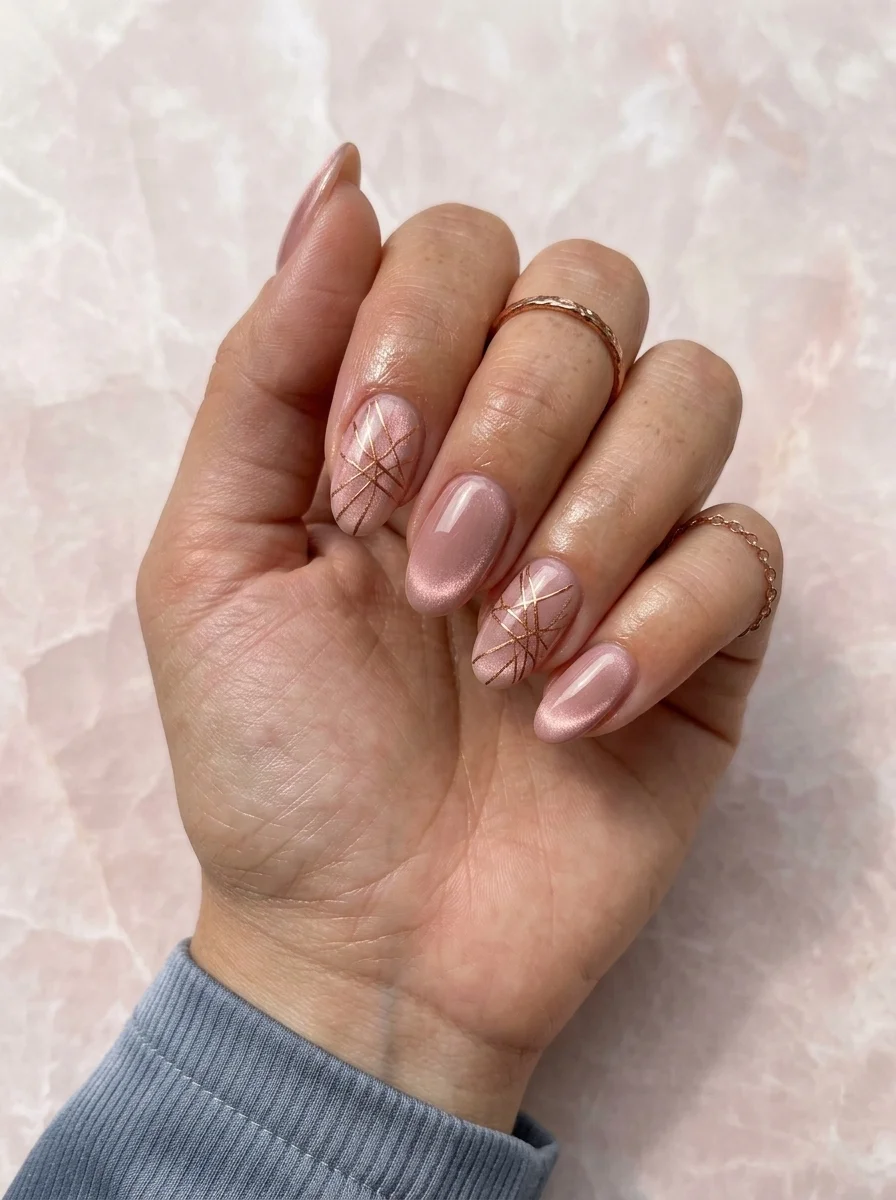
A romantic, warm-toned design with architectural precision.
Overview:
Rose gold cat-eye sits in the same family as champagne and bronze, but with enough pink in its undertone to read as distinctly feminine. The magnetic shimmer in this shade is subtle, creating a soft, diffused glow rather than a sharp line. It's the kind of color that looks expensive without trying too hard.
The geometric line art on the accent nails uses the same rose gold metallic, which creates an interesting texture contrast. The cat-eye base is smooth and shifting; the hand-painted lines are raised and precise. Your eye moves between the two finishes, which keeps the design from feeling one-note.
Rose gold is one of the more forgiving cat-eye colors to apply. The warm tone masks minor imperfections in the magnetic streak better than silver or blue cat-eye. If you're new to cat-eye polish, this is a good starting point.
Design Breakdown:
Monochromatic metallic with textural variation. Same color, different finishes.
Base Color: A soft, warm rose gold with fine magnetic particles. Not copper, not pink. The sweet spot between.
Nail Shape: Medium almond. The tapered tip echoes the angular line work.
Design Element: Rose gold metallic geometric lines on two accent nails. Thin, intersecting strokes.
Finish: High-gloss top coat to enhance the magnetic shimmer.
Get The Look at Home:
The monochromatic approach means you only need two products: cat-eye polish and metallic liner.
- Rose gold base: Three thin coats of rose gold cat-eye polish, activating the magnet each time.
- Line art: Using a thin liner brush and matching rose gold metallic polish, paint intersecting lines on the accent nails. Keep the lines thin.
- Placement: Concentrate the lines on one area of the nail rather than covering the entire surface. Negative space is part of the design.
- Dry time: Wait at least five minutes before applying top coat. Metallic lines smear easily.
- Seal: One thick coat of glossy top coat. Float the brush to avoid dragging the line work.

34 Stunning Summer First Date Hairstyles for 2026 💕☀️
6.Lavender Cat-Eye with Pearl Dot Border
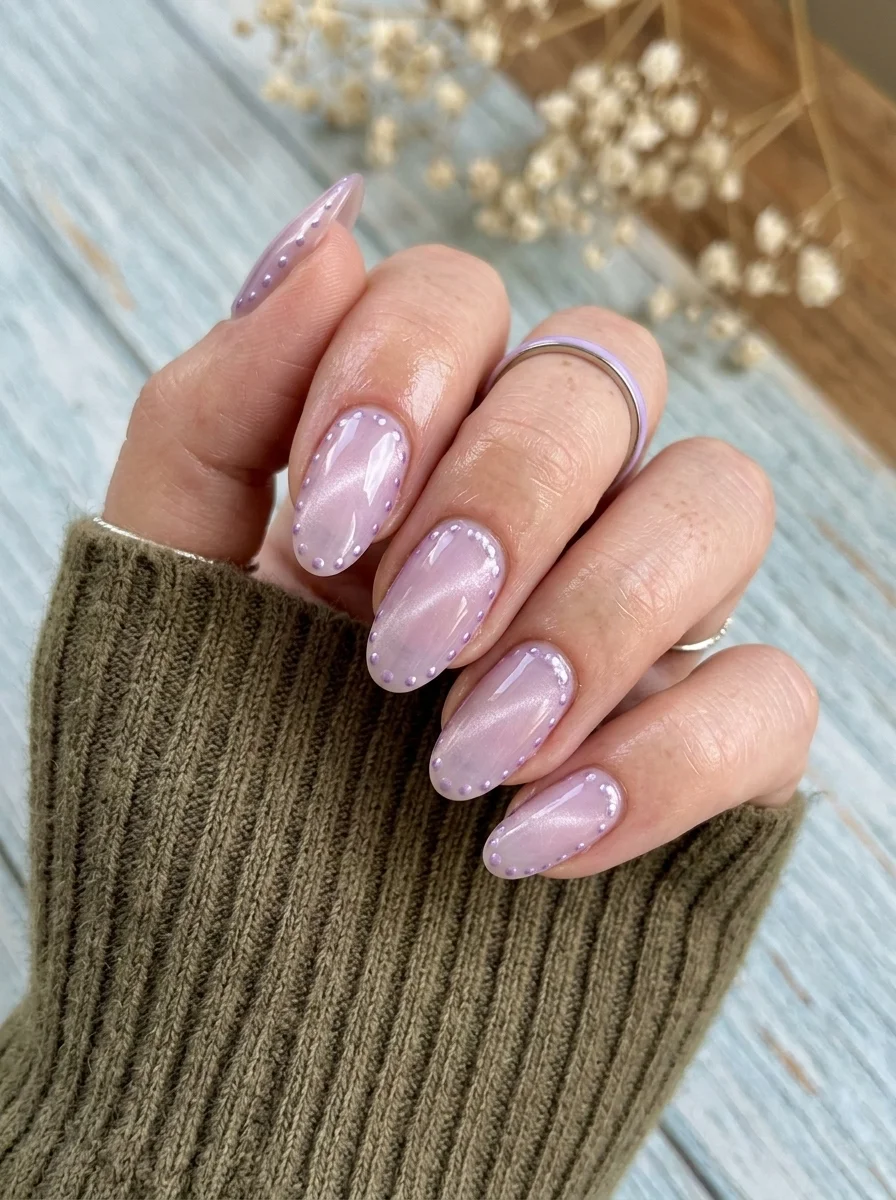
A delicate, feminine design that frames the magnetic shimmer with pearl details.
Overview:
Adding tiny dots around the perimeter of a nail is one of those techniques that looks incredibly intricate but is actually straightforward with a dotting tool. The effect here is a pearl-like border that frames the lavender cat-eye base like a vintage brooch.
The white dots create a contrast against the lavender that draws the eye to the edges of the nail. This has an interesting visual effect: it makes the nails look slightly wider and more oval than they actually are. The border acts as a frame, and frames always make their contents look more intentional.
The challenge is consistency. The dots need to be evenly spaced and roughly the same size across all ten nails. Uneven spacing makes the design look rushed. Take your time with placement. A wax picker tool helps position each dot precisely before pressing it down.
Design Breakdown:
Magnetic base with structured dot border. The framing element is the design.
Base Color: Soft lavender cat-eye with fine silver magnetic particles.
Nail Shape: Medium almond. The curved edges provide a natural path for the dot border.
Design Element: Tiny white pearl-like dots placed along the edges of each nail, creating a framed border effect.
Finish: High-gloss top coat to encapsulate the dots and create a smooth surface.
Get The Look at Home:
The dots are small but they need to be precise. Use your smallest dotting tool or a toothpick.
- Lavender base: Three thin coats of lavender cat-eye polish, activating the magnet each time.
- Dot placement: Using a small dotting tool and opaque white polish, place tiny dots along the edges of each nail. Space them roughly 2mm apart.
- Consistency check: Compare both hands. The dot spacing and size should be roughly uniform.
- Dry time: Wait at least five minutes. The dots are raised and need time to set.
- Seal: Two coats of thick top coat to smooth the surface over the dots.
7.Bronze Cat-Eye Solid
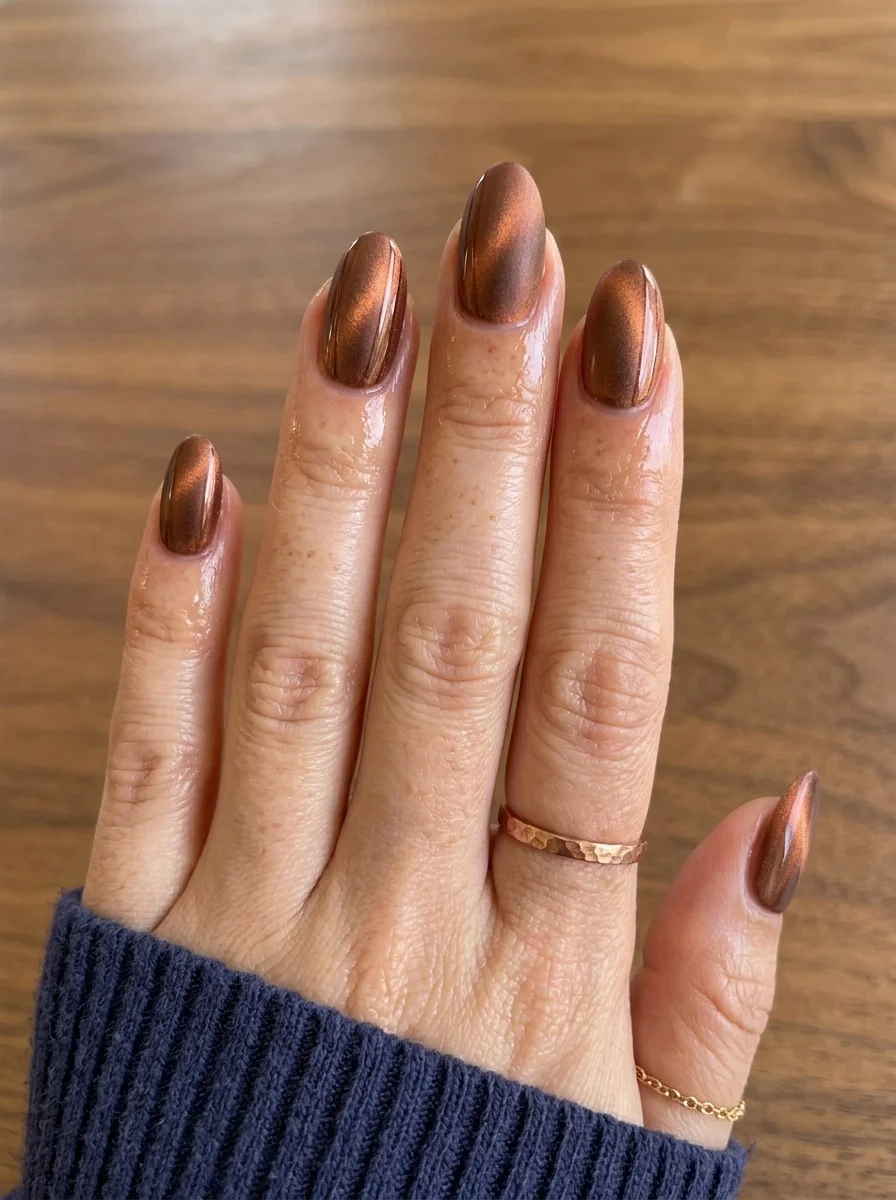
A warm, rich bronze that looks like liquid metal on the nails.
Overview:
Sometimes the best design is no design at all. Bronze cat-eye polish on its own creates enough visual interest that adding art on top would actually detract from the effect. The magnetic particles in bronze formulas are usually larger and more reflective than in pastel shades, which means the light streak is bolder and more defined.
This color reads as warm and earthy in low light, then shifts to almost molten copper under direct sun. That transformation is the entire appeal of cat-eye polish, and bronze showcases it better than almost any other shade. It's the difference between wearing a brown nail and wearing a nail that looks like it's been dipped in liquid metal.
Bronze is also one of the more forgiving cat-eye colors. The warm tone hides minor imperfections in application, and the magnetic streak tends to be forgiving about angle and distance. If you're experimenting with cat-eye for the first time, bronze is a strong starting point.
Design Breakdown:
Single-color magnetic. Maximum impact, minimum complexity. The polish does all the work.
Base Color: A deep, warm bronze with copper magnetic particles. Rich without being dark.
Nail Shape: Medium almond. Classic proportions.
Design Element: None. Solid coverage.
Finish: Ultra-glossy top coat to maximize the metallic reflectivity.
Get The Look at Home:
Bronze cat-eye is straightforward. The key is consistent magnet technique across all nails.
- Base coat: Apply a smoothing base coat. Bronze pigment can stain bare nails.
- First coat: Thin layer of bronze cat-eye. Activate the magnet for 15 seconds.
- Second coat: Repeat. The bronze should be building to full opacity now.
- Third coat if needed: Some formulas need a third coat for complete coverage.
- Magnet consistency: Hold the magnet at the same angle and distance for every nail. Inconsistent technique creates different streak patterns.
- Top coat: One generous coat of high-shine top coat.
26 Stunning Sunflower Floral Nails for Spring & Summer 2026 🌻
8.Pastel Rainbow Cat-Eye
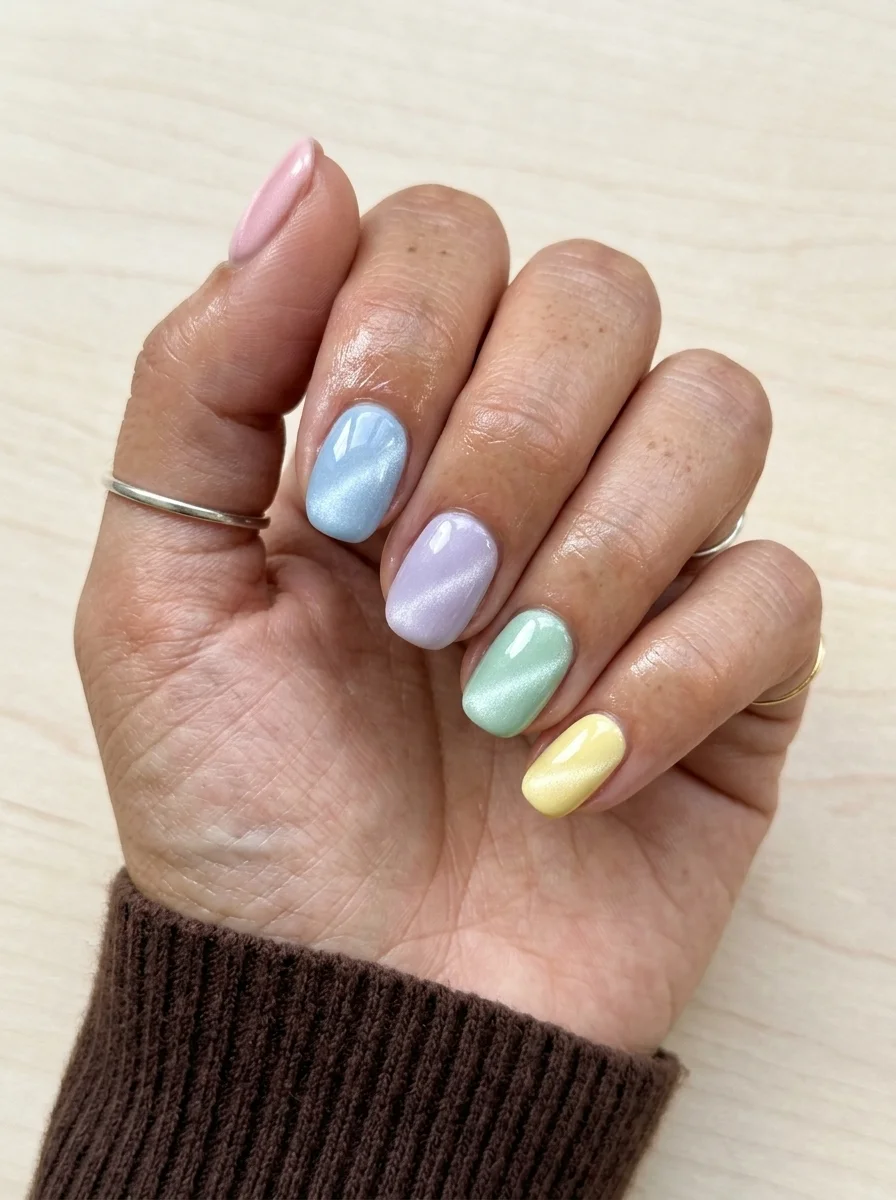
A playful, multi-colored take on the cat-eye trend with soft pastel shades.
Overview:
A different pastel cat-eye color on every nail is either a brilliant idea or a chaotic one, depending on execution. This version works because all five colors share the same value range and the same level of saturation. The pink, blue, lavender, mint, and yellow all sit at roughly the same brightness, which prevents any single nail from shouting louder than the others.
The short almond shape is the right call here. On longer nails, a rainbow of pastels can read as juvenile. On shorter nails, the same colors feel playful without veering into costume territory. The compact surface area also means the magnetic shimmer is subtler, which actually suits pastel formulas better.
The practical challenge is having five different cat-eye polishes on hand. This is not a budget-friendly design unless you already own multiple shades. Alternatively, you can achieve a similar effect with a single iridescent cat-eye topper over five different pastel base colors.
Design Breakdown:
Five colors, one design principle. The uniform saturation level is what keeps it cohesive.
Base Color: Five different pastel cat-eye polishes: soft pink, sky blue, lavender, mint green, and butter yellow.
Nail Shape: Short almond. Compact and proportional for multiple colors.
Design Element: None. Solid color on each nail. The variety is the design.
Finish: High-gloss top coat across all nails for a unified finish.
Get The Look at Home:
The key is applying each color with the same technique so the magnetic effect is consistent across all five shades.
- Map the colors: Decide which finger gets which color before you start. A common layout is pink on the thumb, blue on the index, lavender on the middle, mint on the ring, and yellow on the pinky.
- Apply each color: Two to three thin coats per nail, activating the magnet each time.
- Magnet consistency: Hold the magnet at the same angle for every nail. The streak direction should be uniform.
- Cleanup: Clean the cuticle lines on each nail before moving to the next color. Cross-contamination between shades looks messy.
- Top coat: Apply the same glossy top coat to all nails for a unified finish.
9.Purple and Black Swirl Cat-Eye
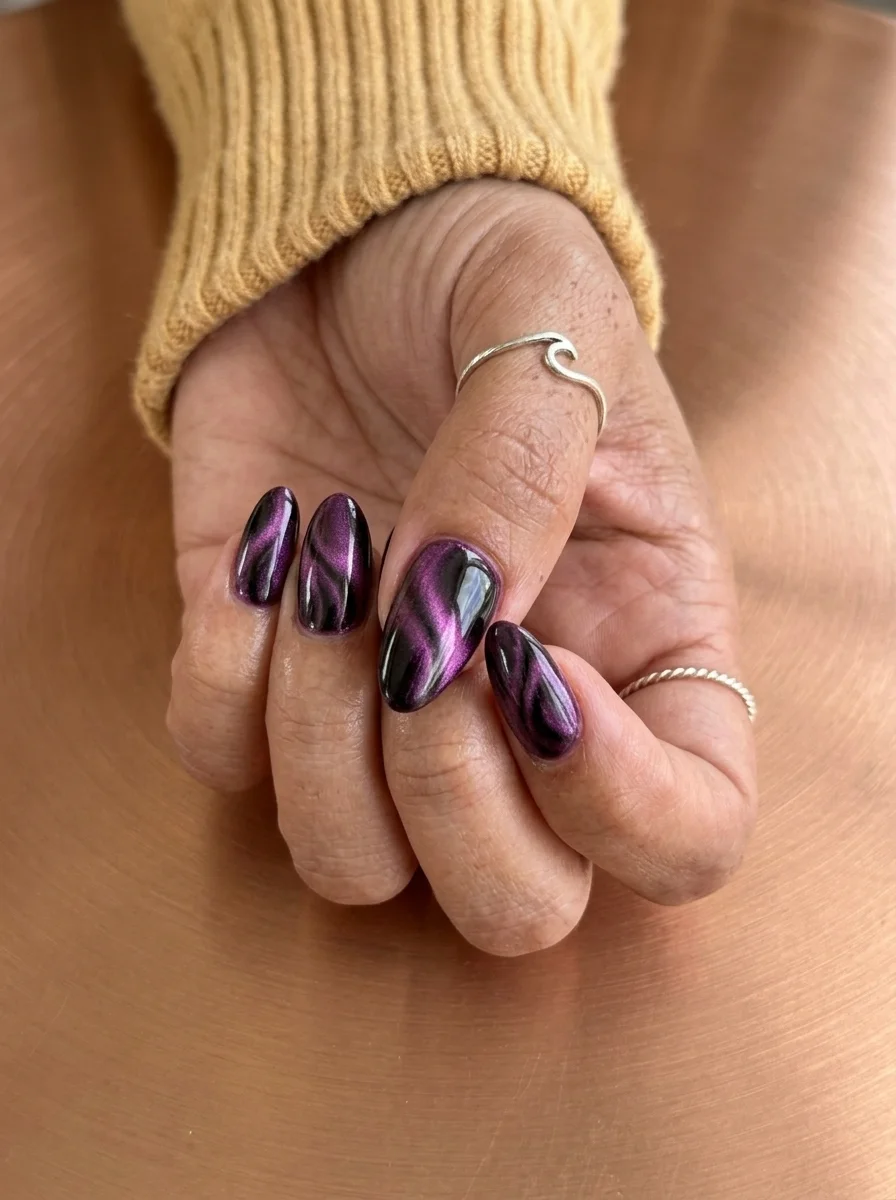
A moody, dimensional swirl of purple and black magnetic shimmer.
Overview:
Purple and black cat-eye swirl is what happens when you manipulate the magnet in circular motions instead of holding it still. The magnetic particles gather into flowing, organic swirl patterns that look like captured smoke or liquid amethyst. No two nails end up with identical patterns, which is the whole point.
The base is deep black, which gives the purple magnetic particles maximum contrast. The purple shifts between a rich plum and a bright magenta depending on the angle, creating a two-tone effect that photographs differently from every direction. In low light, the nails look almost entirely black with faint purple undertones. In direct light, the swirls ignite with color.
The almond shape works well here because the curved surface enhances the swirl movement. On flat coffin nails, the swirl patterns can look more graphic and less fluid. The tapered almond tip lets the magnetic streaks flow naturally toward the point, creating a sense of motion even when the hand is still.
Design Breakdown:
Swirl-manipulated magnetic over a dark base. The circular magnet technique creates organic, flowing patterns.
Base Color: Black with purple magnetic particles. The black base provides maximum contrast for the purple shimmer.
Nail Shape: Medium almond. The curved surface enhances the fluid swirl patterns.
Design Element: Swirl patterns created by moving the magnet in circular motions during application. Each nail is unique.
Finish: Ultra-glossy top coat to seal the magnetic particles and intensify the color depth.
Get The Look at Home:
The swirl technique requires moving the magnet while the polish is still wet. Practice the circular motion on one nail first.
- Base coat: Apply a ridge-filling base coat and let it dry completely.
- First coat: Apply a thin layer of purple-black cat-eye polish. Activate the magnet in a straight line for 10 seconds.
- Second coat: Apply the second coat. While it's still wet, hold the magnet 5mm above the nail and move it in slow circles for 10-15 seconds. The particles will shift into swirl patterns.
- Vary the swirls: On some nails, drag the magnet in S-curves instead of circles for different patterns.
- Third coat if needed: Some formulas need a third coat for full opacity. Repeat the swirl technique each time.
- Top coat: One generous coat of glossy top coat. Cap the free edge to prevent chipping.

31 Flattering Summer Hairstyles for Women Over 40 (2026)
10.Red Cat-Eye with Gold French Tips
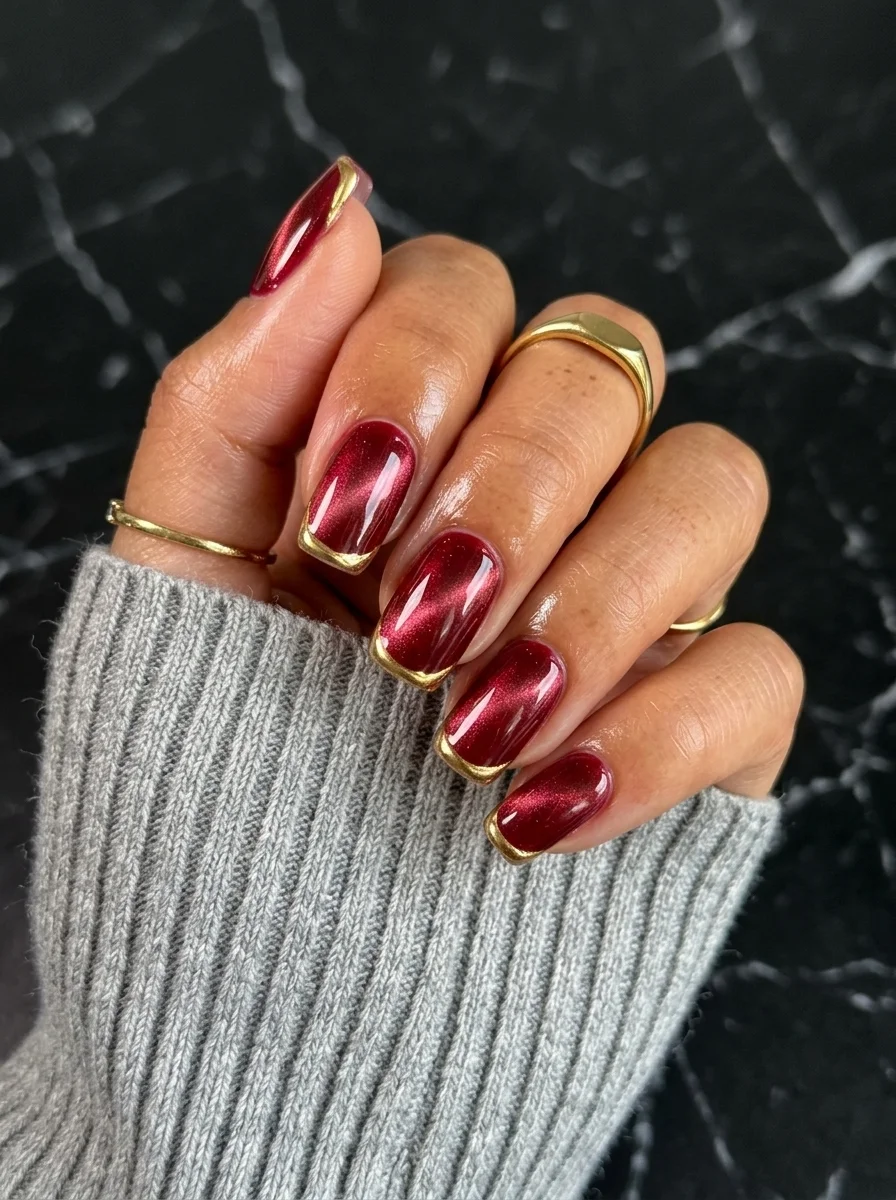
A bold, luxurious combination that pairs warm magnetic red with metallic gold.
Overview:
Red cat-eye is already a statement. Adding gold French tips turns it into a declaration. The two warm tones complement each other because they share the same undertone family: the red leans slightly warm (more crimson than blue-red), and the gold is a true yellow gold, not champagne or rose.
The French tip technique on cat-eye polish requires patience. The magnetic particles create a textured surface that's slightly uneven compared to regular polish. Painting a clean French line over that texture is harder than it sounds. The tip polish needs to be thick enough to cover the magnetic shimmer underneath in one coat, or you'll see the red bleeding through the gold.
This is a design that looks better on medium-length nails. On very short nails, the French tip becomes so thin that it reads as a gold line rather than a tip. On very long nails, the proportions shift and the gold can overwhelm the red. Medium almond hits the sweet spot.
Design Breakdown:
Two warm metallics in a structured French layout. The gold frame elevates the red base.
Base Color: A deep, warm red with fine magnetic particles. Crimson, not burgundy.
Nail Shape: Medium almond. Balanced proportions for the French tip width.
Design Element: Gold metallic French tips on all nails. Thin, precise smile lines.
Finish: High-gloss top coat to unify the two metallic textures.
Get The Look at Home:
The French tip is the hardest part. Use a liner brush rather than the polish bottle brush for precision.
- Red base: Three thin coats of red cat-eye polish, activating the magnet each time.
- Let it cure: Wait at least ten minutes. The magnetic surface is textured and needs to be fully set before the French tip goes on.
- Gold tips: Using a French liner brush and gold metallic polish, paint the smile line from sidewall to center on each nail. Two thin coats for full opacity.
- Cleanup: Use an angled brush dipped in acetone to sharpen the smile line. The border between red and gold needs to be crisp.
- Seal: Two coats of glossy top coat to smooth the transition between the two polishes.
11.Navy Cat-Eye with Moon Phase Art
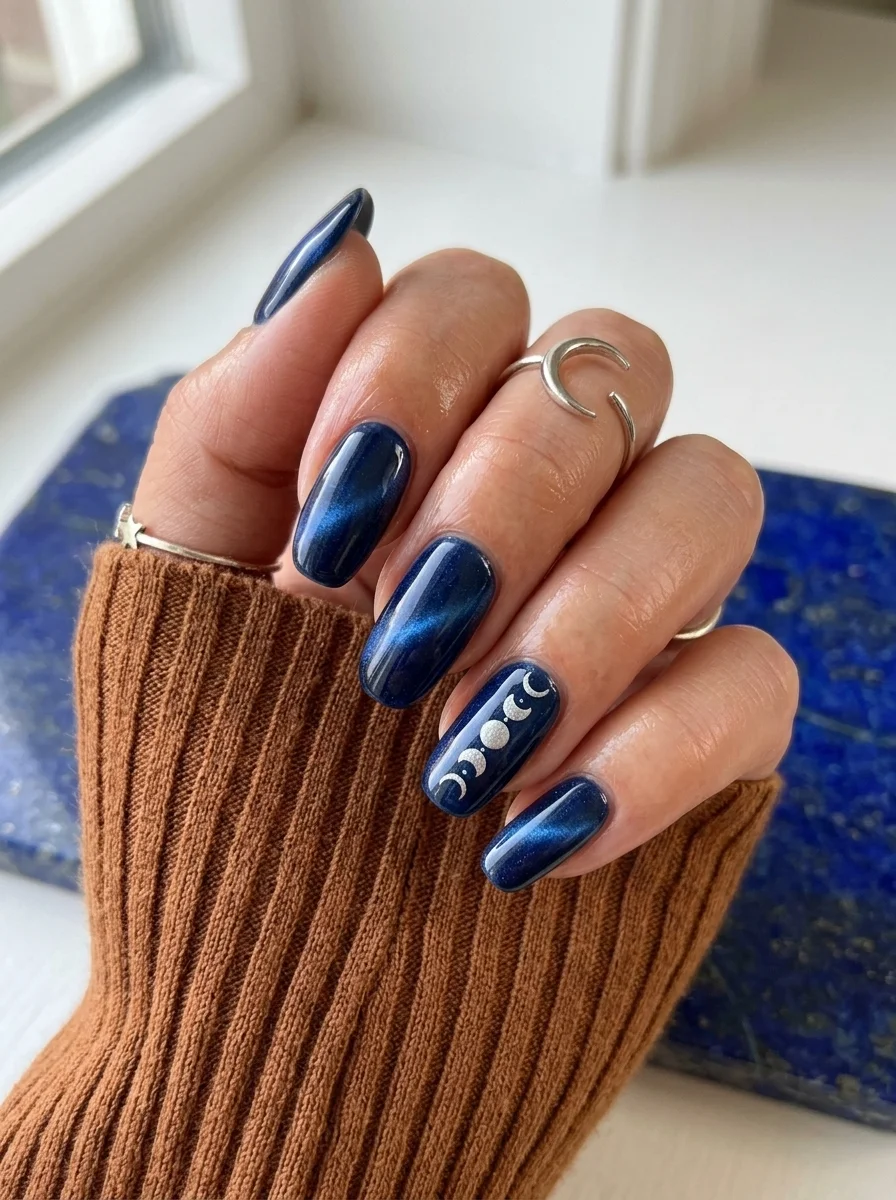
A celestial-inspired design that pairs deep blue magnetic shimmer with lunar motifs.
Overview:
Navy cat-eye is the closest nail polish gets to capturing the look of a night sky. The magnetic particles create a streak that mimics the way light moves across deep water or through a telescope lens. It's atmospheric in a way that flat navy polish can't achieve.
The moon phase art on the accent nails adds a narrative element to the design. The silver crescents and full moons are painted over the navy base, which makes them look like they're floating in space. The small scale of the moons keeps the design from reading as costume-y.
The constellation ring worn with this manicure is a nice touch, but the nails work on their own too. The moon phases are small enough that they read as texture from a distance and reveal their detail only up close. That dual readability is what separates good nail art from busy nail art.
Design Breakdown:
Deep magnetic base with celestial accent art. The silver pops against the dark navy.
Base Color: A deep, saturated navy blue with fine blue or silver magnetic particles.
Nail Shape: Medium almond. Classic and versatile.
Design Element: Silver moon phase designs (crescents, half moons, full moons) on two accent nails.
Finish: High-gloss top coat to intensify the navy depth and protect the silver art.
Get The Look at Home:
The moon phases are small and require a very fine brush. Take your time with each shape.
- Navy base: Three thin coats of navy cat-eye polish, activating the magnet each time.
- Moon shapes: Using a thin liner brush and silver metallic polish, paint small crescent moons and full circles on the accent nails.
- Variety: Use different moon phases on different nails. A crescent on one, a half moon on another, a full moon on a third.
- Scale: Keep the moons small. They should be 2-3mm across at most.
- Dry time: Wait at least five minutes before top coating. Silver metallic smears easily.
- Seal: One thick coat of glossy top coat, floated over the art.
28 Back to School Nail Art Designs for the New Semester (2026) 💅
12.Teal Cat-Eye with Rose Gold Drip Accent
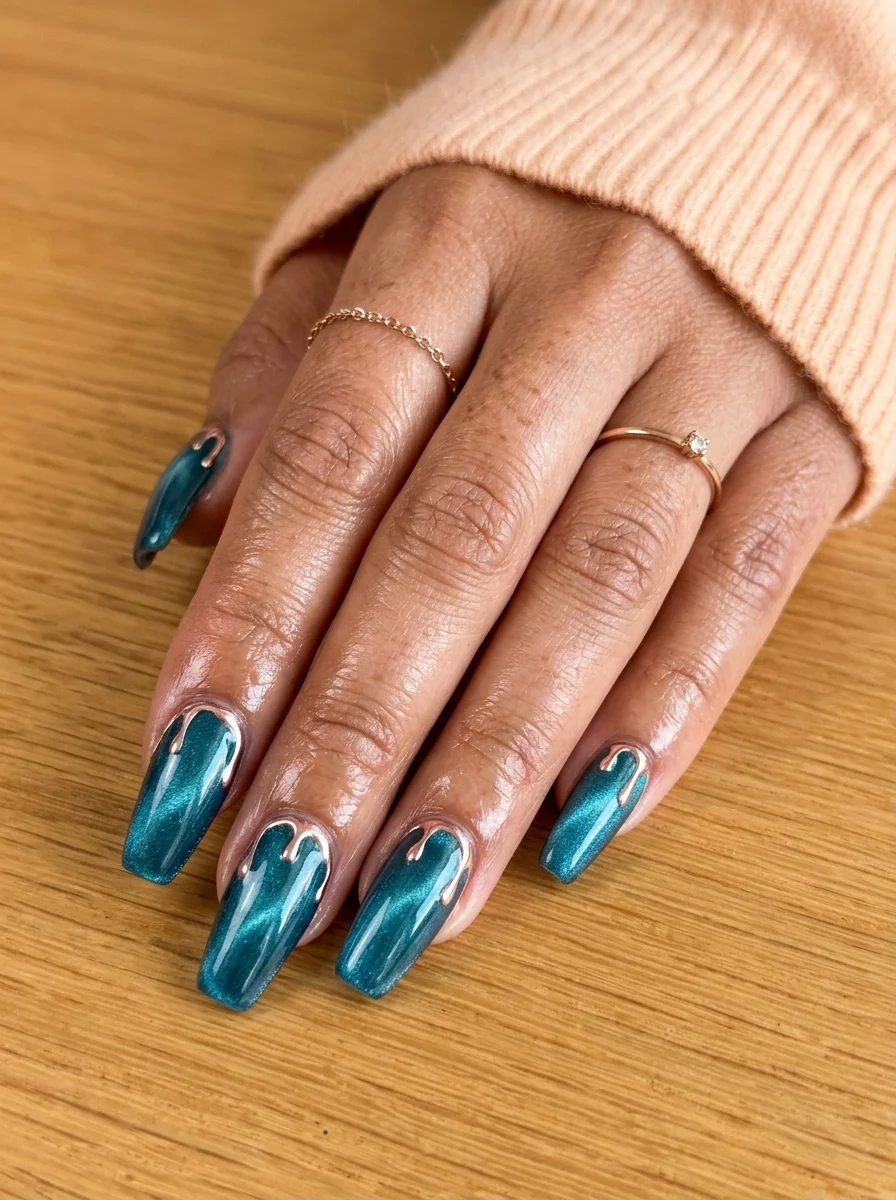
A luxe ocean-depth teal with molten rose gold drip details.
Overview:
Teal cat-eye is one of the more visually striking shades in the magnetic polish category. The particles in this formula lean toward blue-green, creating a shimmer that looks like light refracting through deep tropical water. The effect is intense enough that it becomes the focal point of any outfit.
The rose gold drip accents on the ring finger and thumb are what elevate this from a solid-color set to a designed manicure. The drips look like molten metal was poured over the teal base and allowed to freeze mid-flow. The contrast between the cool teal and the warm rose gold creates a temperature tension that keeps the eye moving across the hand.
Coffin nails are the ideal canvas for this design. The flat, extended surface gives the teal cat-eye more room to develop its magnetic streak, and the wider tip area provides enough space for the rose gold drips to look deliberate rather than cramped. On shorter nails, the drip detail would need to be scaled down significantly.
Design Breakdown:
Bold magnetic base with metallic drip accent. The warm-cool contrast between teal and rose gold is the design.
Base Color: A deep, saturated teal with fine blue-green magnetic particles. Rich without being dark.
Nail Shape: Long coffin. The flat surface maximizes the magnetic shimmer and provides space for the drip detail.
Design Element: Rose gold metallic drip accents on the ring finger and thumb only. The drips appear to flow from the cuticle area.
Finish: High-gloss top coat to unify the teal base and the raised rose gold drips.
Get The Look at Home:
The drip effect is created by letting thick metallic polish flow naturally from a dotting tool. Don't try to paint the drips — let gravity do the work.
- Teal base: Three thin coats of teal cat-eye polish, activating the magnet each time. Let each coat dry fully.
- Plan the drips: Decide which nails get the rose gold accent. Typically ring finger and thumb.
- Rose gold application: Using a dotting tool, place a large blob of rose gold metallic polish near the cuticle of the accent nails.
- Let it flow: Tilt the finger slightly downward and let the polish drip naturally toward the tip. Don't guide it.
- Control the length: When the drips reach your desired length, use a clean tool to stop the flow. Vary the drip lengths for a natural look.
- Dry time: Wait at least ten minutes. The raised drips need extra time to set.
- Seal: Two coats of thick top coat to encapsulate the drips and create a smooth surface.
13.Deep Purple Cat-Eye with Gold Outline
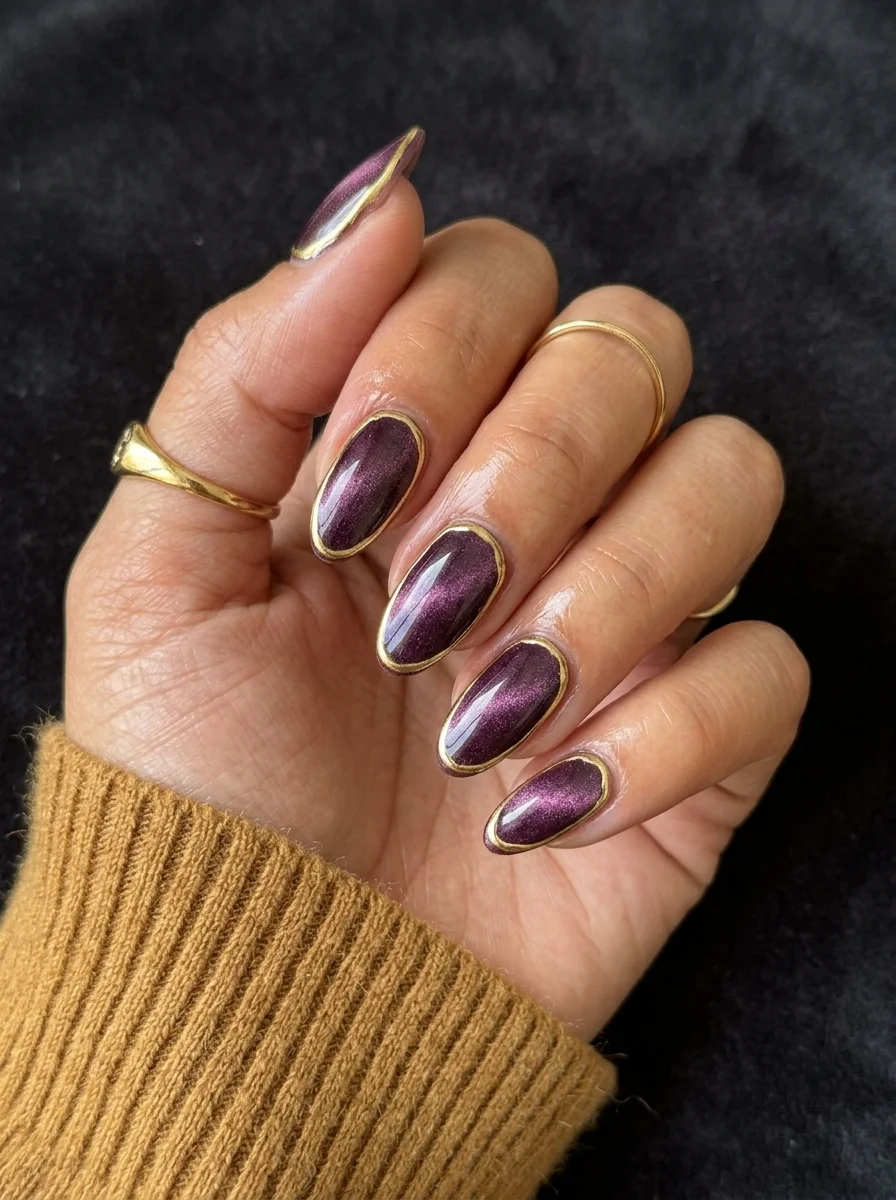
A regal, jewel-toned design framed with precise metallic detailing.
Overview:
Deep purple cat-eye has the same visual weight as a amethyst gemstone. The magnetic particles in this shade usually lean gold or copper, which creates a warm shimmer against the cool purple base. That warm-cool tension is what makes the color interesting.
The gold outline around each nail is a framing technique that makes the purple look deeper by contrast. It's the nail equivalent of putting a dark painting in a gold frame. The metallic border creates a clear boundary that makes the interior color appear more saturated.
The outline technique requires a very thin brush and a steady hand. The line needs to be consistent in thickness around the entire nail. Any wobble or variation in width is immediately visible against the dark purple. If freehand isn't your strength, metallic striping tape along the edges achieves a similar effect with less room for error.
Design Breakdown:
Dark jewel tone with metallic framing. The gold border amplifies the purple's depth.
Base Color: A deep, saturated purple with gold or copper magnetic particles.
Nail Shape: Medium almond. The curved edges provide a smooth path for the outline.
Design Element: Thin gold metallic outline around the perimeter of each nail.
Finish: High-gloss top coat to seal the outline and intensify the magnetic shimmer.
Get The Look at Home:
The outline is precise work. Take your time and use the thinnest brush you own.
- Purple base: Three thin coats of deep purple cat-eye polish, activating the magnet each time.
- Outline: Using a thin liner brush and gold metallic polish, trace a thin line around the entire edge of each nail. Keep the thickness consistent.
- Check consistency: Compare all nails. The outline width should be roughly the same across all fingers.
- Dry time: Wait at least five minutes. Metallic outlines smear easily.
- Seal: Two coats of glossy top coat to encapsulate the outline and create a smooth surface.

26 Best Hiking Hairstyles That Survive the Trail and Look Good in Photos
14.Teal Chrome with Silver Stripe Texture
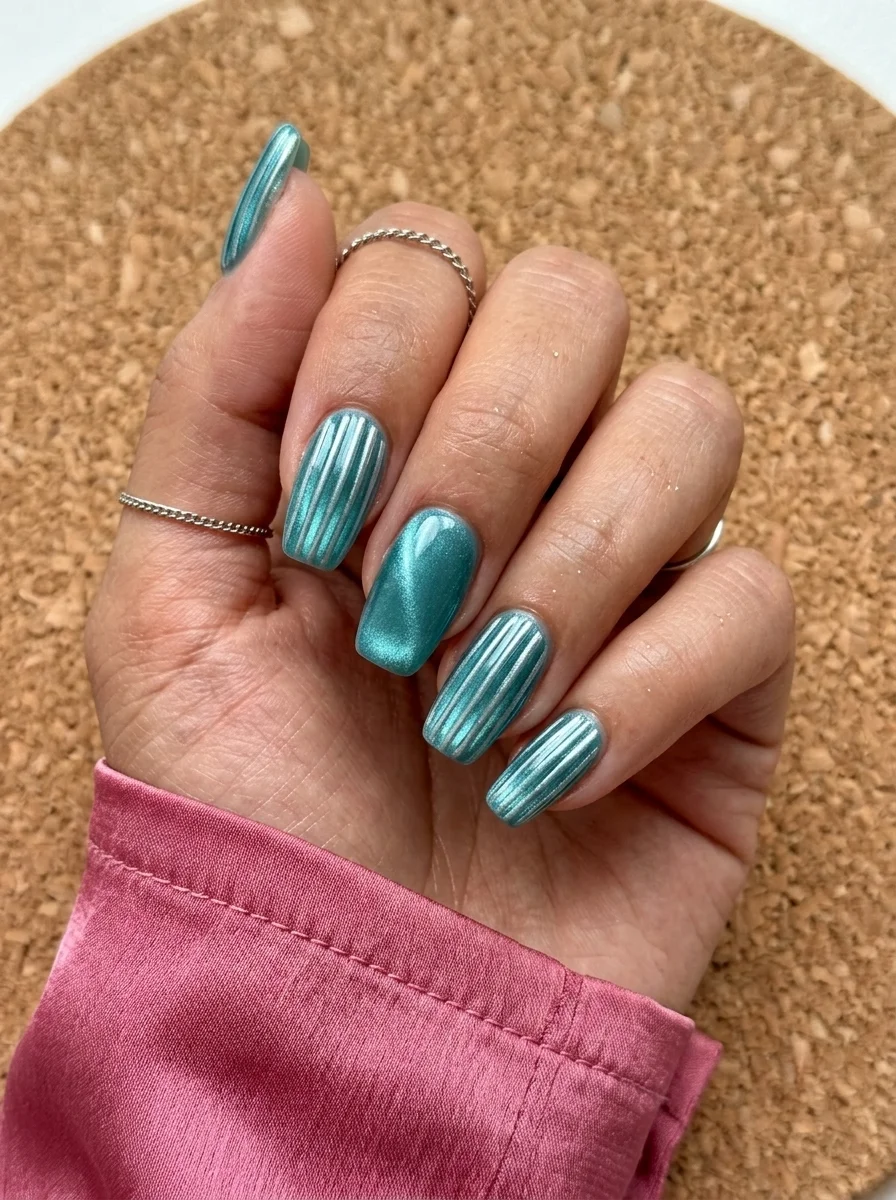
A high-shine chrome base with dimensional stripe texture that catches light differently.
Overview:
Teal chrome and cat-eye share the same family of magnetic effects, but chrome pushes the reflectivity further. The surface looks like polished metal rather than polished stone. The silver stripes add a texture element that breaks up what would otherwise be a uniform surface.
The stripe texture is created by applying thin lines of builder gel or thick top coat over the cured chrome base, then curing or drying those lines into raised ridges. The result is a tactile surface that creates different reflections depending on the angle. It's a subtle effect that photographs well but is even more impressive in person.
The coffin shape works well here because the flat surface gives the stripes room to travel. On almond nails, the curved surface would distort the lines. On coffin, they stay straight and parallel, which is the whole point.
Design Breakdown:
Chrome base with dimensional texture. The stripes are raised, not painted.
Base Color: A saturated teal with chrome or high-shine magnetic finish.
Nail Shape: Medium coffin. The flat surface keeps the stripe lines straight.
Design Element: Raised silver vertical stripes created with builder gel or thick top coat, concentrated on accent nails.
Finish: High-gloss top coat over everything to encapsulate the raised texture.
Get The Look at Home:
The stripe texture requires builder gel or a very thick no-wipe top coat. Regular polish won't hold the raised shape.
- Teal base: Apply two to three coats of teal chrome or cat-eye polish. Cure or dry fully.
- Stripe setup: Using a thin liner brush and clear builder gel, paint vertical lines on the accent nails. Space them 2-3mm apart.
- Cure the stripes: If using UV gel, cure under the lamp immediately so the stripes don't flatten.
- Silver enhancement (optional): For more visible stripes, paint over the cured gel lines with silver metallic polish.
- Encapsulate: Two coats of thick top coat over everything to smooth the surface while preserving the raised texture.
15.Black Chrome with Silver Stripe Detail
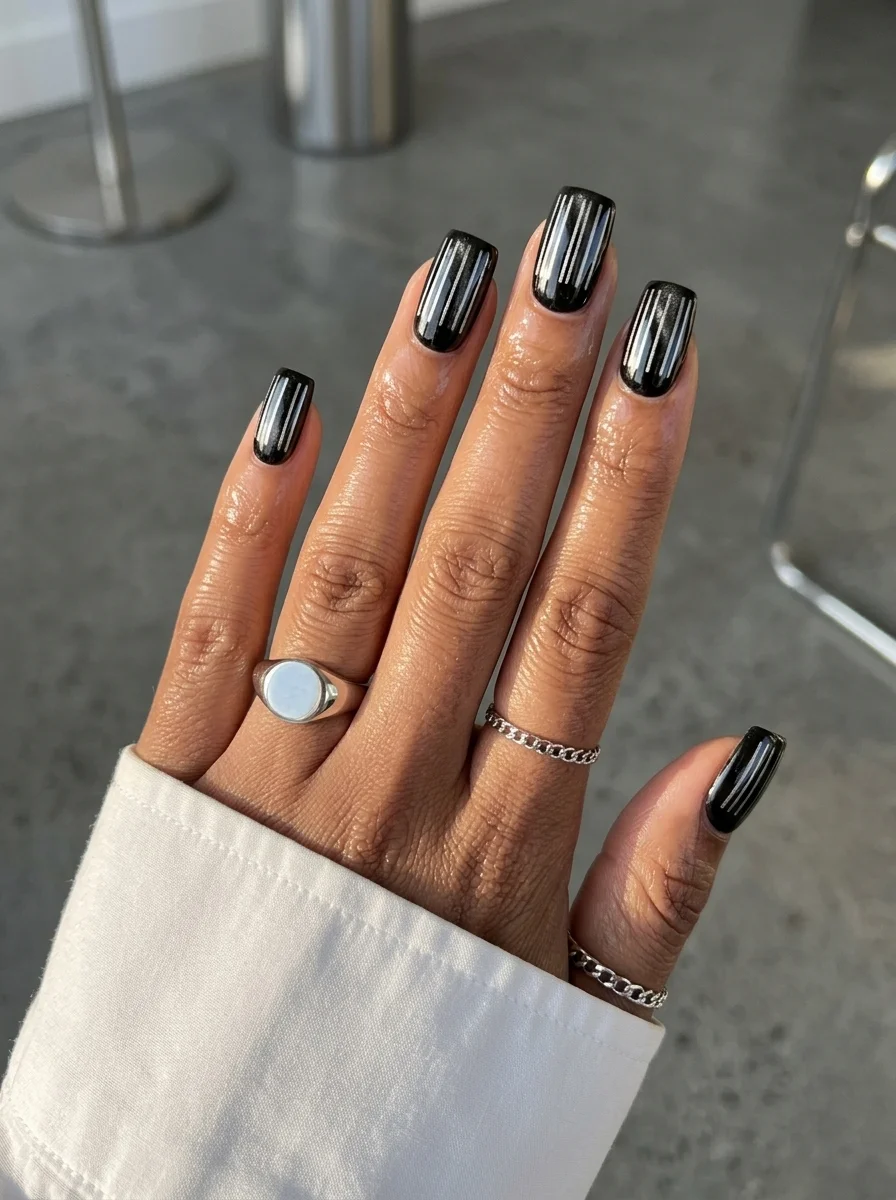
A bold, high-contrast design that pairs reflective black with metallic silver lines.
Overview:
Black chrome is the nail equivalent of a black mirror. The surface is so reflective that it picks up colors from the environment around it. In a room with warm lighting, it looks almost bronze. Under cool fluorescents, it reads as pure, liquid black.
The silver stripes add a linear element that breaks up the uniform reflectivity. Without them, black chrome nails are striking but one-note. The stripes create visual rhythm and give the eye something to follow across the hand.
This is a design that photographs well from a distance but reveals its complexity up close. The stripes are thin enough that they read as texture in casual viewing, but the precision of the lines rewards closer inspection. It's the kind of manicure that makes people ask "where did you get your nails done?"
Design Breakdown:
Maximum reflectivity with linear detail. The contrast between black and silver is the design.
Base Color: A true black with chrome or high-shine magnetic finish. Not charcoal, not dark grey. Black.
Nail Shape: Medium coffin. The flat surface complements the geometric stripes.
Design Element: Thin silver metallic vertical stripes across each nail.
Finish: Ultra-glossy. The chrome finish needs maximum shine to work.
Get The Look at Home:
The stripes need to be straight and parallel. Use striping tape for the cleanest lines.
- Black chrome base: Two to three coats of black chrome or cat-eye polish. Cure or dry fully.
- Stripe placement: Apply thin silver striping tape vertically across each nail, spacing them 3-4mm apart. Press firmly.
- Trim: Cut the tape about 0.5mm inside the nail border on all sides. Tape that reaches the edge peels within a day.
- Flatten: Press the tape flat with a silicone tool. Raised edges catch on things.
- Seal: Two coats of thick top coat to encapsulate the tape and create a smooth surface.
30 Stunning Beach Nail Ideas for the Best Vacation in 2026 🌊
16.Deep Purple and Black Swirl Cat-Eye
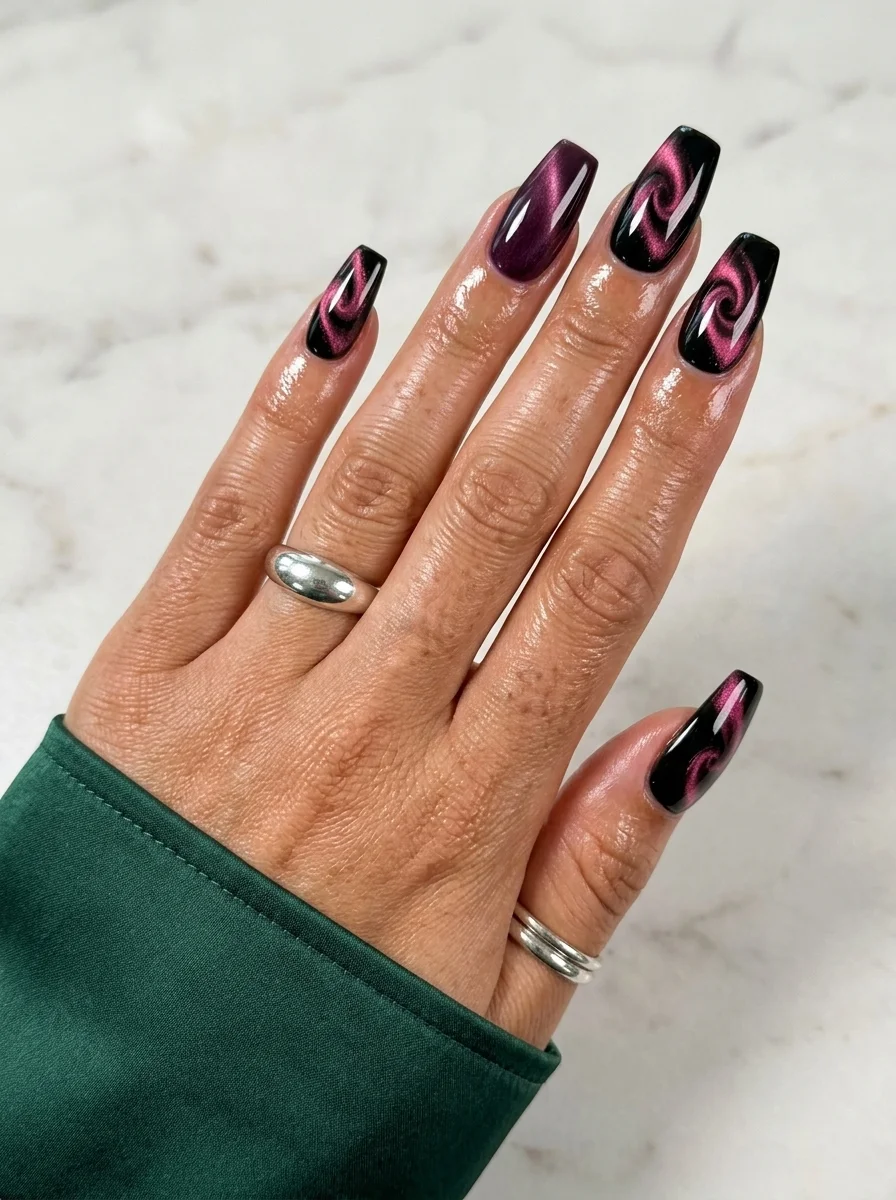
A dark, dramatic swirl of purple and black with rose-like magnetic patterns.
Overview:
This variation of the purple-black swirl uses a deeper, more wine- toned purple that leans toward burgundy rather than magenta. The result is a moodier, more sophisticated version of the swirl effect that reads as evening wear rather than playful. The magnetic particles create patterns that resemble dark roses blooming against a black sky.
The swirl technique on longer coffin nails produces larger, more dramatic patterns than on shorter nails. The extended surface area lets the magnetic particles spread into wider arcs, creating swirls that look like captured smoke or ink dropped into water. Some nails show more solid purple, while others display intricate swirl patterns — that variation across the hand is intentional.
The deep purple-burgundy against black is a high-contrast pairing that photographs beautifully. The dark base makes the purple appear to glow from within, especially under warm lighting. This is a design that looks expensive, and the coffin shape amplifies that impression.
Design Breakdown:
Burgundy-purple magnetic swirl over black. The darker purple tone creates a more sophisticated mood.
Base Color: Black with deep burgundy-purple magnetic particles. The purple leans toward wine rather than magenta.
Nail Shape: Long coffin. The extended length allows for larger, more dramatic swirl patterns.
Design Element: Swirl patterns created by circular magnet manipulation. Some nails show solid color, others show swirls.
Finish: Ultra-glossy top coat to intensify the depth and seal the magnetic particles.
Get The Look at Home:
The swirl technique requires confidence — hesitant movements produce muddled patterns. Move the magnet decisively.
- Base coat: Apply a smoothing base coat. Dark polish shows every ridge.
- First coat: Thin layer of purple-black cat-eye polish. Activate the magnet in a straight diagonal line.
- Second coat: Apply the second coat. While wet, hold the magnet 5mm above and move it in slow S-curves for 15 seconds. The particles will gather into rose-like swirl patterns.
- Vary the intensity: On some nails, swirl more aggressively for dramatic patterns. On others, use a lighter touch for subtler effects.
- Third coat: Repeat the process. The depth builds with each layer.
- Top coat: Two coats of glossy top coat for maximum depth and durability.
17.Navy Cat-Eye with Rose Gold French Tips
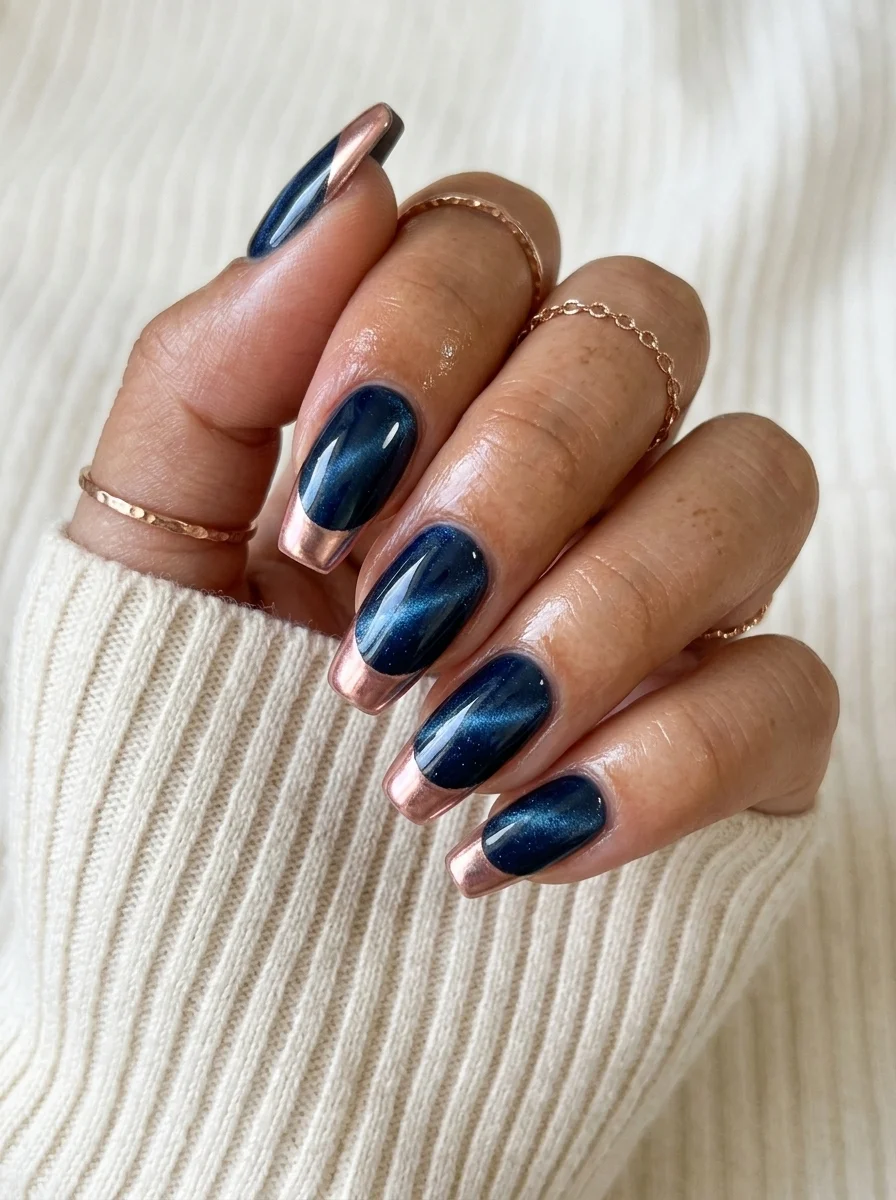
A sophisticated pairing of deep blue magnetic shimmer with warm rose gold tips.
Overview:
Navy and rose gold is a color combination that borrows from the jewelry world. The cool depth of the navy creates a background that makes the warm rose gold appear more luminous. The two colors share enough visual weight that neither overwhelms the other.
The French tip technique on cat-eye polish requires extra care because the magnetic surface is textured. The tip polish needs to be applied in thin, even coats to avoid creating a visible ridge where the two colors meet. A self-leveling formula helps smooth the transition.
This is a design that works across seasons and occasions. The navy keeps it grounded enough for professional settings, while the rose gold adds enough warmth for evening events. It's one of the more versatile French tip combinations in the cat-eye category.
Design Breakdown:
Cool magnetic base with warm metallic tips. The temperature contrast is the design.
Base Color: A deep, saturated navy blue with fine blue or silver magnetic particles.
Nail Shape: Medium almond. Classic proportions for French tips.
Design Element: Rose gold metallic French tips on all nails. Thin, precise smile lines.
Finish: High-gloss top coat to unify the two colors and protect the tips.
Get The Look at Home:
The French tip is the precision part. A liner brush gives you more control than the bottle brush.
- Navy base: Three thin coats of navy cat-eye polish, activating the magnet each time.
- Dry completely: Wait at least ten minutes. The magnetic surface needs to be fully set.
- Rose gold tips: Using a French liner brush and rose gold metallic polish, paint the smile line from sidewall to center. Two thin coats for opacity.
- Cleanup: An angled brush dipped in acetone sharpens the smile line. The border needs to be crisp.
- Seal: Two coats of glossy top coat to smooth the transition between navy and rose gold.
32 Stunning Summer Wedding Hairstyles for Brides ☀️💍
18.Blue Cat-Eye with Star and Moon Art
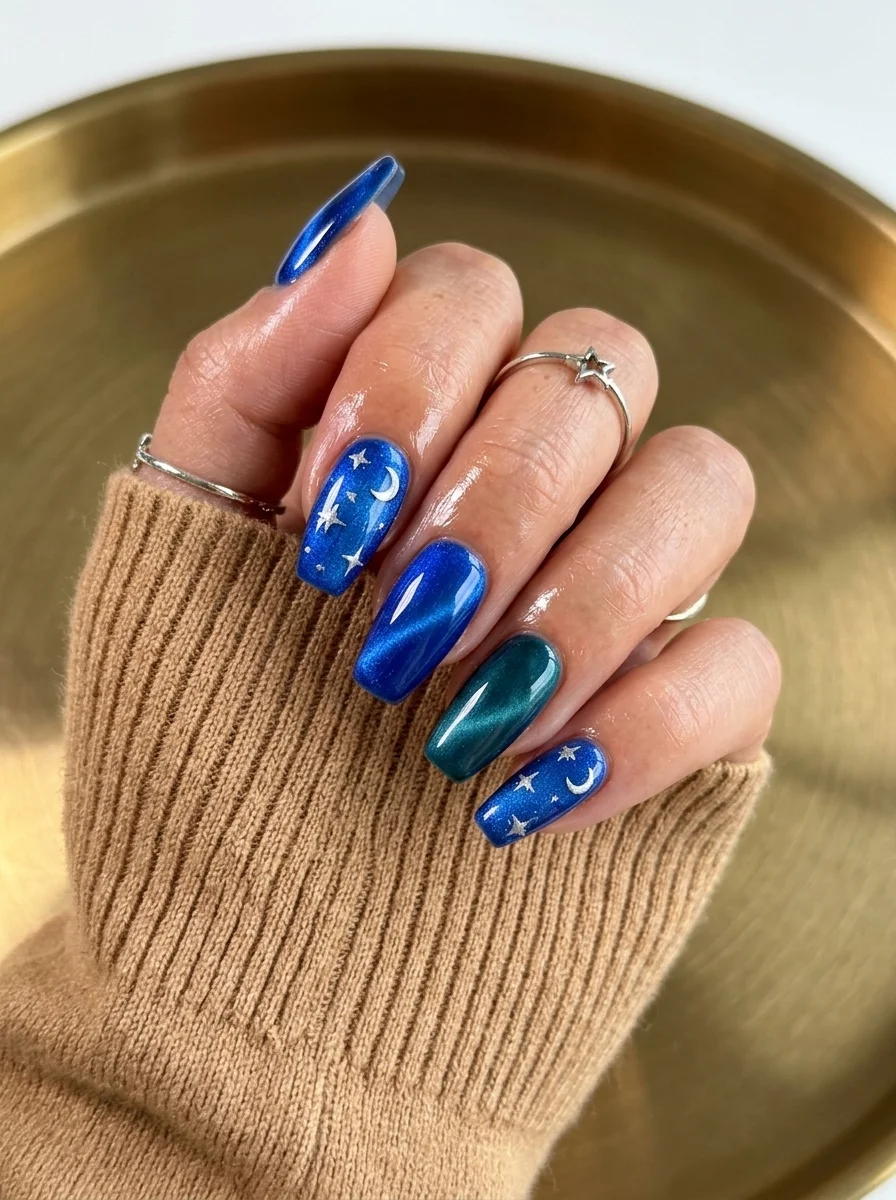
A celestial design that pairs vibrant blue magnetic shimmer with cosmic motifs.
Overview:
Vibrant blue cat-eye is one of the more visually striking shades in the category. The magnetic particles create a streak that looks like light passing through a sapphire. It's intense without being dark, which is a combination that few nail colors achieve.
The star and moon art adds a celestial narrative to the design. The silver motifs are painted over the blue base, which creates a "night sky" effect. The green accent nail breaks the blue monotony and adds an unexpected color temperature shift.
The coffin shape gives the design room to breathe. The flat surface provides a stable canvas for the detailed star and moon art, and the longer length means the blue cat-eye effect has more space to develop.
Design Breakdown:
Vibrant blue magnetic base with celestial accent art. The silver pops against the saturated blue.
Base Color: A vibrant, saturated blue with fine blue magnetic particles. Not navy, not pastel. True blue.
Nail Shape: Medium coffin. The flat surface provides a stable canvas for the art.
Design Element: Silver hand-painted stars and crescent moons on accent nails. One green accent nail for color variation.
Finish: High-gloss top coat to intensify the blue depth and protect the silver art.
Get The Look at Home:
The celestial art requires a very fine brush. Keep the stars and moons small for the best effect.
- Blue base: Three coats of vibrant blue cat-eye polish on most nails. One coat of green cat-eye on the accent nail.
- Star shapes: Using a thin liner brush and silver metallic polish, paint small four-pointed stars on the accent nails.
- Moon shapes: Add small crescent moons between the stars. Vary the sizes.
- Scale: Keep the celestial motifs small. They should be 2-3mm across at most.
- Dry time: Wait at least five minutes before top coating.
- Seal: One thick coat of glossy top coat, floated over the art.
19.Mauve Cat-Eye with Hearts
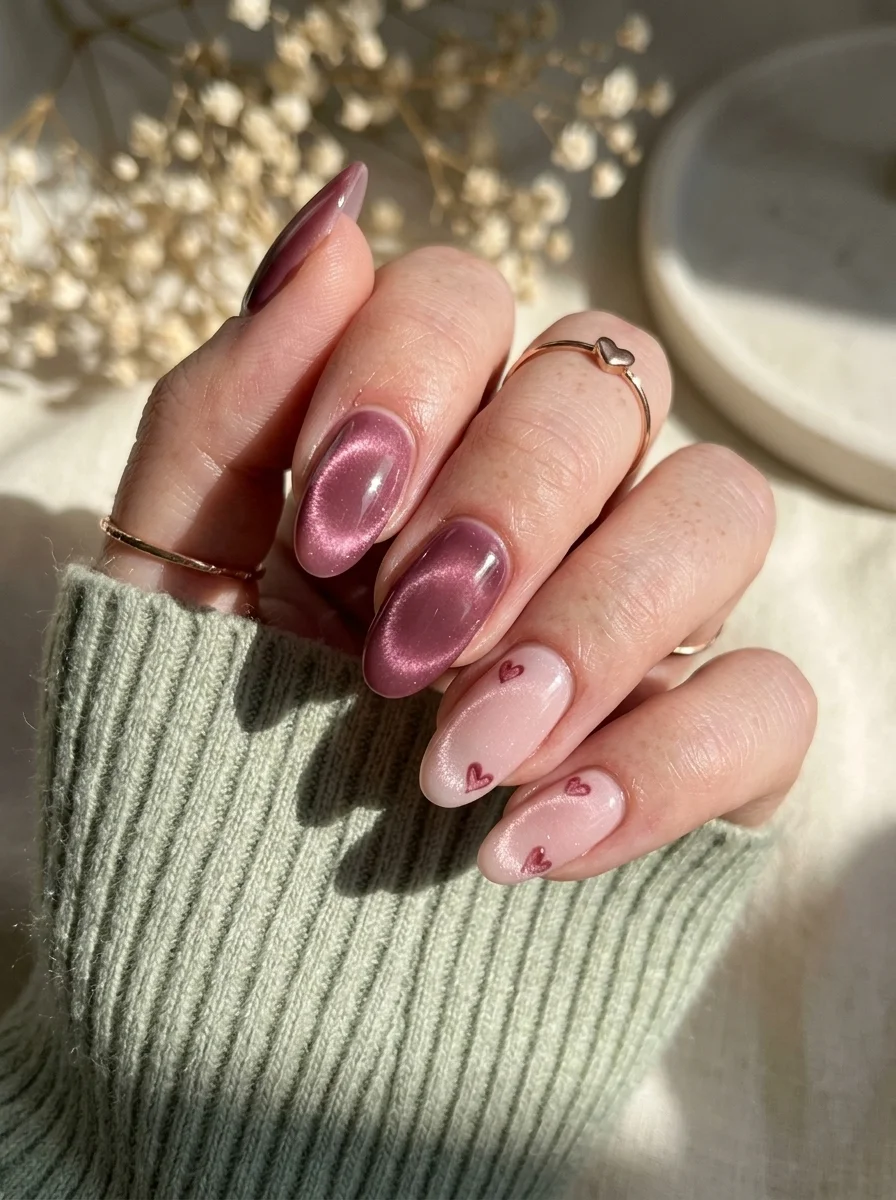
A romantic, soft design that combines magnetic shimmer with delicate heart details.
Overview:
Mauve cat-eye sits in the sweet spot between pink and purple. It's warm enough to read as feminine but muted enough to avoid looking juvenile. The magnetic particles create a soft, diffused shimmer that gives the color a lit-from-within quality.
The small hearts on some nails create a beautiful design that keeps the set from feeling repetitive. The hearts are organic and loose.
This is a strong choice for anyone who wants nail art that's visible but not loud. The hearts are small enough that they read as texture from a distance. Up close, they add a personal, hand-painted quality that stamped designs can't replicate.
Design Breakdown:
Two accent styles on a magnetic base. The variety keeps the design interesting.
Base Color: A soft mauve with fine pink or silver magnetic particles.
Nail Shape: Medium almond. The curved shape suits the romantic theme.
Design Element: Small hand-painted hearts on ring and pinky fingers.
Finish: High-gloss top coat to unify the different design elements.
Get The Look at Home:
The hearts are the fun part. The French tips are the precision part. Do the hard part first.
- Mauve base: Three thin coats of mauve cat-eye polish, activating the magnet each time.
- Heart art: On the accent nails, use a small dotting tool and pink polish to place two dots side by side, then drag them downward to meet at a point. That's a heart.
- Scale: Keep the hearts small. Two or three per nail, placed randomly.
- Seal: One thick coat of glossy top coat over everything.
34 Cutest Butter Yellow Nail Designs for 2026 🧈
20.Champagne Cat-Eye with Silver Stripes
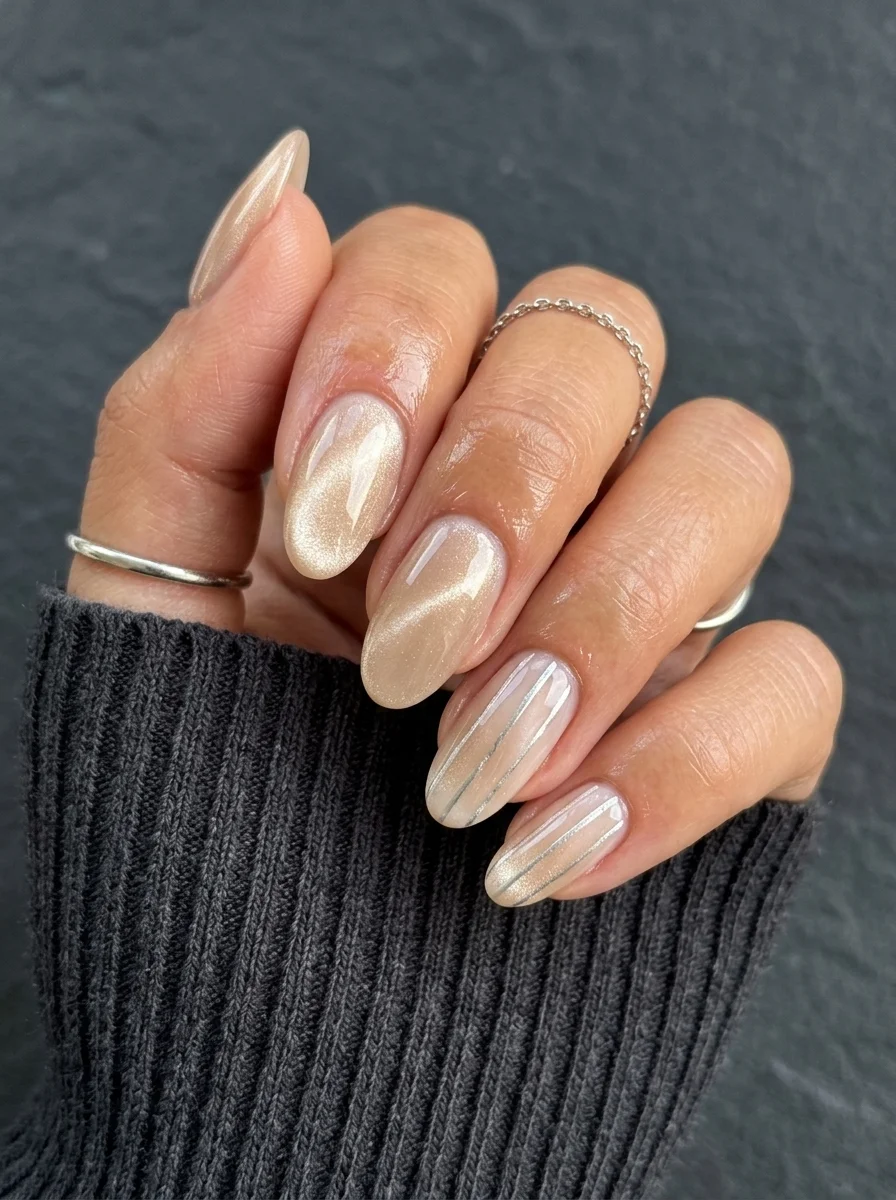
A neutral, elegant design that pairs warm champagne shimmer with cool silver lines.
Overview:
Champagne cat-eye is the neutral option for people who want the cat-eye effect without committing to a bold color. The magnetic particles create a soft, diffused shimmer that looks like liquid champagne. It's warm without being yellow, neutral without being boring.
The silver vertical stripes add a linear element that breaks up the uniform shimmer. The contrast between warm champagne and cool silver creates a visual tension that keeps the design interesting. The stripes are thin enough that they read as texture from a distance.
This is a design that works in any setting. The champagne is professional enough for the office, the silver adds enough interest for evening events, and the overall effect is polished without being loud. It's one of the more versatile options in the cat-eye category.
Design Breakdown:
Neutral magnetic base with cool metallic stripes. The warm-cool contrast is the design.
Base Color: A warm champagne with fine gold or silver magnetic particles. Not yellow, not pink. True champagne.
Nail Shape: Medium almond. Classic and versatile.
Design Element: Thin silver metallic vertical stripes across each nail.
Finish: High-gloss top coat to enhance the champagne shimmer.
Get The Look at Home:
Striping tape gives you the cleanest lines. Freehand works if your hand is steady.
- Champagne base: Three thin coats of champagne cat-eye polish, activating the magnet each time.
- Stripe placement: Apply thin silver striping tape vertically across each nail, spacing them 3-4mm apart.
- Trim: Cut the tape about 0.5mm inside the nail border.
- Flatten: Press the tape flat with a silicone tool.
- Seal: Two coats of thick top coat to encapsulate the tape and create a smooth surface.
21.Purple Iridescent Cat-Eye
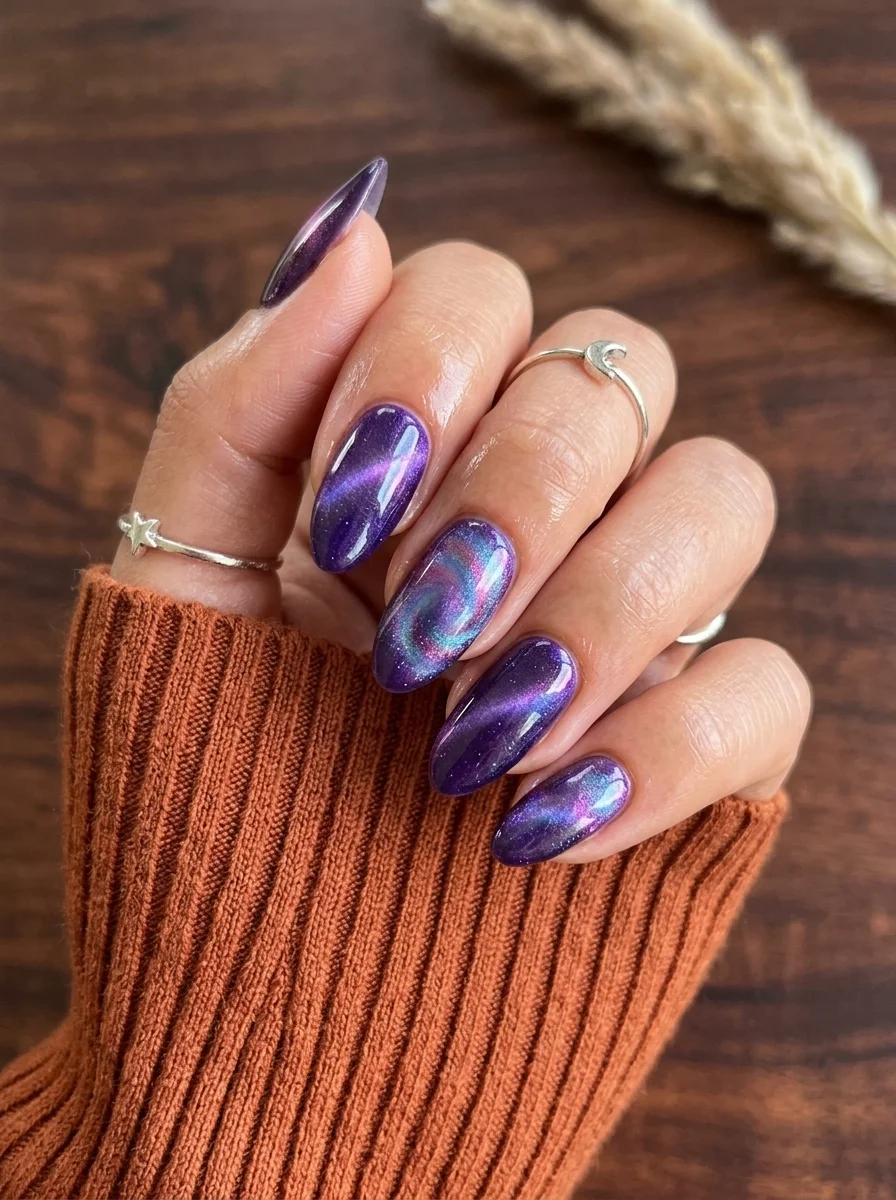
A multichromatic purple that shifts through three colors depending on the angle.
Overview:
Iridescent purple cat-eye is one of the more complex magnetic formulas. The particles shift between purple, pink, and blue depending on the viewing angle, which means the color is never static. It's the nail equivalent of an opal.
The swirl effect visible on some nails is created by manipulating the magnet at different angles during application. Instead of holding the magnet in one position, you move it in a circular motion while the polish is still wet. The result is an organic, galaxy-like pattern that's unique on every nail.
This is a design that photographs differently than it looks in person. Camera sensors struggle with the color-shifting particles, often capturing only one of the three colors. In real life, the constant movement between purple, pink, and blue is what makes the design compelling.
Design Breakdown:
Multichromatic magnetic with swirl manipulation. The color-shifting is the design.
Base Color: An iridescent purple that shifts between purple, pink, and blue. The specific shade varies by brand.
Nail Shape: Medium almond. The curved surface enhances the color-shifting effect.
Design Element: Swirl patterns created by manipulating the magnet during application. No additional art needed.
Finish: High-gloss top coat to maximize the iridescent shift.
Get The Look at Home:
The swirl technique requires moving the magnet while the polish is wet. Practice on one nail first.
- Base coat: Apply a ridge-filling base coat and let it dry.
- First coat: Apply a thin layer of iridescent purple cat-eye polish. Activate the magnet in a straight line.
- Second coat: Apply the second coat. While it's still wet, hold the magnet 5mm above the nail and move it in slow circles for 10-15 seconds.
- Swirl variation: On some nails, drag the magnet in S-curves instead of circles for a different pattern.
- Third coat if needed: Some formulas need a third coat for full opacity.
- Top coat: One generous coat of glossy top coat.
35 Cute & Sporty Athletic Hairstyles for Women (2026)
22.Emerald Green Glitter Cat-Eye French Tips
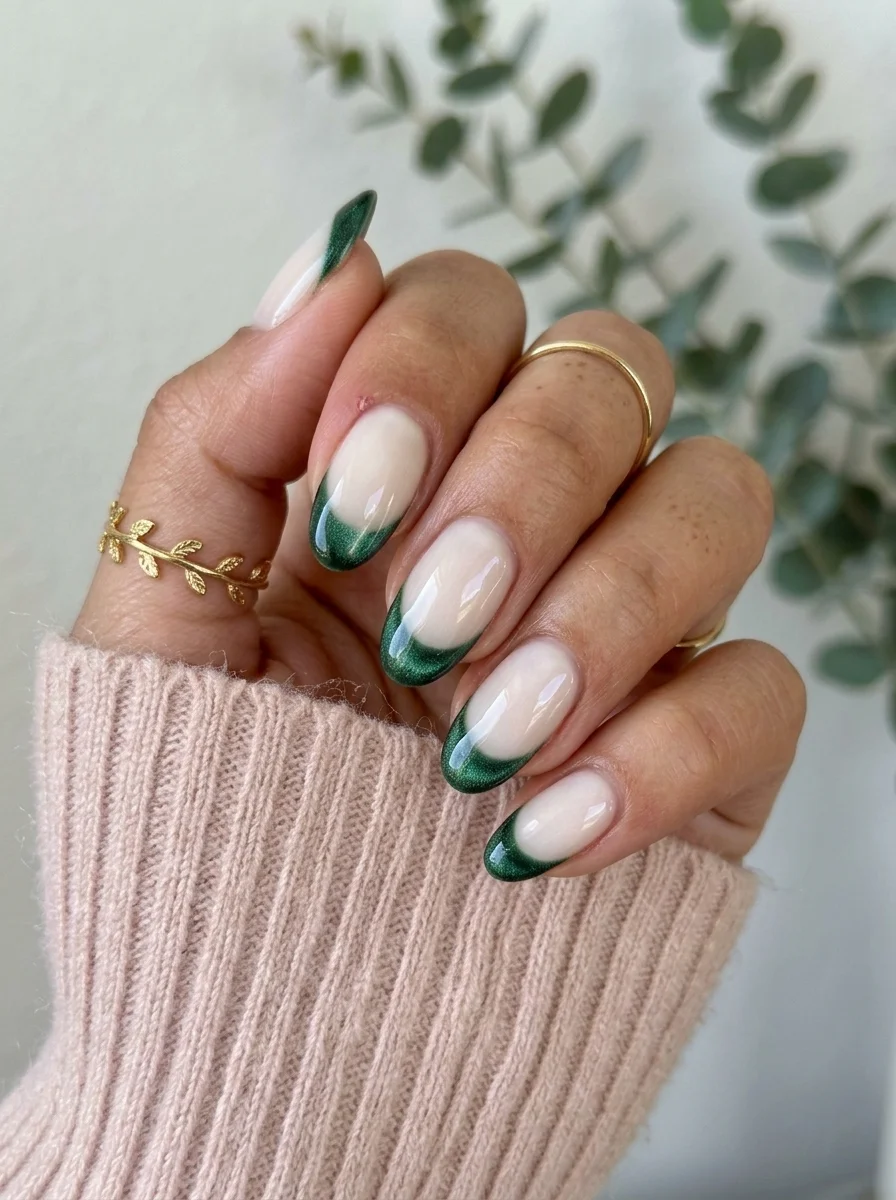
A fresh take on French tips with sparkling emerald green magnetic shimmer.
Overview:
Colored French tips are a simple upgrade that changes the entire personality of a manicure. Replace the white with emerald green glitter and suddenly the French goes from "professional" to "I have taste." The green tips here have a cat-eye shimmer that makes them look like crushed emeralds applied to the nail tips.
The sheer nude base does critical work. It matches the natural nail bed tone, which means the green tips read as an accent rather than a full-color manicure. That restraint color on the tips only keeps the design versatile. The cat-eye particles in the green create a shifting depth that flat glitter polish can't match.
The almond shape is the classic canvas for French tips. The curved tip creates a natural smile line that the green follows. The medium length keeps the proportions balanced long enough to showcase the magnetic shimmer in the tips, short enough to remain practical.
Design Breakdown:
Classic French structure with magnetic glitter tips. The emerald green adds a jewel-toned twist.
Base Color: Sheer nude-pink that matches the natural nail bed. Two coats for even coverage.
Nail Shape: Medium almond. The curved tip complements the French smile line.
Design Element: Deep emerald green glitter cat-eye French tips on all nails. Even, consistent smile lines.
Finish: High-gloss top coat to unify the nude base and sparkling tips.
Get The Look at Home:
The French tip is the precision part. Use a liner brush rather than the bottle brush for clean smile lines.
- Nude base: Two coats of sheer nude-pink. Let each coat dry fully.
- Green tips: Using a French liner brush and emerald green cat-eye polish, paint the smile line from sidewall to center on each nail.
- Magnet: Hold the magnet above each wet tip for 10-15 seconds to activate the cat-eye effect in the green.
- Second coat: Apply a second thin coat of green to the tips for full opacity. Activate the magnet again.
- Cleanup: An angled brush dipped in acetone sharpens the smile line. The border between nude and green needs to be crisp.
- Seal: Two coats of glossy top coat to smooth the transition and amplify the glitter shimmer.
23.Olive Green Cat-Eye with Gold Geometric Lines
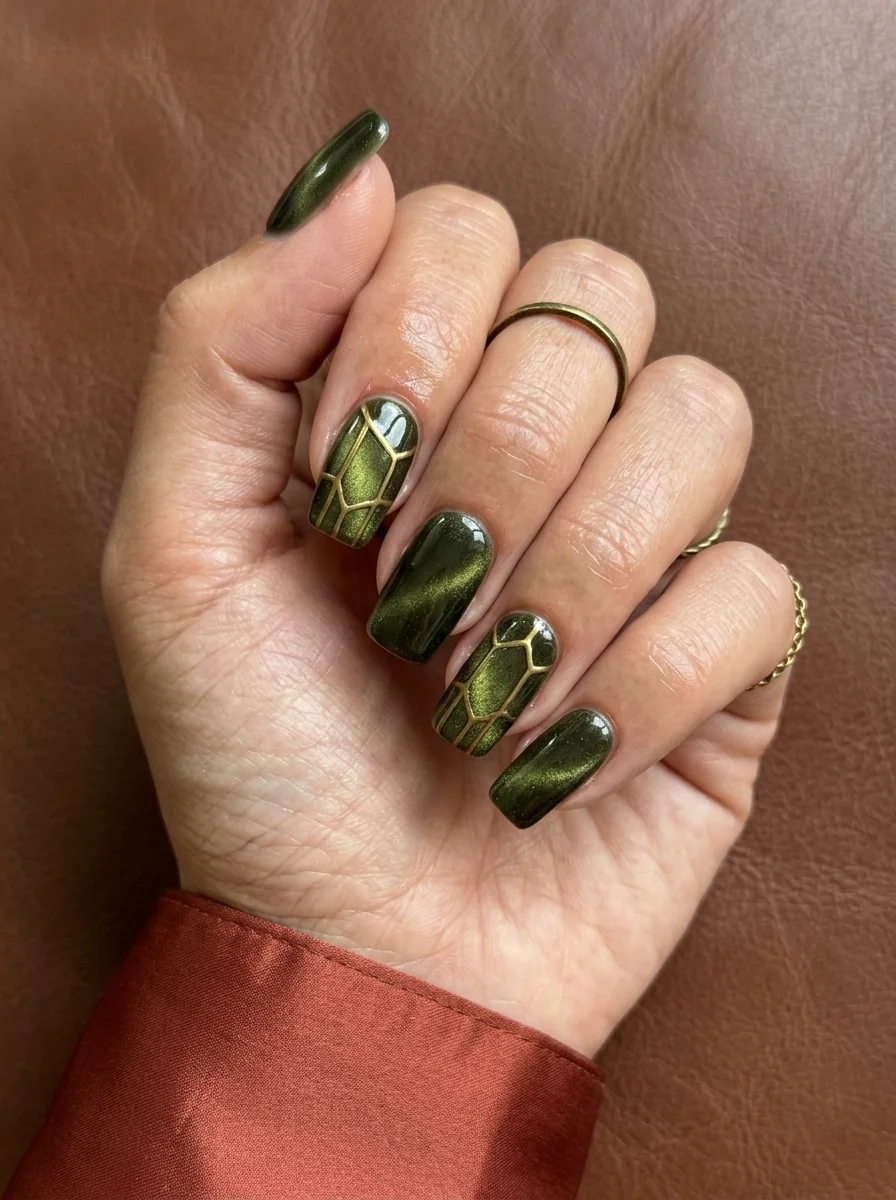
An earthy, sophisticated design that pairs military green with architectural gold detailing.
Overview:
Olive green cat-eye is an unexpected shade that works surprisingly well. The magnetic particles in this color tend to lean gold, which creates a warm shimmer against the cool green base. The result is a color that reads as earthy and sophisticated rather than utilitarian.
The gold geometric lines on the accent nails create an interesting tension with the organic cat-eye shimmer. The lines are precise and angular; the magnetic effect is fluid and shifting. That contrast between structure and movement is what makes the design visually engaging.
Olive is one of those colors that flatters a wider range of skin tones than people expect. The grey undertone prevents it from looking too yellow on warm skin, and the green prevents it from looking too washed out on cool skin. It's more versatile than its military associations suggest.
Design Breakdown:
Earthy magnetic base with architectural gold accents. The contrast between organic and geometric is the design.
Base Color: A deep olive green with gold magnetic particles. Not too grey, not too yellow.
Nail Shape: Medium coffin. The flat surface complements the geometric line work.
Design Element: Gold metallic geometric lines on two accent nails. Angular, intersecting strokes.
Finish: High-gloss top coat to seal the line work and enhance the magnetic shimmer.
Get The Look at Home:
The geometric lines don't need to be perfectly precise. Slight irregularity adds character.
- Olive base: Three thin coats of olive green cat-eye polish, activating the magnet each time.
- Line art: Using a thin liner brush and gold metallic polish, paint intersecting geometric lines on the accent nails.
- Variety: Use different line patterns on each accent nail. One could have parallel lines; the other could have crossing lines.
- Dry time: Wait at least five minutes before top coating. Metallic lines smear easily.
- Seal: Two coats of thick top coat to smooth the raised texture of the line work.
27 Gorgeous Mint Green Nails That Are Popular Right Now (2026)
24.Green Cat-Eye with Leopard Print
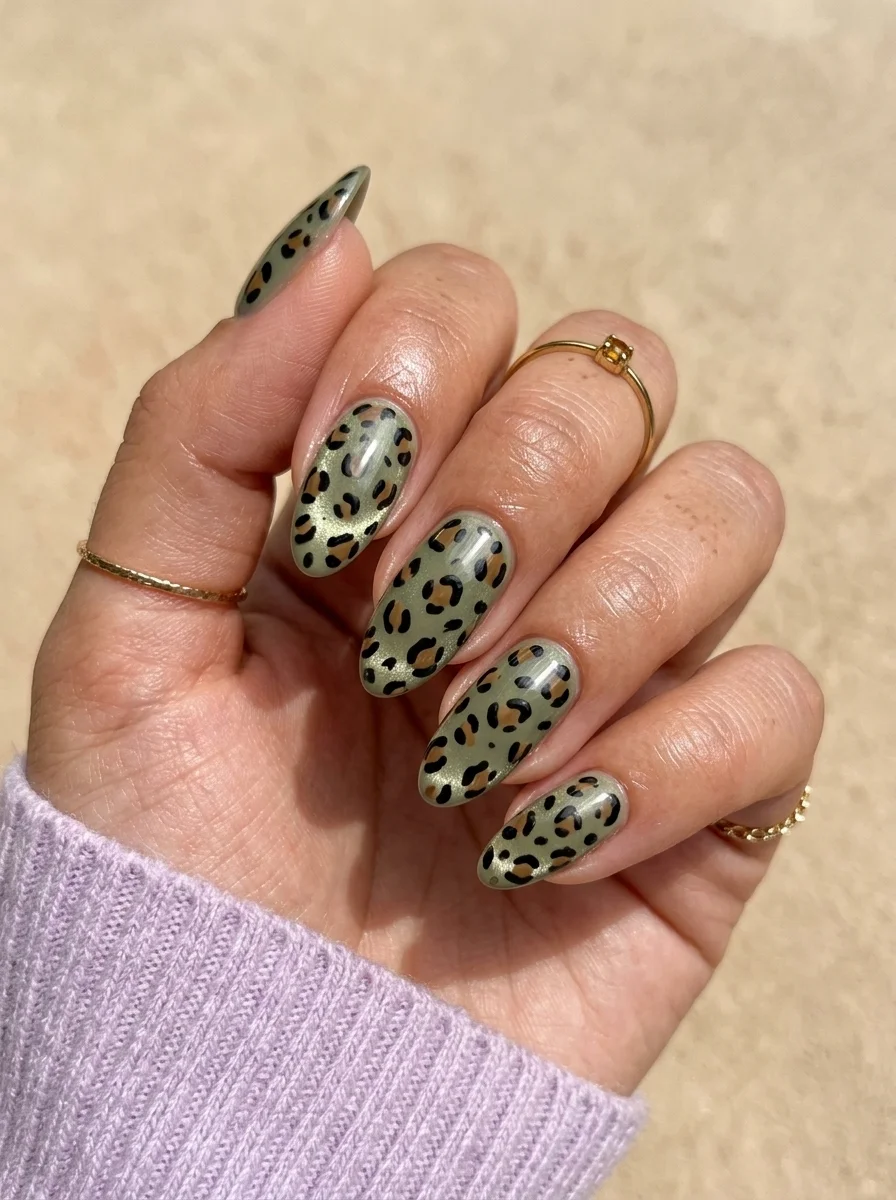
A wild, unexpected combination that pairs magnetic green with animal print.
Overview:
Leopard print on green is a combination that shouldn't work on paper but does in practice. The green cat-eye base provides a cool-toned background that makes the warm brown and black of the leopard spots pop with more contrast than they'd have on a neutral base.
The leopard spots are hand-painted, which gives them an organic quality that stamped or decal versions lack. Real leopard rosettes aren't uniform, and neither are these. The slight variation in size and shape across the nails is what makes the pattern look natural rather than printed.
This is a design for someone who wants their nails to start conversations. It's not subtle. The green is bold, the leopard is bold, and the combination is deliberately maximalist. If that sounds like your energy, this design delivers.
Design Breakdown:
Bold magnetic base with animal print accent. The contrast between cool green and warm leopard is the design.
Base Color: A saturated green with fine magnetic particles. Not mint, not forest. True green.
Nail Shape: Medium almond. The curved shape complements the organic spot patterns.
Design Element: Hand-painted leopard spots (brown centers with black outlines) on accent nails.
Finish: High-gloss top coat to protect the detailed spot work.
Get The Look at Home:
Leopard spots are created in two steps: brown centers first, then black outlines. Work across all nails in stages.
- Green base: Three thin coats of green cat-eye polish, activating the magnet each time.
- Brown centers: Using a dotting tool and brown polish, place irregular blobs on the accent nails. Vary the sizes and spacing.
- Black outlines: Using a thin liner brush and black polish, paint partial outlines around the brown blobs. Don't close the circles completely. Real leopard rosettes are open on one side.
- Extra spots: Add a few standalone black dots between the rosettes for density.
- Dry time: Wait at least five minutes before top coating.
- Seal: Two coats of glossy top coat to smooth the raised texture of the spot work.
25.Silver and Gold Chrome Ombre
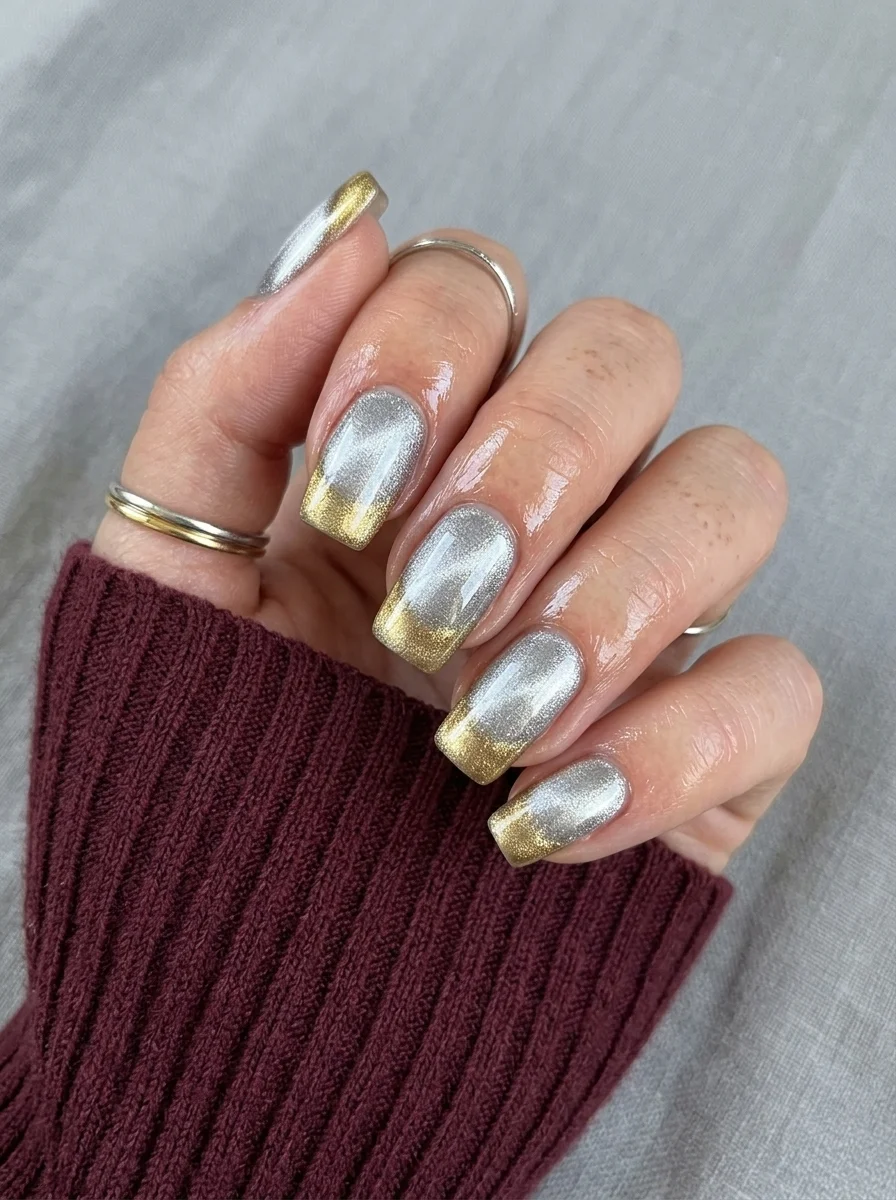
A luxe metallic gradient that transitions from cool silver to warm gold.
Overview:
Silver to gold ombre is a gradient that looks like it belongs on a piece of jewelry rather than on nails. The transition between the two metals creates a color that's neither silver nor gold but something in between, which shifts depending on where your eye lands.
The technique requires either a sponge application or a carefully blended chrome powder gradient. Sponge is more forgiving for beginners. Chrome powder gives a smoother transition but requires more skill. Either way, the key is blending the two metals where they meet so there's no hard line between silver and gold.
This is a design that looks expensive, and that's the point. The dual-metal gradient reads as luxury without any additional art or embellishment. Sometimes the color itself is the design.
Design Breakdown:
Dual-metal gradient. The transition zone between silver and gold is the design.
Base Color: Silver chrome at the cuticle fading to gold chrome at the tips.
Nail Shape: Medium coffin. The flat surface gives the gradient room to develop.
Design Element: None. The gradient is the design.
Finish: Ultra-glossy to maximize the chrome reflectivity.
Get The Look at Home:
Chrome powder gives a smoother gradient than polish. If you're using powder, work over a no-wipe gel top coat.
- Base coat: Apply a no-wipe gel top coat and cure. This is the surface the chrome powder adheres to.
- Silver chrome: Using a sponge applicator, rub silver chrome powder onto the lower half of each nail.
- Gold chrome: Rub gold chrome powder onto the upper half.
- Blend: Where the two powders meet, use a clean sponge to gently blend the transition. Less is more.
- Dust off: Use a fluffy brush to remove excess powder.
- Seal: Two coats of gel top coat to lock in the chrome and create a smooth surface.
24 Stunning Bridesmaid Hairstyles for Weddings 2026 💍✨
26.Silver and Red Cat-Eye French Tips
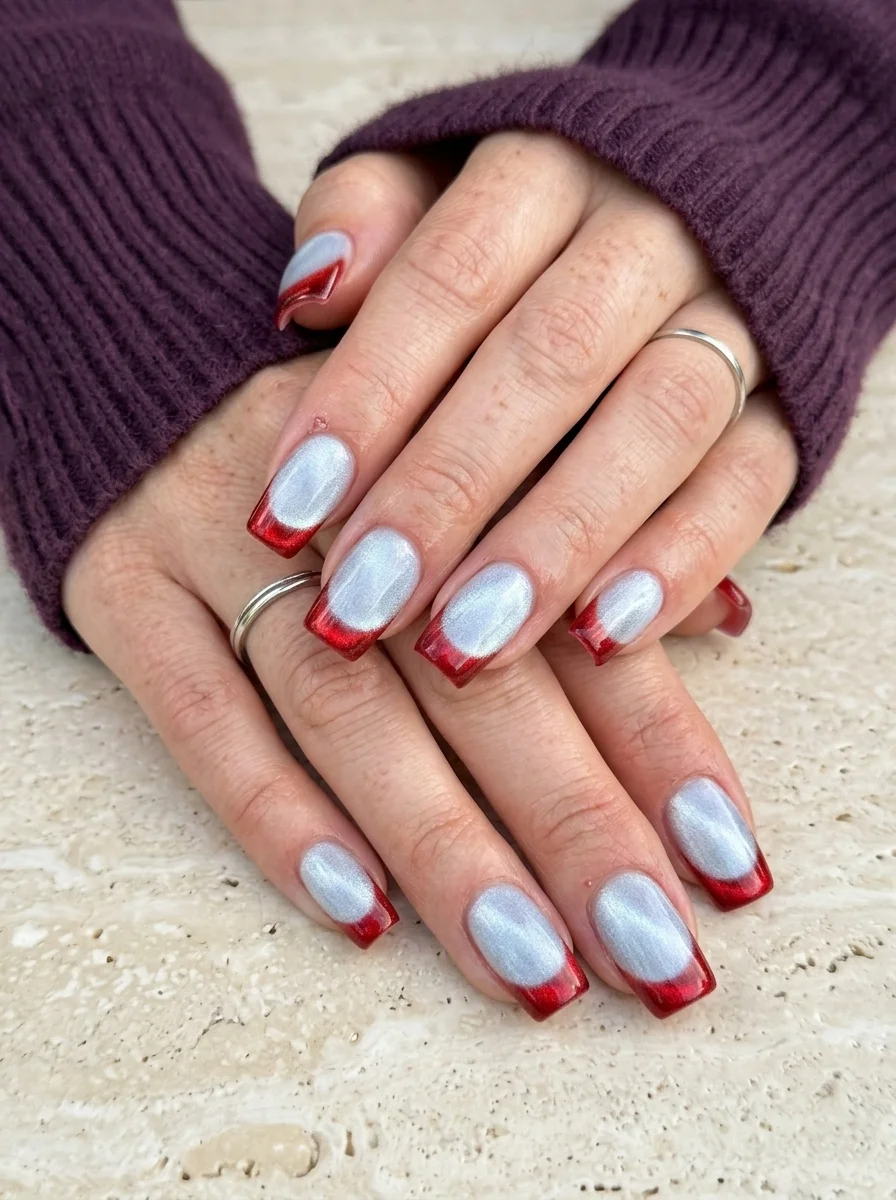
A bold, patriotic pairing of shimmering silver with classic red tips.
Overview:
Silver cat-eye as a base color creates a pearlescent, almost icy backdrop that makes any accent color pop. The magnetic particles in this silver lean toward blue, giving the base a cool, frost-like quality. Against that cool background, the warm red tips create a temperature contrast that's immediately eye-catching.
The red French tips are applied with precision over the cured silver base. The smile line between the two colors is crisp and clean, which is essential when pairing two such different finishes. A messy border would undermine the entire design. The red itself is a true, neutral red, not orange, not burgundy that reads as classic and confident.
Short squoval nails are the right canvas for this combination. The compact shape keeps the high-contrast pairing from feeling overwhelming. The flat tip of the squoval gives the French line a defined horizontal frame, making the color application more precise. On longer nails, the proportions shift and the silver base can overwhelm the red.
Design Breakdown:
Cool metallic base with warm classic tips. The temperature contrast is the design.
Base Color: A pearlescent silver with fine blue magnetic particles. Cool and frosty.
Nail Shape: Short squoval. The flat tip provides a clean frame for the French line.
Design Element: Vibrant red French tips on all nails. Thin, precise smile lines.
Finish: High-gloss top coat to unify the silver base and red tips.
Get The Look at Home:
The French tip is the precision part. Use a liner brush for the cleanest results.
- Silver base: Three thin coats of silver cat-eye polish, activating the magnet each time. Let each coat dry fully.
- Red tips: Using a French liner brush and opaque red polish, paint the smile line from sidewall to center on each nail. Two thin coats for full opacity.
- Cleanup: An angled brush dipped in acetone sharpens the smile line. The border between silver and red must be crisp.
- Consistency: Compare all nails side by side before top coating. The tip thickness should be uniform.
- Seal: Two coats of glossy top coat to smooth the transition between the two polishes.
27.Navy Cat-Eye with Gold Constellation Art
A celestial design that maps gold constellations across a deep navy magnetic sky.
Overview:
Navy cat-eye provides the perfect background for constellation art. The deep blue reads as a night sky, and the magnetic shimmer creates an atmospheric depth that flat navy can't achieve. The gold constellations look like they're floating in space.
The constellation designs are hand-painted with a thin liner brush. Each constellation is a series of small gold dots connected by thin gold lines. The key is keeping the dots small and the lines thin. The delicacy of the linework is what makes the design look like an actual star map rather than random dots.
This is a design that rewards close inspection. From a distance, the nails read as solid navy. Up close, the gold constellations reveal themselves. That dual readability is what separates good nail art from busy nail art.
Design Breakdown:
Deep magnetic base with celestial line art. The gold pops against the navy.
Base Color: A deep, saturated navy blue with fine blue or silver magnetic particles.
Nail Shape: Medium almond. Classic and versatile.
Design Element: Gold hand-painted constellation designs on every nail. Small dots connected by thin lines.
Finish: High-gloss top coat to protect the delicate line work.
Get The Look at Home:
Use reference images of actual constellations for the most authentic results.
- Navy base: Three thin coats of navy cat-eye polish, activating the magnet each time.
- Star dots: Using a small dotting tool and gold metallic polish, place small dots where you want each star. Vary the sizes.
- Connecting lines: Using a thin liner brush and the same gold polish, draw thin lines connecting the dots to form constellation patterns.
- Variety: Use different constellation patterns on different nails. Not every nail needs the same design.
- Dry time: Wait at least five minutes before top coating.
- Seal: One thick coat of glossy top coat, floated over the art.
30 Stunning July Nail Designs for Summer 2026 💅
28.Peach Cat-Eye with White Lace Art
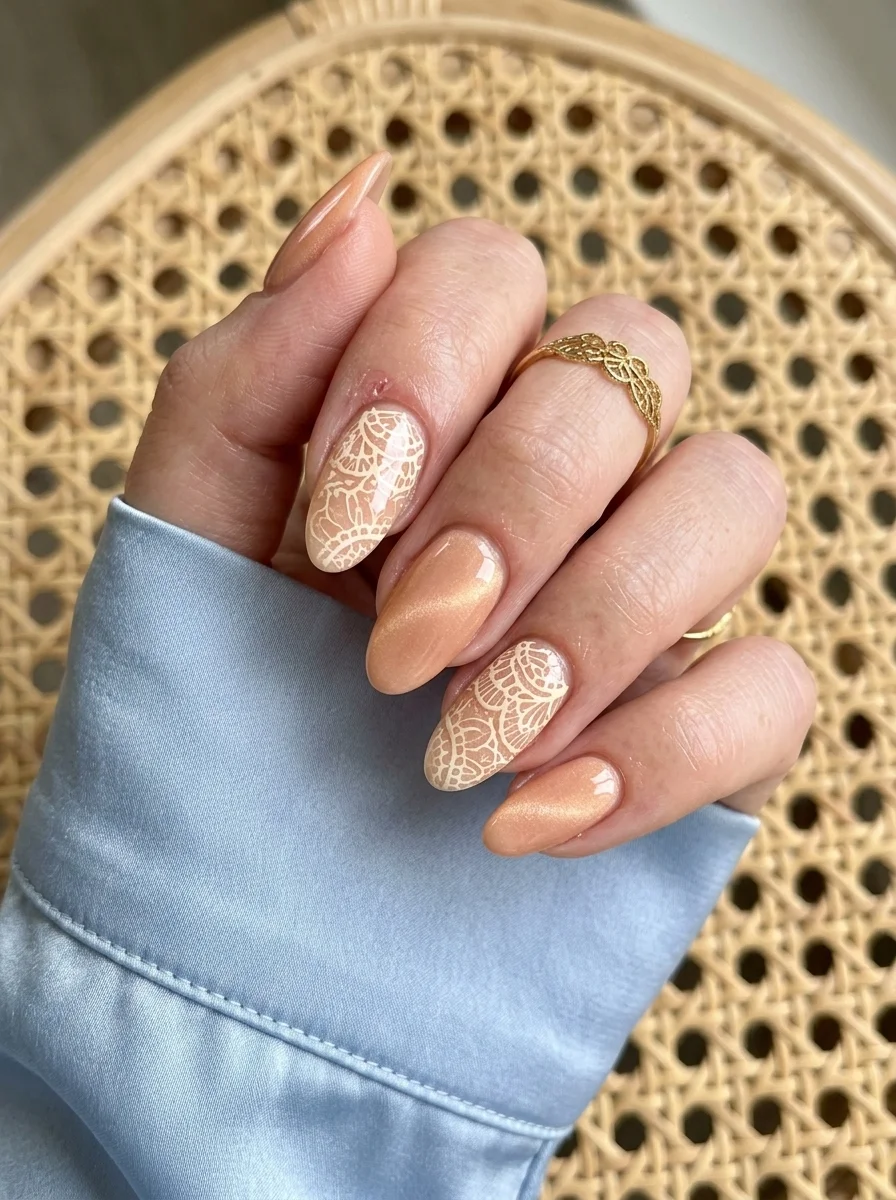
a romantic, vintage-inspired design that pairs warm peach shimmer with delicate lace details.
Overview:
Peach cat-eye is one of the warmer shades in the category. The magnetic particles lean gold, which gives the shimmer a sunrise quality that feels warm and inviting. It's a color that looks good in every season, though it's particularly strong in spring and summer.
The white lace art on the accent nails is what elevates this from "pretty peach nails" to a designed set. The lace patterns are intricate enough that they read as textile rather than illustration. The contrast between the warm peach and the cool white creates a visual tension that keeps the design interesting.
The lace technique requires either stamping plates or a very steady freehand. Stamping gives more consistent results. Freehand gives more character. Either way, the key is keeping the lines thin. Thick lines lose the delicacy that makes lace look like lace.
Design Breakdown:
Warm magnetic base with textile-inspired accent art. The lace adds a vintage quality.
Base Color: A warm peach or apricot with gold magnetic particles.
Nail Shape: Medium almond. The curved shape complements the organic lace patterns.
Design Element: White lace patterns on two accent nails. Intricate, textile-like designs.
Finish: High-gloss top coat to protect the delicate lace work.
Get The Look at Home:
Stamping plates make the lace pattern much easier than freehand. If you're doing it freehand, practice on paper first.
- Peach base: Three thin coats of peach cat-eye polish, activating the magnet each time.
- Lace art: Using a stamping plate with a lace pattern and white stamping polish, transfer the design onto the accent nails.
- Freehand alternative: Using a thin liner brush and white polish, paint intersecting curved lines to create a lace-like pattern. Add small dots at the intersections.
- Cleanup: Use a clean-up brush dipped in acetone to remove any stamping polish from the skin.
- Dry time: Wait at least five minutes before top coating.
- Seal: One thick coat of glossy top coat, floated over the lace art.
29.Hot Pink Cat-Eye with Heart Cutouts
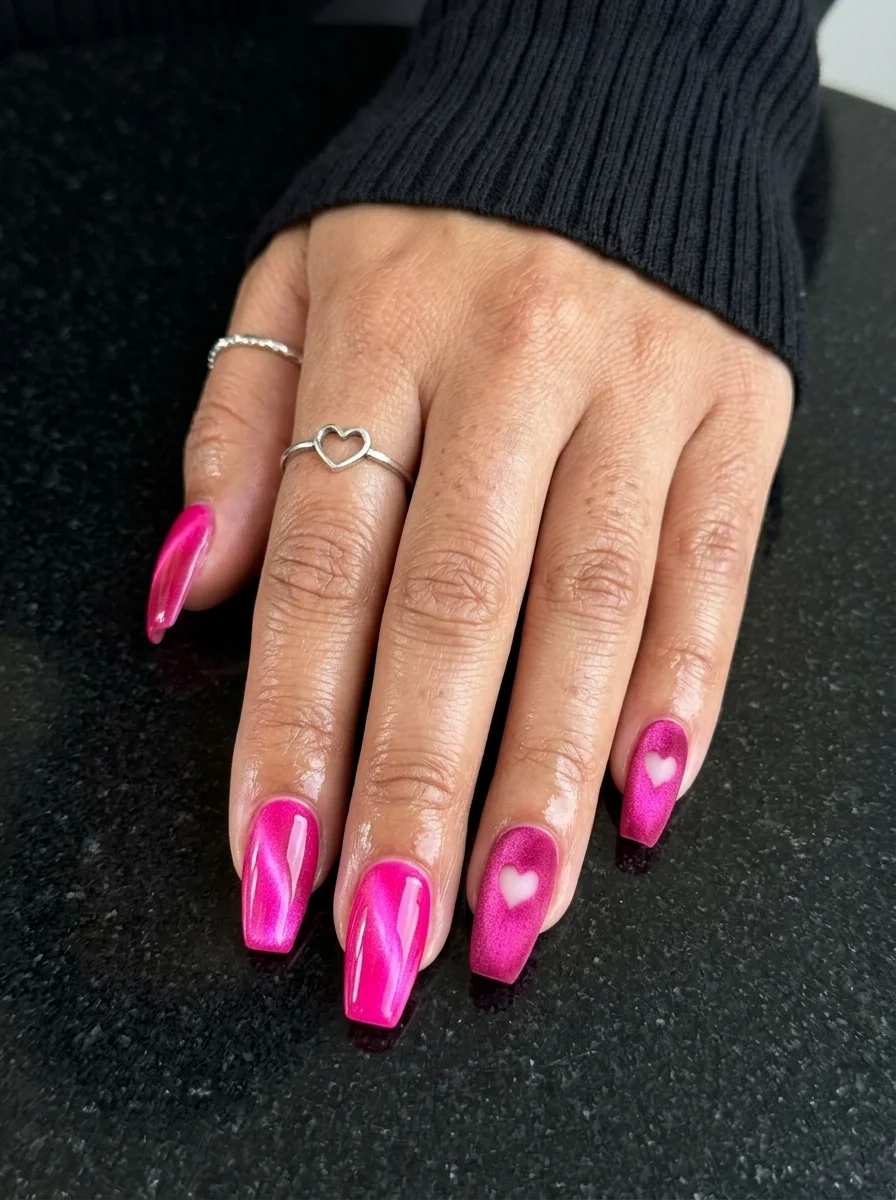
A bold, playful design that combines saturated pink magnetic shimmer with negative-space hearts.
Overview:
Hot pink cat-eye on coffin nails is a statement that doesn't apologize. The magnetic particles create a shifting depth that makes the color look three-dimensional, like you've dipped your nails in liquid fuchsia.
The white heart "cutouts" on the accent nails are actually painted over the pink base, not true negative space. But the technique creates the illusion of hearts carved into the color. The white hearts are small enough to feel delicate against the bold pink.
Coffin is the right shape for this design. The flat tip gives the hot pink maximum visibility, and the longer length means the magnetic effect has more room to develop. This is a design that wants to be seen.
Design Breakdown:
High-saturation magnetic with contrasting heart art. The white hearts pop against the hot pink.
Base Color: A vibrant, saturated hot pink with fine pink or silver magnetic particles.
Nail Shape: Medium coffin. Maximum surface area for the bold color.
Design Element: Small white heart shapes on two accent nails, creating a cutout illusion.
Finish: High-gloss top coat to intensify the pink saturation.
Get The Look at Home:
The hearts can be painted freehand or created with a dotting tool. Keep them small and consistent.
- Pink base: Three thin coats of hot pink cat-eye polish, activating the magnet each time.
- Heart shapes: Using a small dotting tool and white polish, place two dots side by side, then drag them downward to meet at a point.
- Placement: One heart per accent nail, centered on the nail surface.
- Dry time: Wait at least five minutes before top coating.
- Seal: One thick coat of glossy top coat over everything.

26 Quick Hairstyles for a Waitress Job (2026)
30.Grey Cat-Eye with White Plaid Pattern
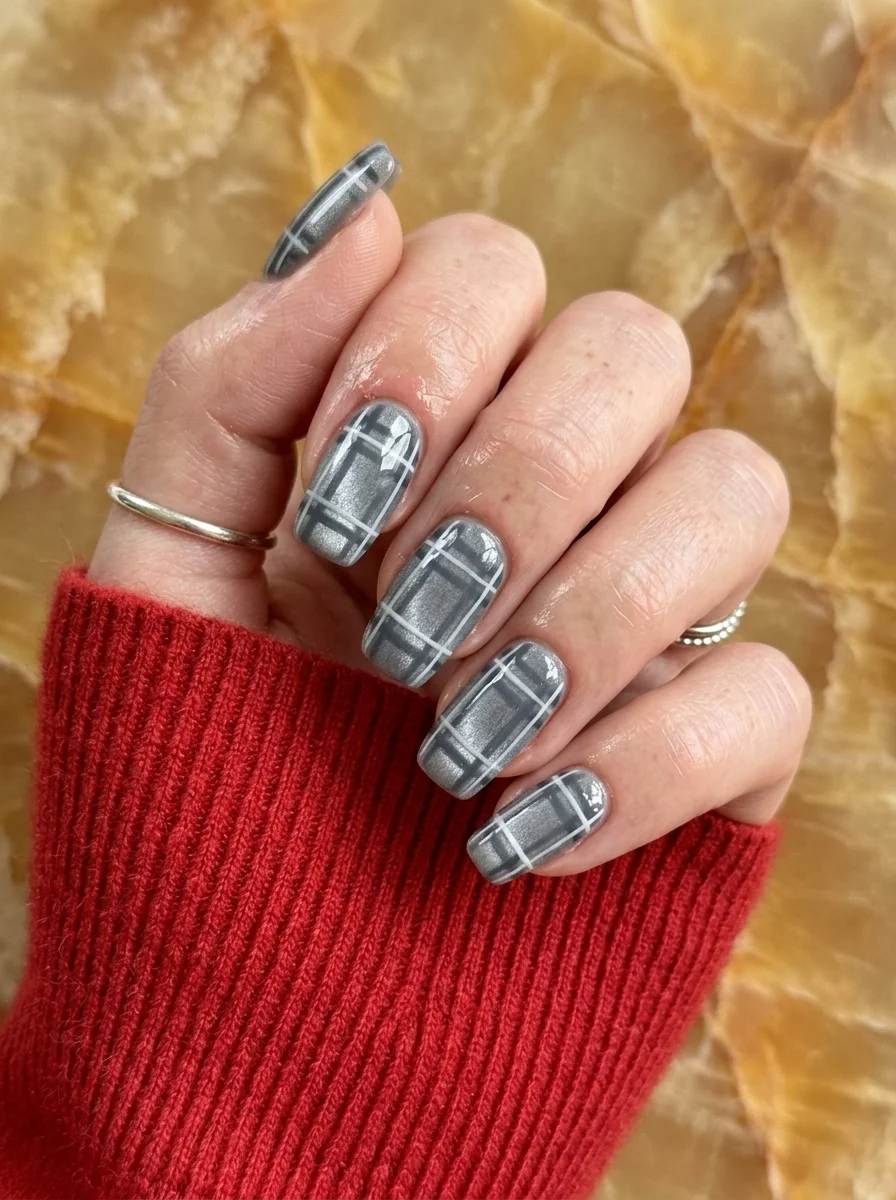
A structured, textile-inspired design that pairs cool grey magnetic shimmer with classic plaid.
Overview:
Grey cat-eye is the most neutral option in the category. The magnetic particles create a subtle shimmer that prevents the grey from reading as flat or lifeless. It's the difference between wearing a grey sweater and wearing a grey sweater with a subtle metallic thread.
The white plaid pattern over the grey base creates a textile quality that makes the nails look like they've been wrapped in fabric. The intersecting white lines create a grid that's structured but not rigid. The slight hand-painted quality of the lines is what keeps the design from looking printed.
Plaid is one of those patterns that scales well on nails. On longer nails, you can fit more grid intersections and create a denser pattern. On shorter nails, a simplified plaid with fewer lines still reads as plaid. The design adapts to the canvas.
Design Breakdown:
Neutral magnetic base with structured textile pattern. The plaid adds visual interest without color.
Base Color: A medium grey with fine silver magnetic particles.
Nail Shape: Medium coffin. The flat surface provides a stable canvas for the plaid lines.
Design Element: White plaid/tartan pattern created with thin intersecting horizontal and vertical lines.
Finish: High-gloss top coat to protect the line work and enhance the magnetic shimmer.
Get The Look at Home:
The plaid lines need to be straight and evenly spaced. Striping tape or a very steady hand.
- Grey base: Three thin coats of grey cat-eye polish, activating the magnet each time.
- Horizontal lines: Using a thin liner brush and white polish, paint thin horizontal lines spaced 3-4mm apart. Let them dry.
- Vertical lines: Paint thin vertical lines at the same spacing, creating a grid. Where lines cross, the doubled-up white creates darker "overlap" squares.
- Consistency: Compare all nails. The line spacing should be roughly uniform.
- Dry time: Wait at least five minutes before top coating.
- Seal: Two coats of glossy top coat to smooth the raised texture of the plaid lines.
31.Brown Cat-Eye with White Polka Dots
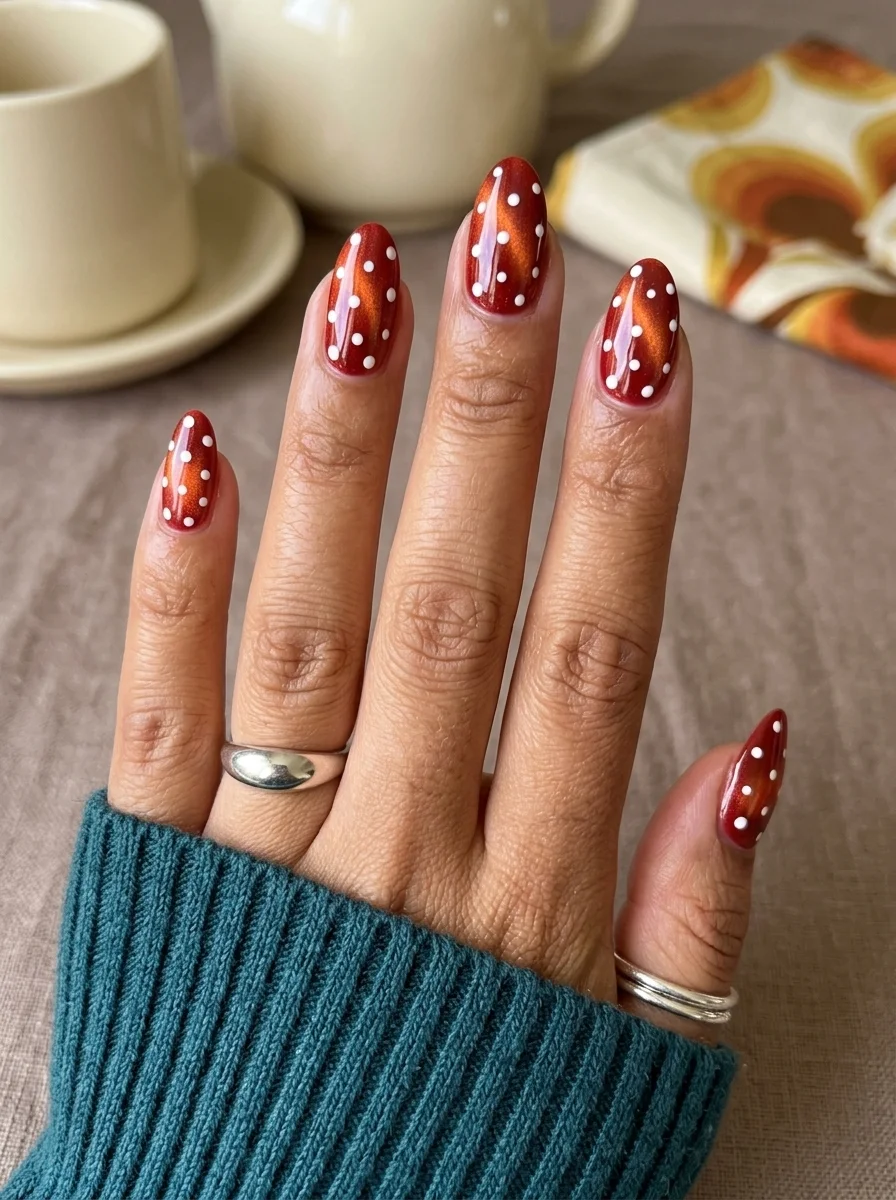
A playful, retro-inspired design that pairs warm magnetic brown with classic polka dots.
Overview:
Brown cat-eye with polka dots is a combination that borrows from vintage aesthetics. The warm brown reads as retro, and the white dots amplify that association. The magnetic shimmer adds a modern twist that prevents the design from reading as costume-y.
The polka dot technique is one of the simplest nail art methods available. A dotting tool dipped in white polish, pressed straight down, lifted straight up. The challenge isn't the dots themselves. It's the spacing. Crowded dots create a busy pattern. Widely spaced dots feel intentional. The white space between the dots is part of the design.
Brown cat-eye is one of the more forgiving colors to work with. The warm tone hides minor imperfections in the magnetic streak, and the white dots draw the eye away from any inconsistencies in the base coat. It's a good choice for beginners.
Design Breakdown:
Warm magnetic base with retro dot pattern. The simplicity is the design.
Base Color: A warm, rich brown with copper magnetic particles.
Nail Shape: Medium almond. The curved shape complements the circular dots.
Design Element: Small white polka dots scattered across every nail. Five to eight dots per nail.
Finish: High-gloss top coat to encapsulate the dots and create a smooth surface.
Get The Look at Home:
The dots are the easy part. The spacing is what makes or breaks the design.
- Brown base: Three thin coats of brown cat-eye polish, activating the magnet each time.
- Dot placement: Using a medium dotting tool and opaque white polish, press straight down and lift straight up. Don't twist or drag.
- Spacing: Space the dots roughly 3-4mm apart. Not in rows, but scattered randomly.
- Consistency: Compare both hands. The dot density should be roughly uniform.
- Dry time: Wait at least five minutes. The dots are raised and need time to set.
- Seal: Two coats of thick top coat to smooth the surface over the dots.
33 Trendy Polka Dot Nail Ideas for 2026 💅
32.Bronze Cat-Eye French Tip
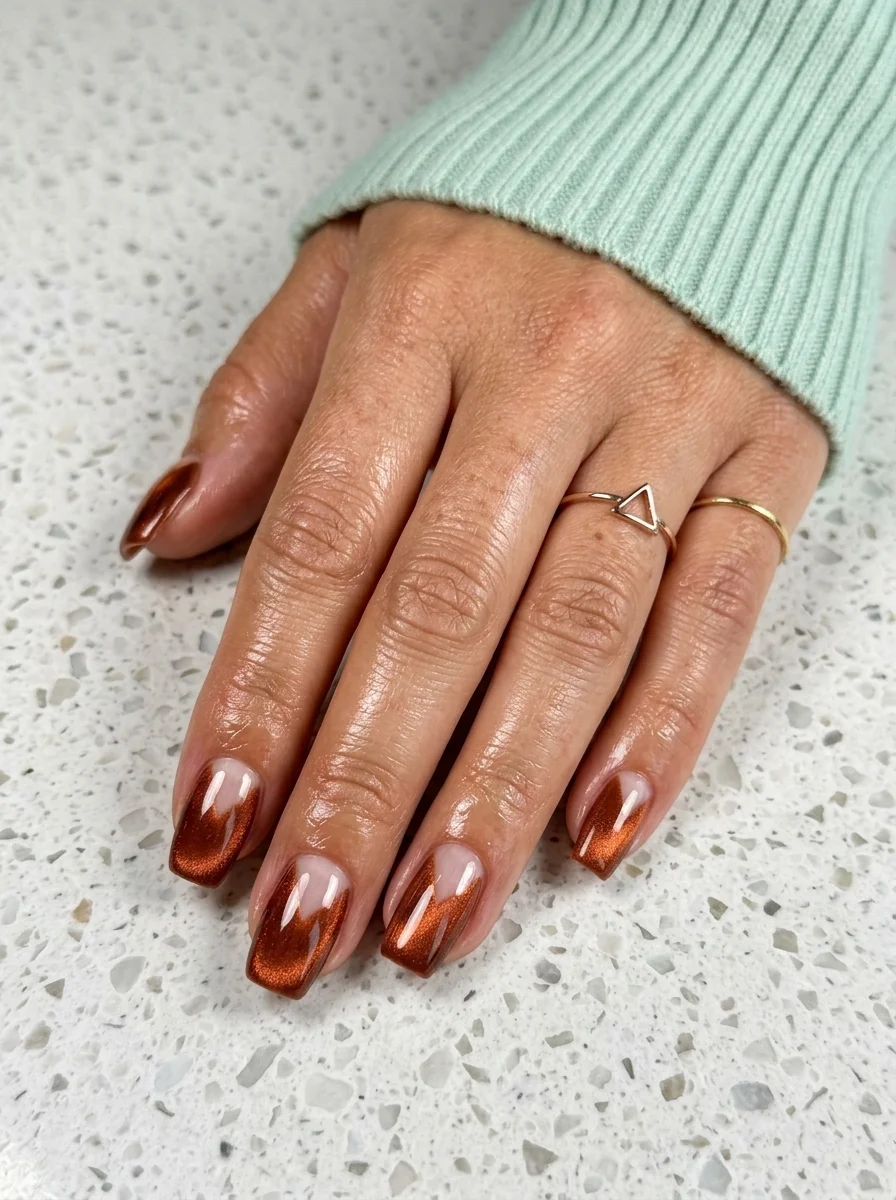
A warm, metallic take on the classic French manicure with magnetic shimmer tips.
Overview:
A bronze cat-eye French tip on a nude base is the kind of design that looks simple but requires precision. The nude base needs to be completely opaque and streak-free. The bronze tip needs to be even in thickness across all ten nails. The smile line between the two needs to be crisp.
The bronze cat-eye tips create a color shift that a regular bronze polish can't match. The magnetic particles make the tips look dimensional, almost like you've dipped your nails in liquid copper. In certain light, the tips appear darker than others; in others, they glow.
This design is one of the more wearable cat-eye options. The nude base keeps it grounded, the bronze tips add interest, and the overall effect is polished without being loud. It works in professional settings and social ones equally well.
Design Breakdown:
Classic French structure with magnetic metallic tips. The nude base keeps it grounded.
Base Color: A warm, opaque nude that matches the natural nail bed tone.
Nail Shape: Medium almond. The curved tip complements the French smile line.
Design Element: Bronze cat-eye French tips on all nails. Even, consistent smile lines.
Finish: High-gloss top coat to unify the nude base and metallic tips.
Get The Look at Home:
The French tip is the precision part. Use a liner brush for the cleanest results.
- Nude base: Two to three coats of opaque nude. Let each coat dry fully.
- Bronze tips: Using a French liner brush and bronze cat-eye polish, paint the smile line from sidewall to center on each nail.
- Magnet: Hold the magnet above each wet tip for 10-15 seconds to activate the cat-eye effect.
- Second coat: Apply a second thin coat of bronze to the tips for full opacity. Activate the magnet again.
- Cleanup: An angled brush dipped in acetone sharpens the smile line. This step is non-negotiable.
- Seal: Two coats of glossy top coat to smooth the transition between nude and bronze.
33.Warm Bronze Cat-Eye Coffin
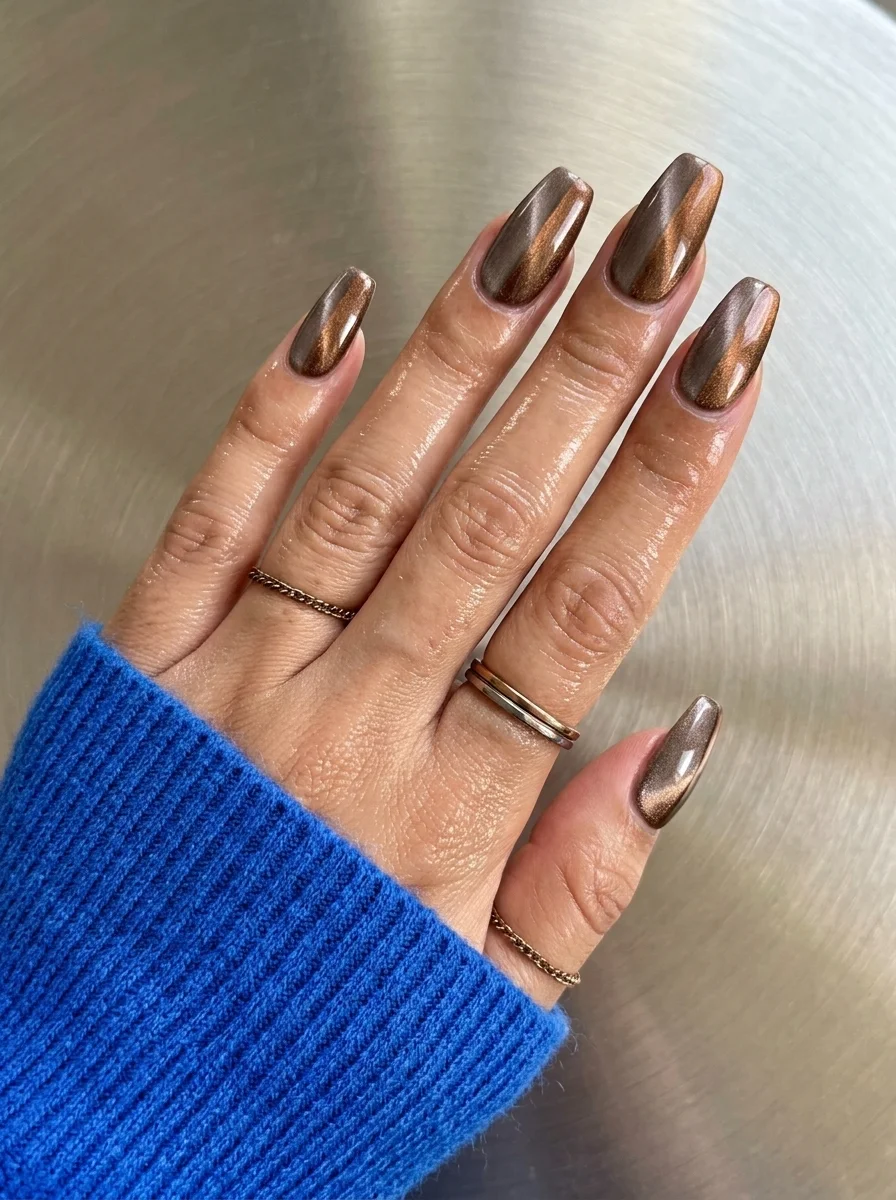
A rich, liquid bronze that looks like molten copper on the nails.
Overview:
Bronze cat-eye on a coffin shape is a different animal than on almond. The flat tip and longer surface area give the magnetic streak more room to travel, which makes the light effect more dramatic. The color appears to shift more between angles because there's more nail to catch the light.
This particular shade sits in the warm middle of the bronze spectrum. In low light, it reads as a rich copper-brown with amber undertones. In direct light, the magnetic particles create a streak that's almost golden. That range of expression within a single color is what makes cat-eye polish compelling, the nails look different every time you move your hand.
Coffin nails are longer than almond by necessity. The flat tip only works when there's enough free edge to create that distinctive tapered-but-squared shape. If your nails can't grow that long, extensions are the standard solution. Just know that cat-eye polish on extensions requires a slightly different technique: the magnet needs to be held closer to the surface because the gel layer is thicker.
Design Breakdown:
Warm bronze magnetic on a dramatic shape. The coffin silhouette amplifies the color-shift effect.
Base Color: A warm bronze-brown with copper and amber magnetic particles. Rich without being dark.
Nail Shape: Long coffin. The flat tip and extended length maximize the magnetic effect.
Design Element: None. Solid color. The shape and shimmer carry the design.
Finish: Ultra-glossy. The high shine intensifies the color depth and makes the bronze look like liquid metal.
Get The Look at Home:
Longer nails need more polish and more magnet time. Adjust your technique accordingly.
- Shape first: File into a clean coffin shape. The flat tip needs to be precise.
- Base coat: Apply a ridge-filling base coat. Long nails show every imperfection.
- Three coats: Apply three thin coats of bronze cat-eye polish, activating the magnet for 20 seconds each time. Longer nails need more magnet time.
- Consistent angle: Hold the magnet at the same angle for every nail. The streak should run in the same direction across all fingers.
- Cap the edges: Run the polish brush along the free edge of each nail to seal the tips.
- Top coat: Two coats of glossy top coat for maximum shine and durability.
26 Stunning Summer Braided Hairstyles for Women 2026 ☀️💇♀️
34.Gold and Brown Cat-Eye Almond
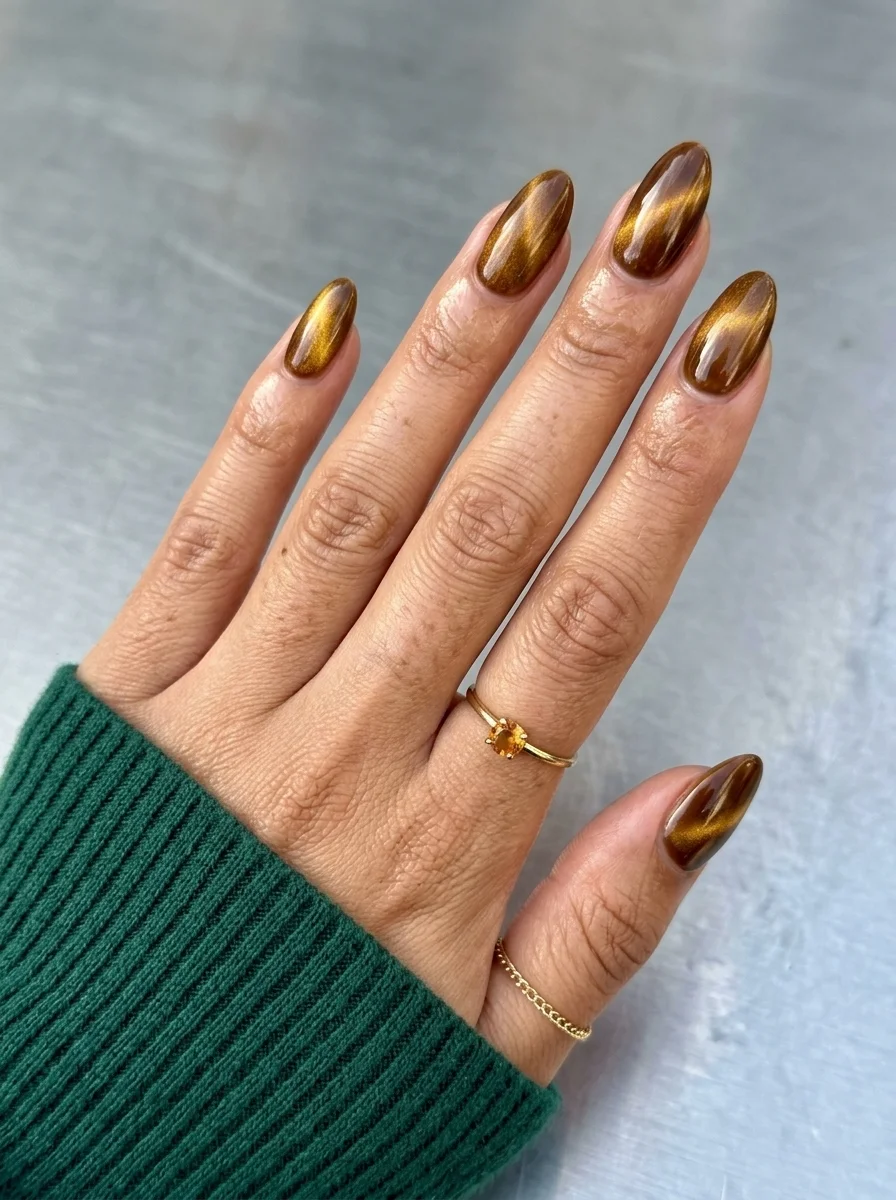
A luxurious golden-bronze that mimics the warm glow of tiger's eye stone.
Overview:
Gold-brown cat-eye is the nail equivalent of tiger's eye gemstone. The magnetic particles in this shade lean heavily toward gold, which gives the shimmer a warm, almost honey-like quality. Against the deeper brown base, the gold creates a diagonal light band that looks like trapped sunlight.
The almond shape is the natural home for this color. The curved surface lets the magnetic streak flow along the nail's natural arc, creating a more organic light effect than the flat surface of a coffin. The tapered tip draws the eye along the gold streak, elongating the appearance of the fingers.
This is one of the more versatile cat-eye colors. The warm gold-brown reads as autumnal but doesn't feel seasonal. In summer, the golden shimmer picks up warm light. In winter, the deep brown feels appropriately cozy. It's a year-round color that flatters a wide range of skin tones.
Design Breakdown:
Warm golden-brown magnetic. The tiger's eye shimmer is the entire design.
Base Color: A warm brown with strong gold magnetic particles. The gold should be prominent, not subtle.
Nail Shape: Medium almond. The curved surface enhances the organic flow of the magnetic streak.
Design Element: None. Solid color. The golden shimmer carries the design.
Finish: Ultra-glossy top coat to maximize the metallic reflectivity and create a gemstone-like depth.
Get The Look at Home:
Gold-leaning cat-eye formulas are forgiving. The warm tone hides minor imperfections in the magnetic streak.
- Base coat: Apply a smoothing base coat. Gold pigment can stain bare nails.
- First coat: Thin layer of gold-brown cat-eye polish. Activate the magnet for 15 seconds at a 45-degree angle.
- Second coat: Repeat. The gold should be building to full intensity now.
- Third coat if needed: Some formulas need a third coat for complete coverage.
- Magnet consistency: Hold the magnet at the same angle and distance for every nail. Inconsistent technique creates different streak patterns.
- Top coat: One generous coat of high-shine top coat. Cap the free edge.
35.Tortoiseshell Cat-Eye
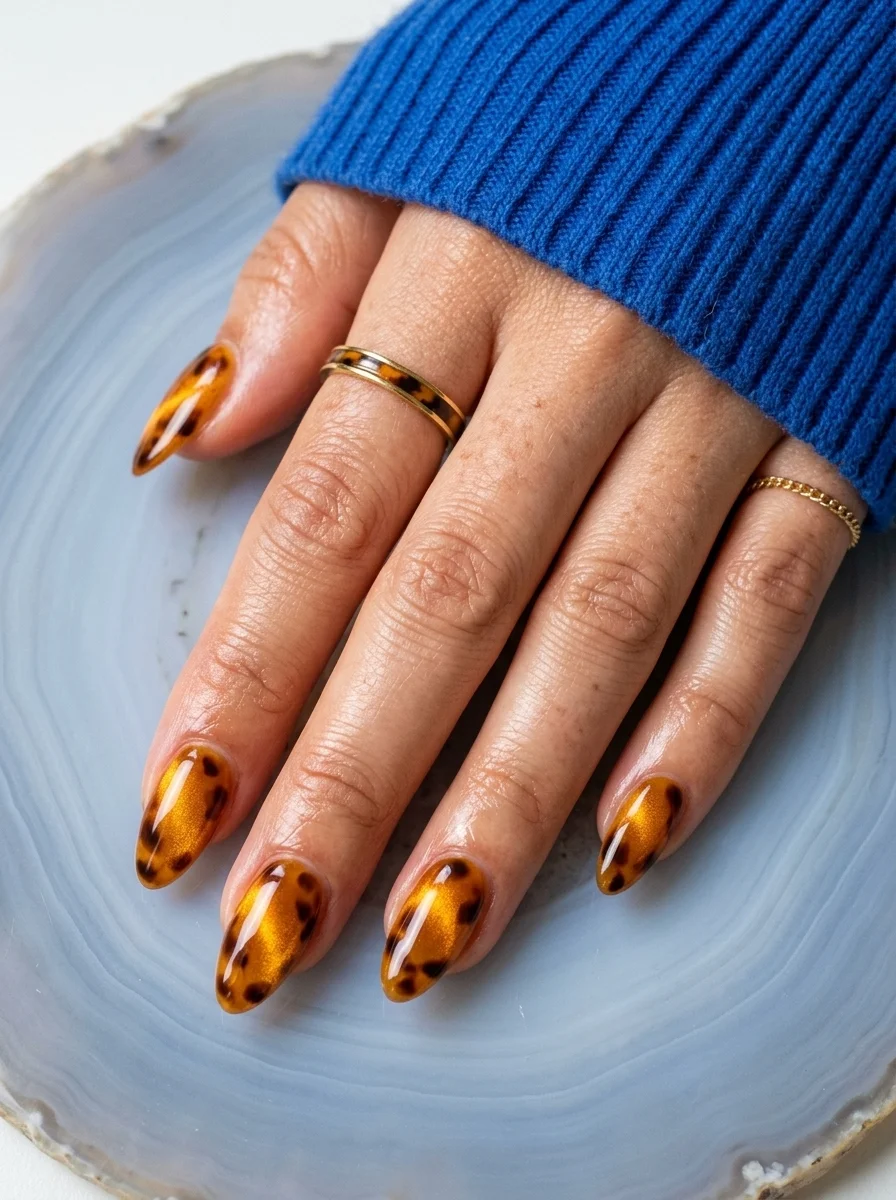
A rich, organic pattern that mimics the look of polished tortoiseshell.
Overview:
Tortoiseshell nails have been trending for several seasons, but the cat-eye version adds a dimension that flat tortoiseshell can't match. The magnetic particles in the amber base create a shifting depth that makes the pattern look three-dimensional, like you're looking into actual polished resin.
The technique is a wet-on-wet method where you drop brown and black polish into a still-wet cat-eye base and let them spread naturally. The result is organic and slightly random, which is exactly how real tortoiseshell looks. Trying to control the spread too much produces artificial-looking patterns.
The warm amber tones work across seasons. In autumn, the colors feel appropriately cozy. In spring, the golden shimmer keeps it from reading too heavy. It's one of the more versatile pattern designs in the cat-eye category.
Design Breakdown:
Organic pattern created through wet-on-wet technique. The randomness is the design.
Base Color: A warm amber or honey-colored cat-eye polish with gold magnetic particles.
Nail Shape: Medium almond. The curved shape complements the organic pattern.
Design Element: Brown and black spots dropped into the wet base, creating a tortoiseshell pattern through natural spreading.
Finish: High-gloss top coat to create the "polished resin" effect.
Get The Look at Home:
This is a wet-on-wet technique. Work quickly and don't overthink the placement.
- Amber base: Apply one coat of amber cat-eye polish. Do NOT cure or let it dry.
- Drop colors: While the base is still wet, use a dotting tool to place random drops of dark brown and black polish across the nail.
- Let them spread: The drops will naturally expand and blur into the amber base. Don't touch them. Wait 30 seconds.
- Magnet time: Hold the magnet above the nail to activate the cat-eye effect through the wet layers.
- Cure or dry: If using gel, cure under the lamp. If using regular polish, wait at least 15 minutes.
- Top coat: Two coats of thick, glossy top coat to smooth the surface and create depth.
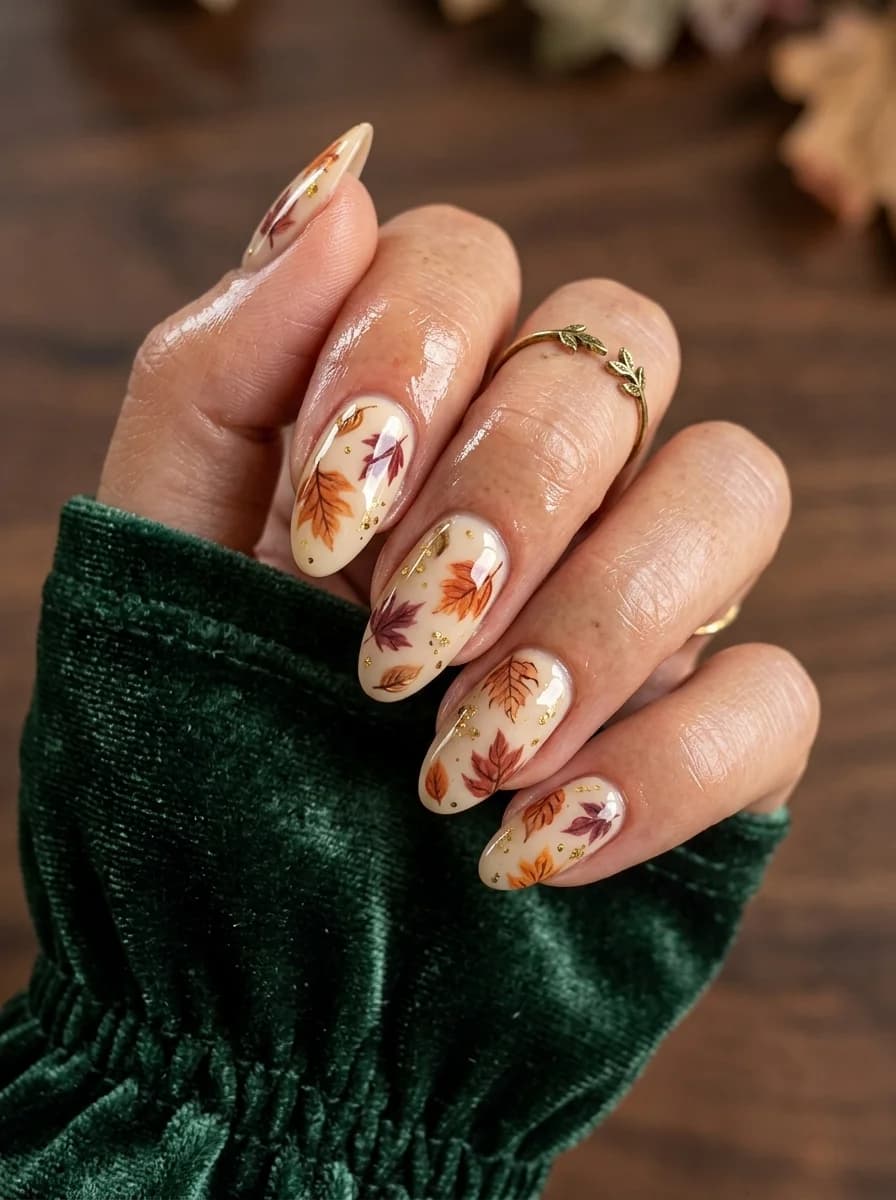
28 Fall Nail Designs for an Autumn-Ready Manicure (2026) 💅
Cat eye nails are one of those rare trends that works across every season, every occasion, and every personal style. The magnetic effect adds a dimension that flat polish can't match, and the range of available colors means there's a cat eye shade for everyone.
Whether you go for a soft lavender shimmer, a bold bronze coffin, or an intricate constellation design, the key is taking your time with the magnet technique. The difference between mediocre cat eye nails and stunning ones is almost always patience.