Nail Trends
31 Spooky Halloween Nail Art Designs for Fall (2026)
Halloween nails don't have to mean orange-and-black costume art that only works for one night. The best spooky-season manicures lean into mood, texture, and atmosphere, which means they work from early October through Thanksgiving. This collection covers everything from subtle cat-eye shimmer and gothic lace to full-on skeleton hands and stained glass roses. Whether you want something you can wear to the office or something that commits fully to the holiday, there's a design here that fits.
Dark Palette Guide: Choosing the Right Halloween Base
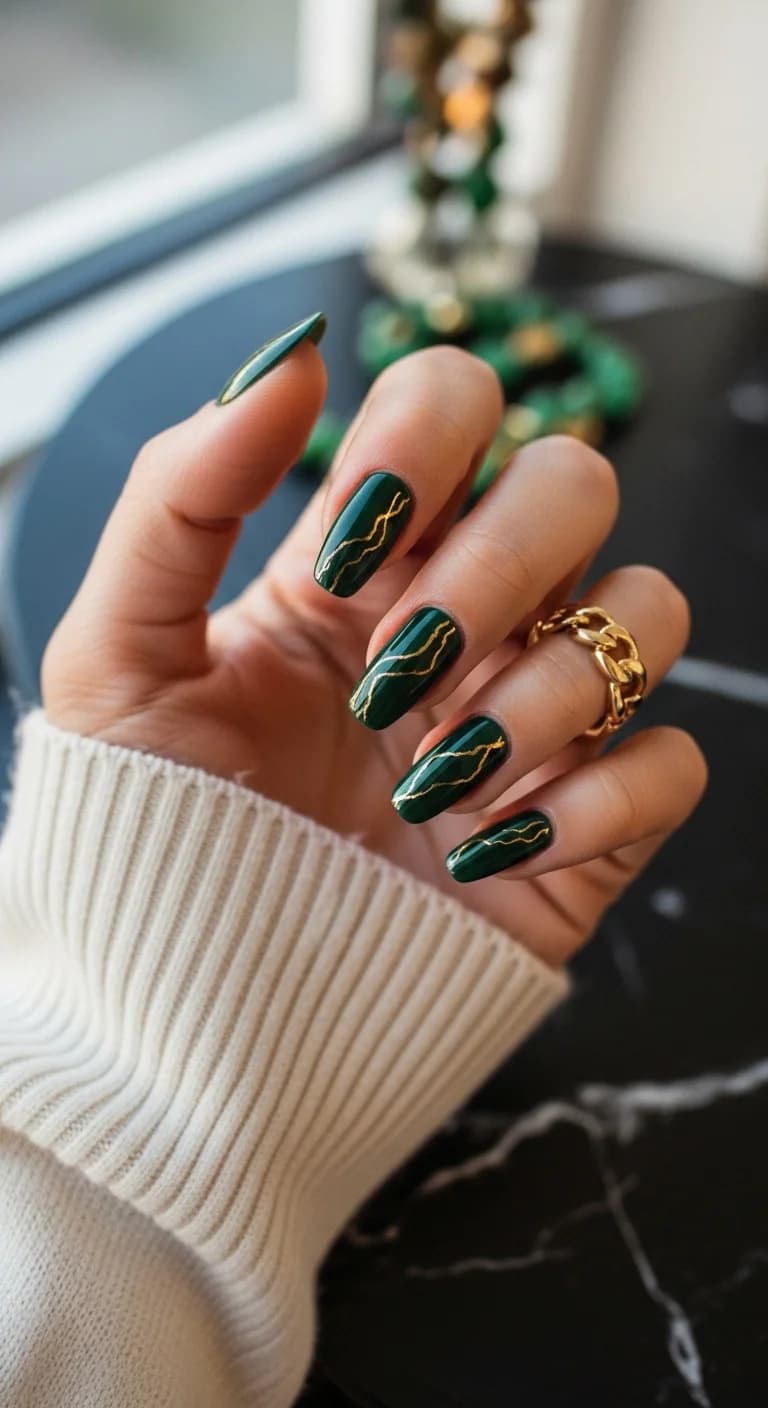
The difference between "Halloween nails" and "nails that happen to be dark" is the base color choice. Burgundy and wine tones (like designs 5, 11, 13, and 15) read as sophisticated and moody without relying on literal Halloween imagery. Deep greens and teals (designs 14, 24, 25, and 31) lean into a forest or witchy aesthetic that works well beyond October. Black-based designs (7, 8, and 19) are the most versatile because black goes with everything and reads as intentional in any context.
The nail shape you choose affects how "Halloween" the design reads. Almond shapes work well for the more elegant, gothic designs like the cat-eye and velvet finishes. Coffin shapes provide a flat canvas that's ideal for detailed art like the potion bottles, stained glass, and constellation designs. Stiletto shapes amplify the drama, which is why they work best for the blood-red ombre and chrome designs.
1.Copper Chrome Black Cat
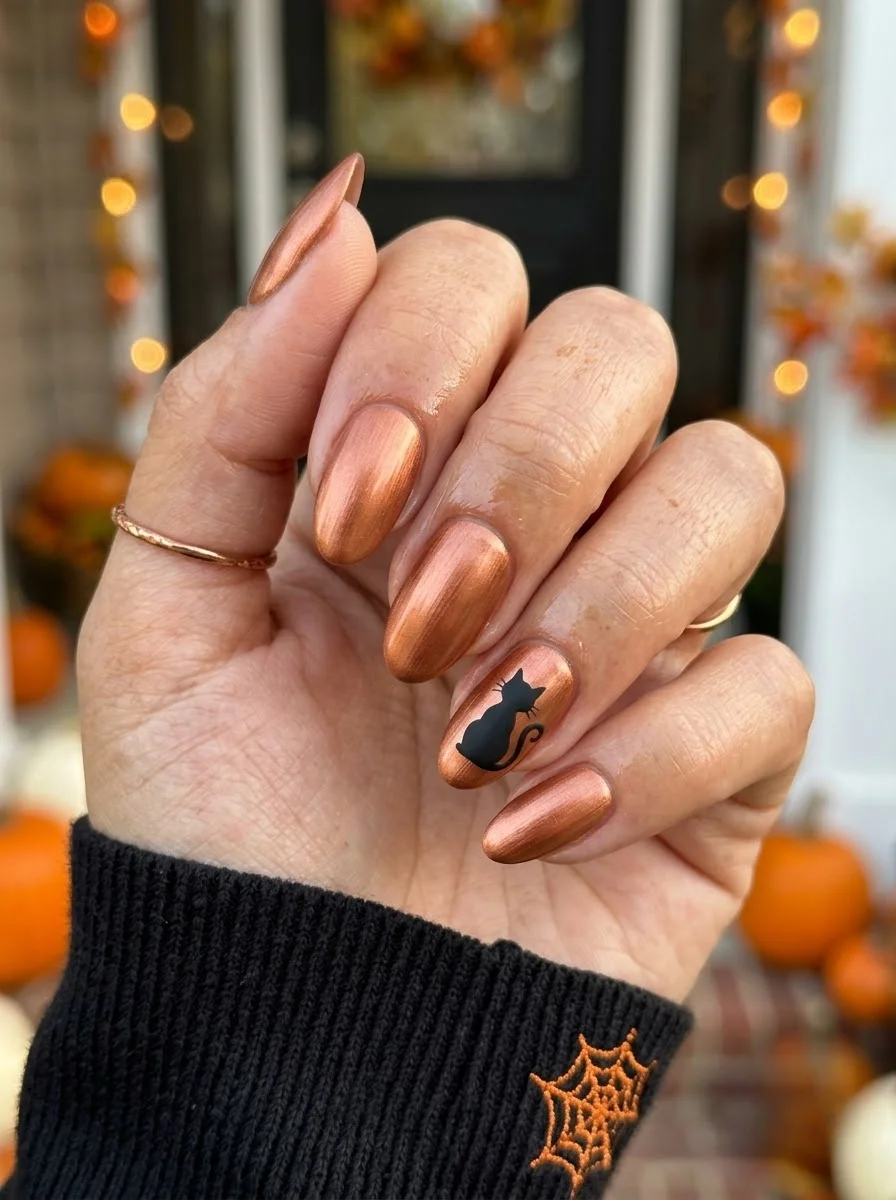
A warm, reflective chrome that catches light like a polished penny.
Overview:
Copper chrome is one of those finishes that looks completely different depending on the lighting. In direct sun, it reads as a bright, almost orange metallic. Under indoor lights, it deepens into a rich rose-gold. That shift gives the nails a dimensional quality that flat orange polish can't replicate.
The black cat silhouette on the ring finger is the design's anchor. Without it, you have beautiful copper nails that could pass for non-Halloween jewelry. With it, the set becomes unmistakably seasonal while staying elegant enough for daily wear. The cat is small enough that it reads as a subtle accent from across a room, only revealing its shape up close.
One thing to know about chrome powders: they require a no-wipe gel top coat underneath to adhere properly. Regular polish won't give the powder anything to grip, and you'll spend the rest of the day brushing shimmer off your hands. The chrome application itself is fast, but the gel base coat adds time to the overall process.
Design Breakdown:
The chrome does the heavy lifting here. The cat is a single, simple accent that doesn't compete with the finish.
Base Color: A rich copper or rose-gold chrome powder over a dark base. The darker the base, the more dramatic the chrome effect.
Nail Shape: Medium almond. The tapered shape catches light at multiple angles, which is exactly what chrome needs to look its best.
Design Element: A single black cat silhouette on the ring finger. The cat is painted in solid black with a curved tail.
Finish: Ultra-glossy chrome. The mirror-like shine is the entire point of the design.
Get The Look at Home:
Chrome powder is forgiving on technique but unforgiving on base preparation. Get the surface smooth first.
- Dark base: Apply two coats of black or deep burgundy gel polish. Cure each coat. The dark base makes the chrome pop.
- No-wipe top coat: Apply a no-wipe gel top coat and cure. This is the surface the chrome will adhere to.
- Chrome application: Using a silicone applicator or eyeshadow sponge, rub copper chrome powder onto the cured top coat. Work in small circular motions until the surface is mirror-smooth.
- Buff and clean: Use a soft brush to remove excess powder from around the cuticles and skin. Any powder left on skin will transfer.
- Seal: Apply one coat of gel top coat over the chrome and cure. This locks the powder in place and prevents flaking.
- Cat accent: On the ring finger, use a thin liner brush and black gel polish to paint a small cat silhouette. Cure, then seal with top coat.
20 Stunning Mother of the Bride Hairstyle Ideas for 2026 💍
2.Matte Grey Ghost
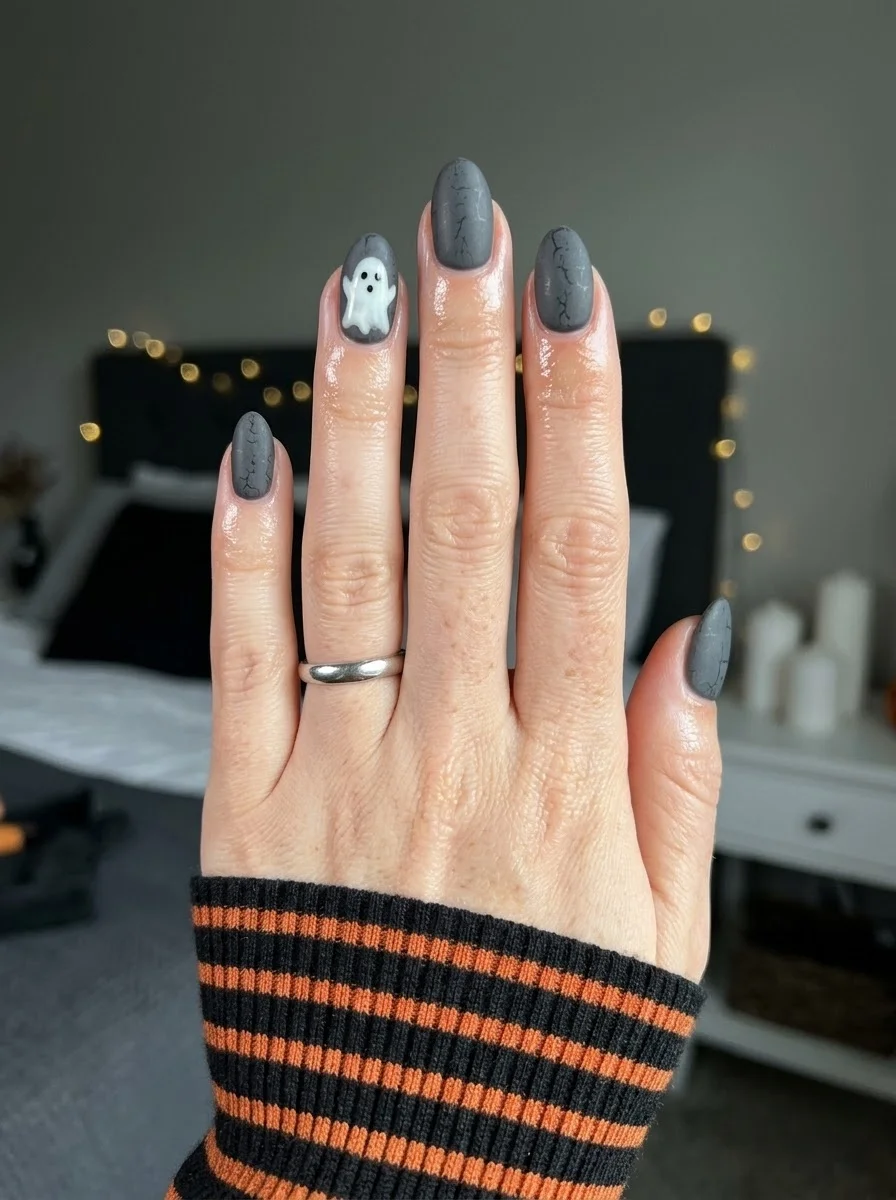
Moody matte grey with a ghost that's more cute than creepy.
Overview:
Matte grey nails with a crackle texture are an unusual choice for Halloween, and that's partly why they work. The finish looks like weathered stone or aged concrete, which gives the set a gothic atmosphere without relying on the usual orange-and-black palette. The crackle effect adds visual texture that keeps the grey from looking flat or unfinished.
The ghost on the ring finger is small and simple: a white shape with two black dot eyes. It's the kind of detail that makes people smile when they notice it, rather than alarming them from across a room. The white pops against the matte grey in a way that it wouldn't on a glossy or colored base.
Matte top coats amplify every flaw in the base coat. Streaks, brush marks, and uneven thickness that glossy finishes hide are fully visible under matte. This means the grey base needs to be applied in thin, even coats with proper dry time between each one. Rush the base and the matte finish will broadcast every imperfection.
Design Breakdown:
Matte texture with a single illustrative accent. The crackle effect is what gives the design its character.
Base Color: A medium, cool-toned grey with a crackle or marbled texture effect.
Nail Shape: Medium almond. The curved shape softens the industrial quality of the grey.
Design Element: A small white ghost with black dot eyes on the ring finger only.
Finish: True matte top coat. The flat finish is what makes the grey read as stone rather than paint.
Get The Look at Home:
The crackle texture can be achieved with crackle polish or by deliberately applying thick, uneven coats. Either way, the matte finish unifies everything.
- Grey base: Two coats of medium grey. If using crackle polish, apply the crackle coat over a dry base and let it do its thing.
- Matte coat: Apply matte top coat over all nails. Let it dry fully before touching the surface.
- Ghost shape: Using a dotting tool and white polish, place a small oval on the ring finger. Add a slight tail at the bottom for the ghost's body.
- Ghost eyes: Two tiny black dots using the smallest dotting tool or a toothpick.
- Final matte: If the ghost paint is glossy, apply a thin layer of matte top coat over just the ghost to unify the finish.
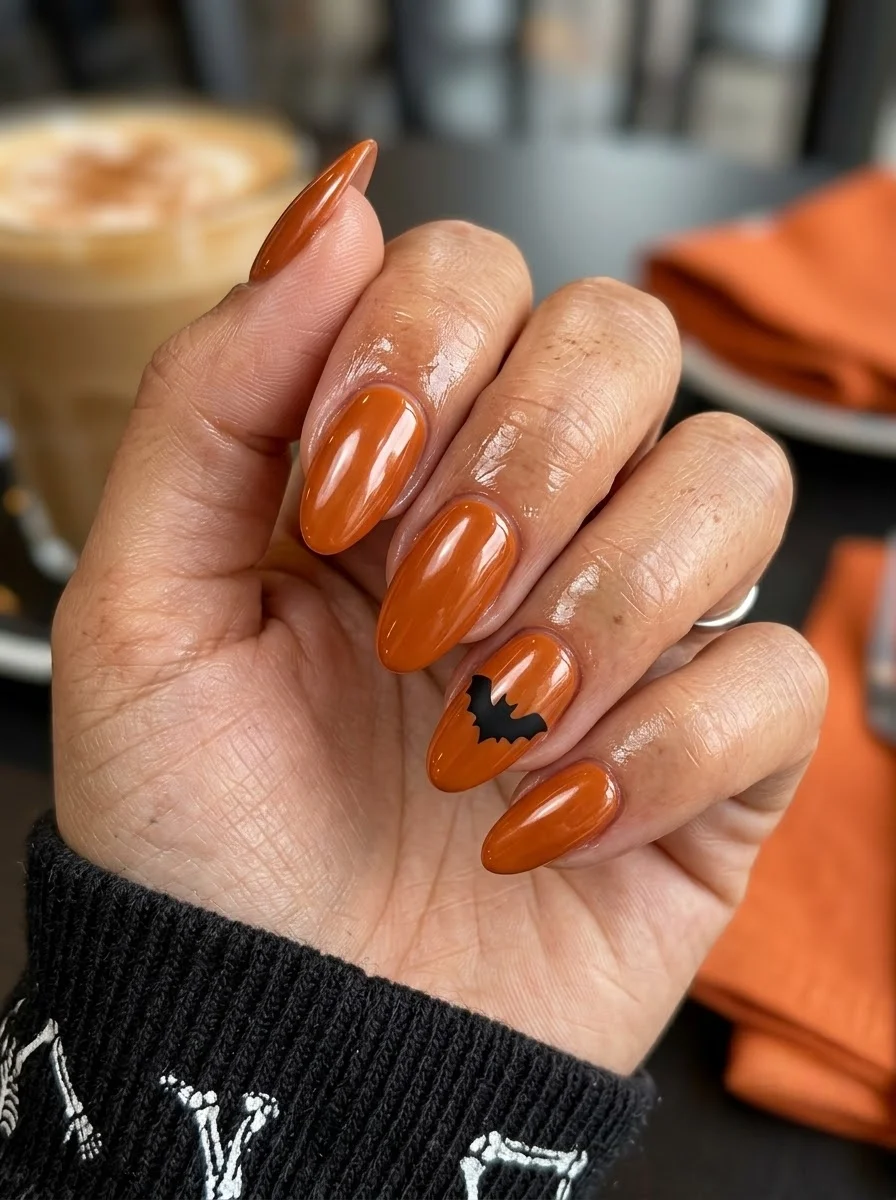
3.Terracotta Bat
Pumpkin-spice energy without the basic execution.
Overview:
Burnt orange is a more sophisticated choice than bright pumpkin orange for Halloween nails. The warmer, deeper tone reads as autumnal rather than costumey, which means the set works well beyond October 31st. Under indoor lighting, the orange shifts toward a rich terracotta that pairs naturally with fall wardrobes.
The bat silhouette on the ring finger is a clean, graphic accent that keeps the design from being just "orange nails." The black against the warm orange creates a high-contrast focal point that your eye returns to. It's a small detail that transforms the entire set's reading from seasonal to themed.
This shade of orange is forgiving to apply. Unlike neon or pastel oranges, which streak badly, burnt orange formulas tend to be self-leveling and opaque in two coats. It's one of the easier Halloween colors to work with at home.
Design Breakdown:
Solid warm base with a single graphic accent. The simplicity is the design.
Base Color: A warm, burnt orange or terracotta. Think pumpkin spice, not traffic cone.
Nail Shape: Medium almond. The rounded shape complements the organic warmth of the color.
Design Element: A single black bat silhouette on the ring finger.
Finish: High-gloss. The shine makes the orange look rich and saturated.
Get The Look at Home:
This is one of the fastest Halloween designs to execute. The bat is the only element that requires any precision.
- Orange base: Two coats of burnt orange. Let each coat dry fully.
- Bat outline: Using a thin liner brush and black polish, draw the basic bat shape on the ring finger: a small body with two wing curves extending outward.
- Fill in: Fill the bat shape with solid black. Two thin coats for full opacity.
- Cleanup: An angled brush dipped in acetone sharpens any rough edges around the bat.
- Seal: One thick coat of glossy top coat over everything.
29 Bright Lemon Nail Art Designs for Summer & Spring (2026)
4.Sheer Nude Ghosts
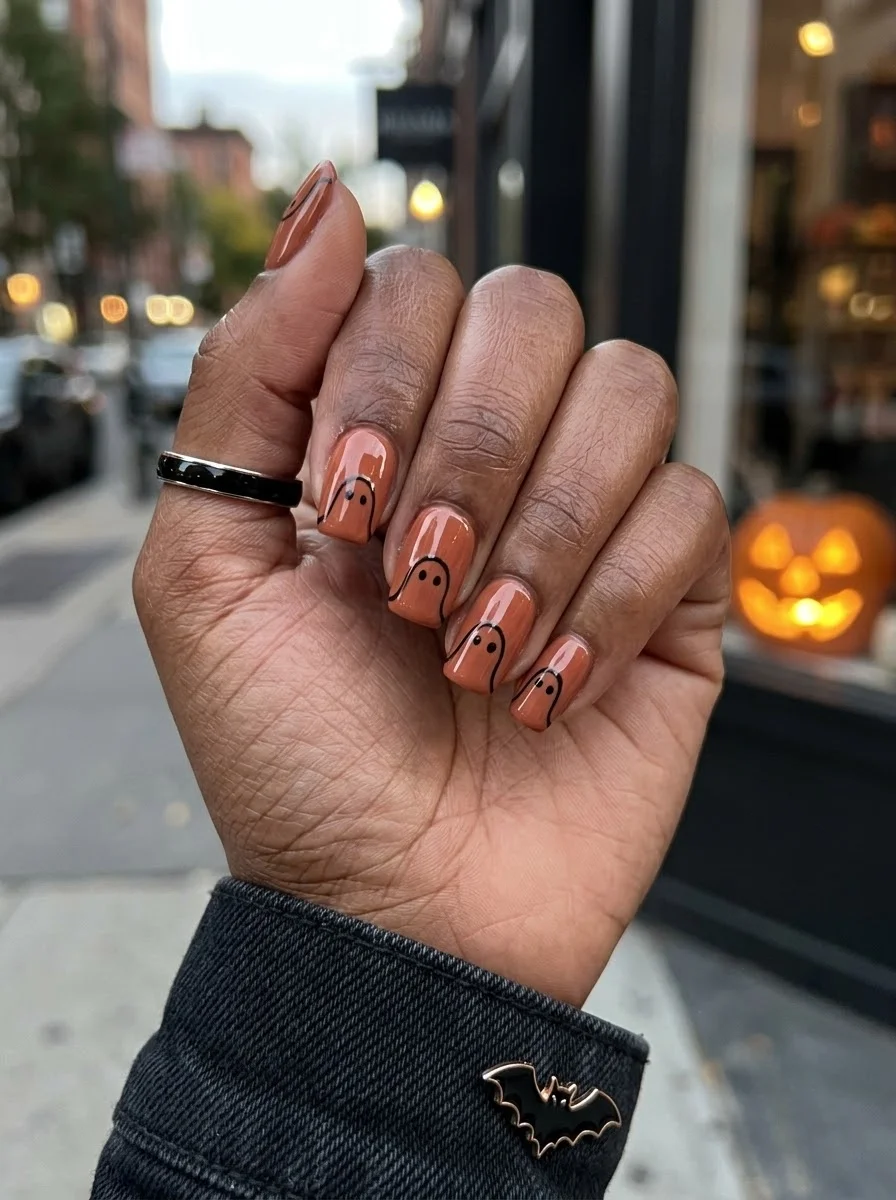
Barely-there base with ghosts that look like they're floating on your nails.
Overview:
Sheer nude nails with black outline ghosts are a masterclass in restraint. The base is so close to your natural nail color that the ghosts appear to be floating directly on bare skin. The effect is ethereal rather than costumey, which makes this design wearable in settings where full-coverage Halloween nails would feel over the top.
The ghosts are drawn as simple outlines rather than filled shapes, which is a critical design choice. Solid white ghosts on nude would read as stickers. The thin black outlines have a hand-drawn, sketchy quality that makes them feel more like illustration than decoration. Each ghost is slightly different, which reinforces that hand-crafted look.
Squaoval is the right shape for this design. The ghosts need enough surface area to be legible, but the nails shouldn't be so long that the design feels dramatic. This is meant to be understated, and the shape supports that intention.
Design Breakdown:
Transparent base with line-art illustration. The ghosts are the entire design.
Base Color: A sheer, warm-toned nude or milky pink. The natural nail should be visible through the base.
Nail Shape: Squaoval. Clean, practical, and proportional for the small ghost illustrations.
Design Element: Black outline ghosts on three to four nails. Each ghost is slightly different in shape and position.
Finish: High-gloss top coat to protect the fine line work.
Get The Look at Home:
The outline technique is forgiving because imperfection is part of the charm. Slightly wobbly lines look intentional.
- Nude base: Two coats of sheer nude. Let each dry fully.
- Ghost body: Using a thin liner brush and black polish, draw a rounded shape with a trailing tail at the bottom. Keep the lines thin and slightly uneven.
- Ghost eyes: Two small black dots near the top of the ghost's head.
- Vary the ghosts: Make each ghost a slightly different size and shape. Some can be wider, some narrower. The inconsistency makes them look hand-drawn.
- Dry time: Wait at least five minutes before top coating. Black outlines on sheer base smear easily if the surface is tacky.
- Seal: One coat of top coat, applied in a single stroke per nail to avoid dragging the fine lines.
5.Wine Swirl with Gold Flecks
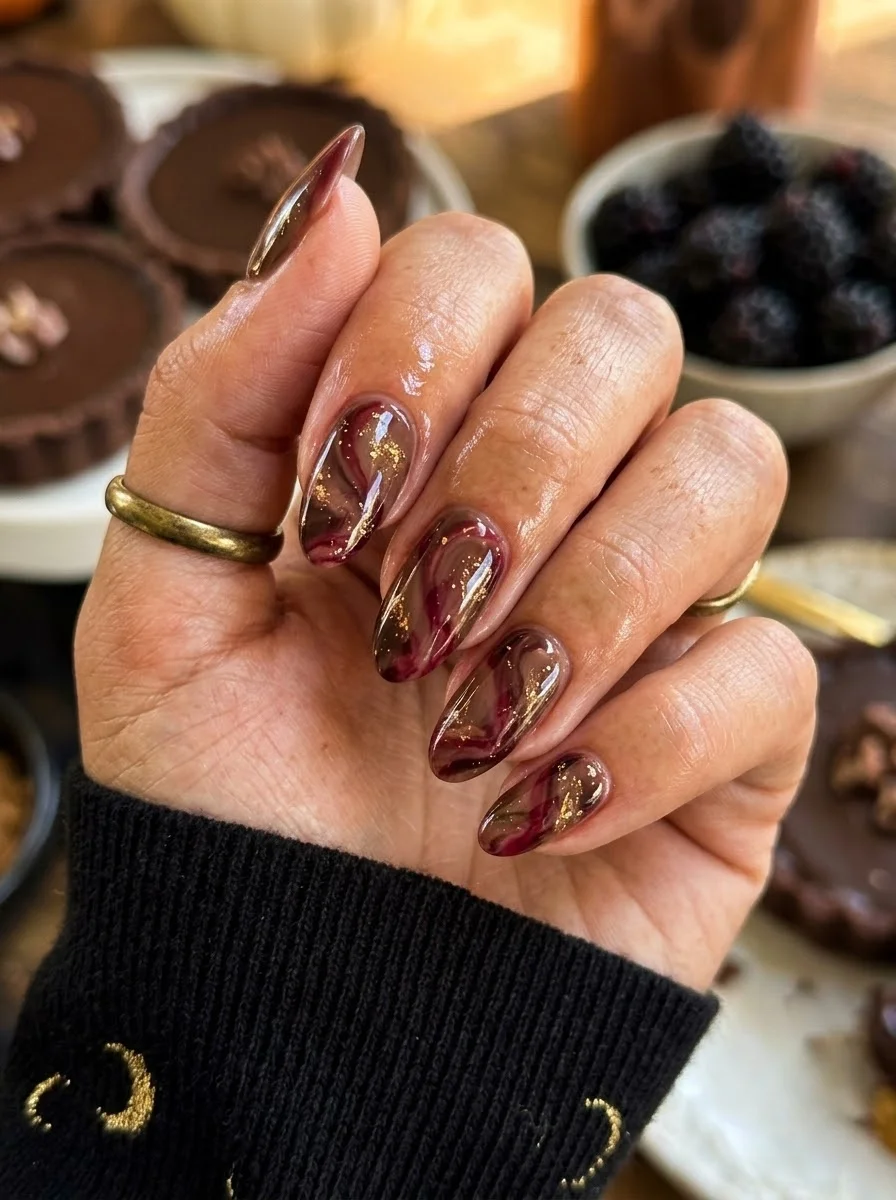
Dark and moody with gold that catches light like scattered embers.
Overview:
The burgundy swirls move between wine red and near- black, creating a marbled effect that looks like polished garnet stone. The gold flecks scattered throughout add warmth that prevents the dark base from reading as flat or heavy.
This design works because the color range stays narrow. Everything lives within the burgundy-to-gold spectrum, so even though the swirls are organic and slightly chaotic, the overall effect feels cohesive. The gold isn't decoration layered on top; it's embedded within the marbling, which gives the design depth that surface glitter can't match.
The almond shape is ideal for this design. The tapered tip lets the swirls flow naturally, and the curved surface catches light in a way that makes the gold flecks shift and sparkle with movement. On a square shape, the swirls would feel compressed.
Design Breakdown:
Wet-on-wet marble technique with metallic inclusions. The swirls are the design; the gold is the accent.
Base Color: A deep burgundy or wine red.
Nail Shape: Medium almond. The curved surface enhances the marble effect.
Design Element: Swirled burgundy and near-black marbling with gold metallic flecks embedded in the design.
Finish: High-gloss. The shine creates the "polished stone" illusion.
Get The Look at Home:
Work on a wet surface. The swirls need to blend naturally, which means you're working into uncured polish.
- Burgundy base: One coat of deep burgundy. Let it dry.
- Wet layer: Apply a second coat of burgundy. Do NOT let it dry.
- Drop the dark: Place small drops of black or near-black polish onto the wet burgundy. Two to three drops per nail.
- Swirl: Use a toothpick to drag through the drops, creating organic swirl patterns. Three to four drags per nail, then stop. Over-working creates mud.
- Gold flecks: While the surface is still tacky, press small pieces of gold leaf or gold flake into the polish. Use a dry brush to pat them flat.
- Seal: Wait ten minutes for the art to set. Apply two coats of thick top coat to smooth the surface and encapsulate the gold.
38 Trending Bandana Hairstyles for Women (2026)
6.Deep Purple Spiderwebs
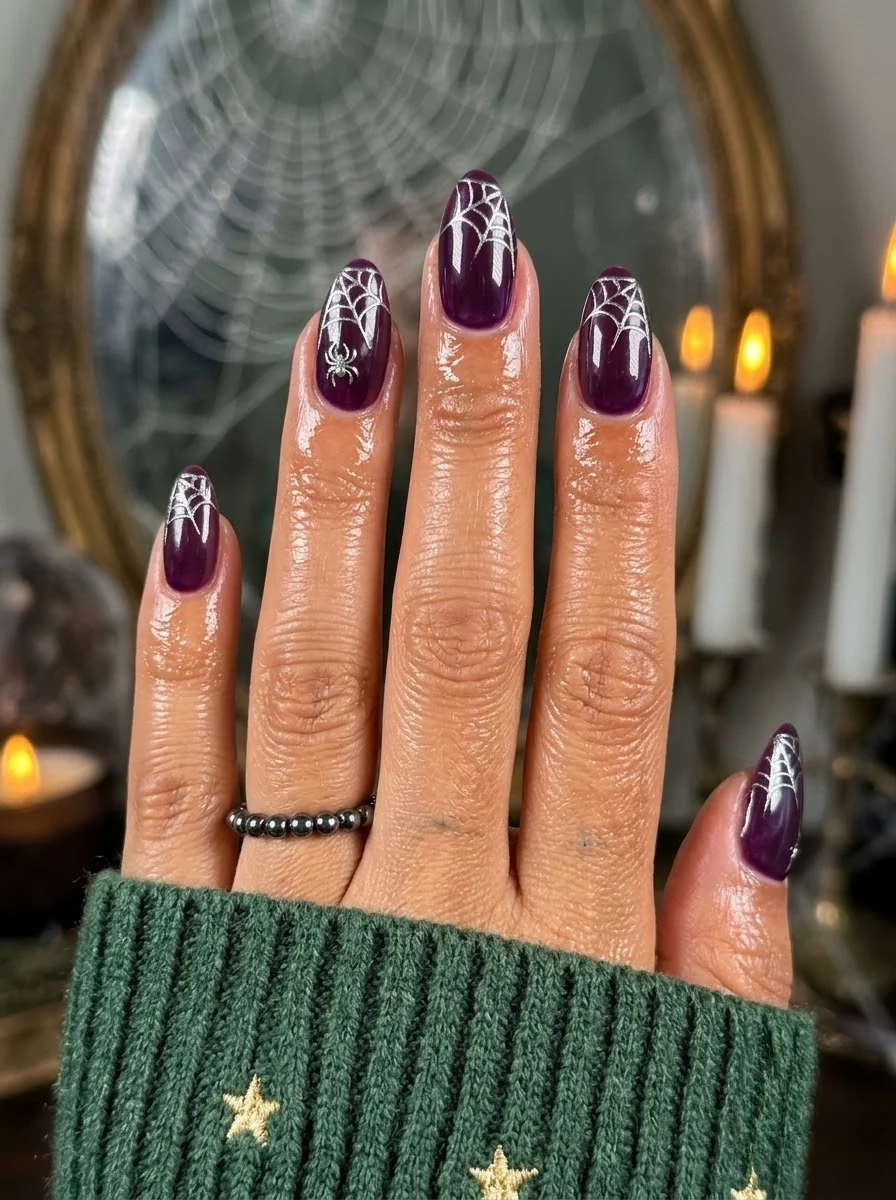
Gothic purple with webs that look like they were spun by a very tidy spider.
Overview:
Deep purple is a underrated Halloween color. It's dark enough to feel moody and seasonal, but it has more complexity than flat black. The white spiderweb design pops against this shade in a way that it wouldn't on a lighter or brighter base. The contrast is sharp without being harsh.
The spider on the ring finger is the detail that elevates the set from "purple nails with lines" to a complete Halloween design. It's small enough to be subtle but detailed enough to reward close inspection. The spider sits within a web pattern, which gives it context and makes the whole composition feel intentional.
White nail art on dark bases requires a highly pigmented white polish. Sheer whites will look greyish against the purple, which kills the contrast. Use a white designed for nail art or stamping, not a standard white polish that needs three coats for opacity.
Design Breakdown:
Dark base with high-contrast white line art. The webs are the structural element; the spider is the focal point.
Base Color: A deep, opaque purple. Think eggplant or plum, not lavender.
Nail Shape: Medium almond. The tapered shape gives the web lines room to radiate naturally.
Design Element: White spiderweb patterns on three to four nails, with a small white spider on the ring finger.
Finish: High-gloss top coat to protect the line work and deepen the purple.
Get The Look at Home:
The web lines need to be thin and confident. A striper brush that holds enough polish to draw a full radial line without re-dipping is essential.
- Purple base: Two coats of deep purple. Let each dry fully.
- Web structure: Using a thin striper brush and white polish, draw three to four radial lines from a center point near the cuticle or corner.
- Web spirals: Connect the radial lines with curved horizontal lines, creating the web pattern. Work from the center outward.
- Spider: On the ring finger, place a small white dot for the body and a smaller dot for the head. Add eight thin legs using a toothpick.
- Dry completely: White on dark base smears easily. Wait at least five minutes.
- Seal: One coat of top coat, applied in a single stroke to avoid dragging the white lines.
7.Bat Wing French Tips
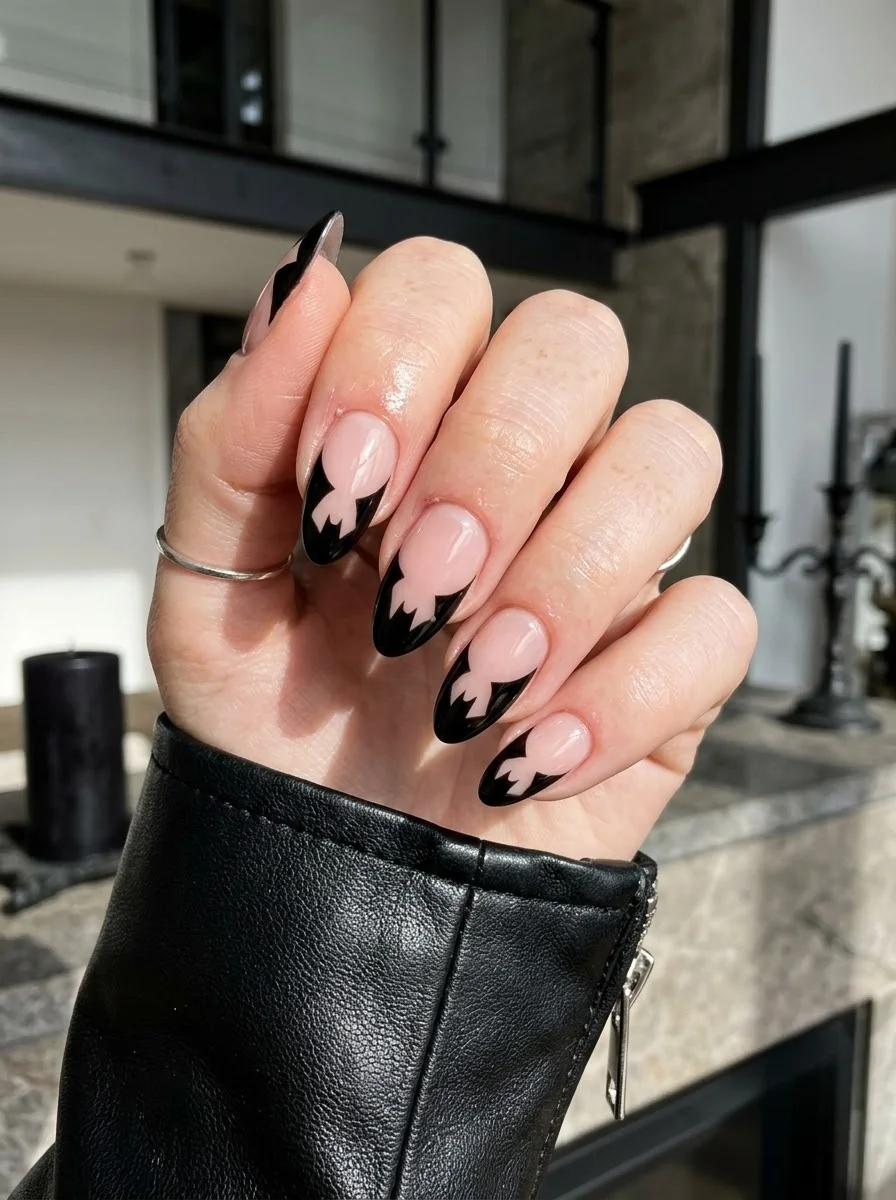
A clever twist on the French where the bat wings become the tip.
Overview:
This is one of the more inventive Halloween French tip variations out there. Instead of a traditional curved smile line, the black tip is shaped like bat wings, with the scalloped edges creating the boundary between nude and black. From a distance, it reads as a dark French tip. Up close, the bat shape reveals itself.
The sheer nude base is essential to the design's success. It creates negative space that lets the bat shape breathe. On an opaque or colored base, the wing scallops would lose their definition and the design would collapse into a standard black tip.
The challenge here is symmetry. Each nail's bat wings need to mirror each other, and the smile line height needs to be consistent across all fingers. Use French tip guides or striping tape to mask the boundary if freehand feels too risky. The tape gives you a safety net that still allows for the organic wing shape.
Design Breakdown:
Modified French structure where the tip shape carries the theme.
Base Color: Sheer nude or milky pink. The natural nail should be visible.
Nail Shape: Medium to long almond. The length gives the bat wings enough room to register as a deliberate shape.
Design Element: Black bat-wing tips replacing the traditional French smile line. The wings scallop downward into the nude base.
Finish: High-gloss top coat.
Get The Look at Home:
The bat shape is the hard part. Consider drawing the wing scallops on paper first to get the curve right.
- Nude base: Two coats of sheer nude on all nails. Let dry fully.
- Map the smile line: Using a thin liner brush, lightly mark where the bat wings will start on each nail. Consistency across all nails matters more than perfection on any single one.
- Bat wings: Using black polish and a liner brush, paint the wing shape: two scalloped curves extending from the sidewalls to the center tip. The scallops should be even on both sides.
- Fill the tips: Fill in the tip area below the wing line with solid black. Two thin coats for full opacity.
- Cleanup: An angled brush dipped in acetone sharpens the scallop edges. This step is non-negotiable for clean wings.
- Seal: One coat of top coat. Cap the free edge to prevent the black tip from chipping.
35 Cute & Trendy Short Summer Nails for 2026 ☀️
8.Grey Cat-Eye Spiderwebs
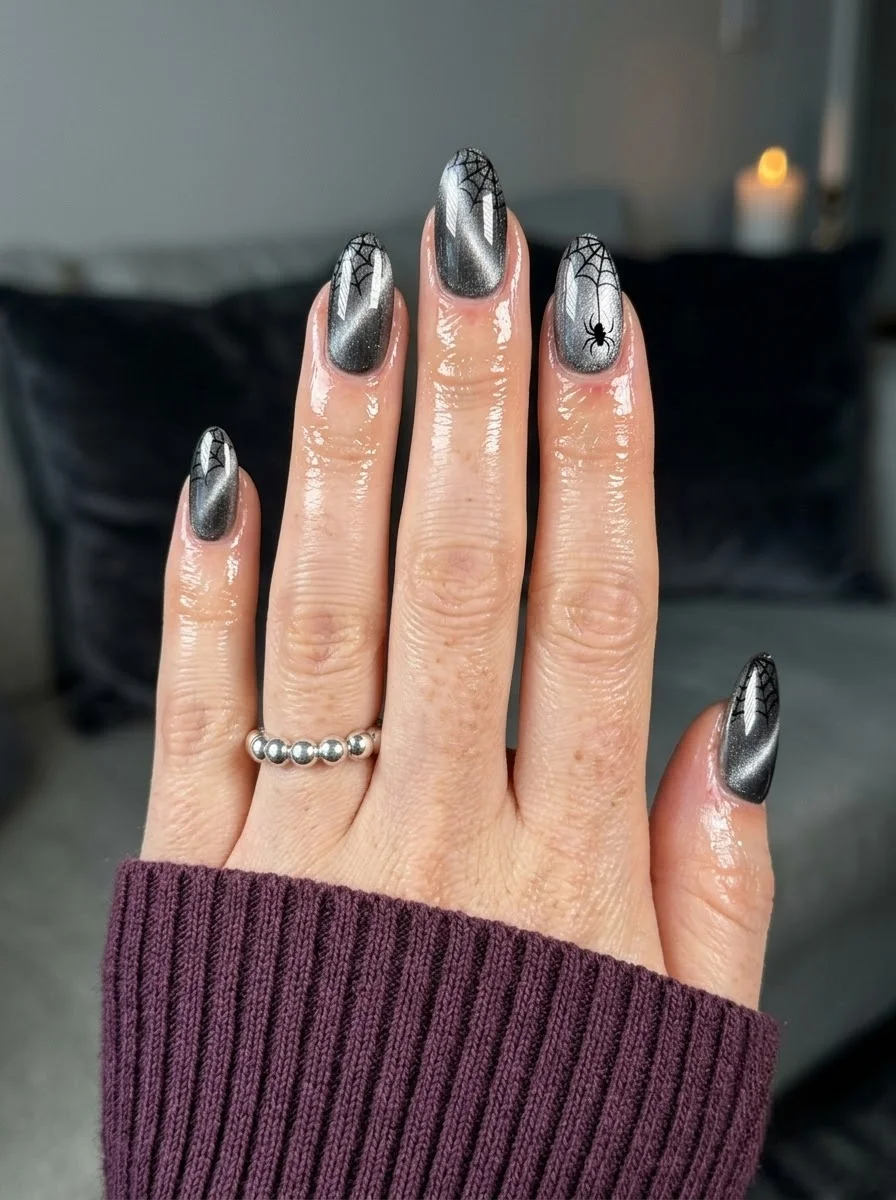
Silvery cat-eye shimmer with webs that catch the light.
Overview:
Cat-eye polish creates a magnetic stripe effect that shifts as your hand moves. On a grey base, this reads as liquid silver or molten metal, which gives the nails a supernatural quality that fits the Halloween theme without relying on literal imagery.
The black spiderwebs painted over the cat-eye base create an interesting layering effect. The webs sit on the surface while the magnetic shimmer moves underneath them, which gives the design depth that flat grey polish wouldn't achieve. The spider on the index finger grounds the web patterns and confirms the Halloween reading.
Cat-eye polish requires a magnet held over the wet polish to activate the magnetic particles. The technique is straightforward but timing-sensitive: hold the magnet for 10 to 15 seconds per nail, keeping it about 5mm above the surface. Too close and the magnet touches the wet polish. Too far and the particles don't move.
Design Breakdown:
Magnetic shimmer base with graphic line art on top. Two distinct techniques layered.
Base Color: Grey cat-eye or magnetic polish. The silver shimmer should be visible against the grey base.
Nail Shape: Medium almond. The curved surface enhances the cat-eye shift.
Design Element: Black spiderweb patterns on three to four nails, with a small black spider on the index finger.
Finish: High-gloss top coat to protect the magnetic effect and the line art.
Get The Look at Home:
The cat-eye effect needs to be fully set before the web art goes on. Painting on a tacky magnetic surface smears the shimmer.
- Cat-eye base: Apply one coat of grey magnetic polish. Hold the magnet over each nail for 10-15 seconds. Let dry completely.
- Second coat: Apply a second coat and repeat the magnet process. Two coats build better opacity and shimmer.
- Web lines: Using a thin striper brush and black polish, draw radial lines from a center point. Connect with curved horizontal lines.
- Spider: On the index finger, paint a small black spider within a web pattern.
- Dry completely: Black on cat-eye smears if the surface is even slightly tacky. Wait at least five minutes.
- Seal: One coat of top coat in a single stroke per nail.
9.Olive Green Drips and Skull
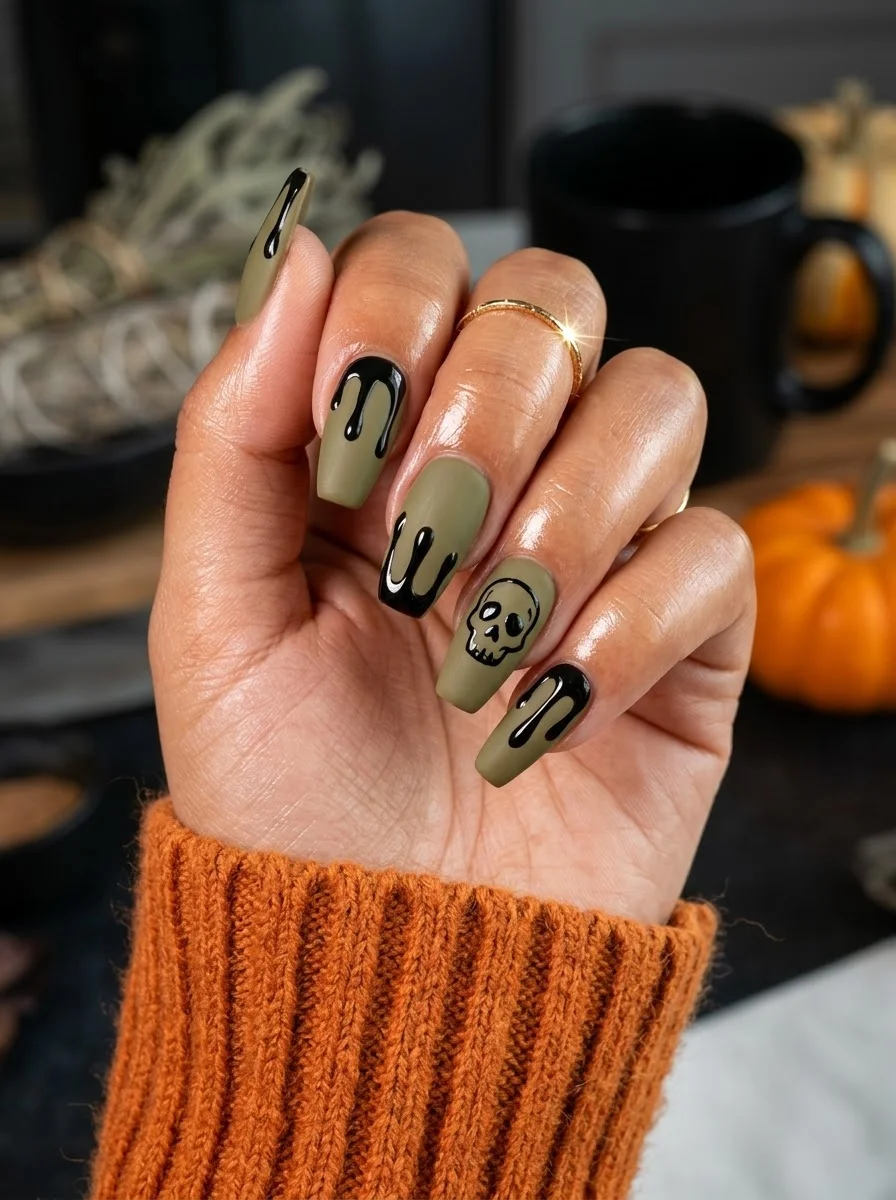
Matte olive meets glossy black drips for a textures contrast that works.
Overview:
Olive green is an unexpected Halloween color, and it works because of the texture contrast. The green base is matte, while the black drips are glossy. That difference in finish is what makes the design visually interesting. Your eye reads the velvety matte surface, then catches the wet-looking drips, then goes back to the matte. It's a push-and-pull that keeps the design from being one-note.
The skull on the ring finger is small and stylized, almost cartoon- like. It's not trying to be realistic or terrifying. That levity is what keeps the design from feeling heavy. The skull sits among the drips, which gives it context and makes the whole composition feel intentional rather than scattered.
The drip technique requires thick, self-leveling black polish or gel. Regular polish tends to be too thin and spreads into blobs instead of maintaining the drip shape. Building gel or a thick no-wipe top coat works better for dimensional drips that hold their form.
Design Breakdown:
Two-finish design: matte base with glossy dimensional accents. The texture contrast is the main attraction.
Base Color: A muted olive or army green with a matte finish.
Nail Shape: Medium coffin. The flat surface provides a stable canvas for the drip and skull art.
Design Element: Glossy black drips extending from the cuticle on three nails. A small skull illustration on the ring finger.
Finish: Matte on the green base; glossy on the black drips and skull. The contrast is the design.
Get The Look at Home:
Apply the matte coat first, then add the glossy drips on top. Going the other direction makes it harder to keep the finishes separate.
- Green base: Two coats of olive green. Let dry fully.
- Matte coat: Apply matte top coat over all nails. Let it set completely.
- Drips: Using a dotting tool and thick black polish or building gel, place a bead at the cuticle edge. Let it run downward naturally, or guide it with the tool. Vary the drip lengths.
- Skull: On the ring finger, use a thin brush to paint a small skull shape. Keep it simple: rounded head, two dot eyes, small nose triangle, and a line for the mouth.
- Cure or dry: If using gel for the drips, cure immediately so they don't flatten. If using polish, let dry for ten minutes.
- Selective gloss: Apply glossy top coat only over the drips and skull. Avoid the matte green areas.
24 Stunning Festival Hairstyle Ideas for Music Concert Nights 2026 🎶✨
10.Purple Chrome with Starbursts
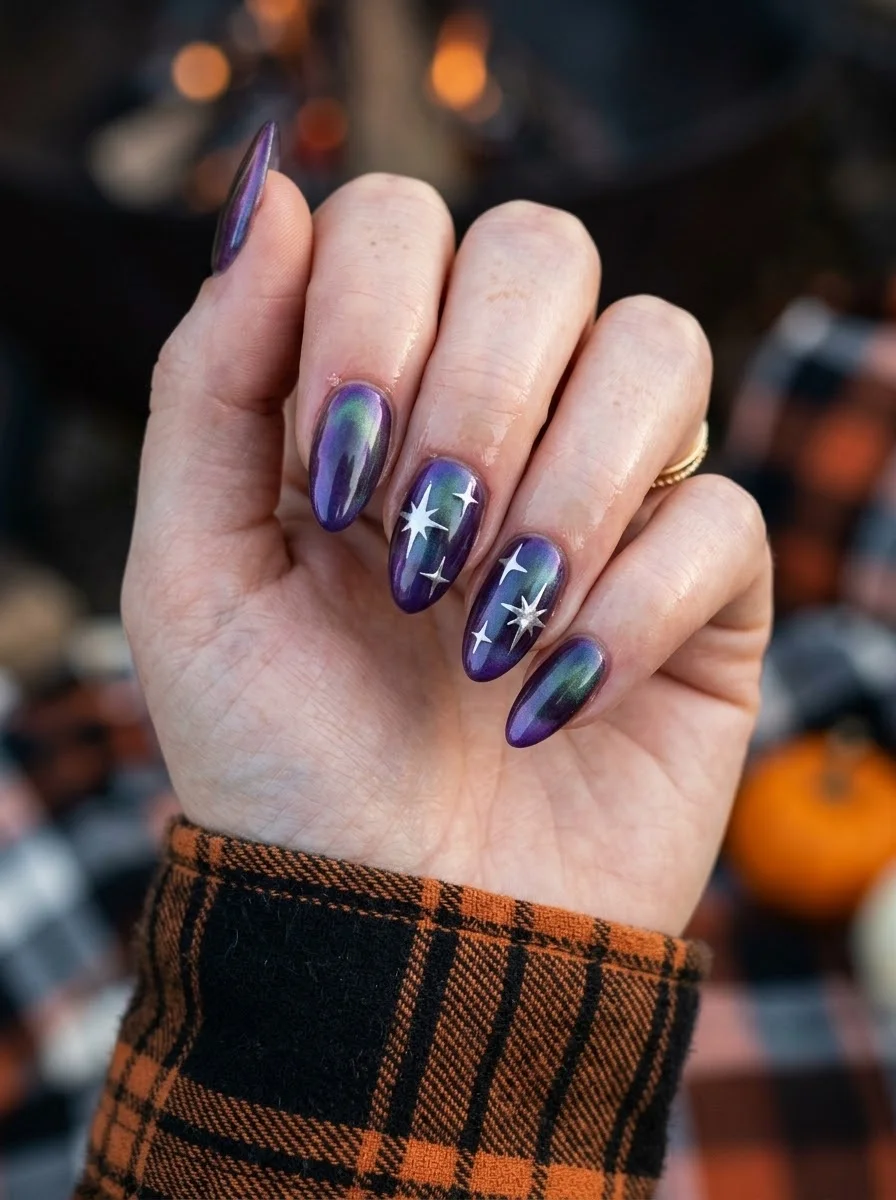
Cosmic purple chrome with stars that shift between silver and blue.
Overview:
Purple chrome or aurora finish Nails are the next trend for the Halloween. The surface shifts between deep violet and teal depending on the angle, which gives the nails a galaxy-like quality. The starbursts painted on two accent nails lean into that cosmic theme.
The starbursts are simple: a central dot with radiating lines of varying lengths. They're painted in silver or white, which pops against the dark purple chrome. The stars are small enough to read as texture from a distance, only revealing their shape up close. That dual reading keeps the design interesting at multiple viewing distances.
Chrome powder over purple gel creates a different effect than purple chrome polish. The powder gives a mirror-like finish that's more reflective and more color-shifting. The polish version is subtler and more forgiving to apply. Choose based on how dramatic you want the result.
Design Breakdown:
Chrome base with hand-painted celestial accents. The finish does the heavy lifting; the stars add narrative.
Base Color: Purple chrome or aurora powder over a dark base. The finish should shift between violet and blue-green.
Nail Shape: Medium almond. The curved surface maximizes the chrome's color shift.
Design Element: Silver or white starburst designs on two accent nails. Remaining nails are solid chrome.
Finish: Ultra-glossy chrome. The mirror finish is the point.
Get The Look at Home:
The starbursts need to be painted after the chrome is fully sealed. Painting directly on chrome powder causes the powder to lift.
- Dark base: Two coats of deep purple or black gel. Cure each coat.
- No-wipe top coat: Apply and cure. This is the chrome surface.
- Chrome application: Rub purple aurora or chrome powder onto the cured surface with a silicone applicator. Buff until mirror-smooth.
- Seal the chrome: Apply one coat of gel top coat and cure. This locks the powder in place.
- Starbursts: Using a thin liner brush and silver or white polish, paint a central dot with radiating lines on two accent nails.
- Final seal: One coat of top coat over the starburst nails to protect the art.
11.Dark Red Black Drip Tips
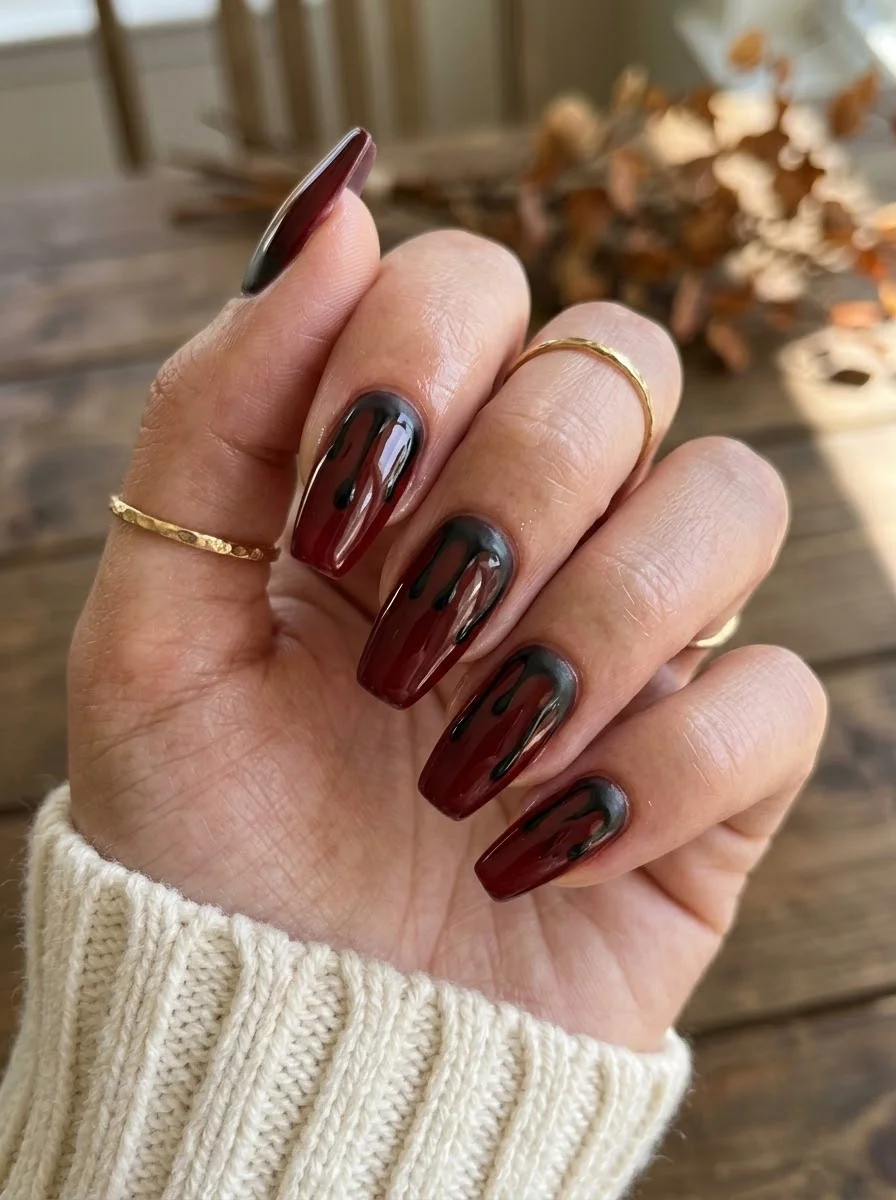
Dark wine with drips that look like they're bleeding from the edge.
Overview:
This dark red nail color is dark enough to read as nearly black in low light, but in direct sun, the red undertone emerges. That duality is what makes the color interesting.
The black drips extend from the tips downward toward the cuticle, which is the opposite of the typical drip direction. This inversion gives the design a "bleeding from the edge" quality that's more unsettling than the standard drip-from-cuticle approach. The glossy black against the slightly less glossy wine creates a subtle texture contrast.
The coffin shape is critical here. The flat tip provides a clean starting point for the drips, and the straight sides give each drip room to extend without running off the nail. On almond or stiletto shapes, the tapered sides would interfere with the drip placement.
Design Breakdown:
Dark base with inverted drip direction. The tip-to-cuticle flow is what makes this design distinctive.
Base Color: A dark red or oxblood burgundy. Dark, rich, and slightly translucent.
Nail Shape: Medium to long coffin. The flat tip is essential for the drip starting point.
Design Element: Black drips extending from the nail tips toward the cuticle. Three to four drips per nail, varying in length.
Finish: High-gloss over everything. The shine makes the wine look wet and the black look like liquid.
Get The Look at Home:
Gravity is your friend here. Let the drips run naturally rather than trying to paint each one manually.
- Wine base: Two coats of dark red. Let dry fully.
- Drip setup: Hold the nail tip-down. Place a bead of thick black polish at the very edge of the free edge.
- Guide the drip: Let gravity pull the bead toward the cuticle. Use a dotting tool to guide it if it veers sideways. Vary the bead sizes for different drip widths.
- Multiple drips: Place two to four drips per nail, spaced unevenly. Perfectly spaced drips look mechanical.
- Dry completely: Thick black drips take longer to dry than regular polish. Wait at least ten minutes.
- Seal: Two coats of top coat to smooth the raised drip texture and unify the finish.
29 Best Tropical Vacation Nails for Women in 2026 🌴
12.Grey Marble with Black Lace
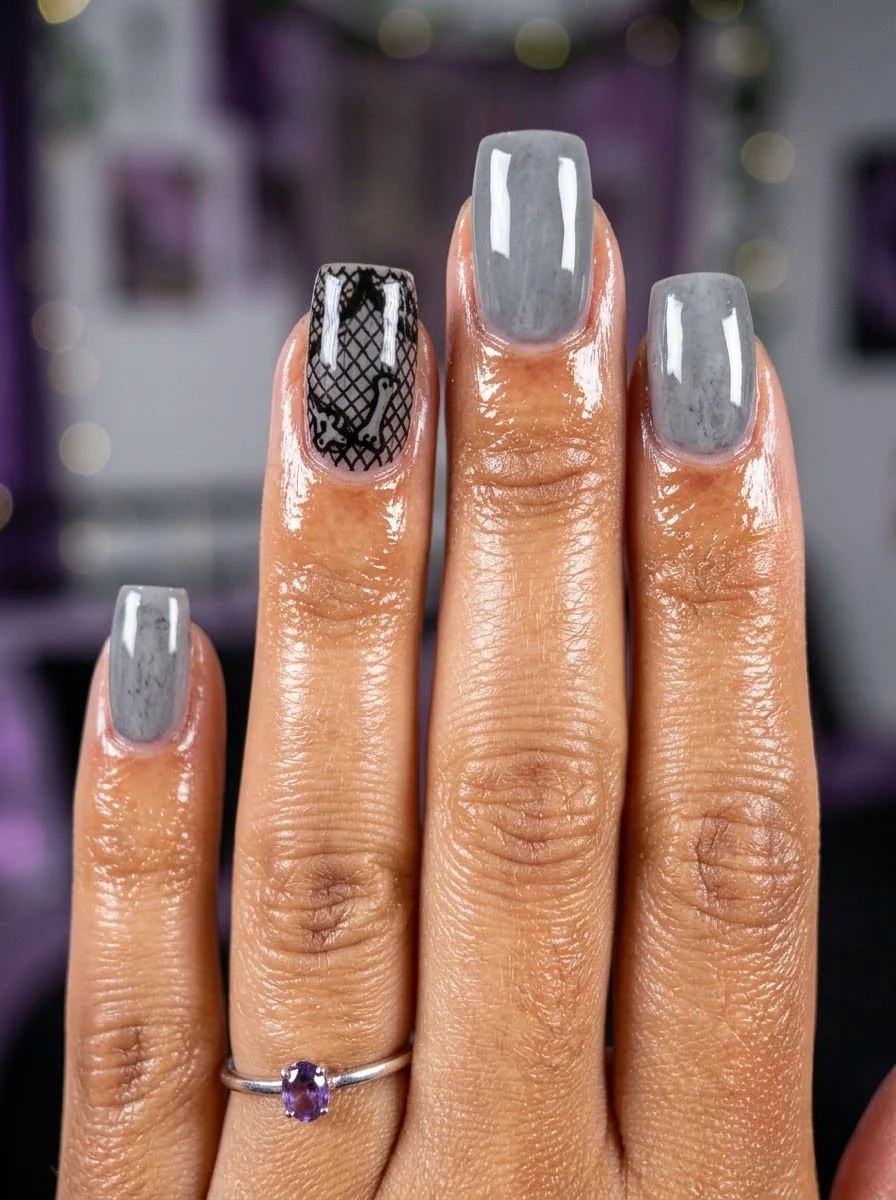
Cool grey marble with a lace accent that adds gothic elegance.
Overview:
Grey marble nails are already moody and atmospheric. Adding a black lace accent nail pushes the design into gothic territory without committing to a full goth aesthetic. The lace reads as a textile reference, which adds a layer of sophistication that all-over grey would miss.
The marble texture on the non-accent nails is subtle. It's not the bold, high-contrast marble you see on white nails. Instead, it's a soft, smoky variation that looks like polished stone. The effect is achieved through a wet-on-wet technique where slightly different shades of grey are dragged alongside each other.
The black lace on the ring finger can be achieved with stamping, decals, or freehand. Stamping gives the cleanest result, but decals are more forgiving for at-home application. Freehand lace is ambitious and requires a very thin liner brush.
Design Breakdown:
Tonal grey marble with one high-contrast accent nail. The lace is the focal point.
Base Color: A cool, light-to-medium grey with a subtle marble or smoky texture.
Nail Shape: Medium coffin. The flat surface showcases both the marble and the lace.
Design Element: Black lace pattern on the ring finger. Remaining nails are solid grey marble.
Finish: High-gloss top coat to smooth the marble texture and protect the lace.
Get The Look at Home:
The marble is simpler than it looks. The lace is where precision matters most.
- Grey base: One coat of light grey. Let it dry.
- Wet marble: Apply a second coat of grey. While wet, drop small amounts of darker grey and white onto the surface. Drag through with a toothpick to create soft swirls.
- Let set: Wait at least five minutes for the marble to dry.
- Lace accent: On the ring finger, use a stamping plate or decal to apply a black lace pattern. If freehanding, use a thin liner brush to create a net pattern with small floral motifs.
- Seal: Two coats of top coat to encapsulate the lace and smooth the marble surface.
13.Burgundy Roses with Gold
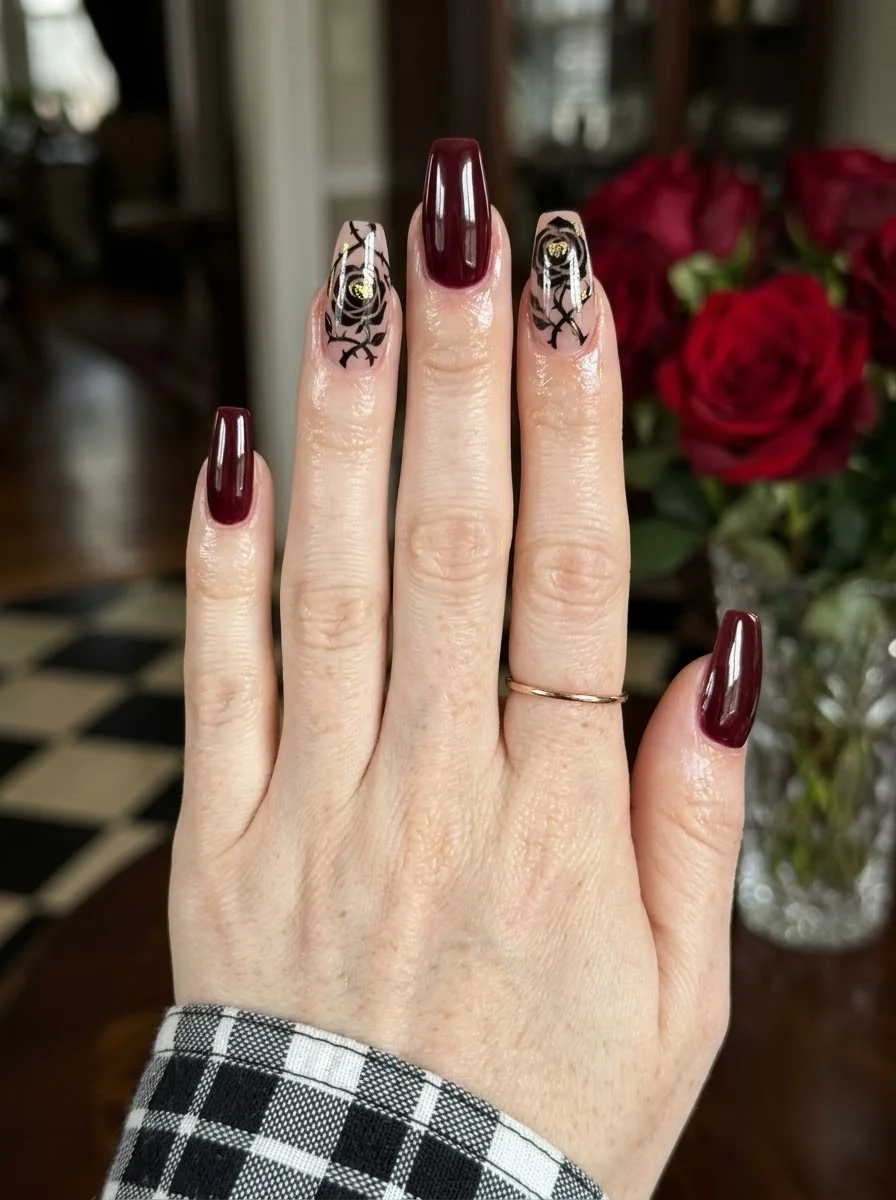
Dark romance with roses that look like they belong in a gothic garden.
Overview:
Deep burgundy paired with black rose art creates a gothic romance aesthetic that works well beyond Halloween. The solid burgundy nails anchor the set, while the sheer accent nails with black rose illustrations add visual complexity. The gold details on the roses catch light and prevent the design from reading as purely dark.
The sheer base on the accent nails is a deliberate choice. It creates negative space that lets the rose illustrations breathe. On an opaque base, the black line work would feel heavy. On sheer, the roses appear to float on the nail.
The rose outlines need a very thin liner brush. Thick lines overpower the delicate petal shapes and make the roses look cartoonish. The goal is delicacy, which requires a brush that holds enough polish to draw a complete petal outline without re-dipping.
Design Breakdown:
Solid dark base with sheer illustrated accent nails. The roses are the design; the burgundy is the frame.
Base Color: Deep burgundy on most nails. Sheer nude on two accent nails for the rose art.
Nail Shape: Medium to long coffin. The flat surface provides a stable canvas for the rose illustrations.
Design Element: Black rose outlines with gold accent details on sheer nude accent nails.
Finish: High-gloss top coat to protect the line work and deepen the burgundy.
Get The Look at Home:
Paint all the rose outlines first across both accent nails, then go back and add the gold details. This is faster than finishing one nail at a time.
- Burgundy base: Two coats on non-accent nails. Let dry fully.
- Sheer accent: Two coats of sheer nude on the ring and middle fingers.
- Rose outlines: Using a thin liner brush and black polish, draw the outer petal shapes. Start with the outermost petals and work inward. Three to four petals per rose.
- Inner detail: Add smaller curved lines inside the petals to suggest depth and layering.
- Gold accents: Using a fine brush and gold metallic polish, add small dots or lines along the petal edges. Less is more here.
- Seal: One coat of top coat, applied carefully to avoid smearing the fine line work.
24 Stunning Bridesmaid Hairstyles for Weddings 2026 💍✨
14.Emerald Cat-Eye Vines
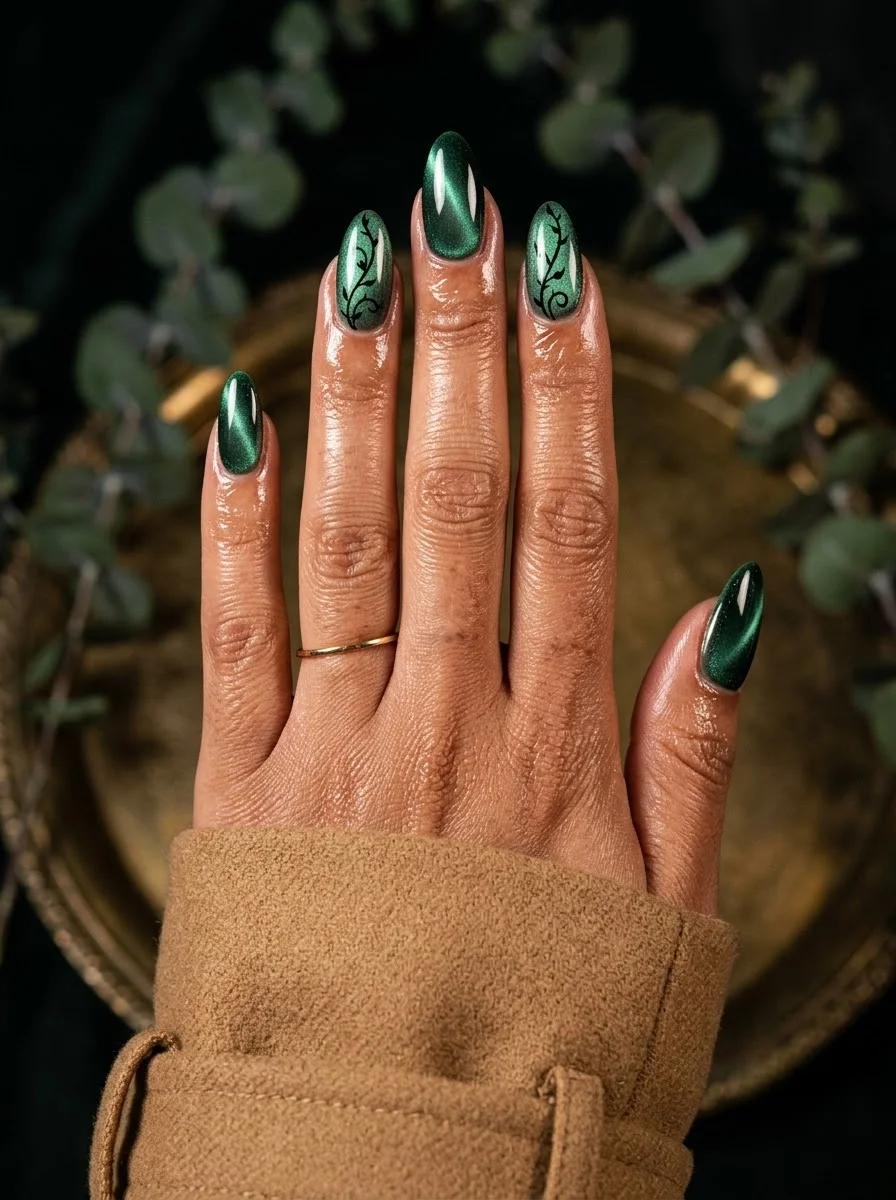
Deep emerald with a cat-eye shimmer that looks like enchanted forest.
Overview:
Emerald green cat-eye polish creates a magnetic stripe effect that looks like light filtering through a forest canopy. The shimmer shifts between deep green and near-black, which gives the nails a dimensional, almost living quality. It's the kind of finish that makes people ask what polish you're wearing.
The black vine and leaf designs on two accent nails lean into the forest theme. The vines are painted in thin, flowing lines that follow the natural curve of the nail. The leaves are small and scattered, which keeps the design from feeling cluttered. Together, the cat-eye and the botanical art create a "haunted forest" mood.
Cat-eye polish needs two coats for full effect. The first coat establishes the base color; the second coat, when magnetized, creates the visible stripe. Skipping the second coat leaves the shimmer looking weak and diffuse.
Design Breakdown:
Magnetic shimmer base with botanical line art. The cat-eye provides atmosphere; the vines provide narrative.
Base Color: Dark emerald green cat-eye or magnetic polish.
Nail Shape: Medium almond. The curved surface maximizes the cat-eye stripe effect.
Design Element: Black vine and leaf designs on two accent nails. Remaining nails are solid cat-eye.
Finish: High-gloss top coat to protect the magnetic effect and the line art.
Get The Look at Home:
The vine art goes on after the cat-eye is fully sealed. Painting directly on magnetized polish can disturb the particle alignment.
- Cat-eye base: Apply one coat of emerald magnetic polish. Hold the magnet over each nail for 10-15 seconds. Let dry.
- Second coat: Repeat with a second coat and magnet. Two coats build depth.
- Seal the cat-eye: Apply one coat of top coat and let it dry. This protects the magnetic effect.
- Vine lines: Using a thin liner brush and black polish, draw flowing curved lines on two accent nails. Let the brush wobble slightly for organic-looking vines.
- Leaf details: Add small almond-shaped leaves along the vines. Alternate the leaf direction for a natural look.
- Final seal: One coat of top coat over the accent nails to protect the art.
15.Velvet Burgundy with Gold Swirls
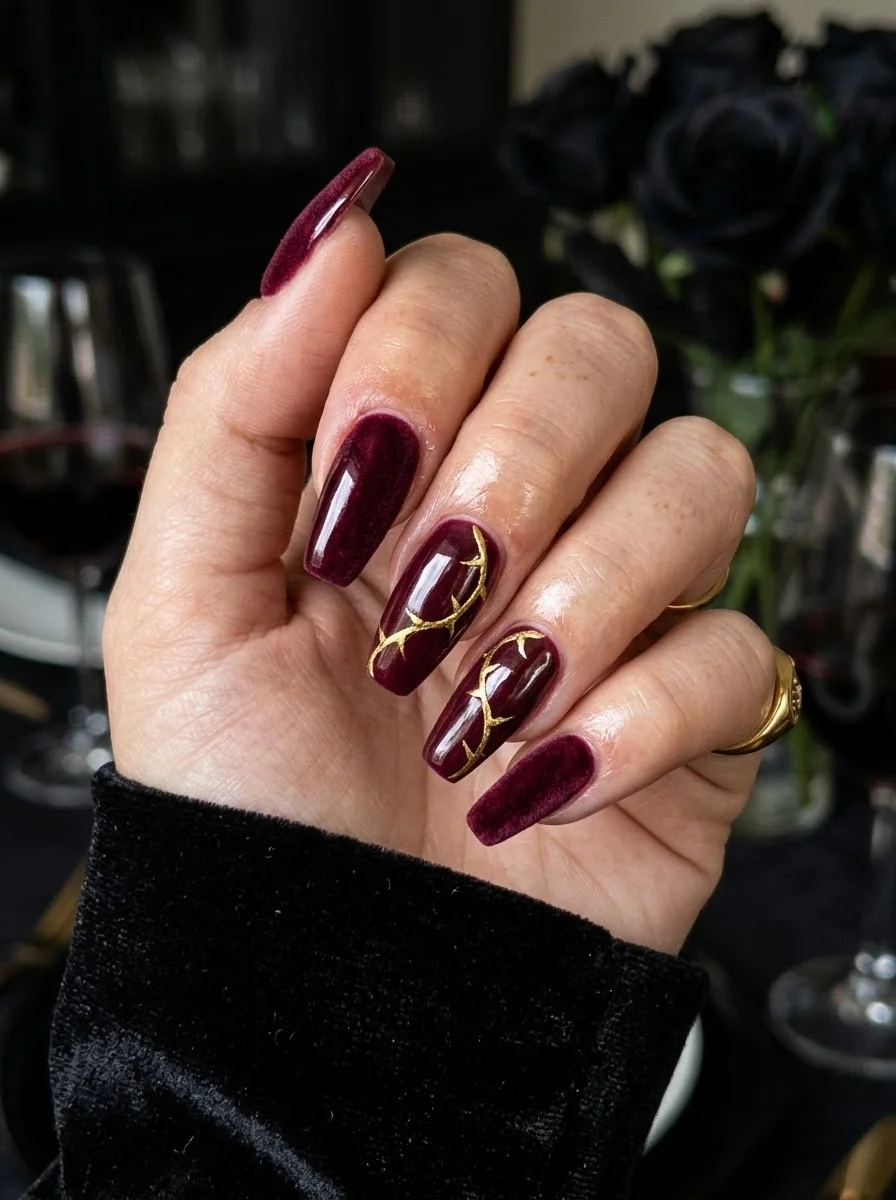
Velvet-textured burgundy with gold that looks like gilded branches.
Overview:
Velvet nail polish has a fuzzy, matte-textured finish that looks like actual fabric. On a deep burgundy, the effect is luxurious and tactile. It catches light differently than glossy or matte finishes, creating a soft, diffused glow that shifts as your hand moves.
The gold swirl designs on the accent nails create a striking contrast against the matte velvet texture. The gold is metallic and reflective, which is the opposite of the velvet's light-absorbing surface. That push-and-pull between matte and metallic is what makes the design visually interesting.
Velvet polish is finicky to apply. It needs to be applied quickly and evenly, because it dries faster than regular polish and shows brush marks easily. Work one nail at a time, and don't go back over areas that have already started to set.
Design Breakdown:
Two-finish design: velvet matte base with metallic accents. The texture contrast is the entire point.
Base Color: Deep burgundy velvet or magnetic matte polish.
Nail Shape: Medium to long coffin. The flat surface showcases both the velvet texture and the gold art.
Design Element: Gold metallic swirl and branch designs on two accent nails. Remaining nails are solid velvet burgundy.
Finish: Velvet matte on the base; metallic gold on the accents. The contrast is the design.
Get The Look at Home:
Apply the velvet base first across all nails, then add the gold art on the accent nails. The gold goes on top of the velvet, not under it.
- Velvet base: Two coats of burgundy velvet polish on all nails. Work quickly and don't over-brush.
- Let set: Wait at least five minutes for the velvet texture to fully develop.
- Gold swirls: Using a thin liner brush and gold metallic polish, paint flowing curved lines on two accent nails. Branch them outward like tree limbs.
- Gold dots: Add small gold dots along the branches for a gilded effect. Three to five per nail.
- Selective seal: Apply glossy top coat only over the gold art. Avoid the velvet areas, as top coat will destroy the texture.
28 Back to School Nail Art Designs for the New Semester (2026) 💅
16.Espresso Constellations
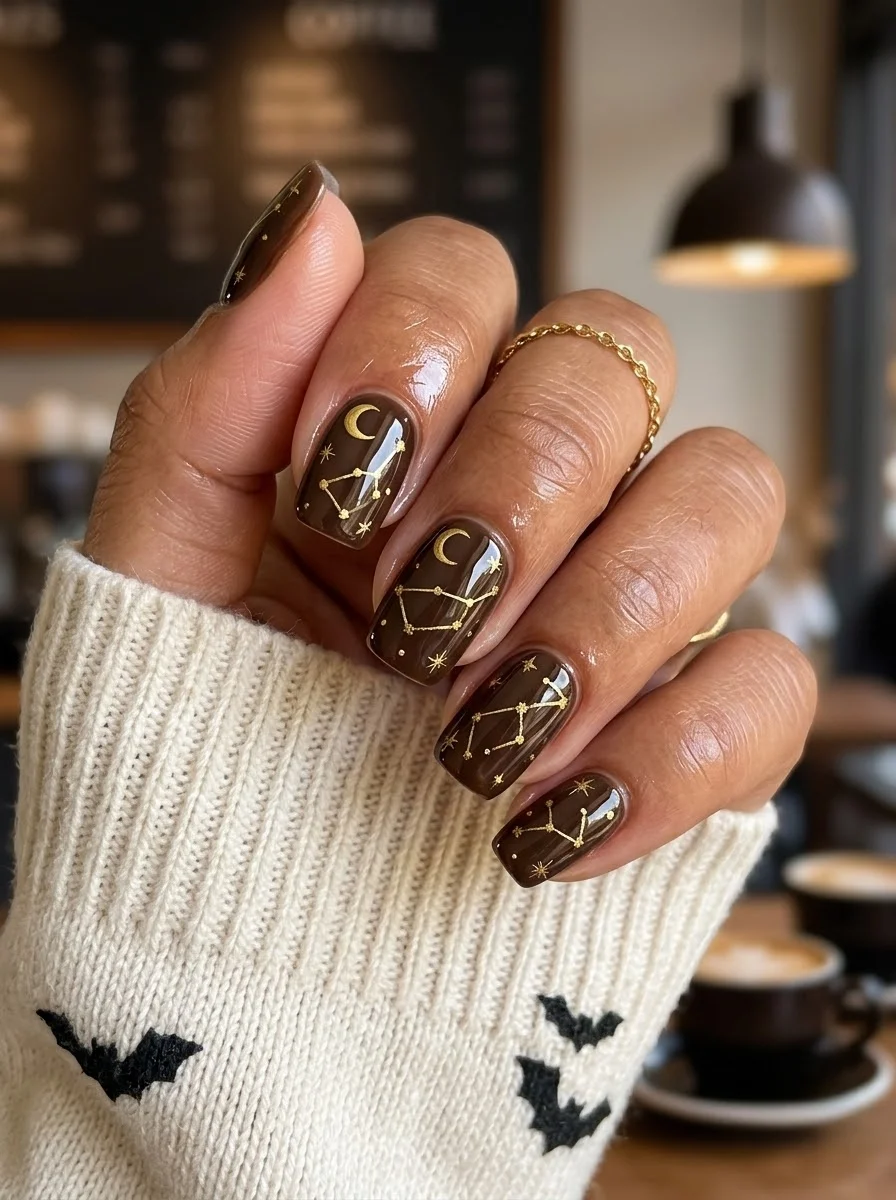
Dark as midnight coffee with constellations mapped in gold.
Overview:
Dark brown with warm undertones that emerge in direct light. It's the color of a very dark roast coffee, and it works as a Halloween base because it's dark without being stark like pure black.
The gold constellation designs transform the brown from "neutral" to "celestial." Each nail carries a different constellation pattern with tiny gold dots connected by thin lines, plus a crescent moon on one nail. The gold against the dark brown creates a warm, vintage feeling, like an old star chart.
Squaoval is the right shape for this design. The celestial art is detailed enough that it needs a clean, proportional canvas. Long nails would make the constellations feel sparse; short nails keep them compact and readable.
Design Breakdown:
Dark chocolate brown base with celestial gold illustration. The brown is the night sky; the gold is the stars.
Base Color: A deep, warm espresso brown. Nearly black but with visible warmth.
Nail Shape: Short squaoval. Clean and practical, matching the intimate scale of the constellation art.
Design Element: Gold constellation patterns with connected dots and a crescent moon accent on one nail.
Finish: High-gloss top coat to deepen the brown and make the gold shine.
Get The Look at Home:
The constellation dots are tiny. Use the smallest dotting tool you have, or the tip of a toothpick.
- Brown base: Two coats of deep espresso brown. Let each coat dry fully.
- Constellation dots: Using a small dotting tool and gold metallic polish, place tiny dots in constellation patterns on each nail. Three to five dots per nail.
- Connect the dots: Using a thin liner brush and gold polish, draw thin lines connecting the dots. Keep the lines hair-thin.
- Moon accent: On one nail, paint a small crescent moon in gold. Place it off-center for a more natural look.
- Star accents: Add tiny four-pointed star shapes (a cross with tapered ends) scattered around the constellations.
- Seal: One coat of top coat to protect the gold art and deepen the brown base.
17.Red Cat-Eye with Lace
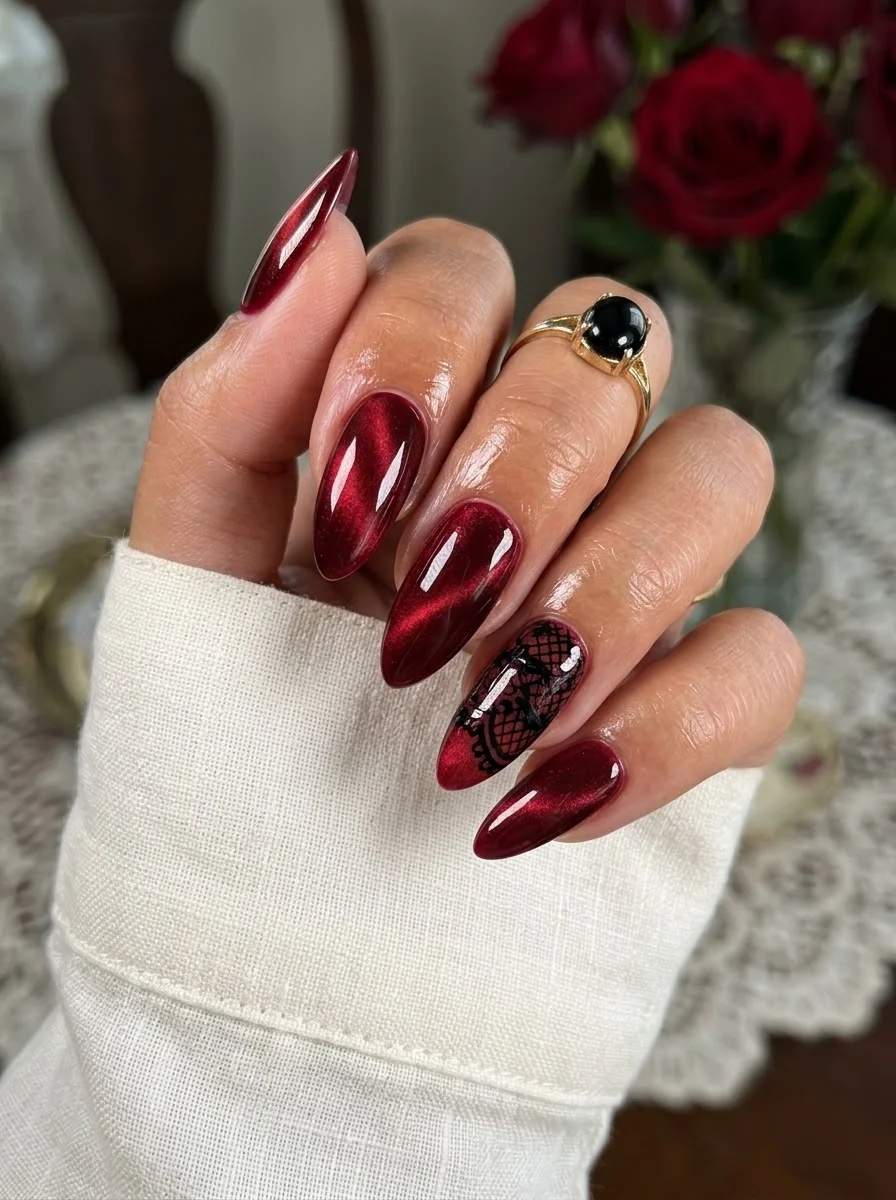
Crimson cat-eye that shifts like liquid rubies, with a lace accent for gothic flair.
Overview:
Red cat-eye polish creates a magnetic stripe effect that looks like light passing through a ruby. The shimmer shifts between deep red and near-black, which gives the nails a dimensional, almost liquid quality. It's more dramatic than flat red polish, and it fits the Halloween mood without relying on literal imagery.
The black lace accent on the ring finger adds a gothic texture that complements the cat-eye's depth. The lace is intricate enough to reward close inspection but small enough that it doesn't compete with the magnetic shimmer. It's a supporting detail, not a competing element.
Red cat-eye polish is more forgiving than red cream polish. The magnetic particles mask minor application imperfections that would be visible in a flat red. If your red polish applications tend to streak, cat-eye is the way to get a red nail without the frustration.
Design Breakdown:
Magnetic shimmer base with one textured accent. The cat-eye is the star; the lace is the supporting cast.
Base Color: Deep red cat-eye or magnetic polish. The shimmer should shift between crimson and near-black.
Nail Shape: Medium almond. The curved surface maximizes the cat-eye stripe.
Design Element: Black lace pattern on the ring finger. Remaining nails are solid red cat-eye.
Finish: High-gloss top coat to protect the magnetic effect and the lace.
Get The Look at Home:
The cat-eye needs two coats for full depth. The lace goes on after the cat-eye is sealed.
- Cat-eye base: Apply one coat of red magnetic polish. Hold the magnet for 10-15 seconds. Let dry.
- Second coat: Repeat for depth. Two coats build the shimmer.
- Seal: One coat of top coat to lock the magnetic effect.
- Lace accent: On the ring finger, use a stamping plate or decal to apply a black lace pattern. If freehanding, create a net pattern with small floral motifs.
- Final seal: One coat of top coat over the lace to protect it.
28 Stunning Baddie Summer Hairstyles for 2026 🔥☀️
18.Silver Chrome with Red Spiderweb
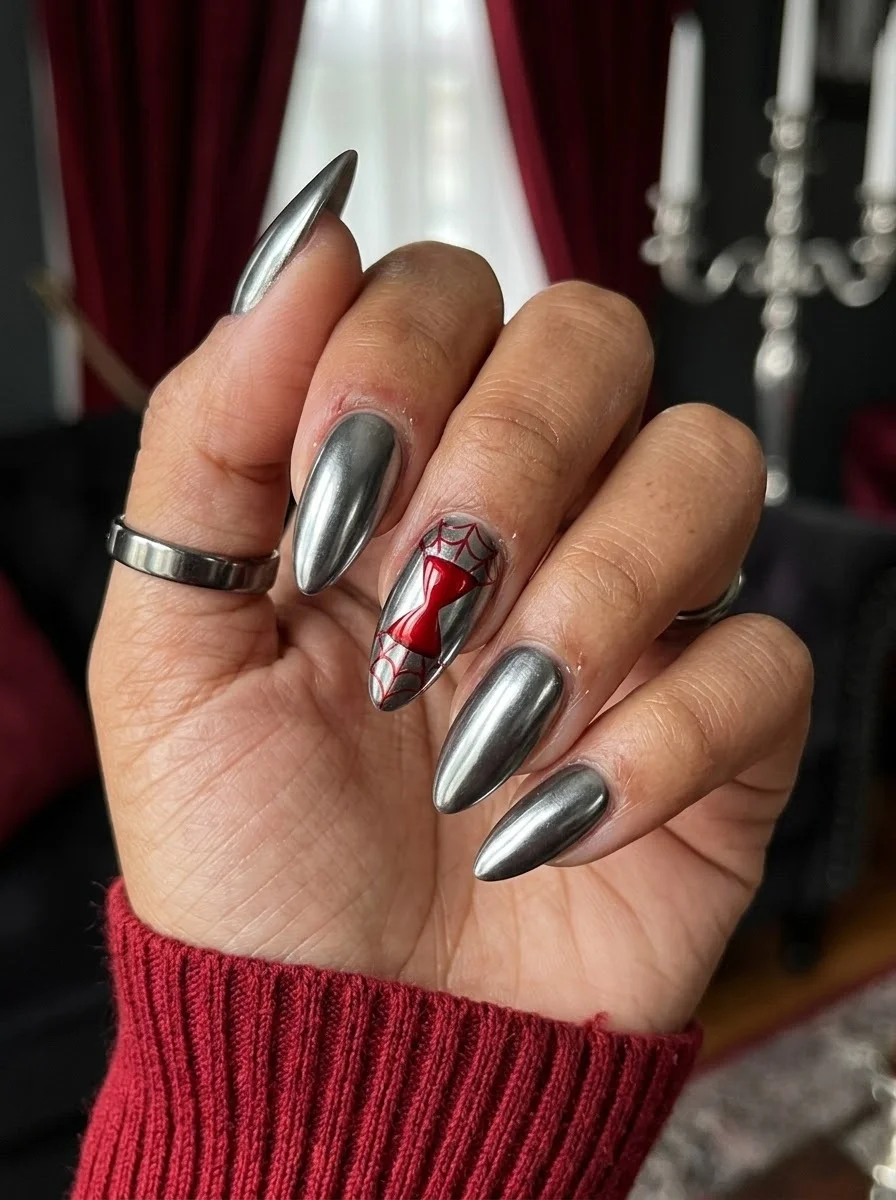
Liquid silver with a red accent that pops like a drop of blood.
Overview:
Silver chrome nails look like liquid metal. The mirror-like finish reflects everything around it, which makes the nails appear to change color depending on your environment. In a room with warm lighting, they pick up gold tones. In cool light, they look icy blue. That adaptability makes chrome one of the more versatile Halloween finishes.
The red spiderweb and bow on the middle finger is the design's curveball. Red against silver is a high-contrast pairing that immediately draws the eye. The web pattern behind the bow adds texture and context, while the bow itself adds a touch of femininity that softens the gothic edge. It's an unexpected combination that works because both elements share the same red.
Chrome powder over a light base gives a different effect than over a dark base. Over light colors, the chrome reads as bright and reflective. Over dark colors, it reads as deeper and more moody. For this design, a light or white base under the chrome gives the brightest silver.
Design Breakdown:
Mirror-finish chrome with one illustrated accent. The silver is the canvas; the red is the statement.
Base Color: Silver chrome powder over a white or light base for maximum brightness.
Nail Shape: Medium to long stiletto or almond. The pointed shape enhances the liquid-metal effect.
Design Element: A red spiderweb with a red bow accent on the middle finger.
Finish: Ultra-glossy chrome. The mirror finish is the point.
Get The Look at Home:
The chrome needs to be fully sealed before the red art goes on. Chrome powder lifts easily if painted over directly.
- Light base: Two coats of white or very light grey gel. Cure each coat.
- No-wipe top coat: Apply and cure. This is the chrome surface.
- Chrome application: Rub silver chrome powder onto the cured surface. Buff until mirror-smooth.
- Seal the chrome: One coat of gel top coat, cured. This locks the powder.
- Red web: Using a thin liner brush and red polish, draw a spiderweb pattern on the middle finger. Add a small bow shape at the center or top of the web.
- Final seal: One coat of top coat over the red art.
19.Glossy Black with Feather
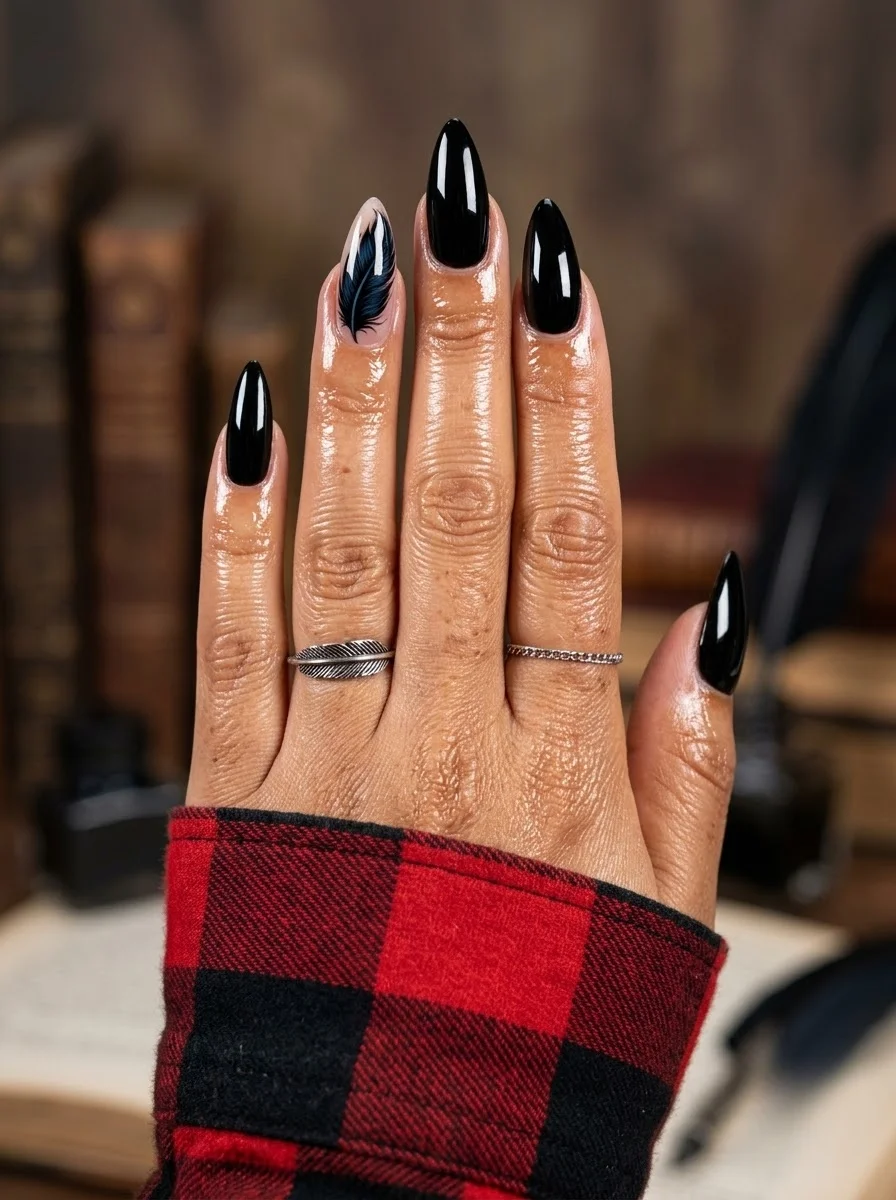
Sleek black with a feather that looks like it just landed.
Overview:
Glossy black nails are one of the simplest and most effective Halloween options. They're dark, they're dramatic, and they go with everything. The challenge with all-black sets is that they can feel monotonous across ten nails. This design solves that problem with a single sheer accent nail.
The feather on the accent nail is painted in black against a sheer nude base, which creates a silhouette effect. The feather looks like it's resting on bare skin rather than painted onto a colored surface. The fine barbs of the feather require a very thin liner brush and a steady hand, but the result is worth the effort.
Black polish is notoriously difficult to remove. It stains cuticles and leaves a grey residue on skin even with careful application. A peel-off base coat on the black nails makes removal significantly easier, though it does reduce wear time.
Design Breakdown:
Solid dark base with one transparent accent. The feather is the focal point; the black provides the backdrop.
Base Color: Opaque glossy black on most nails. Sheer nude on one accent nail.
Nail Shape: Medium almond. The curved shape complements the organic feather form.
Design Element: A black feather illustration on one sheer accent nail. Remaining nails are solid black.
Finish: Ultra-glossy. The shine makes the black look like polished onyx.
Get The Look at Home:
The feather barbs need a very thin brush. If your liner brush is too thick, the barbs will look like thick lines rather than delicate filaments.
- Black base: Two coats of opaque black on four nails. Let dry fully.
- Sheer accent: Two coats of sheer nude on one nail.
- Feather spine: Using a thin liner brush and black polish, draw a single curved line down the center of the accent nail. This is the feather's central shaft.
- Feather barbs: From the central shaft, flick thin lines outward at an angle. Keep them short and closely spaced near the base, longer and more spaced toward the tip.
- Refine: Go back and thin out any barbs that look too thick. The feather should look delicate, not heavy.
- Seal: One coat of top coat over everything. Float the brush to avoid dragging the feather lines.
32 Bright & Fun Summer Toe Nail Designs (2026)
20.Purple Black Ombre with Moon
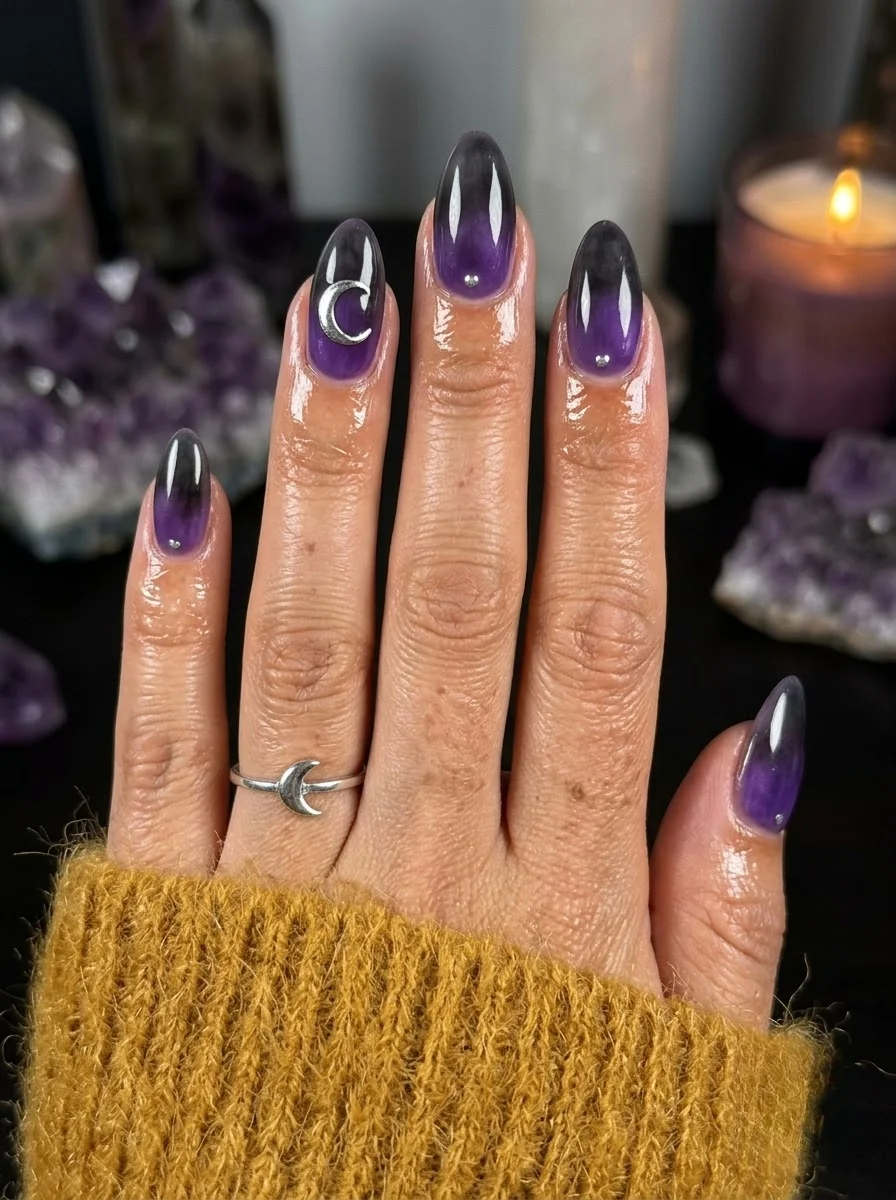
A night-sky gradient with a moon that catches the light.
Overview:
Purple-to-black ombre is a gradient that captures the exact color of a Halloween night sky. The transition from deep violet at the cuticle to near-black at the tip is seamless, with no visible line where the two colors meet. The effect is atmospheric and moody without being overtly themed.
The silver crescent moon on one accent nail confirms the celestial reading. It's small and placed off-center, which makes it feel like a natural part of the night-sky gradient rather than a sticker placed on top. The tiny stud or gem at the base of the moon adds a subtle dimensional detail.
Ombre gradients require a makeup sponge for blending. The sponge technique creates a soft transition, but each layer needs to dry before the next goes on. Rushing the layers causes the colors to mix into a muddy grey instead of a clean gradient.
Design Breakdown:
Sponge-blended gradient with one celestial accent. The gradient is the atmosphere; the moon is the narrative.
Base Color: Purple at the cuticle transitioning to black at the tip.
Nail Shape: Medium almond. The tapered shape enhances the gradient's flow toward the tip.
Design Element: A silver crescent moon on one accent nail, with a small stud or gem at its base.
Finish: High-gloss top coat to blend the gradient and saturate the colors.
Get The Look at Home:
Build the gradient in thin layers. Three to four light sponge passes create a better blend than one heavy press.
- White undercoat: One coat of white. This makes the purple and black appear more saturated.
- Sponge setup: Paint a stripe of purple and a stripe of black side by side on a makeup sponge. Dab on paper first to remove excess.
- Build the fade: Press the sponge onto the nail with purple at the cuticle and black at the tip. Three to four passes builds opacity. Let each pass dry for thirty seconds.
- Dry completely: Wait at least ten minutes. The sponge leaves a textured surface that needs time to level.
- Moon accent: Using a thin brush and silver polish, paint a crescent moon on one nail. Place a small silver stud at the base if desired.
- Seal: Two coats of top coat to smooth the sponge texture and protect the moon.
21.Cracked Bone with Skeleton Hand
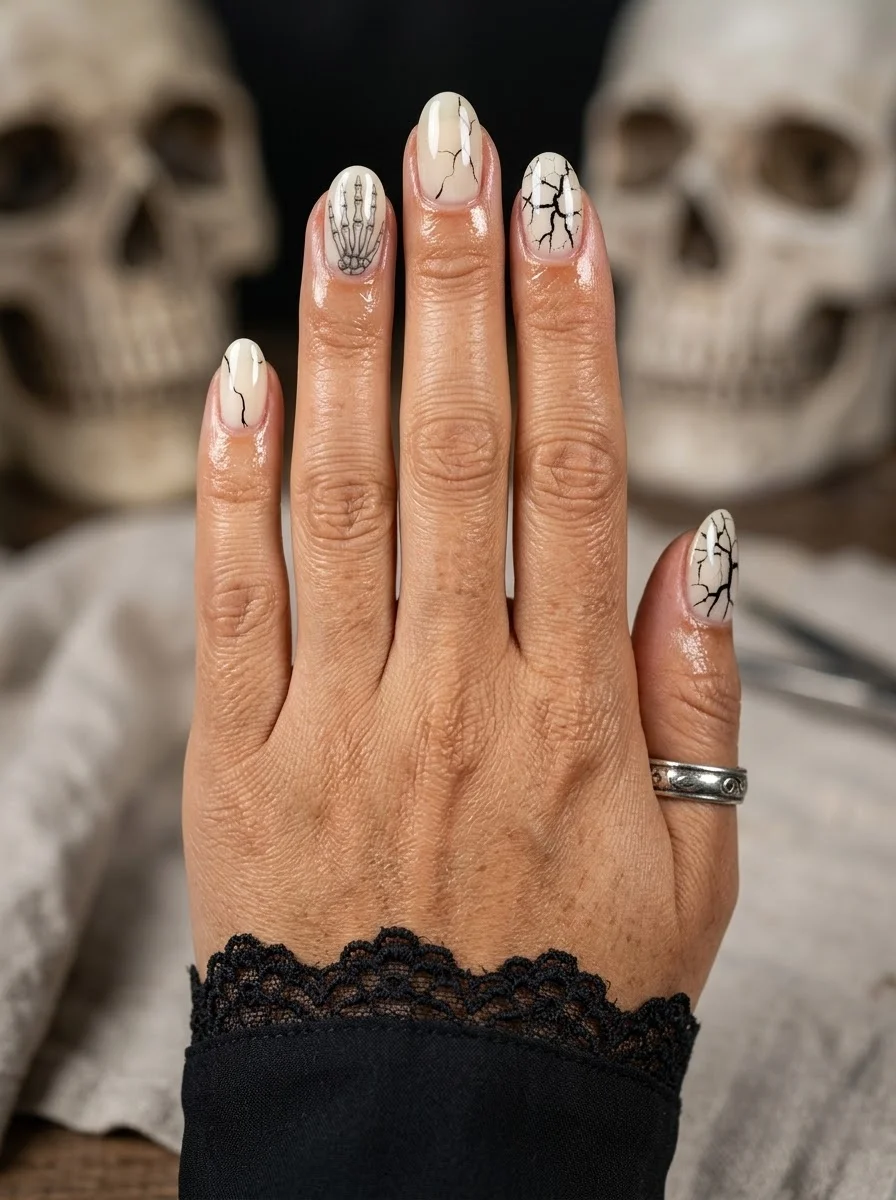
Aged bone texture with a hand reaching from beyond.
Overview:
The base is a warm, off-white that looks like aged bone or antique porcelain. The black crackle lines running through it create a fractured texture that's more interesting than solid color.
The skeleton hand on the ring finger is the design's anchor. It's painted in fine black lines against the cream base, which gives it an illustrated quality. The hand is detailed enough to be recognizable but simple enough that it doesn't overwhelm the crackle pattern on the other nails.
The cream base is more forgiving than pure white. White polish magnifies every ridge and brush mark, but cream has enough warmth to disguise minor imperfections. It's a good choice for at-home application where precision isn't guaranteed.
Design Breakdown:
Textured neutral base with one illustrative accent. The crackle is the atmosphere; the skeleton hand is the focal point.
Base Color: A warm cream or off-white. Not stark white, not yellow. Think aged paper or bone.
Nail Shape: Medium almond. The curved shape complements the organic crackle pattern.
Design Element: Black crackle or vein lines on most nails, with a skeleton hand illustration on the ring finger.
Finish: High-gloss top coat to smooth the crackle texture and protect the art.
Get The Look at Home:
The crackle lines should be irregular and organic. Perfectly straight lines look artificial.
- Cream base: Two coats of warm cream. Let dry fully.
- Crackle lines: Using a thin liner brush and black polish, draw irregular branching lines across each nail. Vary the thickness and direction. Some lines should be thin and wispy, others slightly thicker.
- Skeleton hand: On the ring finger, paint the outline of a hand with extended fingers. Add small lines at each joint for the knuckle details. Keep the bones thin.
- Refine: Go back and thin out any lines that look too heavy. The crackle should look like natural fractures, not drawn lines.
- Seal: One coat of top coat to smooth the surface and protect the fine line work.
27 Stunning Beach Wedding Hairstyles for Brides & Family 2026 🌊💍
22.Black to Blood Red Ombre
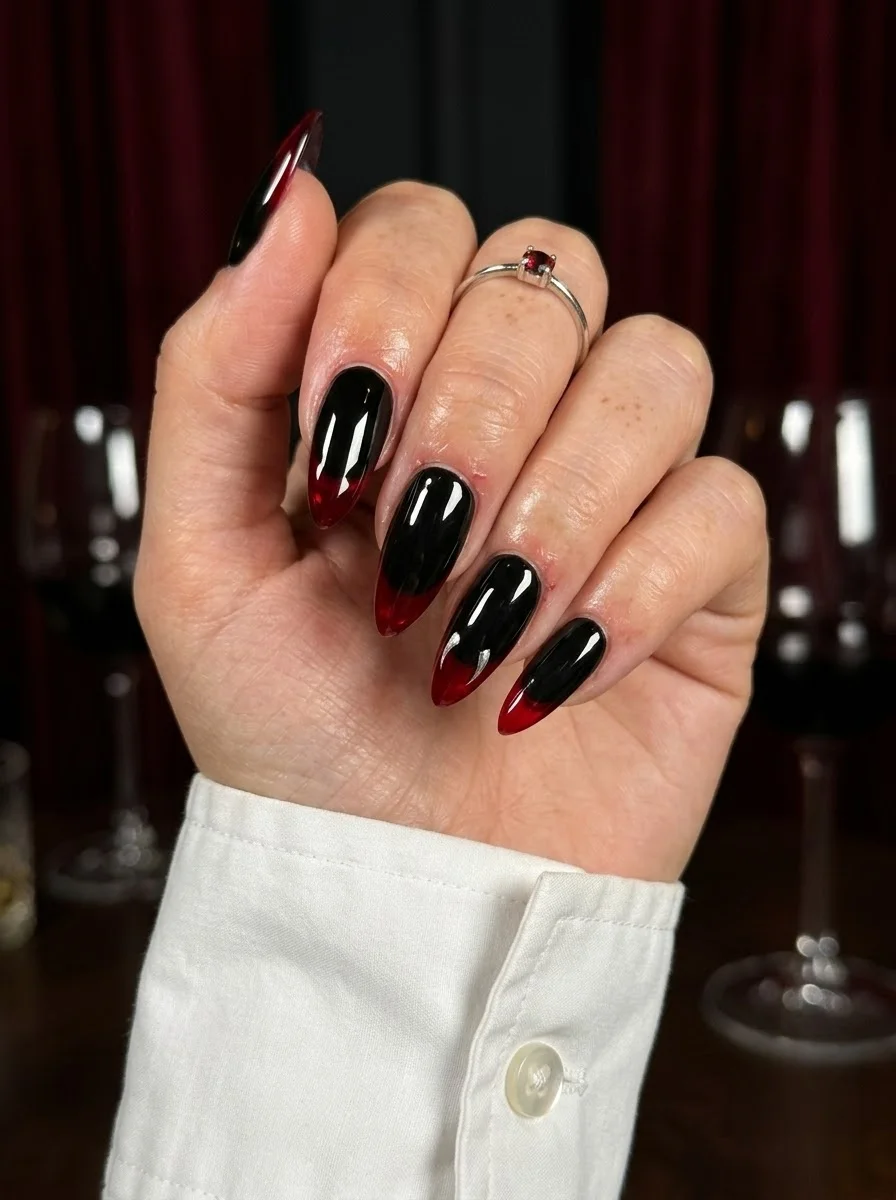
A gradient that looks like it's bleeding from the tips.
Overview:
Black fading to deep red is one of the most dramatic ombre combinations in the Halloween category. The gradient creates the illusion that the nails are transitioning from shadow to blood, which is exactly the kind of visual storytelling Halloween nails should do.
The stiletto shape amplifies the drama. The pointed tip is where the red is most saturated, which draws the eye to the sharpest part of the nail. On a rounded or square shape, the same gradient would feel less aggressive. The stiletto is what makes this design feel dangerous.
The red needs to be a true blood red, not a bright cherry or a dark burgundy. The specific shade matters because it determines whether the gradient reads as "dramatic" or "muddy." Look for a red with blue undertones, not orange ones.
Design Breakdown:
Sponge-blended gradient with no additional art. The color transition is the entire design.
Base Color: Black at the cuticle, transitioning to deep blood red at the tips.
Nail Shape: Medium to long stiletto. The pointed tip is essential for the drama.
Design Element: None. The gradient is the design.
Finish: Ultra-glossy. The shine makes the red look wet and the black look like polished obsidian.
Get The Look at Home:
This gradient is more forgiving than lighter combinations because both colors are dark. Imperfect blending reads as intentional.
- Black base: One coat of opaque black. Let dry.
- Sponge setup: Paint a stripe of black and a stripe of blood red side by side on a makeup sponge. Dab on paper first.
- Build the fade: Press the sponge onto the nail with black at the cuticle and red at the tip. Three to four passes builds opacity.
- Clean the blend: If the transition line is visible, do one more pass with the sponge focused on the middle zone.
- Dry completely: Wait at least ten minutes before top coating. The sponge texture needs time to level.
- Seal: Two coats of top coat to smooth the surface and intensify the colors.
23.Stained Glass Roses
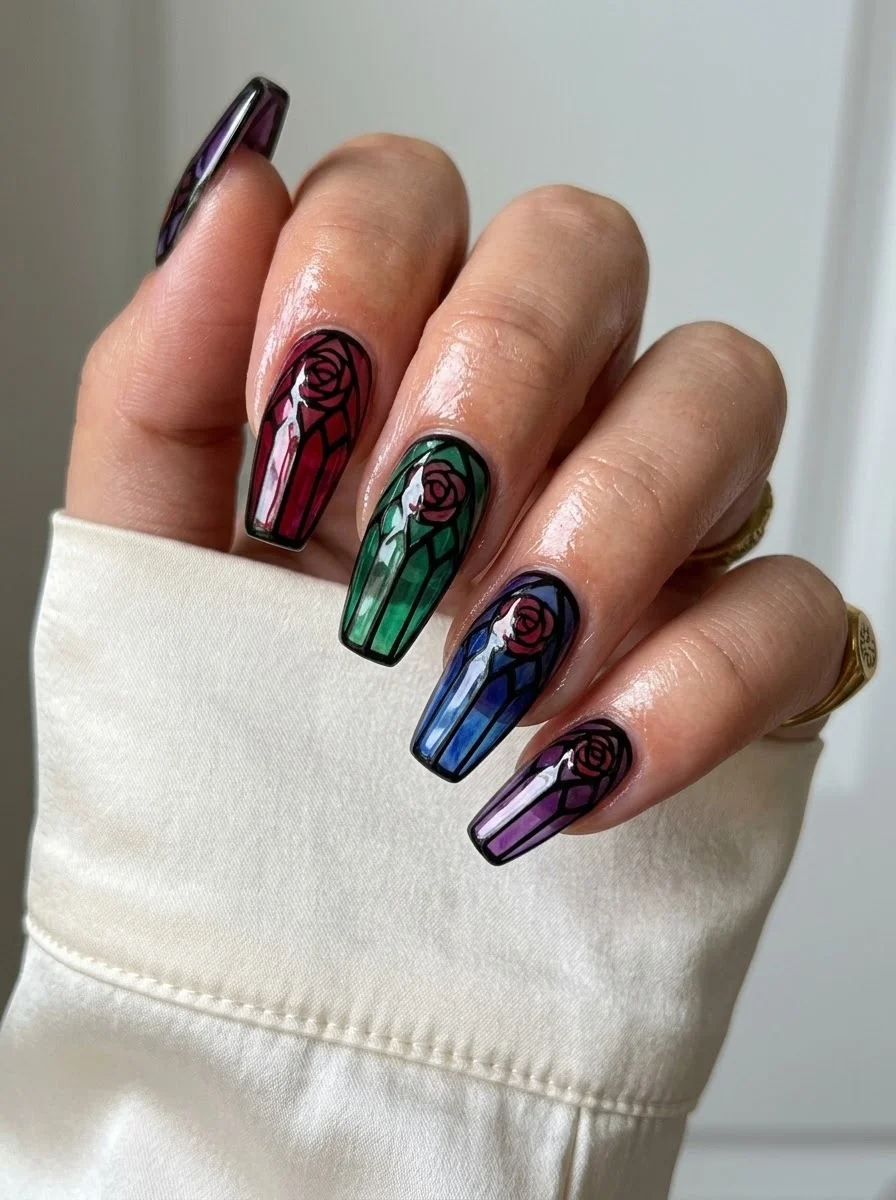
Each nail is a different colored rose in a gothic cathedral window.
Overview:
Stained glass nail art is one of the most technically demanding designs in this collection. Each nail features a rose rendered in a different jewel tone (red, green, blue, purple) with black outlines creating the leaded-glass effect. The result looks like a miniature cathedral window on each finger.
What makes this design work is the consistent black outline technique. Every color section is bordered by thin black lines, which creates the "leaded glass" illusion. Without the outlines, you'd have four different colored roses that look unrelated. The black lines unify the different colors into a single design language.
This is not a beginner design. The outlines need to be thin and consistent, and each color section needs to be filled cleanly without bleeding into adjacent sections. Budget significant time for this one, and consider doing one or two nails per session rather than all ten at once.
Design Breakdown:
Multi-color illustration with black outline structure. The outlines are what make it "stained glass" rather than just "colorful roses."
Base Color: Each nail has a different jewel tone: deep red, emerald green, sapphire blue, and royal purple.
Nail Shape: Medium to long coffin. The flat surface provides the canvas needed for the detailed illustration.
Design Element: Rose shapes in different jewel tones, each outlined in black with interior "pane" lines creating the stained glass effect.
Finish: High-gloss top coat to make the colors look like light passing through glass.
Get The Look at Home:
Do the black outlines first across all nails, then fill in the colors. This is the opposite of most nail art, but it gives you the structural framework to work within.
- Light base: One coat of white or very light grey on all nails. This makes the jewel tones appear more vibrant.
- Outline the roses: Using a thin liner brush and black polish, draw the outer petal shapes on each nail. Then add interior lines dividing each petal into "panes."
- Fill the colors: Using a small brush, fill each pane with the designated color. Work one color at a time across all nails.
- Clean the outlines: If any color bleeds over the black lines, use a thin brush dipped in acetone to clean it up.
- Dry completely: Multiple layers of art take longer to dry. Wait at least fifteen minutes.
- Seal: Two coats of top coat to smooth the raised texture and make the colors pop.
27 Stunning Graduation Day Nail Ideas for 2026 🎓
24.Forest Green with Gold Mushrooms
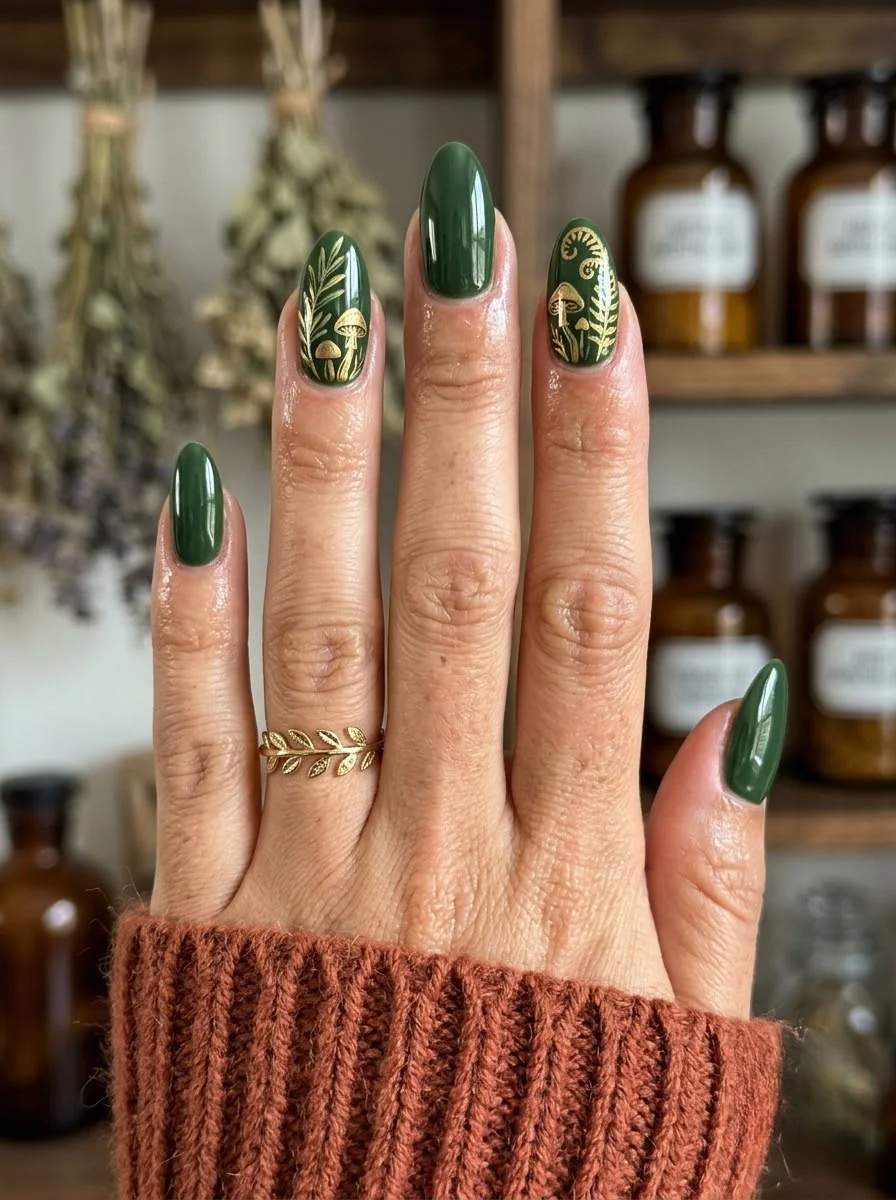
Deep forest green with gold fungi that look like they're growing from the nail.
Overview:
Dark forest green is an earthy, sophisticated choice for Halloween nails. It's less obvious than black or orange, but it carries the same moody weight. The gold mushroom and leaf designs on the accent nails lean into a "dark forest" aesthetic that feels more fairy tale than fright night.
The gold against the dark green creates a warm-on-cool contrast that catches light beautifully. The mushrooms are small and stylized, with rounded caps and thin stems. The fern and leaf details surrounding them add botanical complexity that rewards close inspection.
Gold metallic polish on dark green needs to be highly pigmented. Sheer golds will look muddy against the dark base. Use a true metallic or chrome polish that covers in one or two coats. ILNP and Cirque Colors both make gold metallics that perform well over dark bases.
Design Breakdown:
Dark earthy base with botanical metallic accents. The green is the forest floor; the gold is the treasure.
Base Color: A deep, opaque forest green. Think pine needles, not grass.
Nail Shape: Medium almond. The curved shape complements the organic mushroom and leaf forms.
Design Element: Gold mushroom and fern/leaf designs on two accent nails. Remaining nails are solid green.
Finish: High-gloss top coat to deepen the green and make the gold shine.
Get The Look at Home:
The mushroom shapes are simple: a rounded cap on a thin stem. The leaves are what add complexity.
- Green base: Two coats of forest green on all nails. Let dry fully.
- Mushroom caps: Using a dotting tool and gold polish, place small半圆 shapes on two accent nails. Two to three mushrooms per nail.
- Mushroom stems: Using a thin liner brush, draw thin gold lines downward from each cap.
- Leaf details: Add small fern-like fronds along the sides of the mushrooms. Use a thin brush to create the individual leaf segments.
- Vary the density: One nail can have more mushrooms, the other more leaves. Asymmetry looks more natural.
- Seal: One coat of top coat to protect the gold art and deepen the green base.
25.Dark Green Snake and Evil Eye
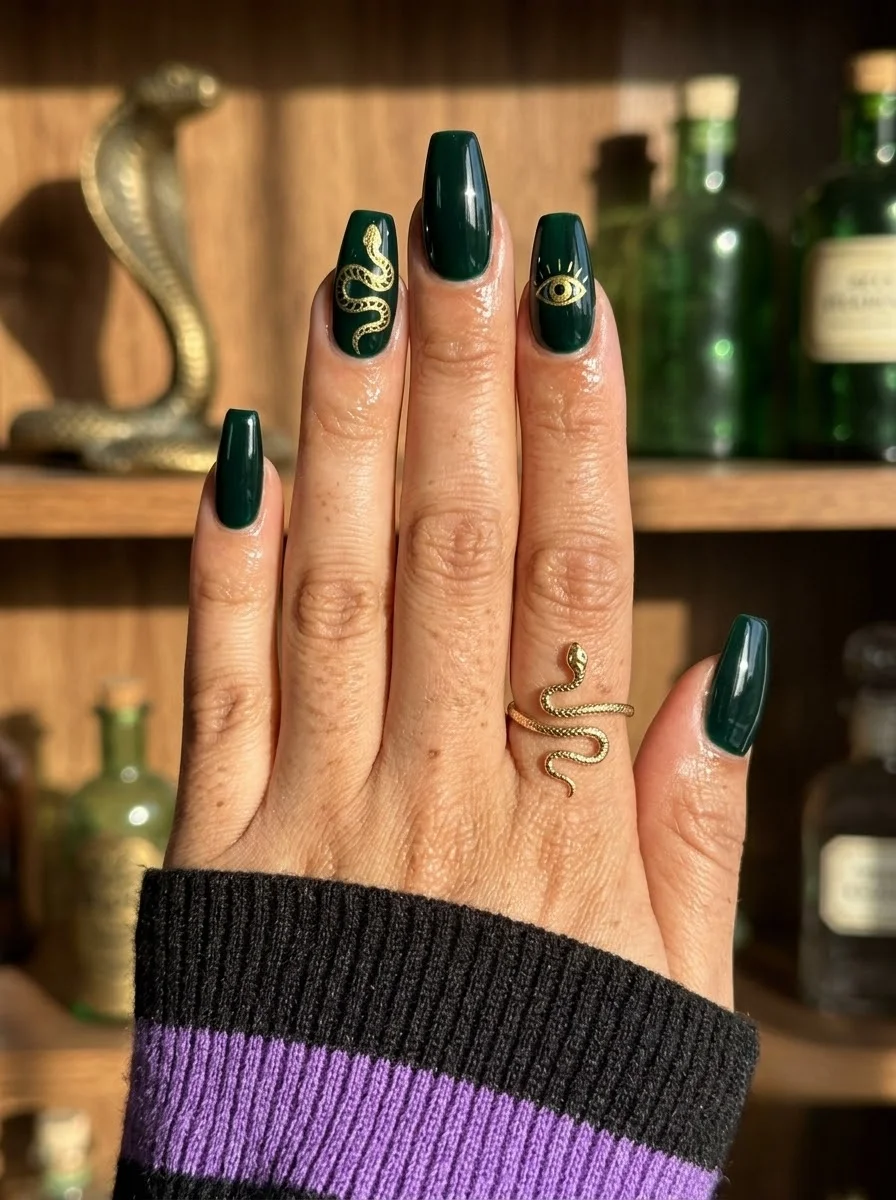
Serpent energy with an eye that sees everything.
Overview:
Dark green with gold snake and evil eye art is a design that leans into mysticism rather than traditional Halloween imagery. The snake and the eye are symbols that carry cultural weight beyond October, which makes this set wearable year-round for anyone drawn to occult-adjacent aesthetics.
The snake is painted as a coiled, sinuous form that follows the natural curve of the nail. The evil eye is a simple concentric circle design with radiating lines. Both are rendered in gold against the dark green, which creates a warm, almost ancient feeling. The pairing of the two symbols on different nails creates a visual dialogue across the hand.
The coffin shape works well for these designs because the flat surface provides a stable canvas for the detailed illustrations. The tapered sides also frame the art nicely, drawing the eye toward the center of each nail.
Design Breakdown:
Dark base with symbolic metallic illustrations. The snake and eye are separate motifs that share a color story.
Base Color: A deep, opaque forest green.
Nail Shape: Medium coffin. The flat surface provides a stable canvas for the detailed art.
Design Element: A gold snake on one accent nail and a gold evil eye on another. Remaining nails are solid green.
Finish: High-gloss top coat to protect the gold art and deepen the green.
Get The Look at Home:
The snake is the harder of the two motifs. Draw the basic S-curve first, then add the details.
- Green base: Two coats of forest green on all nails. Let dry fully.
- Snake outline: Using a thin liner brush and gold polish, draw an S-curve on one accent nail. This is the snake's body.
- Snake details: Add a small triangular head at one end and a tapered tail at the other. Optionally add tiny scale dots along the body.
- Evil eye: On another accent nail, place a gold dot for the pupil. Surround it with a ring of white or lighter gold. Add radiating lines around the outer ring.
- Consistency: Both motifs should be roughly the same size and visual weight. One shouldn't dominate the other.
- Seal: One coat of top coat to protect the gold art.
28 Effortless Hot Weather Day Hairstyles for Women 2026 ☀️💇♀️
26.Navy Moon Phases
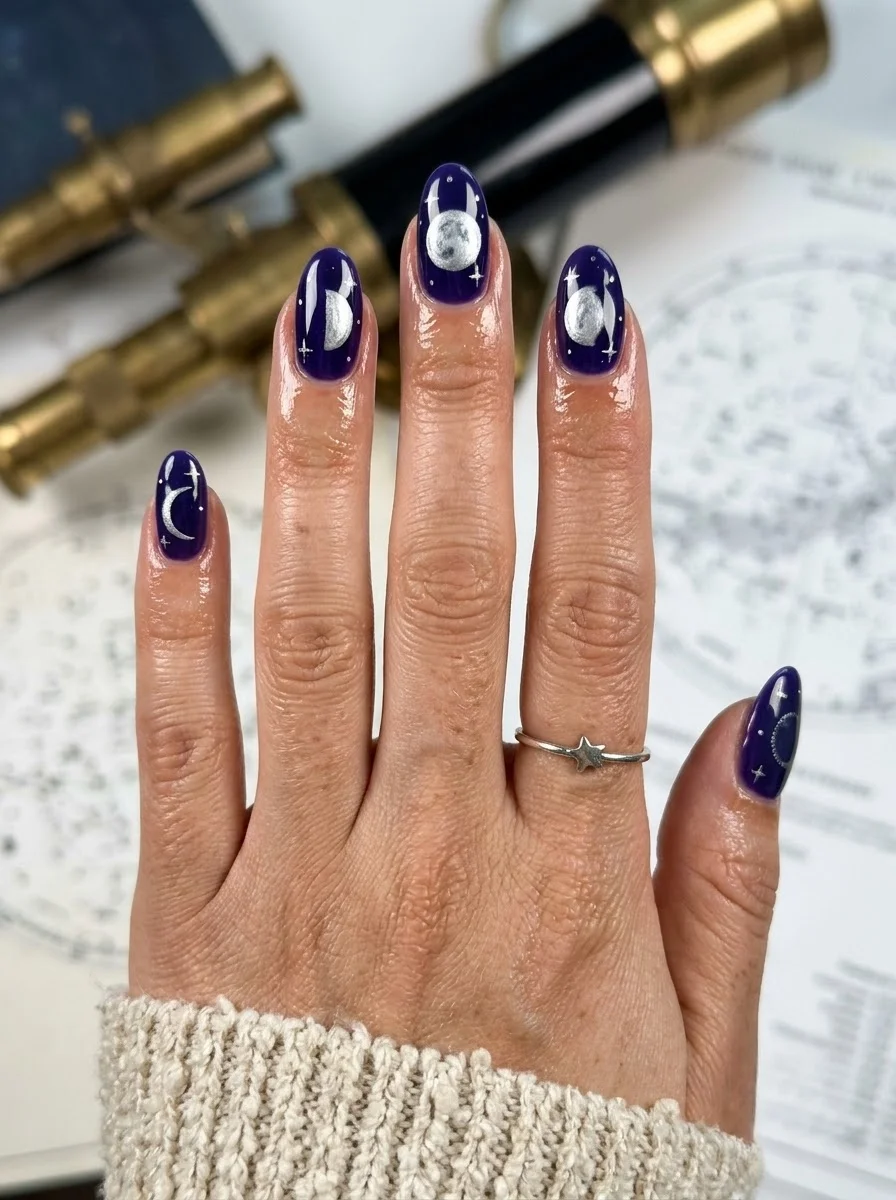
Deep navy with moons that track the lunar cycle across your hand.
Overview:
Navy blue is the closest nail polish color to a clear night sky, and this design leans into that association hard. Each nail carries a different moon phase, from crescent to full, with tiny silver stars scattered around them. The effect is like holding a miniature planetarium in your hands.
The moon phases are painted in silver, which pops against the dark navy in a way that white wouldn't. Silver has a cooler, more celestial quality that matches the night-sky theme. The full moons are textured, with subtle grey shading that suggests the lunar surface.
The moon phases don't need to follow a specific order across the hand. Random placement actually looks more natural, as if you're seeing different moons at different points in their cycle. The randomness is part of the design.
Design Breakdown:
Dark base with celestial silver illustration. The moons are the narrative; the stars are the texture.
Base Color: A deep, opaque navy blue. Not too dark, not too bright. Think midnight, not royal blue.
Nail Shape: Medium almond. The curved shape complements the circular moon forms.
Design Element: Silver moon phases (crescent, half, full) on multiple nails, with small silver stars scattered around them.
Finish: High-gloss top coat to deepen the navy and make the silver shine.
Get The Look at Home:
The moon phases are circles and half-circles. Use dotting tools for the full moons and a liner brush for the crescents.
- Navy base: Two coats of deep navy. Let each coat dry fully.
- Full moons: Using a medium dotting tool and silver polish, place round dots on some nails. Add subtle grey shading on one side for dimension.
- Crescent moons: Paint a full silver circle, then use a cleanup brush dipped in navy to remove one side, creating the crescent shape.
- Half moons: Paint a half-circle using a liner brush or French guide.
- Stars: Using the smallest dotting tool, place tiny silver dots scattered around the moons. Three to five per nail.
- Seal: One coat of top coat to protect the silver art and deepen the navy base.
27.Navy Constellations
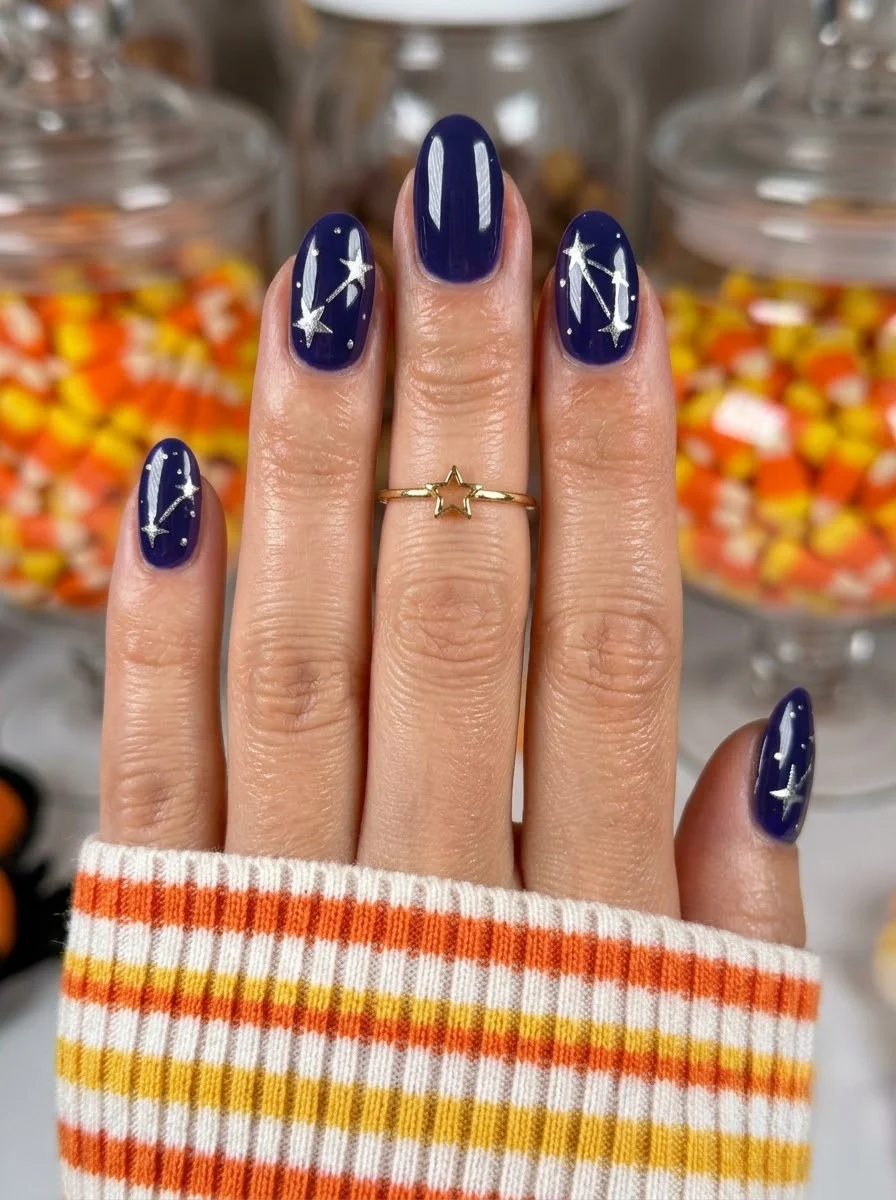
Star charts rendered in silver on a midnight blue canvas.
Overview:
Navy with constellation art is a design that works because it's specific. Rather than generic "star" patterns, constellations are actual astronomical arrangements. Even if the viewer doesn't recognize the specific constellation, the connected-dot pattern reads as intentional and structured rather than random.
The silver against navy creates a crisp, clean contrast that photographs well. Each constellation is slightly different, which gives each nail its own identity while maintaining the overall theme. The stars are connected by thin silver lines, creating geometric patterns that feel both ancient and modern.
The oval shape is the right call here. It's softer than almond but more refined than round, and it provides enough surface area for the constellation art to be legible without feeling cramped.
Design Breakdown:
Dark base with geometric celestial illustration. The constellations are the design; the navy is the sky.
Base Color: A deep, opaque navy blue.
Nail Shape: Medium oval. Clean and proportional for the constellation art.
Design Element: Silver constellation patterns with connected dots on multiple nails. Each nail carries a different constellation.
Finish: High-gloss top coat to deepen the navy and protect the silver.
Get The Look at Home:
The star dots are tiny. Use the smallest dotting tool or the tip of a toothpick for the cleanest results.
- Navy base: Two coats of deep navy. Let dry fully.
- Star dots: Using a small dotting tool and silver polish, place three to five dots on each nail in constellation patterns.
- Connect the dots: Using a thin liner brush and silver polish, draw thin lines connecting the dots. Keep the lines hair-thin.
- Star accents: Add tiny four-pointed star shapes (a cross with tapered ends) at a few of the dot positions for emphasis.
- Vary the patterns: Each nail should have a different constellation. Look up actual constellations for reference, or create your own.
- Seal: One coat of top coat to protect the silver art.
35 Fun Birthday Nail Designs for 2026 🎂
28.Purple Potion Bottles
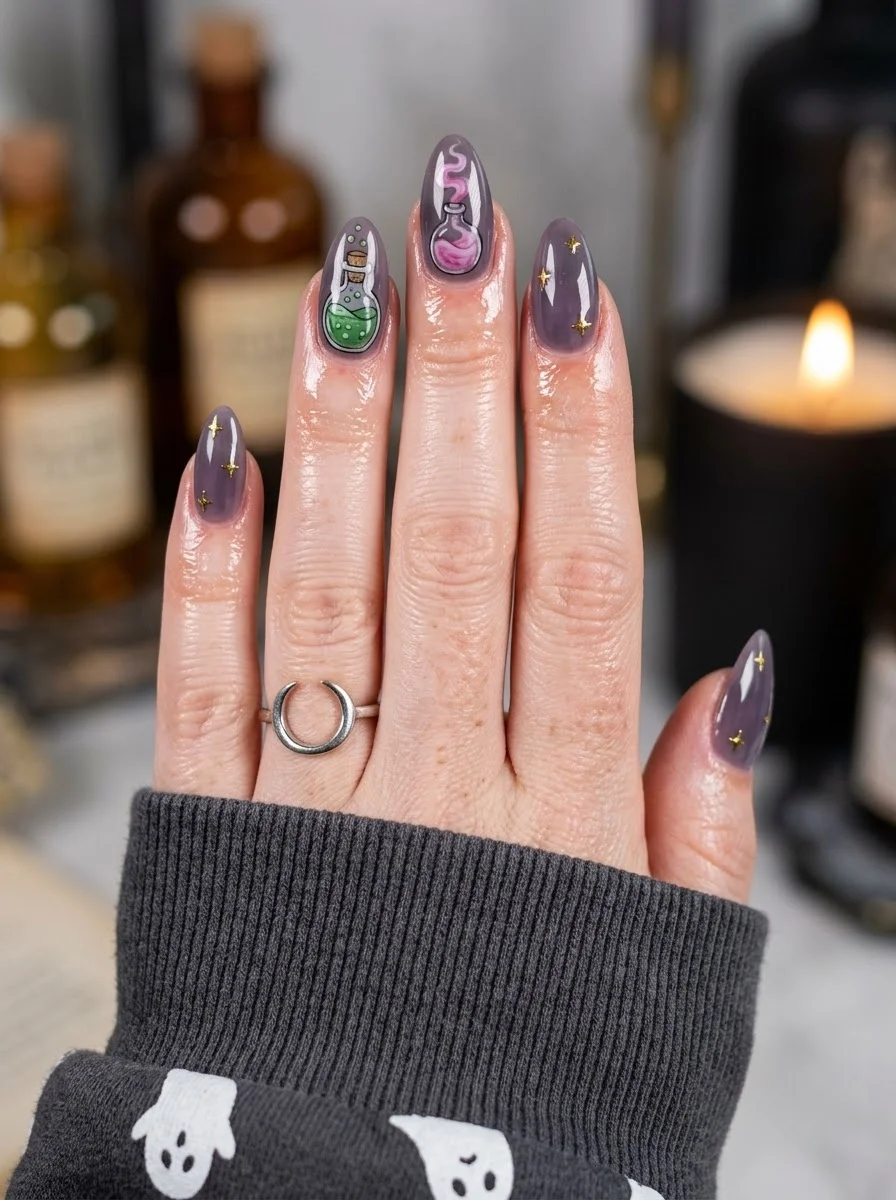
Witchy potions bubbling with gold star accents.
Overview:
The base is a muted, dusty purple that reads as sophisticated rather than childish. The potion bottles on the accent nails are small and detailed, with different colored liquids inside each one.
The gold stars scattered across the remaining nails add a celestial touch that complements the witchy theme without overwhelming it. The stars are small enough to read as texture from a distance, only revealing their shape up close. That dual reading keeps the design interesting at multiple viewing distances.
The potion bottles are the most detailed element in this design. Each bottle has a distinct shape, with some being round and others being tall and narrow. The different liquid colors (green, pink) add variety and suggest different magical concoctions.
Design Breakdown:
Muted base with illustrated accents and scattered metallic detail. The potions are the narrative; the stars are the atmosphere.
Base Color: A muted, dusty purple or mauve. Not bright, not pastel. Think dried lavender.
Nail Shape: Medium almond. The curved shape complements the organic bottle forms.
Design Element: Hand-painted potion bottles on two accent nails, with small gold stars scattered on the remaining nails.
Finish: High-gloss top coat to protect the detailed art.
Get The Look at Home:
The potion bottles are small, so the details need to be proportionally tiny. A toothpick works better than a brush for this scale.
- Purple base: Two coats of dusty purple on all nails. Let dry fully.
- Bottle outline: Using a thin liner brush and black polish, draw the outline of a small bottle on each accent nail. Vary the shapes.
- Liquid color: Fill the bottle outlines with different colored polishes. Green, pink, or purple work well.
- Bottle details: Add a small cork or cap at the top of each bottle using brown or gold polish.
- Gold stars: On the remaining nails, use a small dotting tool and gold polish to place tiny star shapes. Three to five per nail.
- Seal: One coat of top coat to protect all the detailed art.
29.Sage Marble with Haunted Trees
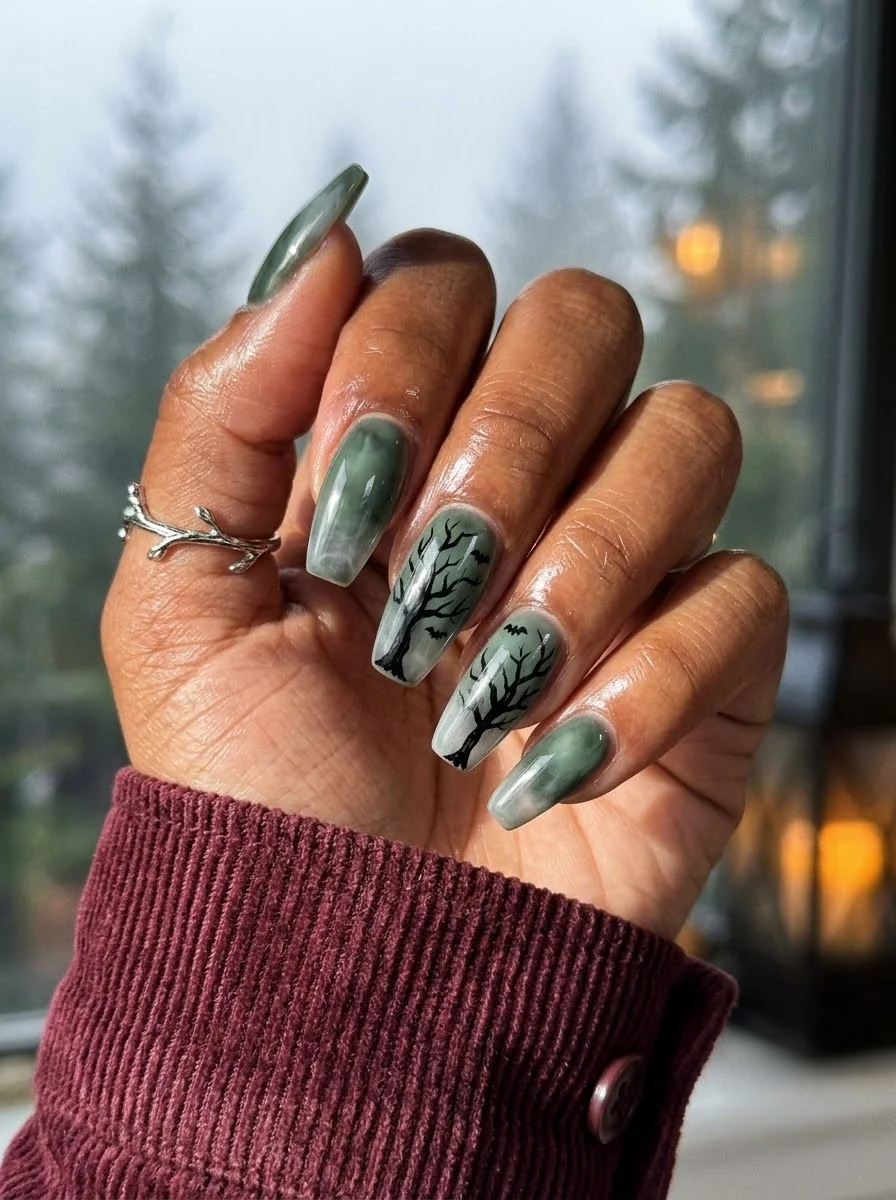
Foggy forest marble with trees that look like they're reaching for you.
Overview:
The base is a sage green marble, with soft swirls of lighter and darker green creating a foggy, atmospheric effect. It looks like morning mist in a forest, which is exactly the right mood for the tree art.
The black bare trees on the accent nails are painted as silhouettes against the marble background. The branches are thin and angular, reaching upward like skeletal fingers. Small bats scattered around the trees add movement and confirm the Halloween reading. The combination of marble and illustration creates depth, as if the trees are emerging from fog.
The marble technique is forgiving on this design because the "imperfections" in the swirl pattern read as natural fog rather than mistakes. This is a good design for anyone who wants to try marble nails but is intimidated by the precision it usually requires.
Design Breakdown:
Atmospheric marble base with silhouette illustration. The marble provides the mood; the trees provide the narrative.
Base Color: Sage green marble with swirls of lighter and darker green.
Nail Shape: Medium coffin. The flat surface showcases both the marble and the tree art.
Design Element: Black bare tree silhouettes with small bats on two accent nails.
Finish: High-gloss top coat to smooth the marble texture and protect the art.
Get The Look at Home:
Do the marble on all nails first, then add the tree art on the accent nails. The marble needs to be fully dry before the black goes on.
- Light green base: One coat of sage green. Let it dry.
- Wet marble: Apply a second coat of sage. While wet, drop small amounts of darker green and white onto the surface. Drag through with a toothpick to create soft swirls.
- Dry completely: Wait at least ten minutes. The marble needs to be fully set before the black art goes on.
- Tree trunk: Using a thin liner brush and black polish, draw a vertical line from the cuticle toward the tip on two accent nails. This is the trunk.
- Branches: From the trunk, flick thin lines outward and upward. Keep them angular and bare. No leaves.
- Bats: Add small black bat silhouettes near the tree tops. Two to three per nail.
- Seal: One coat of top coat to smooth the marble and protect the tree art.

22 Best Graduation Day Hairstyles for 2026 🎓✨
30.Berry Lace French Tips
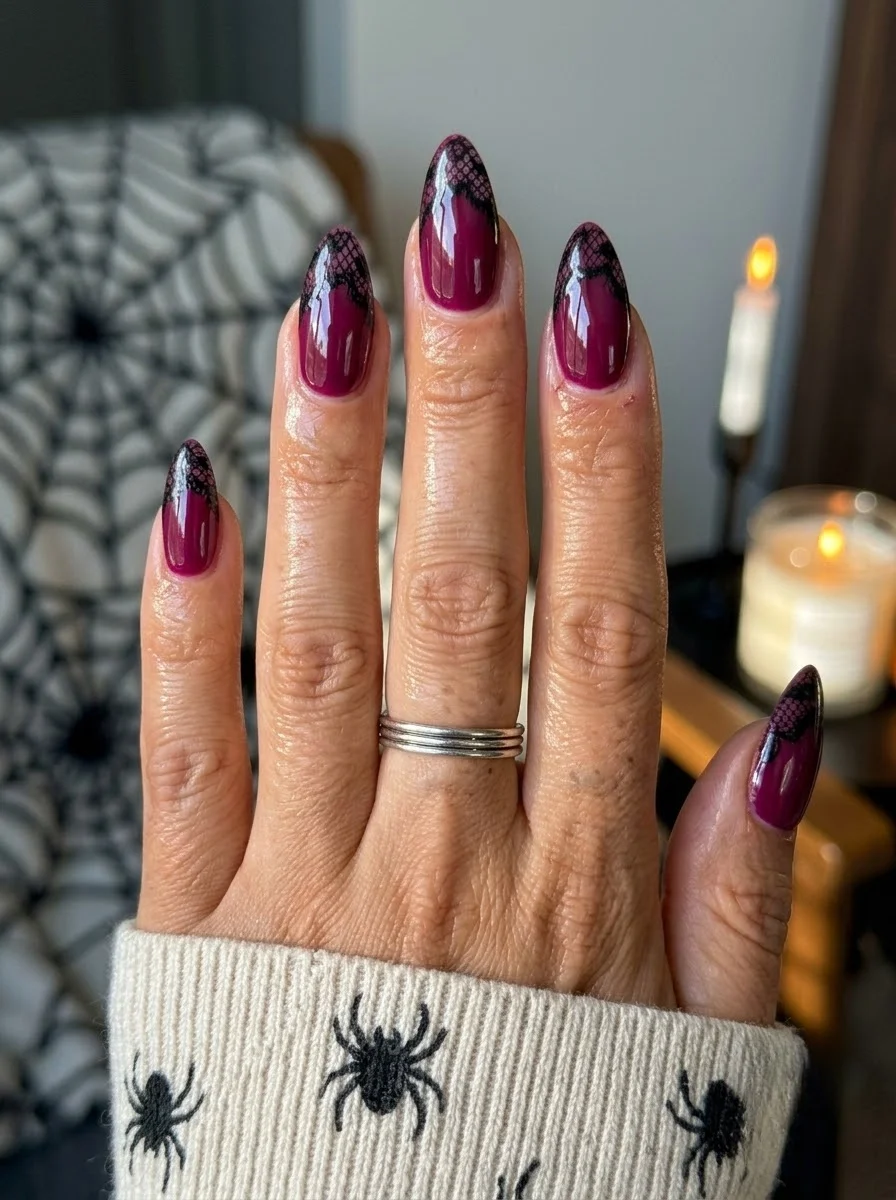
Rich berry with lace tips that add gothic elegance.
Overview:
Deep magenta is one of the warmer and more saturated color than purple, with pink undertones that give it a rich, wine-like quality. The black lace at the tips replaces the traditional French smile line.
The lace pattern at the tips is a clever twist on the French structure. Instead of a solid color block, the tips are decorated with a fine black net pattern. From a distance, it reads as a dark French tip. Up close, the lace reveals itself. That dual reading is what makes the design interesting.
The lace can be achieved with stamping, decals, or freehand. Stamping gives the most consistent result across all nails. Decals are faster but can lift at the edges if not sealed properly. Freehand is the most challenging but gives the most organic, hand-crafted look.
Design Breakdown:
Modified French with a patterned tip. The lace is what makes this design distinctive.
Base Color: A deep berry or magenta. Rich and saturated.
Nail Shape: Medium almond. The curved tip provides a clean boundary for the lace pattern.
Design Element: Black lace patterns at the tips, replacing the traditional French smile line.
Finish: High-gloss top coat to protect the lace and deepen the berry.
Get The Look at Home:
The lace pattern needs to be confined to the tip area. Use French tip guides to mask the boundary if needed.
- Berry base: Two coats of deep berry on all nails. Let dry fully.
- Mask the tips: Apply French tip guides across each nail, leaving the tip area exposed.
- Lace pattern: Using a stamping plate or thin liner brush, create a black net or lace pattern in the exposed tip area.
- Remove guides: Peel the French guides while the black is still slightly tacky for the cleanest line.
- Cleanup: An angled brush dipped in acetone sharpens any rough edges along the smile line.
- Seal: One coat of top coat to protect the lace and unify the finish.
31.Teal Chrome Poison Apple
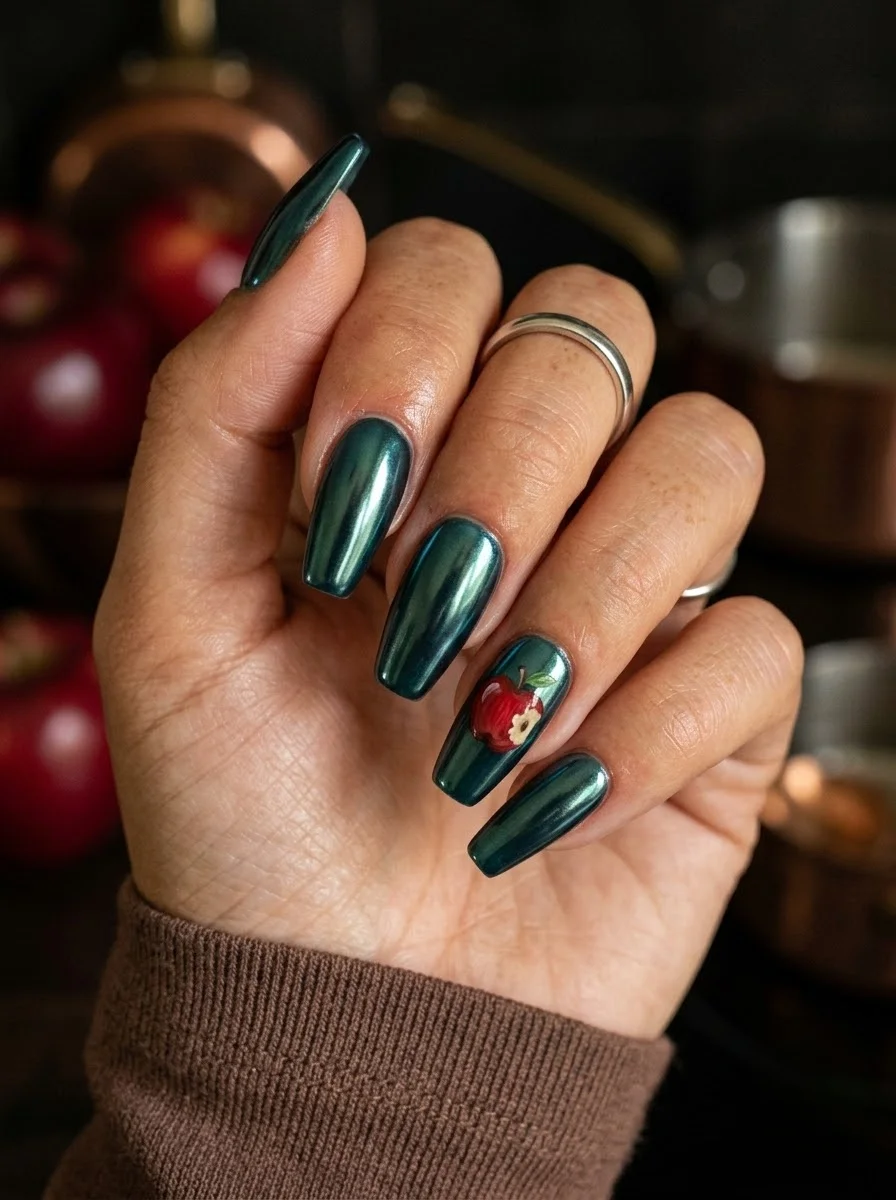
Enchanted teal chrome with a tempting poison apple.
Overview:
Teal metallic chrome creates a finish that shifts between deep green and blue depending on the angle. It's darker and moodier than typical teal, which gives it a supernatural quality. The chrome effect reflects light in a way that makes the nails look like polished gemstones.
The red apple on the ring finger is the design's story. Against the teal chrome, the apple pops with a vibrancy that immediately draws the eye. It's a small detail, but it transforms the set from "beautiful chrome nails" to "Snow White's poisoned apple nails." The apple is simple enough to be recognizable from a distance.
Teal chrome powder is specific. Not all teal powders produce the same effect. Some lean more green, others more blue. Look for a powder that's described as "emerald" or "forest" rather than "aqua" or "turquoise" for the darkest, most Halloween-appropriate result.
Design Breakdown:
Chrome base with a single illustrated accent. The teal is the atmosphere; the apple is the narrative.
Base Color: Teal or emerald green chrome powder over a dark base.
Nail Shape: Medium to long coffin. The flat surface showcases the chrome finish.
Design Element: A red apple accent on the ring finger. Remaining nails are solid teal chrome.
Finish: Ultra-glossy chrome. The mirror finish is the point.
Get The Look at Home:
The apple goes on after the chrome is fully sealed. Painting directly on chrome powder causes it to lift.
- Dark base: Two coats of black or deep green gel. Cure each coat.
- No-wipe top coat: Apply and cure. This is the chrome surface.
- Chrome application: Rub teal chrome powder onto the cured surface. Buff until mirror-smooth.
- Seal the chrome: One coat of gel top coat, cured.
- Apple accent: On the ring finger, paint a small red apple shape. Add a tiny brown stem and green leaf at the top.
- Final seal: One coat of top coat over the apple to protect it.
30 Stunning Beach Nail Ideas for the Best Vacation in 2026 🌊
Whether you're drawn to the subtle shimmer of cat-eye polish, the gothic elegance of black lace, or the full commitment of skeleton hands and stained glass roses, these designs prove that Halloween nails can be sophisticated, artistic, and genuinely wearable. The best spooky-season manicure is the one that makes you feel like your most atmospheric self.
Save your favorites to your Pinterest board before your next salon appointment so you have reference photos ready. Showing your nail tech a specific image is always better than trying to describe "gothic but not too gothic with a hint of mushroom energy."
No matter which design you choose, enjoy the process of wearing something a little darker, a little moodier, and a lot more interesting than your usual rotation. Happy haunting.