Nail Trends
36 Fall Chrome Nails That Capture Autumn's Moody Metallic Side (2026)
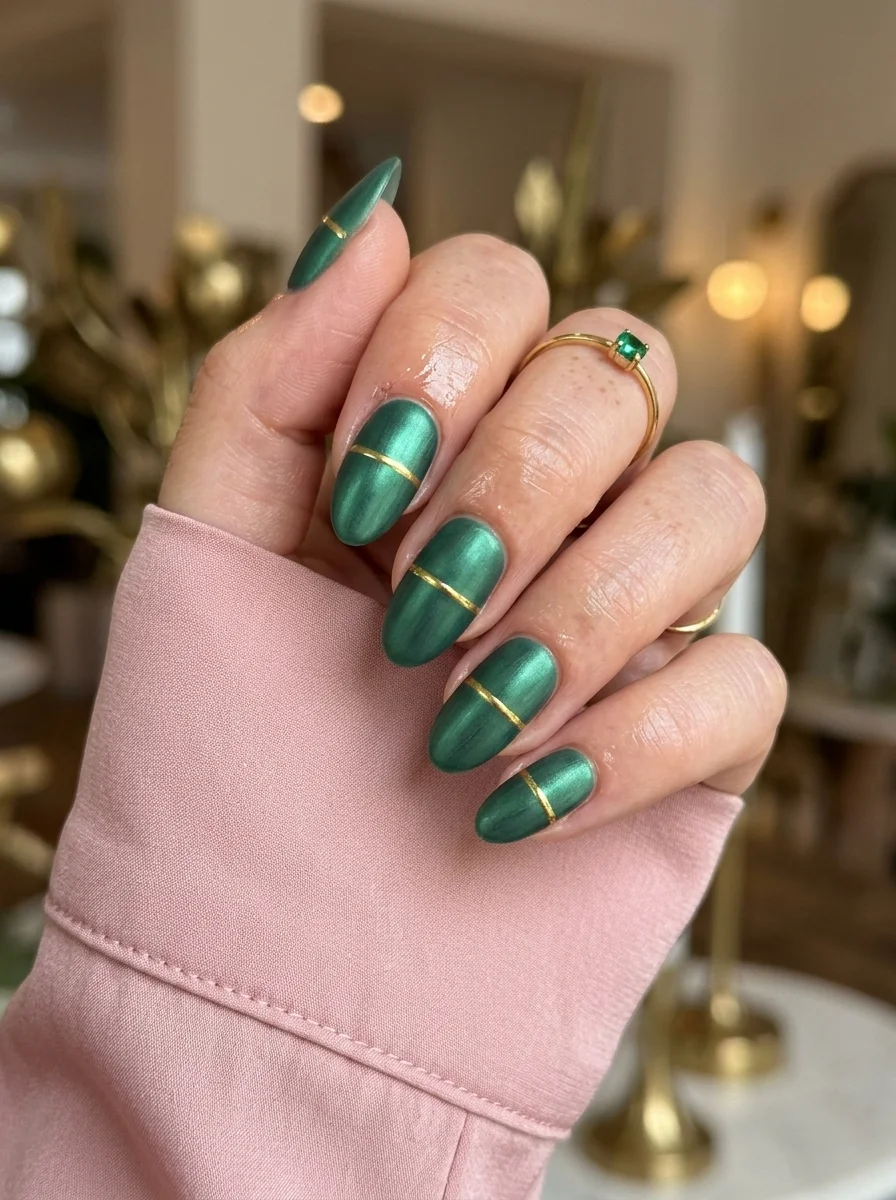
Chrome nails in fall take on a different personality than their summer counterparts. The palette shifts from bright silvers and pastels to deep gunmetals, warm coppers, rich emeralds, and moody burgundies. These 36 designs pair metallic finishes with the season's best tones, creating looks that catch the light like liquid metal against an autumn landscape. Whether you want a full chrome set or just a metallic accent, there's a fall chrome design here for you.
1.Black Chrome with Copper Drip Accent
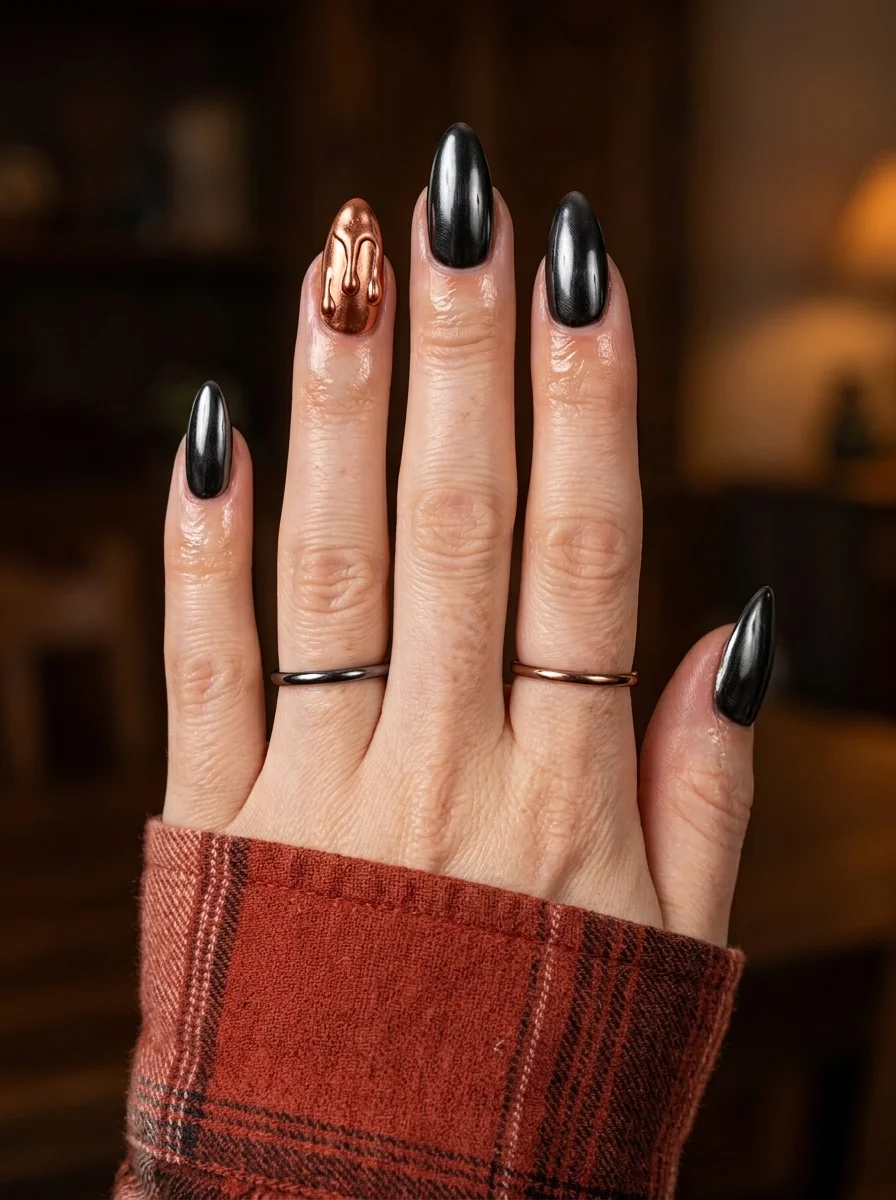
A moody, high-shine chrome that reads like liquid metal.
Overview:
Dark chrome nails have a problem: from a distance, they all look the same. Gunmetal, pewter, dark silver, dark grey, they blur into one indistinguishable "dark metallic" category. Adding a single accent nail with a 3D copper drip effect solves that problem immediately. The warm rose gold against the cool black chrome creates a color tension that gives your hand a focal point.
The drip detail on the accent nail is raised, which means it catches light differently than the flat chrome on the other nails. When your hand moves, the drip reads as a separate material sitting on top of the nail rather than a painted design. That dimensionality is what makes this design interesting in person versus in photos.
One thing to know: chrome powder over dark bases shows every scratch and fingerprint. You'll be buffing and reapplying top coat more often than you would with a lighter chrome. Budget the extra maintenance time, or accept that the mirror finish is temporary and enjoy it while it lasts.
Design Breakdown:
Dark chrome with one dimensional accent. The copper drip is the entire statement.
Base Color: Black gel polish under silver or gunmetal chrome powder. The black base is what gives the chrome its depth; chrome over white reads as bright silver, not dark metallic.
Nail Shape: Long almond. The tapered shape gives the chrome a sleek, elongated surface that catches light along its full length.
Design Element: Full chrome coverage on four nails. One accent nail (ring finger) with a raised copper or rose gold drip effect using builder gel or thick chrome gel.
Finish: High-gloss chrome with a metallic 3D accent. The contrast between flat chrome and raised metal is the design.
Get The Look at Home:
The drip accent is the hardest part. Practice the gel placement on a practice tip before committing to your real nails.
- Black base: Two coats of opaque black gel on all nails. Cure between coats.
- Chrome powder: Apply a no-wipe gel top coat, cure, then rub silver or gunmetal chrome powder over the entire nail with a silicone applicator. Buff until smooth.
- Drip accent: On the ring finger, use a dotting tool and thick clear builder gel to create a raised drip shape starting from the cuticle area. Cure immediately so it doesn't flatten.
- Copper chrome on drip: While the builder gel is still tacky (or after applying a thin no-wipe layer), rub rose gold or copper chrome powder onto the raised drip only.
- Seal: Apply top coat carefully around the drip edges. Don't cover the drip with too much top coat or you'll lose the raised texture.
29 Fun FIFA World Cup Watch Party Hairstyles (2026)
2.Leopard Print with Rose Gold Accent
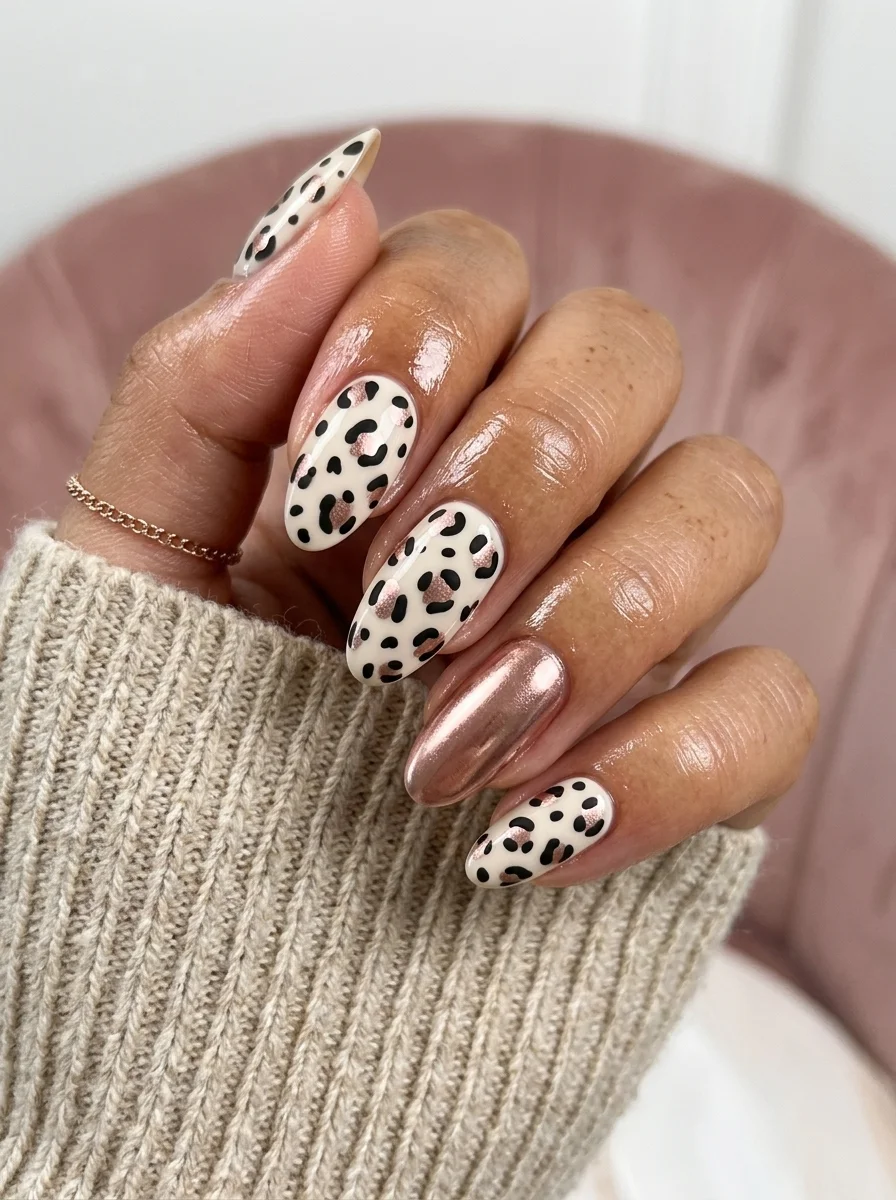
Animal print meets metallic warmth for a polished fall look.
Overview:
Leopard print on nails is one of those patterns that either looks editorial or looks like a costume, and the difference is almost always the color palette. This version stays on the right side by keeping everything within a narrow warm range: cream, black, and rose gold. The cream base softens the print enough that it reads as sophisticated rather than loud.
The rose gold accent nail does two things. First, it breaks up the leopard pattern so your eye has a place to rest. Second, the warm metallic ties into the brown undertones of the print, creating a cohesive palette across the entire hand. Without that accent, the leopard would feel like it's floating on the cream without an anchor.
Almond shape is the right call here. The curved tip softens the angular quality of the leopard spots, which keeps the design from looking too graphic or harsh. On square nails, the same print would skew more geometric and less organic.
Design Breakdown:
Warm-toned animal print with a single metallic accent to anchor the palette.
Base Color: Creamy off-white or light nude. Not stark white, it needs enough warmth to complement the brown spots and the rose gold.
Nail Shape: Medium almond. The rounded shape complements the organic, irregular quality of leopard spots.
Design Element: Hand-painted leopard spots in black and dark brown on most nails. One solid rose gold chrome accent nail on the ring finger.
Finish: High-gloss top coat over everything. The shine unifies the cream and the chrome.
Get The Look at Home:
Leopard spots should be irregular. If you try to make them uniform, the pattern looks stamped and loses its organic quality.
- Cream base: Two coats of creamy off-white on all nails. Let dry fully.
- Rose gold accent: On the ring finger, apply no-wipe gel top coat, cure, then rub rose gold chrome powder. Buff until smooth.
- Spot shapes: Using a medium dotting tool and black polish, place irregular C-shapes and broken circles on the cream nails. Vary the sizes and spacing.
- Brown centers: Add a dark brown dot inside some of the black shapes. Not every spot needs a center, that's what makes it look natural.
- Random filler: A few standalone black dots between the larger spots fill the negative space without overcrowding.
- Seal: One thick coat of top coat over everything. Float the brush to avoid smearing the spot work.
3.Deep Plum Chrome with Silver Tips
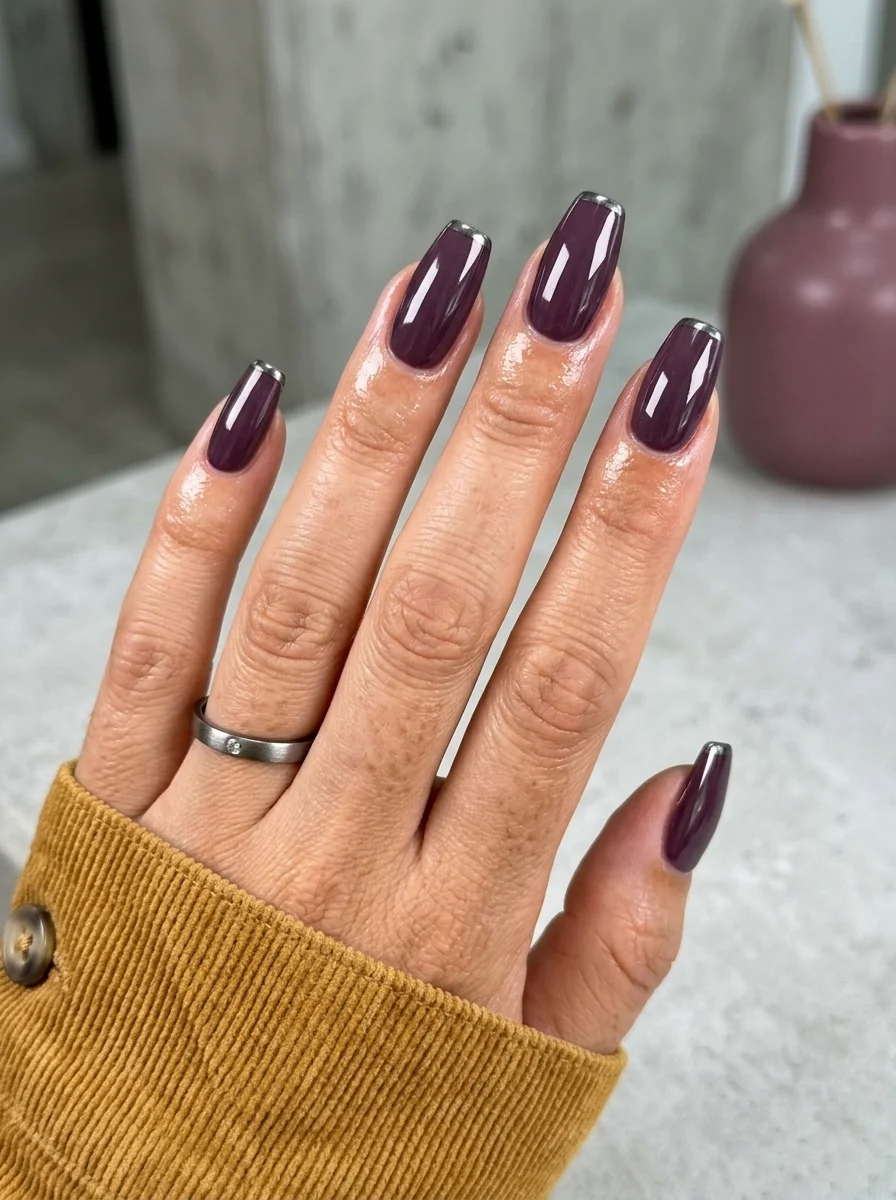
A dark, vampy chrome with just a hint of silver at the edge.
Overview:
Burgundy chrome nails exist in a strange category: they're dark enough to feel moody but shiny enough to avoid looking flat. This particular shade leans more plum than red, which gives it a cooler, more sophisticated edge than a classic wine color. The chrome finish adds depth that cream burgundy can't achieve.
The silver chrome tips are subtle enough that you might miss them on first glance. That's the point. They catch light at certain angles and create a thin metallic border that sharpens the entire nail. Without them, this would be a beautiful solid chrome. With them, it becomes a designed set with intention behind every detail.
Coffin shape works well here because the flat tip gives the silver chrome line a clean, geometric edge. On almond nails, the same French detail would curve with the tip and lose some of its sharpness. The long length also gives the plum chrome enough surface area to show off its color shift.
Design Breakdown:
Deep jewel-tone chrome with a subtle metallic French line. The design lives in the details.
Base Color: A deep plum or burgundy chrome powder over a dark red or maroon gel base. The chrome should shift between purple and deep red depending on the angle.
Nail Shape: Long coffin. The flat tip provides a clean line for the silver chrome French detail.
Design Element: Full plum chrome coverage with thin silver chrome French tips on all nails.
Finish: High-gloss chrome throughout. The silver tips should read as a different metallic, not a continuation of the plum.
Get The Look at Home:
The French tips require precision. Use striping tape or a very thin liner brush for clean lines.
- Dark base: Two coats of deep maroon or burgundy gel on all nails. Cure between coats.
- Plum chrome: Apply no-wipe gel top coat, cure, then rub plum or burgundy chrome powder over the entire nail. Buff until mirror smooth.
- Tip masking: Apply thin striping tape along the smile line area, leaving only the very tip exposed. Press the tape edges firmly to prevent bleeding.
- Silver chrome on tips: Apply a thin no-wipe top coat over the exposed tip area, cure, then rub silver chrome powder onto just the tips. Buff gently.
- Remove tape: Peel the tape carefully at a low angle.
- Seal: One coat of top coat over everything to lock both chromes in place.
31 Patriotic Fourth of July Nail Ideas for 2026 🇺🇸
4.Tortoiseshell with Gold Chrome
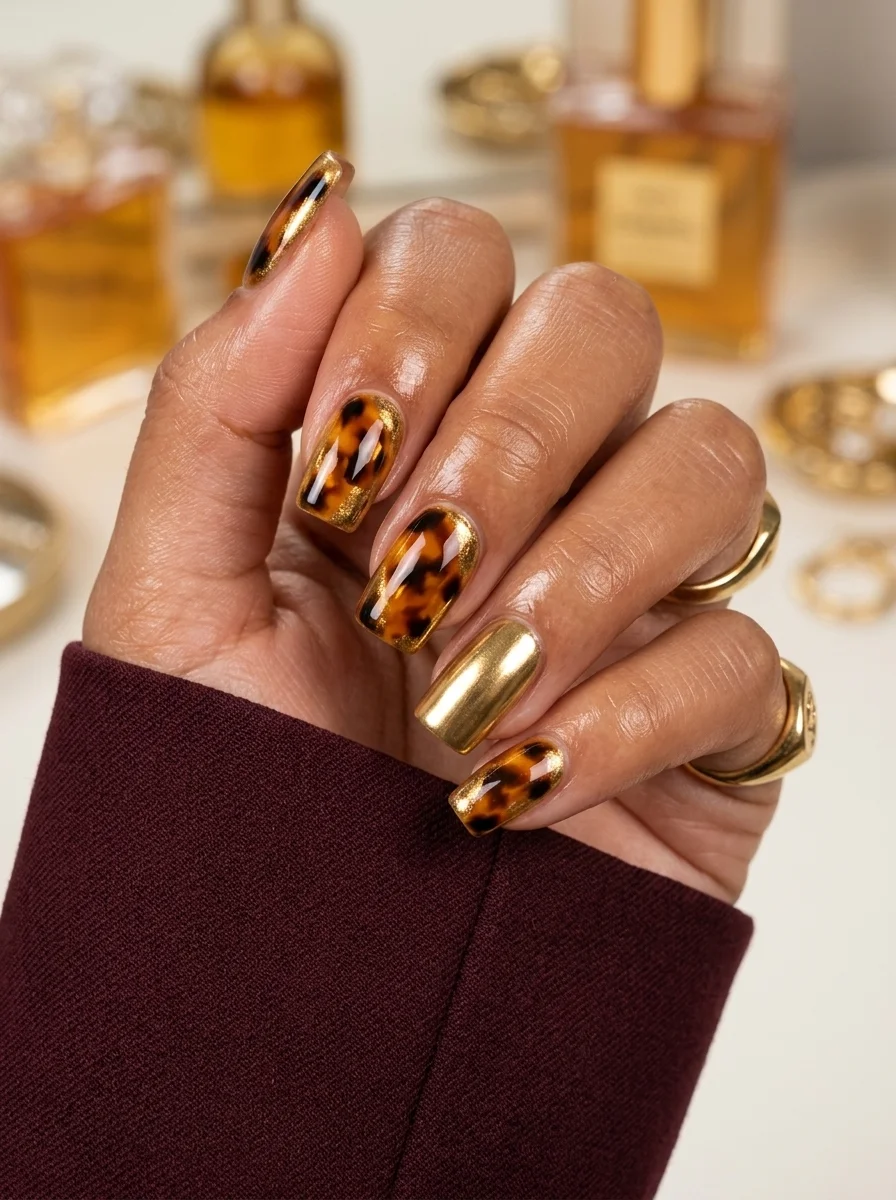
A warm, vintage-inspired pattern paired with high-shine gold.
Overview:
Tortoiseshell nails are one of those designs that look complicated but are actually built from just three colors layered wet-on-wet. The amber, brown, and black blend into each other naturally when you work quickly, which means the "marbling" happens by accident more than by design. The result always looks more sophisticated than the effort suggests.
The gold chrome accent nail is a smart pairing. Tortoiseshell already has warm amber and honey tones running through it, and the gold chrome amplifies that warmth into something deliberately metallic. It turns the nail from "pattern" into "palette." The square shape reinforces the vintage reference, tortoiseshell sunglasses, combs, jewelry boxes.
The wet-on-wet technique means every nail will look different, and that's the appeal. If you try to make them match, you'll overwork the colors and end up with muddy brown instead of distinct amber and black patches. Let the polish do its thing.
Design Breakdown:
Layered wet-on-wet pattern with a solid metallic accent. The "imperfections" are the design.
Base Color: A sheer amber or honey yellow. The base needs to be translucent enough that the layers above it show through.
Nail Shape: Short to medium square. The flat shape echoes the vintage accessories that tortoiseshell is associated with.
Design Element: Wet-on-wet tortoiseshell pattern (amber, dark brown, black) on four nails. One solid gold chrome accent nail on the ring finger.
Finish: High-gloss top coat. The shine gives the tortoiseshell depth and makes the gold chrome pop.
Get The Look at Home:
Work fast. The wet-on-wet technique only works if the layers are still wet when you add the next color.
- Amber base: One coat of sheer honey or amber gel. Don't cure yet, you're building into this wet layer.
- Brown patches: Drop irregular blobs of dark brown gel onto the wet amber. Use a dotting tool or toothpick. Three to four per nail.
- Black accents: While everything is still wet, add smaller black dots and streaks inside and around the brown patches. The colors will bleed into each other, creating the tortoiseshell effect.
- Cure: Once you're happy with the pattern, cure under the lamp immediately to stop the colors from spreading further.
- Gold accent: On the ring finger, apply no-wipe top coat, cure, then rub gold chrome powder. Buff until smooth.
- Seal: Two coats of top coat over everything. The tortoiseshell layers create texture that needs smoothing.
5.Burgundy, Pink, and Purple Chrome Mix
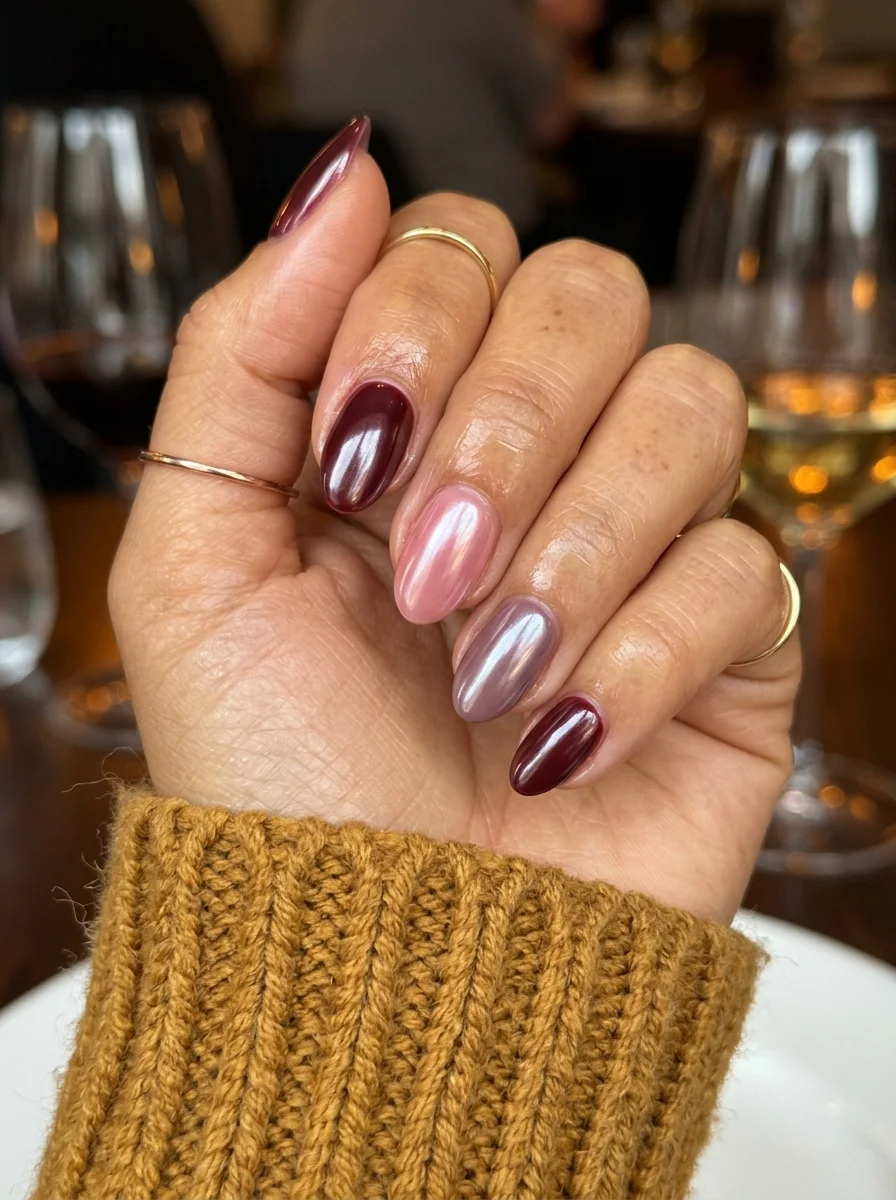
A moody trio of berry-toned chromes that shift with every angle.
Overview:
Mixing three different chrome tones on one hand is a risk that pays off when the colors share the same undertone family. Here, burgundy, pink, and purple all live in the berry spectrum, so the alternation reads as tonal variety rather than a random color grab. Each nail catches light differently, which gives the hand a dynamic quality that a single-color set can't match.
The oval shape is doing important work. The rounded edges soften the color transitions between nails, making the three-tone mix feel cohesive instead of jarring. On square nails, the same color alternation would read as more deliberate and geometric.
The practical challenge with multi-chrome sets is consistency in application. Each chrome powder needs the same base coat, the same curing time, and the same buffing technique. If one nail gets more powder than another, the reflectivity levels won't match and the set will look uneven. Work methodically, one nail at a time.
Design Breakdown:
Three berry-toned chromes alternating across the hand. The shared undertone is what holds the palette together.
Base Color: Dark maroon or burgundy gel under all three chrome powders. The dark base ensures each chrome reads as deep and saturated.
Nail Shape: Medium oval. The soft curves complement the flowing quality of the chrome finishes.
Design Element: Alternating nails in burgundy chrome, pink chrome, and purple chrome. The pattern repeats across both hands.
Finish: High-gloss chrome throughout. Each color should reflect light at the same intensity.
Get The Look at Home:
Work in sets of the same chrome color before switching powders. This prevents cross-contamination between colors.
- Dark base: Two coats of deep burgundy or maroon gel on all nails. Cure between coats.
- First chrome: Apply no-wipe top coat on three nails, cure, then rub burgundy chrome powder. Buff until smooth.
- Second chrome: Repeat with pink chrome powder on two nails.
- Third chrome: Repeat with purple chrome powder on the remaining nail.
- Clean between powders: Wipe your silicone applicator with alcohol between each chrome color to prevent mixing.
- Seal: One coat of top coat over everything to lock all three chromes in place.

31 Flattering Summer Hairstyles for Women Over 40 (2026)
6.Gold Chrome with Branch Silhouettes
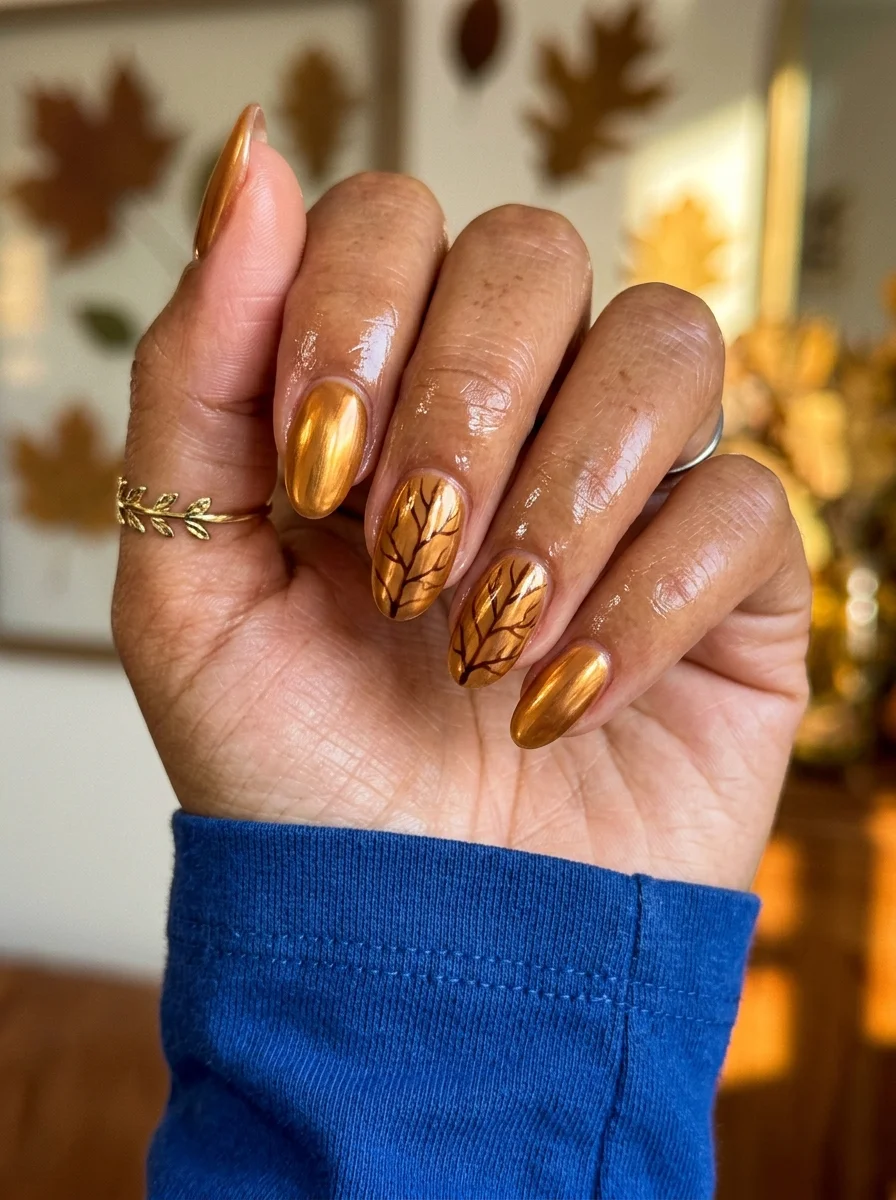
Liquid gold meets bare autumn branches for a rich, seasonal look.
Overview:
Gold chrome on its own is already a statement. Adding hand-painted branch silhouettes on top of it turns the design from "metallic nails" into something with narrative. The dark brown branches against the reflective gold create a silhouette effect, like bare trees against a sunset sky. It's fall without being literal about it.
The branches are painted in a dark brown rather than black, which is an important distinction. Black against gold would read as graphic and harsh. Brown against gold reads as warm and organic. The tone-on-tone warmth is what makes this design feel autumnal rather than edgy.
The practical challenge is painting thin, consistent lines over a chrome surface. Chrome powder creates a slippery layer that regular polish doesn't grip well. Using gel paint or a very thin liner brush with gel polish helps, but expect some trial and error. The branches don't need to be perfect, bare trees never are, but they do need to stay visible against the reflective background.
Design Breakdown:
Full gold chrome with dark botanical line art. The warmth of the palette is the unifying element.
Base Color: Warm gold chrome powder over a nude or clear gel base. The warmth of the gold matters here, cool-toned gold would clash with the brown branches.
Nail Shape: Long almond. The tapered shape echoes the organic lines of the branch art.
Design Element: Full gold chrome on all nails. Hand-painted dark brown tree branch silhouettes on the middle and ring fingers.
Finish: High-gloss top coat to protect the chrome and seal the painted art.
Get The Look at Home:
The branches are the last step. Chrome needs to be fully sealed before you paint on top of it.
- Gold chrome base: Apply no-wipe gel top coat over bare nails (or a nude base), cure, then rub gold chrome powder. Buff until smooth.
- Seal the chrome: Apply one coat of top coat over the chrome and cure. This gives the paint something to grip.
- Branch outlines: Using a thin liner brush and dark brown gel paint, draw the main branch lines. Start thicker at the base and taper toward the tips.
- Small branches: Add thinner secondary branches splitting off from the main lines. Let the brush wobble slightly for a natural look.
- Cure and seal: Cure the branch art, then apply one final coat of top coat over everything.
7.Matte Burgundy with Rose Gold French Tips
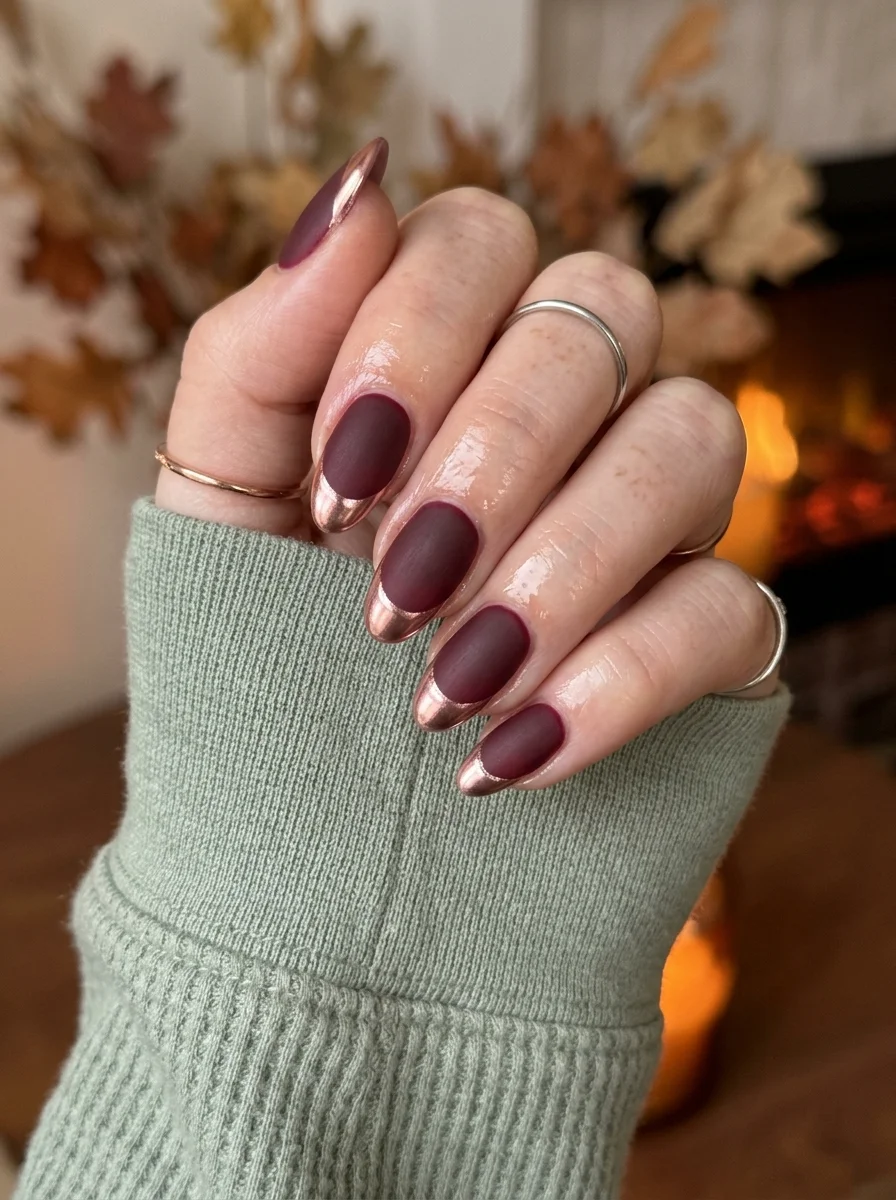
Velvet matte meets reflective chrome for a luxe texture contrast.
Overview:
Matte and chrome on the same nail is a combination that shouldn't work. One absorbs light, the other reflects it. But that's exactly why it does work. The contrast between the velvety burgundy base and the mirror-bright rose gold tips creates a texture tension that keeps your eye moving across the nail.
The burgundy reads as deeper under matte than it would under gloss. Matte top coats darken most colors by a shade, which is why this design uses a mid-tone plum rather than a very dark one. Under the matte coat, it deepens to the right level without becoming indistinguishable from black in low light.
The rose gold tips are applied after the matte coat, which means they sit on top of the flat surface rather than being covered by it. This ordering matters. If you chrome first and matte second, the matte coat dulls the metallic finish. Chrome last, matte first, is the only way to preserve both textures.
Design Breakdown:
Matte base with metallic French accent. The texture contrast is the design.
Base Color: A mid-tone plum or burgundy that will deepen under matte top coat. Not too dark, or it'll look black when matted.
Nail Shape: Medium almond. The curved tip creates an elegant French line that complements the warm metallic.
Design Element: Matte burgundy on the nail bed with rose gold chrome French tips on all nails.
Finish: Flat matte on the base, high-shine chrome on the tips. The texture split is the entire point.
Get The Look at Home:
Order of operations is critical here. Matte first, chrome second. Reverse it and you lose both effects.
- Burgundy base: Two coats of plum or burgundy gel on all nails. Cure between coats.
- Matte coat: Apply matte top coat over the entire nail and cure. The color will deepen slightly.
- Tip masking: Place thin striping tape along the smile line to protect the matte base. Press the edges firmly.
- No-wipe for chrome: Paint a thin no-wipe gel top coat over just the exposed tip area. Cure.
- Rose gold chrome: Rub rose gold chrome powder onto the tips only. Buff gently with a silicone tool.
- Remove tape and seal: Peel the tape. Apply a thin coat of matte top coat over the burgundy areas only, avoiding the chrome tips.
27 Elegant Wedding Guest Nail Designs for Family in 2026 💍
8.Caramel with Rose Gold Half-Moon
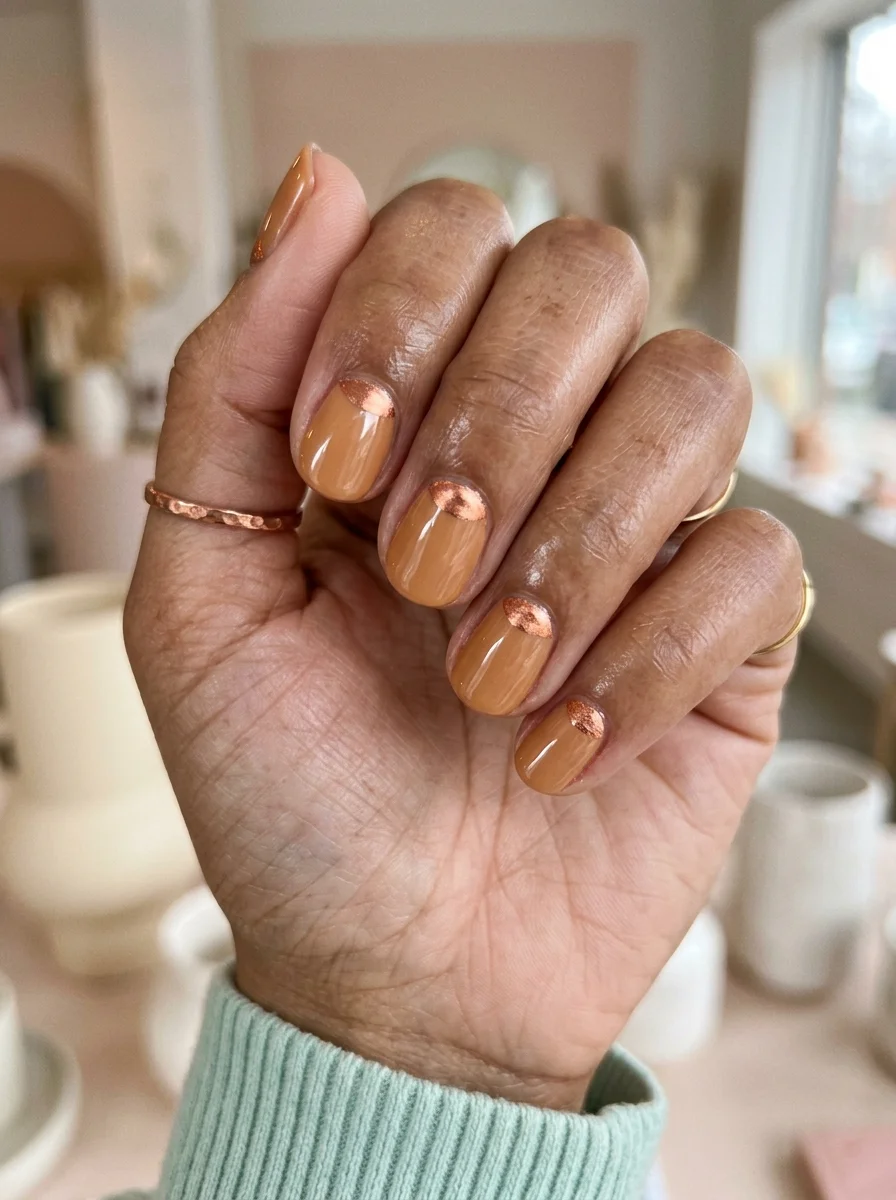
A warm neutral with a metallic crescent that catches the light.
Overview:
The half-moon manicure is one of those designs that sounds simple but separates thoughtful nail art from basic polish application. Here, the warm caramel base does most of the work on its own. It's the kind of neutral that flatters almost every skin tone without washing anyone out. The rose gold chrome half-moons at the cuticle add a detail that elevates the whole thing.
The half-moon placement at the cuticle creates a built-in grow-out buffer. As your nails grow, the chrome crescent stays near the base where it's supposed to be, which means the design holds its shape longer than a French tip would. It's a practical choice disguised as an aesthetic one.
Short oval is the right shape for this design. The rounded edges mirror the curve of the half-moon, which creates a visual harmony between the nail shape and the chrome detail. On square nails, the same half-moon would fight against the angular edges.
Design Breakdown:
Warm neutral base with a metallic crescent at the cuticle. The simplicity is the design.
Base Color: Warm caramel or toffee tan. Not too orange, not too grey. The color of roasted nuts.
Nail Shape: Short oval. Clean, practical, and complementary to the curved chrome accent.
Design Element: Solid caramel on all nails with rose gold chrome half-moon crescents at the cuticle area of each nail.
Finish: High-gloss top coat to make the caramel look rich and the rose gold look reflective.
Get The Look at Home:
The half-moon curve should follow your natural cuticle line. Don't try to make it perfectly round if your cuticle isn't.
- Caramel base: Two coats of warm tan on all nails. Let dry fully.
- Half-moon masking: Apply curved stickers or carefully cut striping tape along the cuticle area, leaving only the crescent exposed.
- No-wipe for chrome: Paint a thin no-wipe gel top coat over the exposed crescent. Cure.
- Rose gold chrome: Rub rose gold chrome powder onto the crescent only. Buff gently.
- Remove tape: Peel carefully. The curve should follow your cuticle line.
- Seal: One coat of top coat over everything to lock both finishes in place.
9.Silver Chrome Plaid
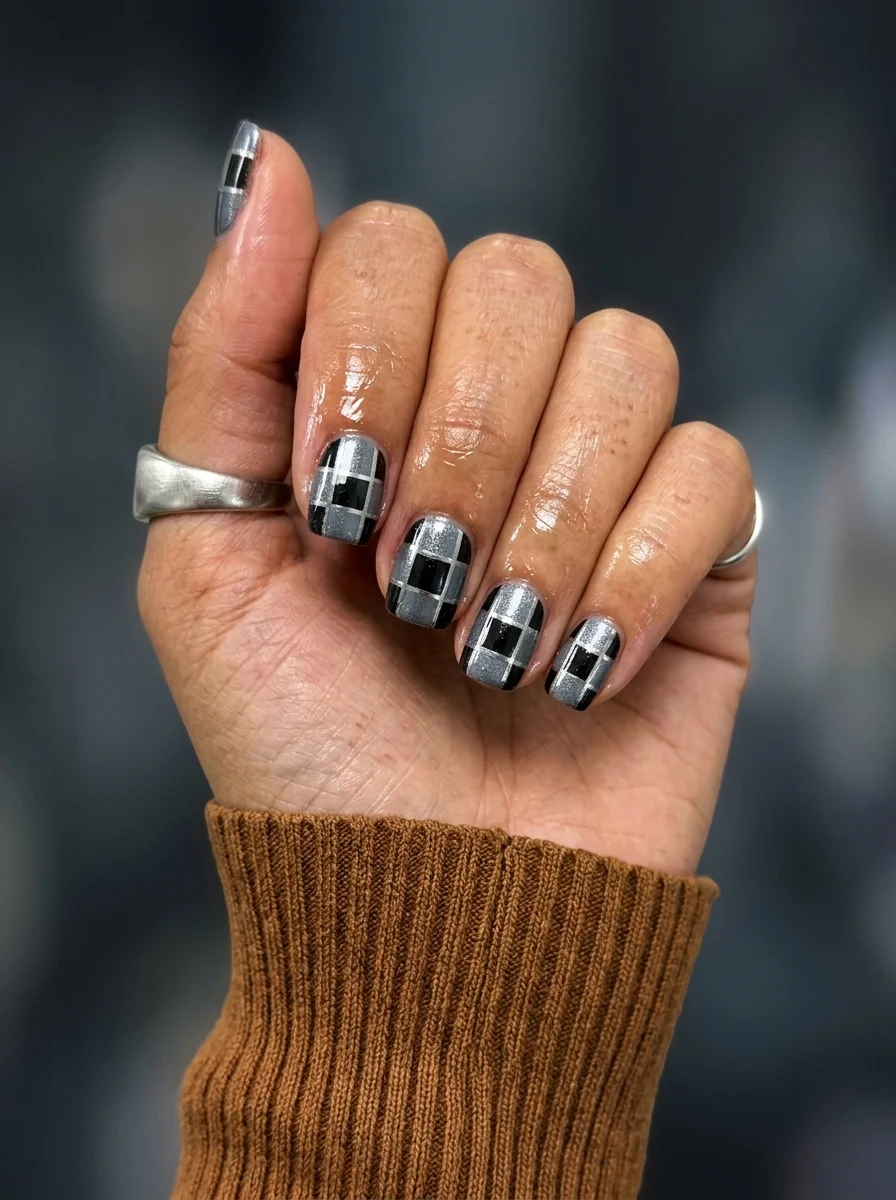
Metallic plaid that catches light from every angle.
Overview:
Plaid on nails is usually done with cream polishes, which gives it a flat, textile quality. Doing it in chrome flips that expectation entirely. The silver chrome base makes the plaid pattern shimmer instead of sitting flat, which creates a metallic tartan that reads as both classic and futuristic at the same time.
The black and grey lines over the silver create the plaid grid. Where the lines cross, the doubled-up pigment creates darker intersections that mimic the woven quality of real tartan. The chrome underneath catches light through the gaps in the pattern, which adds a dimensionality that flat plaid can't achieve.
This design works best on shorter nails. The plaid pattern needs fewer grid intersections to read clearly, and the chrome base has less room to show fingerprints and scratches. Short oval keeps the design contained and practical.
Design Breakdown:
Chrome base with matte pattern overlay. The contrast between reflective and flat is what makes the plaid readable.
Base Color: Silver chrome powder over a white or light grey gel base.
Nail Shape: Short oval. Clean and practical, keeping the plaid pattern proportional.
Design Element: Full silver chrome base with black and grey plaid grid lines painted on top.
Finish: High-gloss top coat to protect the chrome and smooth the painted lines.
Get The Look at Home:
The chrome needs to be sealed before you paint the plaid lines on top. Paint over raw chrome and the lines won't adhere.
- Chrome base: Apply no-wipe gel top coat, cure, then rub silver chrome powder. Buff until smooth.
- Seal chrome: Apply one coat of top coat and cure. This gives the paint a surface to grip.
- Horizontal lines: Using a striper brush and black polish, draw thin horizontal lines spaced about 3mm apart. Let dry.
- Vertical lines: Draw vertical lines at the same spacing. Where they cross, the black overlaps create darker squares.
- Grey accents: Add thinner grey lines between the black lines for a more complex plaid pattern.
- Seal: One coat of top coat to smooth the raised paint texture.
20 Stunning Mother of the Bride Hairstyle Ideas for 2026 💍
10.Bronze Chrome with Matte Black Accent
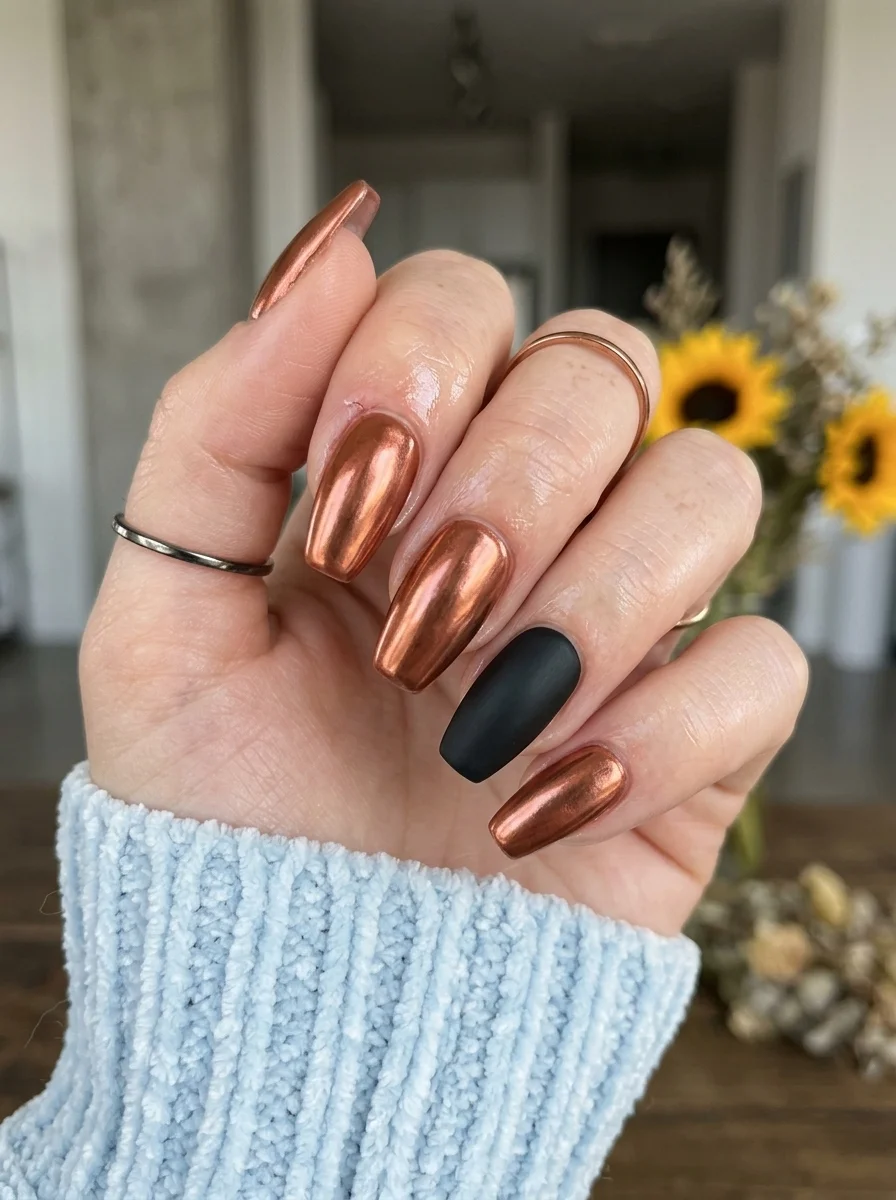
Warm metallic meets flat black for an edgy autumn combo.
Overview:
Copper and black is a color combination borrowed from industrial design, exposed wiring, aged metal, factory signage. On nails, the same pairing reads as both warm and edgy. The copper chrome brings the warmth; the matte black brings the edge. Neither color dominates because they occupy opposite ends of the reflectivity spectrum.
The matte black accent nail creates a visual stop. When your eyes move across the shimmering copper, the flat black nail acts as a pause, a moment of silence in a loud room. That rhythm between shine and void is what makes this design more interesting than all-copper or all-black would be on their own.
Coffin shape is the natural match here. The angular, tapered tip reinforces the industrial quality of the copper-and-black palette. On rounded shapes, the same colors would feel softer and less intentional. The sharpness of the coffin is part of the design.
Design Breakdown:
Warm metallic with one flat-dark accent. The reflectivity contrast does the work.
Base Color: Copper or rose gold chrome over a warm brown or nude gel base. The warmth of the base affects how the chrome reads.
Nail Shape: Long coffin. The flat tip and tapered sides reinforce the industrial aesthetic.
Design Element: Full copper chrome on four nails. One solid matte black accent nail on the ring finger.
Finish: High-gloss chrome on the copper nails, fully flat matte on the black accent. The texture difference is the statement.
Get The Look at Home:
The black accent is the easiest nail. The chrome nails take more patience.
- Copper chrome nails: Apply no-wipe gel top coat over four nails, cure, then rub copper or rose gold chrome powder. Buff until mirror-smooth.
- Black accent: On the ring finger, apply two coats of opaque black gel. Cure between coats.
- Matte the black: Apply matte top coat over the black nail only. Cure.
- Edge seal: Apply top coat around the base of each nail to prevent lifting. Chrome nails are prone to chipping at the edges.
- Cuticle oil: Finish with cuticle oil to keep the chrome looking fresh and the matte looking clean.
11.Emerald Green Chrome with Gold Swirls
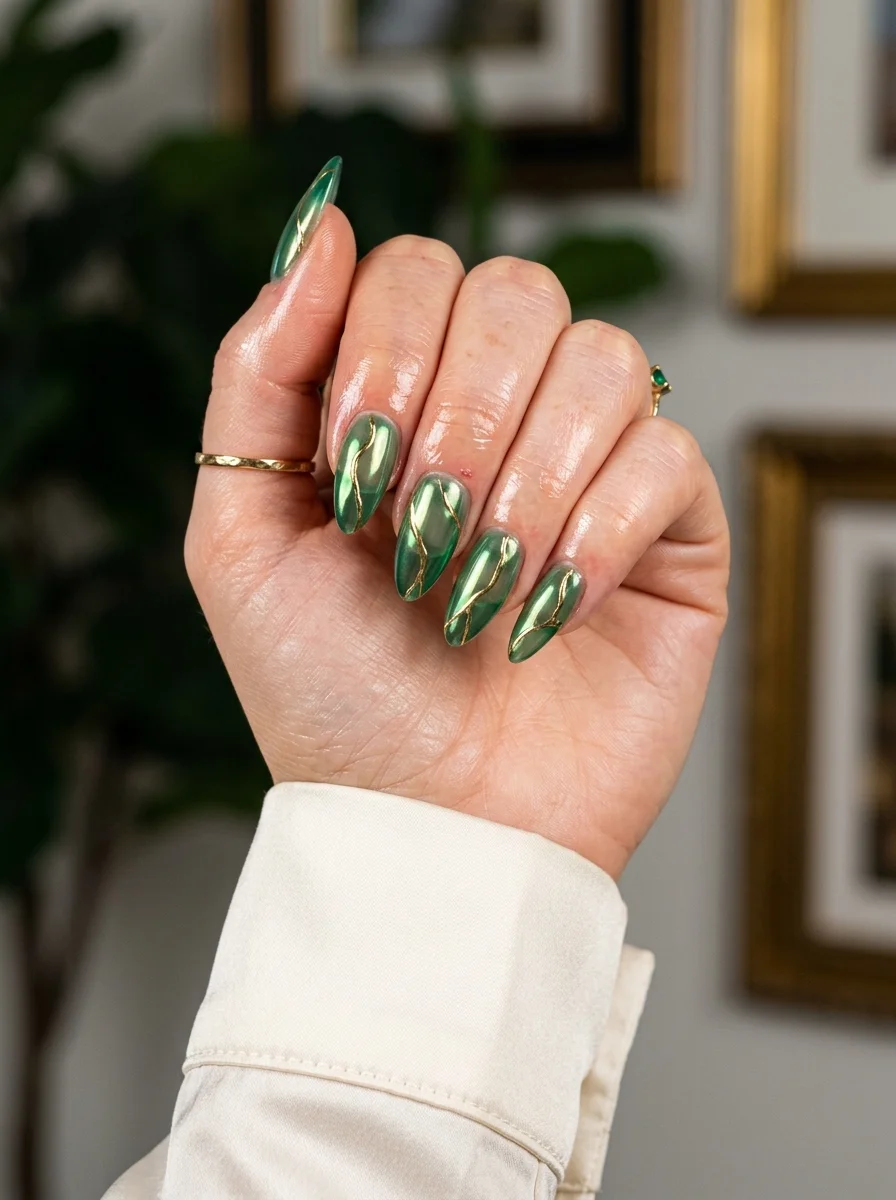
Jewel-tone chrome with gilded movement across every nail.
Overview:
Green chrome is one of the most underrated fall nail colors. It has the depth of emerald jewelry and the reflectivity of liquid metal, which is a combination that reads expensive without trying. This particular shade leans slightly teal in some lights, which keeps it from looking like a Christmas green.
The gold swirl lines are what elevate this from "pretty green chrome" to a designed set. The lines flow across the nails in organic, wave-like patterns that catch light independently of the chrome base. When your hand moves, the gold lines flash at different moments than the green chrome, creating a layered shimmer effect.
The swirl lines are thin, which matters. Thick gold lines would overpower the green and make the design look busy. At this thickness, they function as accent lighting rather than a competing pattern. The restraint in line weight is what keeps the design elegant.
Design Breakdown:
Jewel-tone chrome with metallic line art. The gold lines create movement across the green surface.
Base Color: Emerald or forest green chrome powder over a dark green or black gel base.
Nail Shape: Long almond. The curved shape gives the swirl lines room to flow naturally.
Design Element: Full green chrome on all nails with thin gold metallic swirl lines painted across every nail in organic, flowing patterns.
Finish: High-gloss top coat over everything. The shine unifies the two metallic finishes.
Get The Look at Home:
Seal the chrome before painting the gold lines. Paint over raw chrome and the gold won't adhere properly.
- Green chrome base: Apply no-wipe gel top coat over dark green or black gel, cure, then rub emerald chrome powder. Buff until smooth.
- Seal chrome: Apply one coat of top coat over the chrome and cure. This gives the gold paint a surface to grip.
- Swirl lines: Using a thin liner brush and gold gel paint or metallic polish, draw flowing, organic swirl lines across each nail. Keep the lines thin and consistent.
- Vary the pattern: Each nail should have a slightly different swirl pattern. Some lines curve left, some right, some cross over each other.
- Cure and seal: Cure the gold lines, then apply one final coat of top coat over everything.
27 Stunning Graduation Day Nail Ideas for 2026 🎓
12.Rose Gold Chrome French Fade
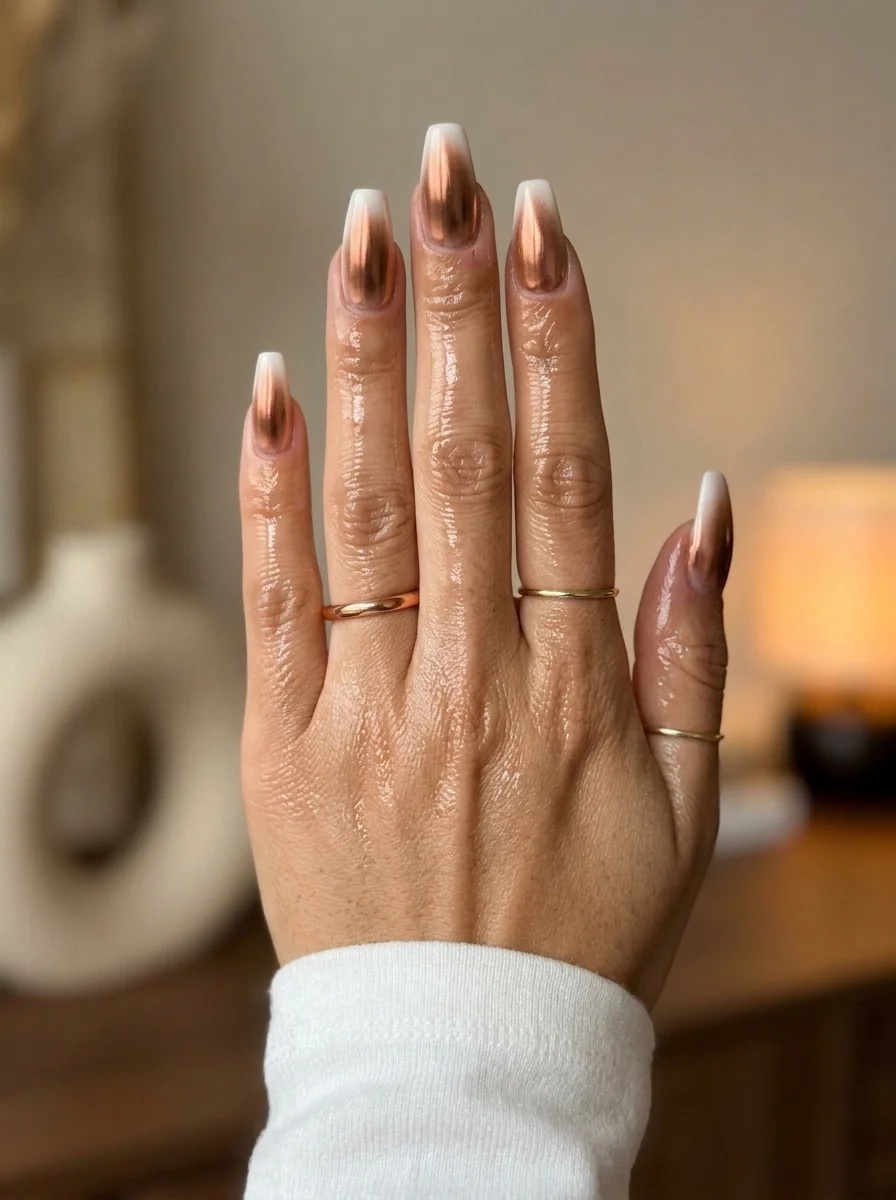
A French manicure reimagined with a warm chrome gradient.
Overview:
A French tip with a chrome twist isn't just a color swap. The rose gold chrome here is applied as a gradient, densest at the cuticle and fading toward the tip where the white takes over. This reverses the traditional French structure, where the color lives at the tip. The result feels like a sunset reflected in a mirror.
The gradient approach solves a problem that regular chrome French tips have: the harsh line between the metallic and the nude. By fading the chrome, the transition becomes gradual and organic rather than a hard border. The eye reads it as a continuous color shift rather than two separate zones.
Long coffin is essential here. The extended surface area gives the gradient room to develop properly. On shorter nails, the chrome-to- white transition would feel rushed and compressed, losing the atmospheric quality that makes this design work.
Design Breakdown:
Chrome gradient at the cuticle fading into white at the tip. The transition zone is the design.
Base Color: White at the tips, transitioning to rose gold chrome at the cuticle area.
Nail Shape: Long coffin. The flat tip gives the white French section a clean edge.
Design Element: Rose gold chrome gradient concentrated at the cuticle, fading into opaque white French tips at the free edge.
Finish: High-gloss top coat to blend the gradient and intensify both the chrome and the white.
Get The Look at Home:
The chrome gradient requires building up thin layers. One heavy application will look patchy.
- White tips: Paint opaque white French tips on all nails. Let dry fully.
- Chrome gradient: Apply no-wipe gel top coat over the entire nail, cure. Using a sponge or silicone tool, dab rose gold chrome powder starting at the cuticle and fading toward the tip. Build in thin layers.
- Blend the transition: The densest chrome should be at the cuticle, gradually thinning out toward the white tip. Add more powder at the base if the gradient looks too abrupt.
- Buff smooth: Gently buff the entire surface to even out the chrome distribution.
- Seal: One thick coat of top coat to lock the gradient in place and create a smooth, glassy surface.
13.Classic Silver Chrome
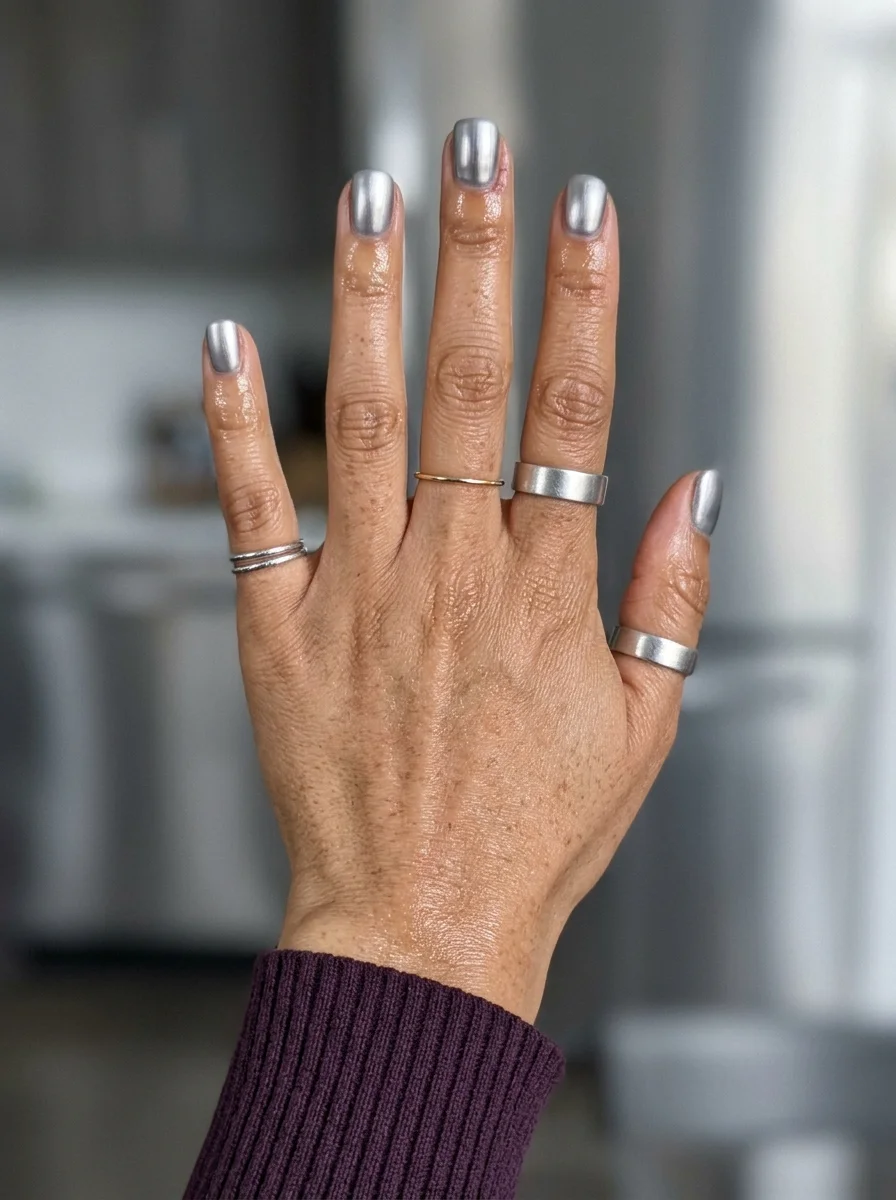
Pure mirror shine with zero embellishment.
Overview:
Sometimes the strongest design choice is no design at all. Solid silver chrome on every nail is one of those looks that doesn't need accent nails, patterns, or embellishments to hold attention. The mirror finish does all the work, reflecting your surroundings and shifting with every hand movement.
Silver chrome is the most versatile metallic in the fall palette. It pairs with everything from dark burgundy to forest green to black, which means you don't have to think about outfit coordination. The chrome becomes the accessory, like wearing silver jewelry on every finger.
The downside is maintenance. Silver chrome shows every fingerprint, every scratch, every minor imperfection in the top coat. You'll find yourself buffing and re-sealing more often than with any other color. The mirror finish is beautiful when fresh and tolerable when worn. Set your expectations accordingly.
Design Breakdown:
Single-color chrome, zero art. The finish IS the design.
Base Color: White or light grey gel under silver chrome powder. White gives a brighter, more mirror-like result; grey gives a deeper, more pewter-like result.
Nail Shape: Short oval. Clean, modern, and practical for everyday wear.
Design Element: None. Full silver chrome coverage on every nail.
Finish: High-gloss chrome. The mirror finish is the entire point.
Get The Look at Home:
Chrome powder application is the same regardless of color. The key is in the prep and the sealing.
- Base coat: Apply a ridge-filling base coat and let it dry completely. Chrome shows every surface imperfection.
- Gel color: Two coats of white or light grey gel. Cure between coats.
- No-wipe top: Apply a no-wipe gel top coat. Cure fully.
- Chrome powder: Using a silicone applicator, rub silver chrome powder over the entire nail. Buff in circular motions until the surface is mirror-smooth.
- Dust off: Use a fluffy brush to remove excess powder from around the cuticles and under the nail edge.
- Seal: Apply one coat of top coat, capping the free edge. This locks the chrome in place and prevents flaking.

21 Stunning Concert Hairstyles for Women 2026 🎶✨
14.White with Copper Geometric Lines
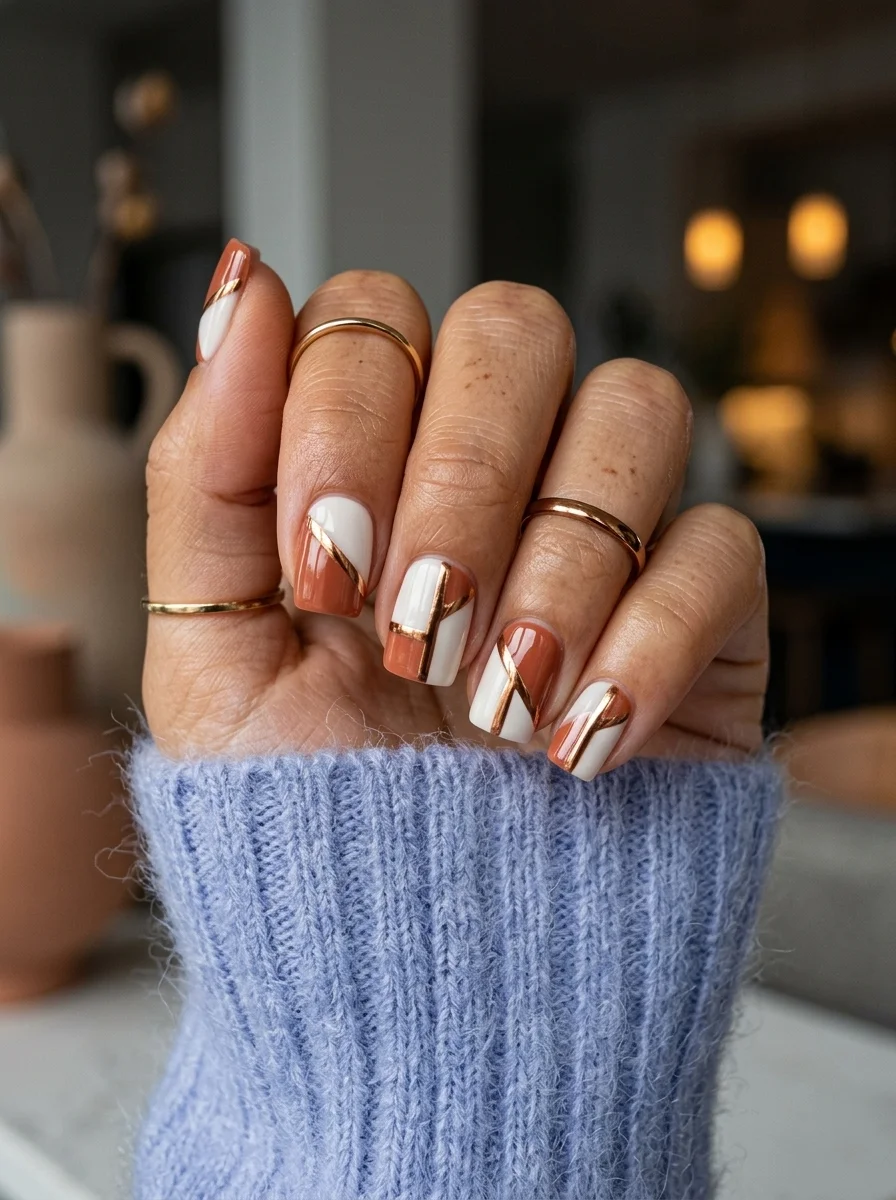
Clean geometry in warm metallic against a crisp white canvas.
Overview:
White nails with metallic line art is a combination that works because of contrast. The white acts as a blank canvas, and the copper chrome lines become the illustration. Unlike chrome powder applied to the entire nail, here the chrome is confined to thin geometric shapes, which means it catches light in specific areas rather than across the whole surface.
The geometric patterns vary from nail to nail. Some get diagonal lines, others get intersecting shapes, others get partial coverage. This variation keeps the set from looking like a printed pattern and gives it a more hand-designed quality. The copper warms up the white enough that it doesn't read as clinical.
The challenge is getting clean lines with chrome. Chrome powder spreads beyond where you apply it, so the geometric shapes need to be sealed with a no-wipe top coat first, then the chrome goes on top. It's a multi-step process, but the result is worth the effort.
Design Breakdown:
White canvas with metallic geometric line art. The copper shapes create the design through negative space.
Base Color: Bright, opaque white. Streak-free coverage is essential for this design.
Nail Shape: Short square. The angular shape complements the geometric line work.
Design Element: Copper chrome geometric lines and abstract shapes painted over white on every nail. Each nail has a different pattern.
Finish: High-gloss top coat to protect the chrome lines and make the white look crisp.
Get The Look at Home:
The chrome only sticks where you apply the no-wipe top coat, so mapping your design before adding powder is essential.
- White base: Two to three coats of opaque white. Let dry fully.
- Map the design: Using a thin brush and no-wipe gel top coat, paint your geometric lines and shapes onto the white. Cure immediately so the design doesn't spread.
- Chrome application: Rub copper chrome powder over the entire nail. The powder will only adhere to the cured no-wipe areas, creating the geometric pattern.
- Dust off: Brush away excess powder. The white areas should remain clean.
- Seal: One coat of top coat over everything to lock the chrome design in place.
15.Grey Chrome Swirl Stiletto
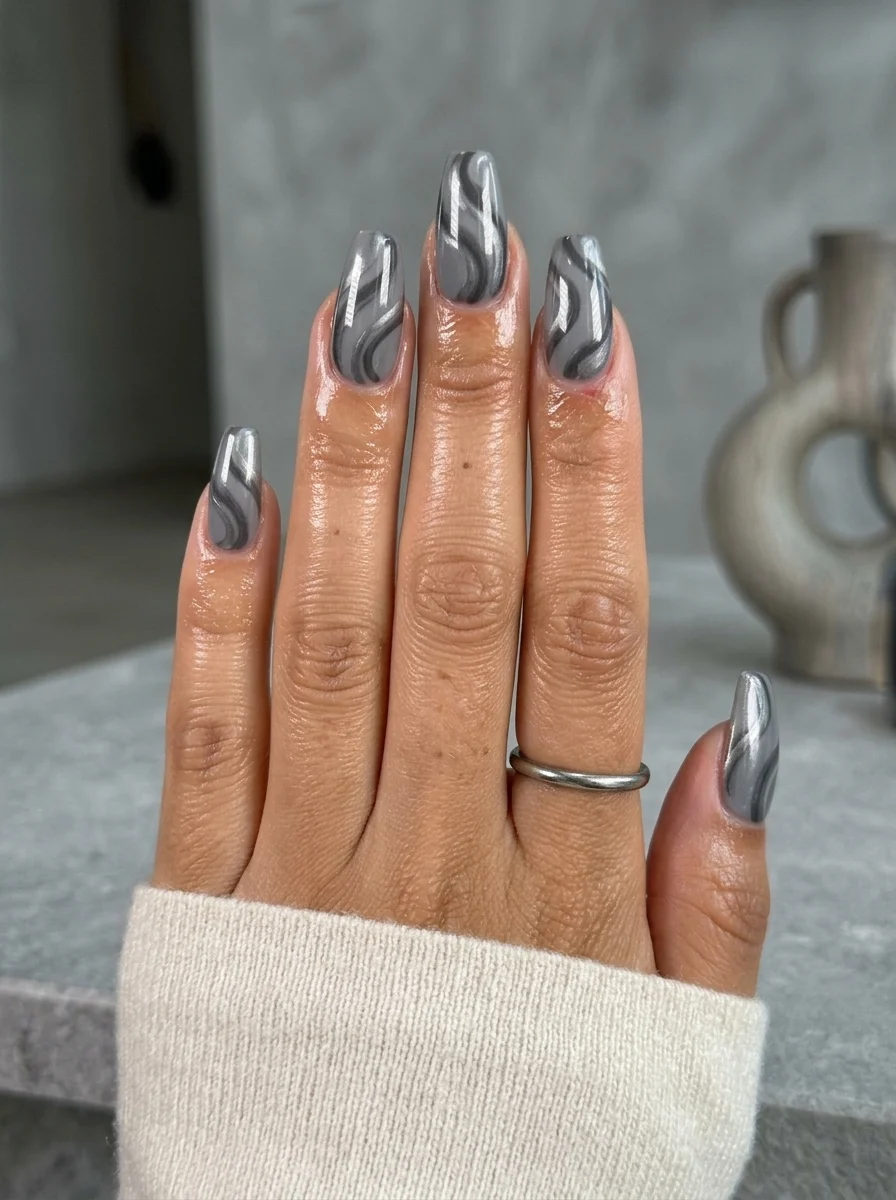
Cool-toned chrome with organic swirl movement in every direction.
Overview:
Grey chrome is one of those colors that looks different in every light. Under warm lighting, it reads as pewter. Under cool fluorescent, it reads as liquid silver. The swirl patterns painted on top create areas of density and openness that make the chrome shift even more dramatically as your hand moves.
The swirls are painted in a darker grey or black over the lighter chrome base, creating a tonal contrast that adds depth without introducing new colors. The organic, flowing shapes look like smoke trapped under glass. Each nail gets a different swirl pattern, which keeps the set visually interesting without breaking the monochrome palette.
Stiletto is the shape that makes this design work. The sharp, tapered tip amplifies the flowing quality of the swirls, making them look like they're streaming toward the point. On rounded shapes, the same swirls would feel more contained and less dynamic.
Design Breakdown:
Tonal grey chrome with organic swirl art. The monochrome palette is what keeps it sophisticated.
Base Color: Light silver or pewter chrome over a grey gel base.
Nail Shape: Long stiletto. The sharp tip amplifies the directional flow of the swirls.
Design Element: Grey chrome base with darker grey or black swirl patterns flowing across every nail.
Finish: High-gloss top coat to intensify the chrome and protect the swirl art.
Get The Look at Home:
The swirls are painted into a wet top coat layer, which softens the edges and creates the smoky effect.
- Chrome base: Apply no-wipe gel top coat, cure, then rub silver or pewter chrome powder. Buff until smooth.
- Seal: Apply one coat of top coat and cure. This is your working surface.
- Wet layer: Apply a thin, uncured layer of top coat over the sealed chrome.
- Swirl color: Using a thin brush, drop lines of dark grey or black gel polish onto the wet top coat.
- Drag the swirls: Use a toothpick or clean liner brush to drag through the wet color, creating flowing, smoke-like patterns. Three to four drags per nail.
- Cure immediately: Once you like the pattern, cure right away to stop the colors from spreading. Apply final top coat.
35 Fun Birthday Nail Designs for 2026 🎂
16.Dark Green Marble Chrome
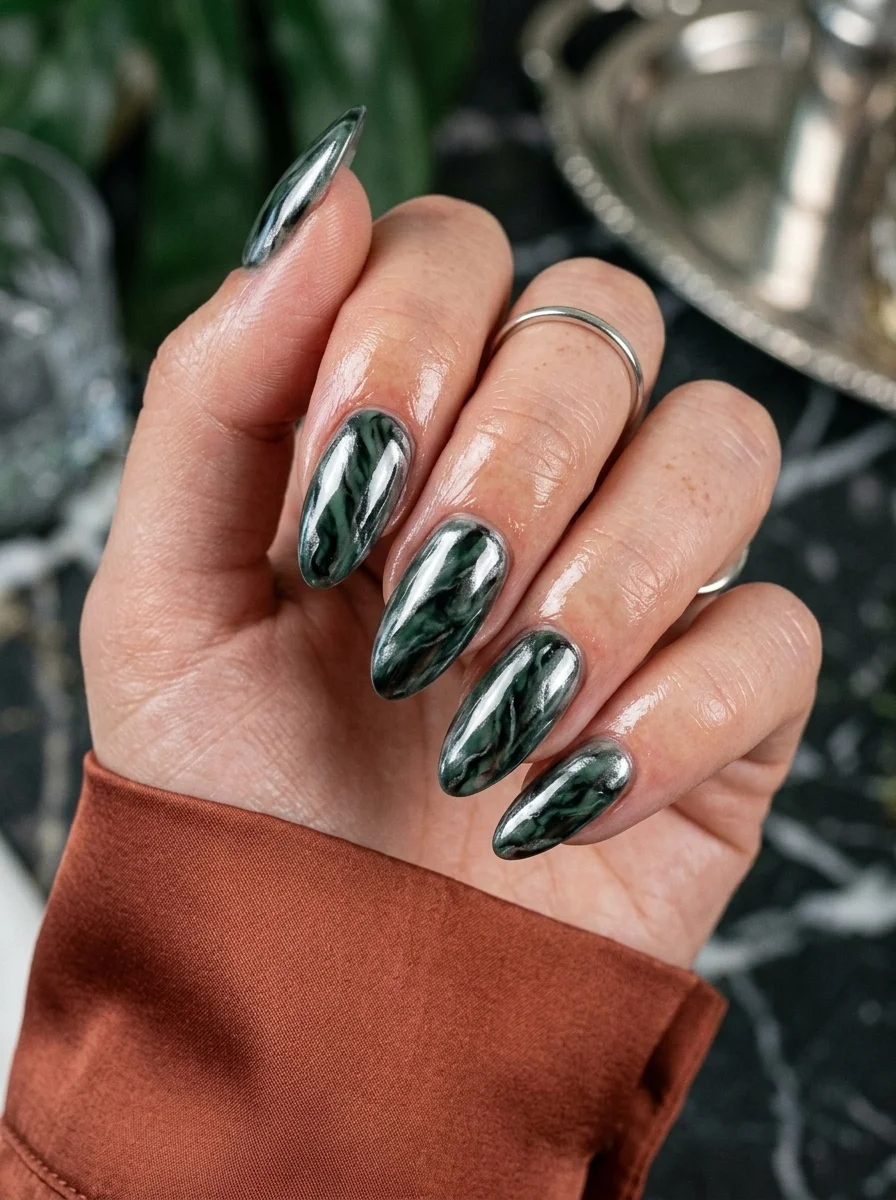
Deep malachite stone rendered in reflective chrome.
Overview:
Green marble nails combine two things that are hard to get right on their own: chrome finish and organic pattern. The dark green chrome provides the depth and reflectivity, while the marble veining adds a natural, geological quality that flat green polish can't achieve. The result looks like polished malachite, a stone that's been used in jewelry for centuries.
The marble veins are painted in silver or white over the green chrome, creating thin, branching lines that mimic the natural fracture patterns found in real stone. The key is keeping the veins thin and irregular. Thick, uniform lines look like stripes, not marble.
This design photographs beautifully but requires patience in person. The chrome shows every fingerprint, and the marble veins can smear if the top coat isn't applied carefully. It's a special-occasion design rather than an everyday one, unless you're willing to accept the maintenance that comes with high-shine chrome.
Design Breakdown:
Chrome base with stone-inspired veining. The marble lines create the illusion of natural mineral patterns.
Base Color: Dark forest green chrome over a black or deep green gel base.
Nail Shape: Medium almond. The curved shape echoes the organic quality of the marble veins.
Design Element: Full green chrome base with thin silver or white marble veins branching across every nail.
Finish: High-gloss top coat to intensify the chrome and create the "polished stone" effect.
Get The Look at Home:
Seal the chrome before painting the marble veins. The veins need a surface that grip, and raw chrome is too slippery.
- Green chrome base: Apply no-wipe gel top coat over dark green or black gel, cure, then rub emerald chrome powder. Buff until smooth.
- Seal chrome: Apply one coat of top coat and cure. This gives the vein paint something to grip.
- Main veins: Using a thin liner brush and silver or white gel paint, draw the primary vein lines. Start thick at one edge and taper toward the other. Two to three main veins per nail.
- Branch veins: Add thinner secondary veins splitting off from the main lines. Keep them irregular and organic.
- Cure and seal: Cure the vein art, then apply one final coat of top coat over everything.
17.Emerald Chrome with Gold Stripe
One clean line across jewel-tone chrome for understated elegance.
Overview:
A single metallic stripe across a chrome nail is one of the most minimal designs that still qualifies as "nail art." The emerald green chrome does most of the heavy lifting on its own; the gold stripe just adds one sharp note of contrast that catches the eye. It's the nail equivalent of a thin gold chain over a dark dress.
The stripe placement matters. Positioned slightly above center, the gold line divides the nail into two visual zones: a larger green area below and a smaller one above. This asymmetry is more interesting than centering the stripe, which would feel static and predictable.
This is a good entry-level chrome design for people who find full chrome too intense. The emerald green has enough depth to feel substantial, and the gold stripe adds just enough detail to make it feel designed rather than just a solid color.
Design Breakdown:
Jewel-tone chrome with one clean metallic accent. The simplicity is what makes it elegant.
Base Color: Deep emerald green chrome over a dark green or black gel base.
Nail Shape: Medium almond. The curved shape complements the clean horizontal line.
Design Element: Full green chrome on all nails with a single thin gold metallic stripe painted horizontally across each nail, positioned slightly above center.
Finish: High-gloss top coat to protect both the chrome and the gold line.
Get The Look at Home:
The stripe needs to be straight and consistent across all nails. Use striping tape for the cleanest result.
- Green chrome base: Apply no-wipe gel top coat, cure, then rub emerald chrome powder. Buff until smooth.
- Seal chrome: Apply one coat of top coat and cure. This gives the gold paint a surface to grip.
- Stripe placement: Apply thin striping tape horizontally across each nail, slightly above center. Press firmly.
- Gold line: Paint gold gel polish or metallic polish over the tape, or use gold striping tape directly.
- Remove tape: If using painted gold, peel the tape at a low angle while the polish is still wet.
- Seal: One coat of top coat to lock everything in place.
28 Effortless Hot Weather Day Hairstyles for Women 2026 ☀️💇♀️
18.Silver Chrome with Gold Dot Accent
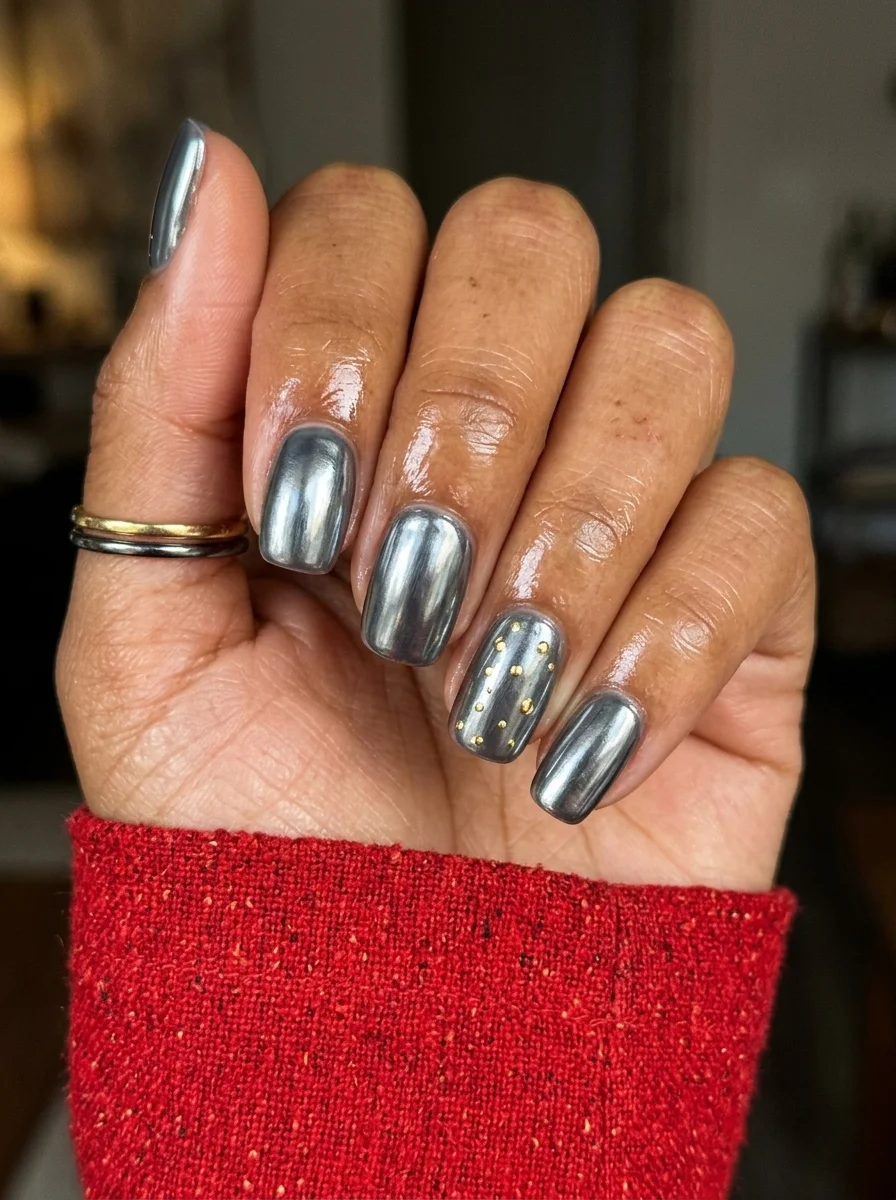
Cool silver warmed up with scattered gold metallic dots.
Overview:
Silver chrome on its own can read as cold. Adding gold dot accents on one nail changes the temperature of the entire set. The warm metallic dots create a mixed-metal look that's more interesting than either gold or silver alone. It's the nail equivalent of wearing both silver and gold jewelry, which used to be a fashion rule and is now a deliberate choice.
The dots are small and scattered, which keeps the accent nail from looking like a different design altogether. They function as texture rather than illustration, adding visual interest without breaking the chrome palette. The mixed-metal approach also makes this design easier to pair with jewelry, since you're already committed to both tones.
Short oval keeps the chrome practical. Long chrome nails are high- maintenance; short chrome nails are high-impact with less upkeep. The shorter the nail, the less surface area there is to scratch and fingerprint.
Design Breakdown:
Cool chrome with warm metallic dot accents. The mixed-metal palette is the design.
Base Color: Silver chrome over a white or light grey gel base.
Nail Shape: Short oval. Clean and practical, letting the chrome speak for itself.
Design Element: Full silver chrome on four nails. One accent nail (ring finger) with small gold metallic dots scattered across the surface.
Finish: High-gloss top coat over everything. Both metals should reflect light equally.
Get The Look at Home:
The dots are applied after the chrome is sealed. Use a dotting tool for consistent sizes.
- Silver chrome base: Apply no-wipe gel top coat, cure, then rub silver chrome powder on all nails. Buff until smooth.
- Seal chrome: Apply one coat of top coat and cure. This prevents the gold dots from smearing the silver.
- Gold dots: On the ring finger, use a small dotting tool and gold metallic polish or gel to place scattered dots across the nail. Vary the spacing.
- Dot sizes: Use two different dotting tool sizes for visual variety. Some dots larger, some smaller.
- Seal: One coat of top coat over everything to protect the dots and unify the finish.
19.Green Chrome with Leopard Accent
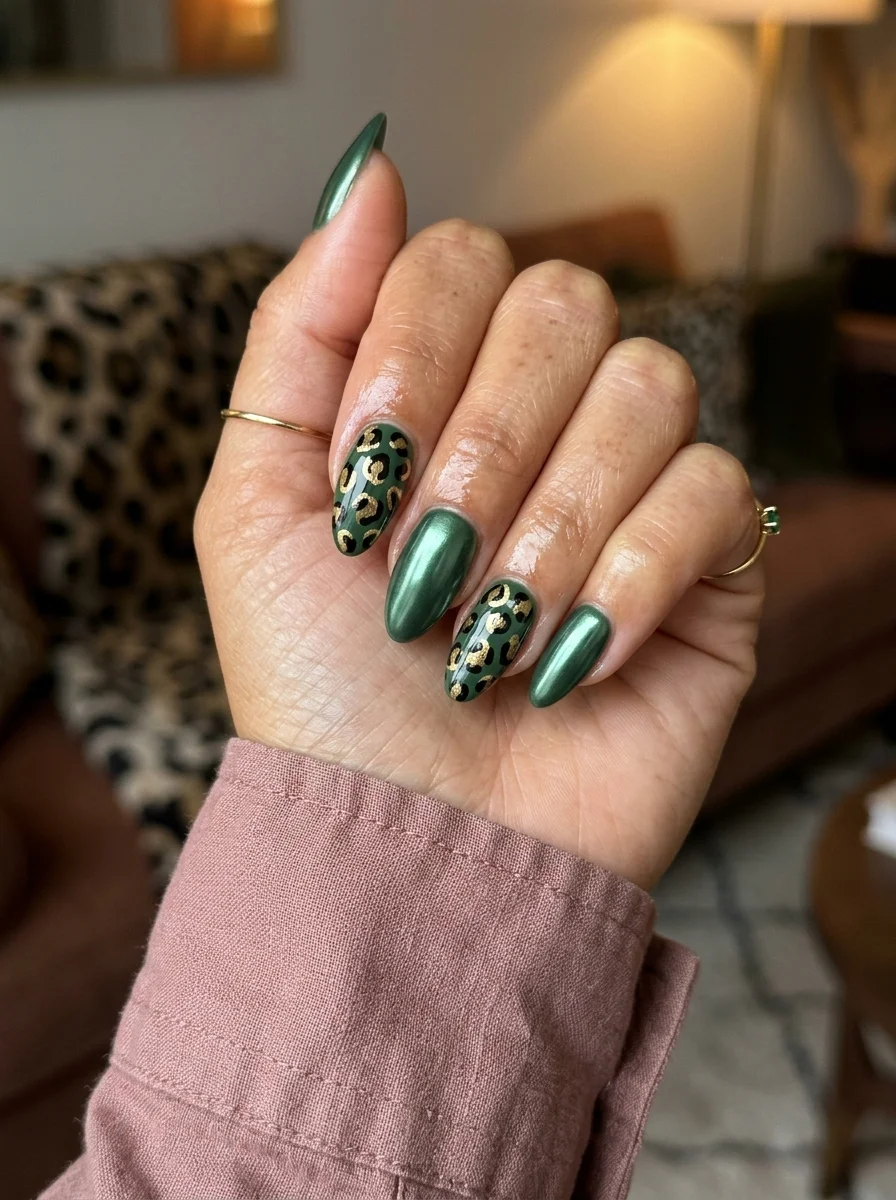
Jewel-tone chrome meets wild print for a bold fall combination.
Overview:
Green chrome and leopard print is a combination that shouldn't work on paper. One is cool and metallic; the other is warm and organic. But the leopard spots here are painted over a gold chrome base, which ties them into the warm end of the green's undertone range. The gold bridges the gap between the two elements, making them feel like they belong on the same hand.
The leopard accent nails break up the solid green chrome and add a pattern element that makes the set feel more designed. Without them, you have green chrome nails. With them, you have a curated set where different nails serve different purposes. The green nails establish the mood; the leopard nails provide the contrast.
This is a bold design that works best on people who want their nails to be a conversation piece. The green chrome is already attention- grabbing; adding leopard print turns the volume up further. It's not subtle, and that's the point.
Design Breakdown:
Jewel-tone chrome with animal print accent. The gold base of the leopard ties the two elements together.
Base Color: Emerald green chrome on most nails. Gold chrome on two accent nails (index and ring fingers).
Nail Shape: Medium almond. The curved shape complements both the organic leopard spots and the flowing chrome finish.
Design Element: Full green chrome on three nails. Two accent nails with gold chrome base and black leopard spots painted on top.
Finish: High-gloss top coat to protect both the chrome and the painted art.
Get The Look at Home:
The leopard spots go over sealed gold chrome. Don't paint them on raw chrome, or the spots won't adhere properly.
- Green chrome nails: Apply no-wipe gel top coat, cure, then rub emerald chrome powder on three nails. Buff until smooth.
- Gold chrome accent: On two nails, apply no-wipe gel top coat, cure, then rub gold chrome powder. Buff until smooth.
- Seal all nails: Apply one coat of top coat over every nail and cure.
- Leopard spots: On the gold accent nails, use a dotting tool and black polish to place irregular C-shapes and broken circles. Three to four per nail.
- Brown centers: Add a dark brown dot inside some of the black shapes for depth.
- Seal: One coat of top coat over everything to protect the art and unify the finish.
28 Trendy May Nail Designs for 2026 💅
20.Taupe Chrome with Gold French Tips
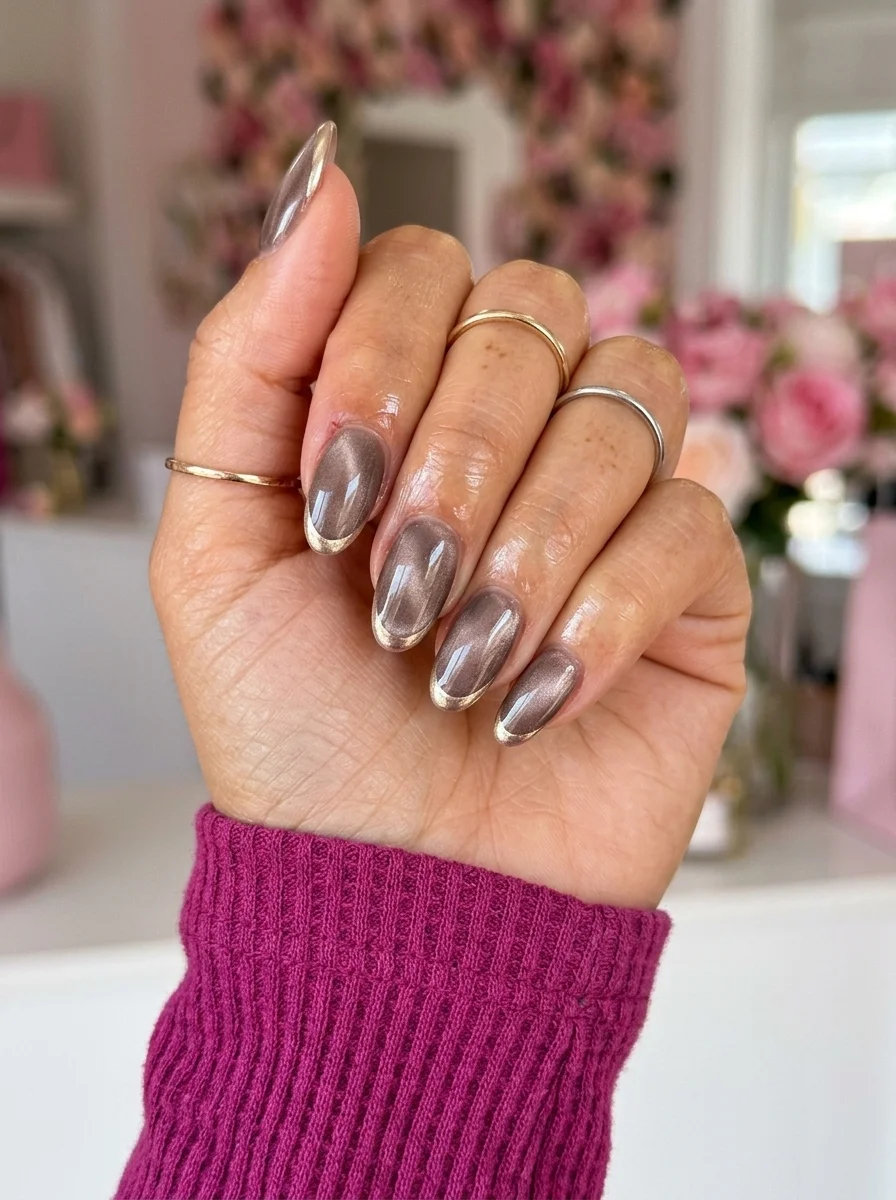
A muted metallic base with a warm, gleaming edge.
Overview:
Taupe chrome occupies a strange middle ground: not quite brown, not quite purple, not quite grey. That ambiguity is what makes it interesting. The color shifts depending on what's around it, picking up warm tones in golden light and cool tones in fluorescent light. It's a chrome that adapts to its environment.
The gold French tips add a warm metallic accent that harmonizes with the taupe's brown undertones. Unlike silver tips, which would contrast against the warmth, gold tips lean into it. The result is a design that feels cohesive and intentional, like the two colors were always meant to be together.
The French tips here are thin, which keeps the design understated. Thicker gold tips would push the design toward glamour, which would fight against the taupe's muted personality. At this thickness, the gold reads as a subtle highlight rather than a bold statement.
Design Breakdown:
Muted chrome with warm metallic accent. The taupe-to-gold transition is seamless because of their shared warmth.
Base Color: Taupe or mauve chrome over a neutral or warm-toned gel base.
Nail Shape: Medium almond. The curved tip creates an elegant French line.
Design Element: Full taupe chrome on all nails with thin gold chrome French tips at the free edge.
Finish: High-gloss top coat to protect both chrome finishes and unify the design.
Get The Look at Home:
The gold tips are applied after the taupe chrome is sealed. Tape off the base to keep the gold where you want it.
- Taupe chrome base: Apply no-wipe gel top coat, cure, then rub taupe or mauve chrome powder. Buff until smooth.
- Seal chrome: Apply one coat of top coat and cure. This protects the taupe during the tip application.
- Tip masking: Apply thin striping tape along the smile line, leaving only the very tip exposed.
- Gold chrome on tips: Apply no-wipe gel top coat to the exposed tips, cure, then rub gold chrome powder. Buff gently.
- Remove tape: Peel carefully at a low angle.
- Seal: One coat of top coat over everything to lock both chromes in place.
21.Brown Chrome Swirls
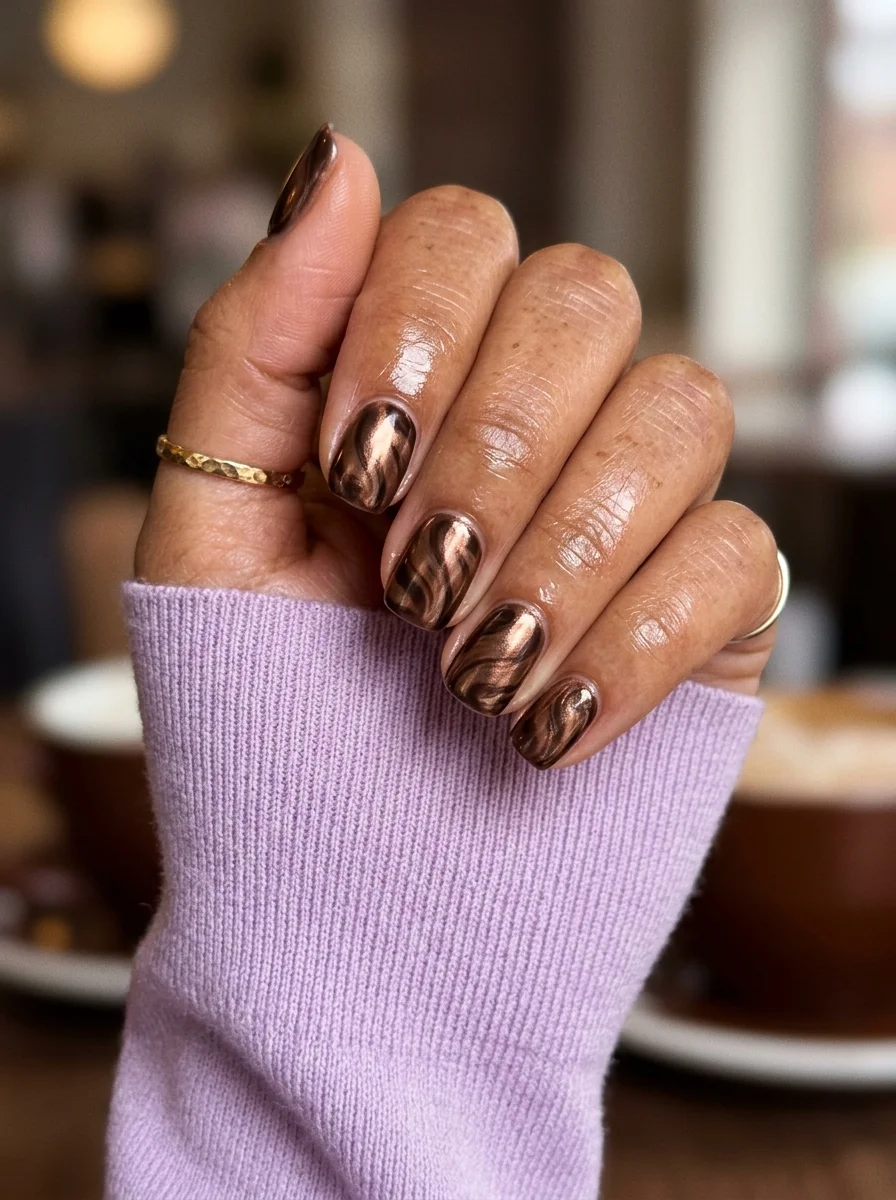
A warm, coffee-inspired chrome with organic swirl movement.
Overview:
Brown chrome sounds like it could lean muddy, but the key is keeping the tonal range narrow. Everything in this design stays within the chocolate-to-caramel spectrum, so the swirls read as tonal depth rather than color contrast. The result looks like stirred espresso, warm and fluid and slightly unpredictable.
The swirl technique creates lines that are impossible to replicate exactly from nail to nail. That inconsistency is the design's strength. Each nail becomes a unique pattern within the same color family, which keeps the set visually interesting without breaking the cohesion.
Short oval is the right shape here. The rounded edges complement the organic swirl patterns, and the shorter length keeps the brown from reading too heavy. On long nails, all-over brown chrome can feel oppressive. On short nails, it reads as warm and contained.
Design Breakdown:
Tonal brown chrome with organic swirl art. The narrow color range is what keeps it polished.
Base Color: Chocolate or espresso brown chrome over a dark brown gel base.
Nail Shape: Short oval. The soft shape matches the flowing quality of the swirls.
Design Element: Brown chrome with lighter brown and rose gold swirl lines creating organic, marbled patterns across all nails.
Finish: High-gloss top coat. The shine gives the brown depth and prevents it from looking flat.
Get The Look at Home:
The swirls are painted into a wet top coat layer, which is what creates the soft, blended edges.
- Brown chrome base: Apply no-wipe gel top coat, cure, then rub brown chrome powder. Buff until smooth.
- Seal: Apply one coat of top coat and cure. This is your working surface.
- Wet layer: Apply a thin, uncured layer of top coat over the sealed chrome.
- Swirl colors: Using a thin brush, drop lines of lighter brown and rose gold gel polish onto the wet top coat. Work quickly.
- Drag the swirls: Use a toothpick or clean liner brush to drag through the wet colors, creating flowing swirl patterns. Three to four drags per nail.
- Cure immediately: Once you like the pattern, cure right away to stop the colors from spreading further. Apply final top coat.
24 Stunning Bridesmaid Hairstyles for Weddings 2026 💍✨
22.Copper Chrome Half-Moon
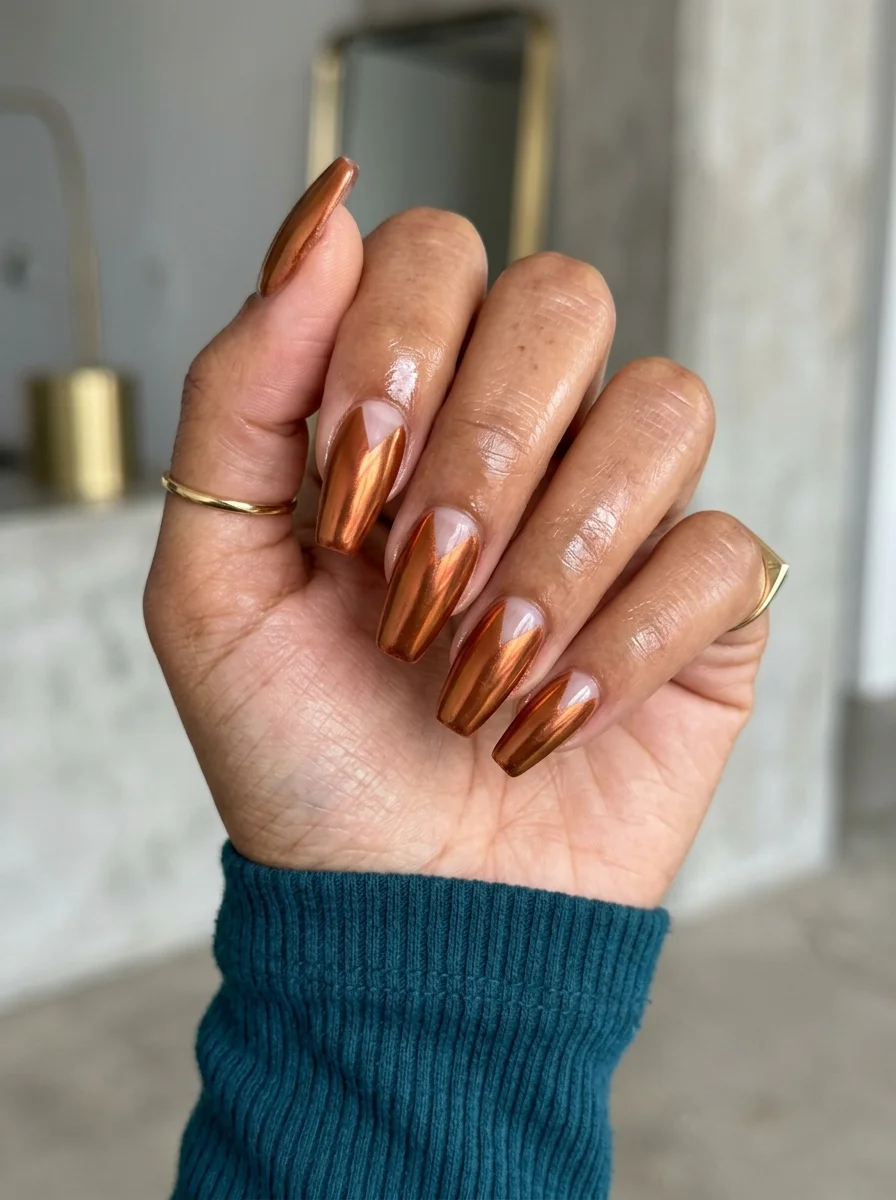
Warm copper chrome framed by a clean white crescent.
Overview:
Copper chrome on its own is one of the warmest metallics in the fall palette. The orange-leaning tone reads as autumn captured in metal. Adding white half-moons at the cuticle creates a frame that grounds the warmth and adds a clean, graphic element to an otherwise fluid design.
The white crescents serve a practical purpose too. They create a built-in grow-out buffer, since the design is anchored at the cuticle rather than the tip. As your nails grow, the white half-moon stays where it's supposed to be, which means the manicure holds its shape longer than a French tip would.
The copper chrome over a coffin shape creates a lot of visual weight. The white half-moons lighten the overall effect and prevent the design from reading as too heavy or too dark. It's a small detail that makes a big difference in the final look.
Design Breakdown:
Warm metallic with a graphic white accent. The half-moon frames the chrome and adds visual balance.
Base Color: Copper or burnt orange chrome over a warm-toned gel base.
Nail Shape: Long coffin. The flat tip and long sides give the chrome enough surface area to show its warmth.
Design Element: Full copper chrome on all nails with white half-moon crescents at the cuticle area.
Finish: High-gloss top coat to intensify the copper and keep the white crescents crisp.
Get The Look at Home:
The half-moon should follow your natural cuticle curve. Use curved stickers or tape for clean lines.
- Copper chrome base: Apply no-wipe gel top coat, cure, then rub copper chrome powder. Buff until smooth.
- Seal chrome: Apply one coat of top coat and cure.
- Half-moon masking: Apply curved stickers along the cuticle, leaving only the crescent exposed.
- White crescent: Paint opaque white over the exposed crescent area. Two thin coats for full coverage.
- Remove stickers: Peel carefully while the white is still slightly wet for the cleanest line.
- Seal: One coat of top coat over everything to lock both finishes in place.
23.White with Burgundy Swirl Art
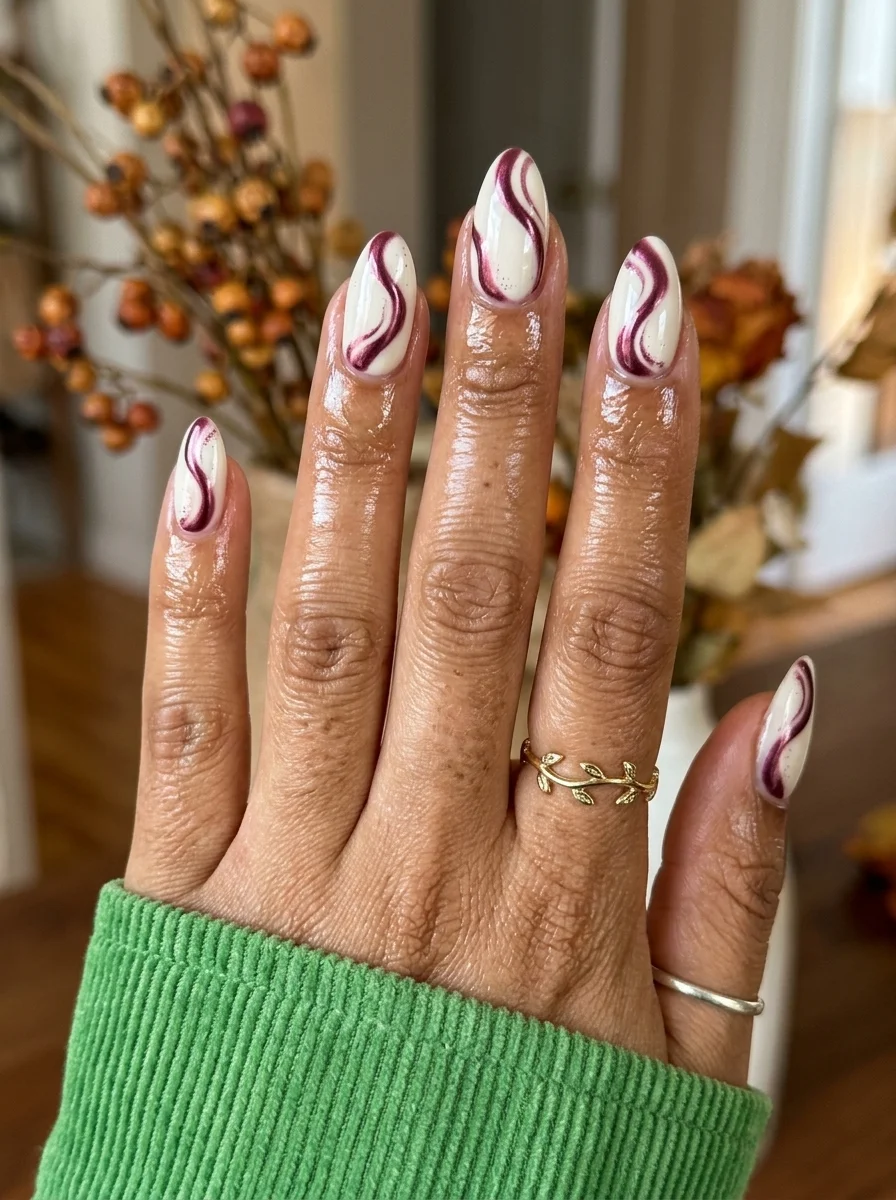
Crisp white meets wine-colored swirls for a bold, artistic contrast.
Overview:
White nails with burgundy swirls create a high-contrast design that reads as both clean and dramatic. The white base acts as a gallery wall, making the burgundy swirls the focal point. The deep red-purple against the bright white creates a visual tension that's hard to ignore.
The swirl patterns are organic and flowing, which softens the stark contrast between the two colors. If the burgundy were applied in geometric shapes, the design would feel rigid. The flowing swirls give it movement and a hand-painted quality that feels more artistic than manufactured.
The challenge with this design is keeping the white pristine while adding the burgundy. Any smearing or bleeding from the dark color into the white is immediately visible. The burgundy needs to be applied with a thin brush and a steady hand, and the top coat needs to be floated over the art rather than dragged across it.
Design Breakdown:
High-contrast two-tone design. The white base makes the burgundy swirls pop.
Base Color: Bright, opaque white. Streak-free coverage is essential.
Nail Shape: Medium almond. The curved shape complements the flowing swirl patterns.
Design Element: Solid white on all nails with deep burgundy swirl art flowing across every nail in organic, wave-like patterns.
Finish: High-gloss top coat to protect the swirl art and make the white look crisp.
Get The Look at Home:
The burgundy swirls go on last, after the white is fully dry. Any tackiness in the white will drag the dark color.
- White base: Two to three coats of opaque white. Let each coat dry fully.
- Seal for paint: Apply a thin coat of top coat and cure. This gives the burgundy paint a smooth surface.
- Burgundy swirls: Using a thin liner brush and burgundy gel paint or polish, draw flowing, organic lines across each nail. Two to three lines per nail, curving in different directions.
- Vary the pattern: Each nail should have a slightly different swirl pattern. Some lines thicker, some thinner.
- Check for bleeding: If any burgundy has bled into the white, clean it up with an angled brush dipped in acetone before the paint dries.
- Seal carefully: Float the top coat over the art in a single stroke per nail. Going back over the same area drags the burgundy into the white.
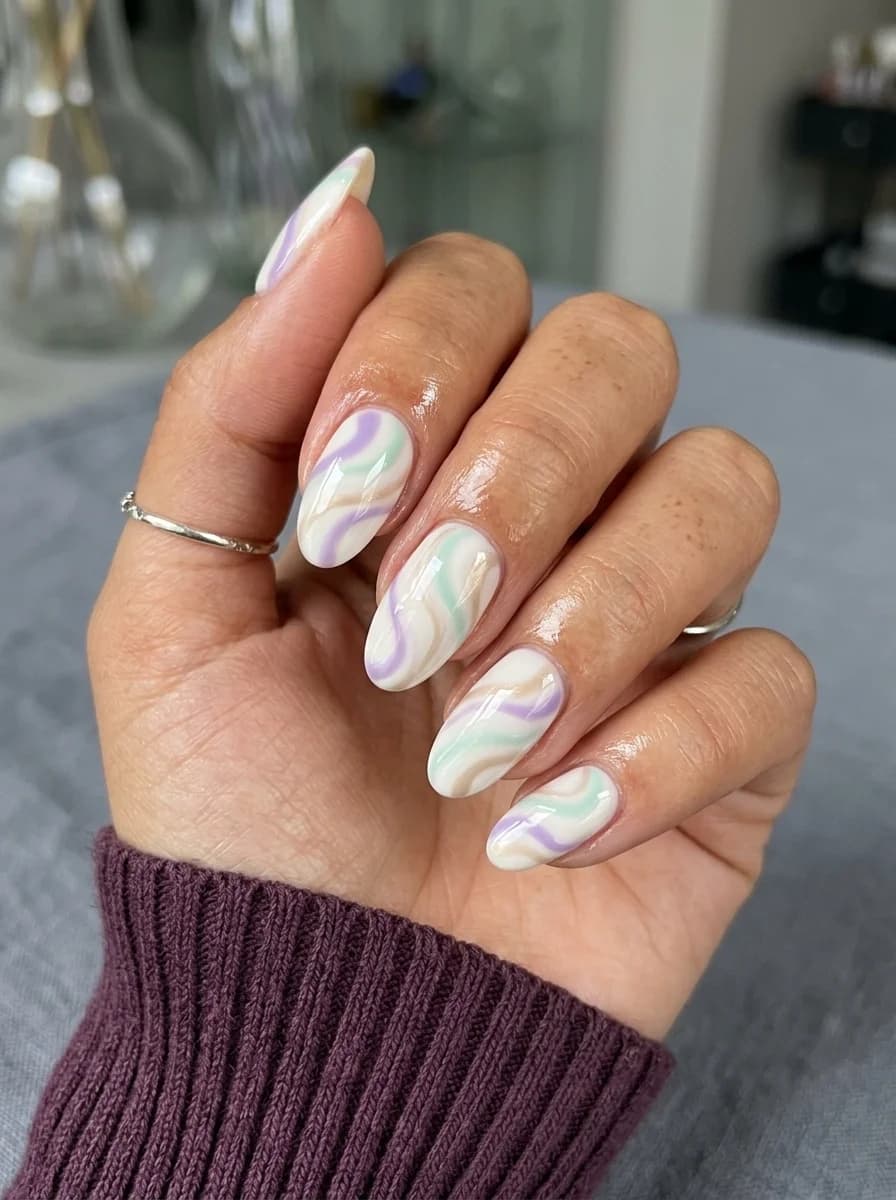
27 August Nail Designs That Capture the Last Days of Summer
24.Sage Green with Silver Swirl Art
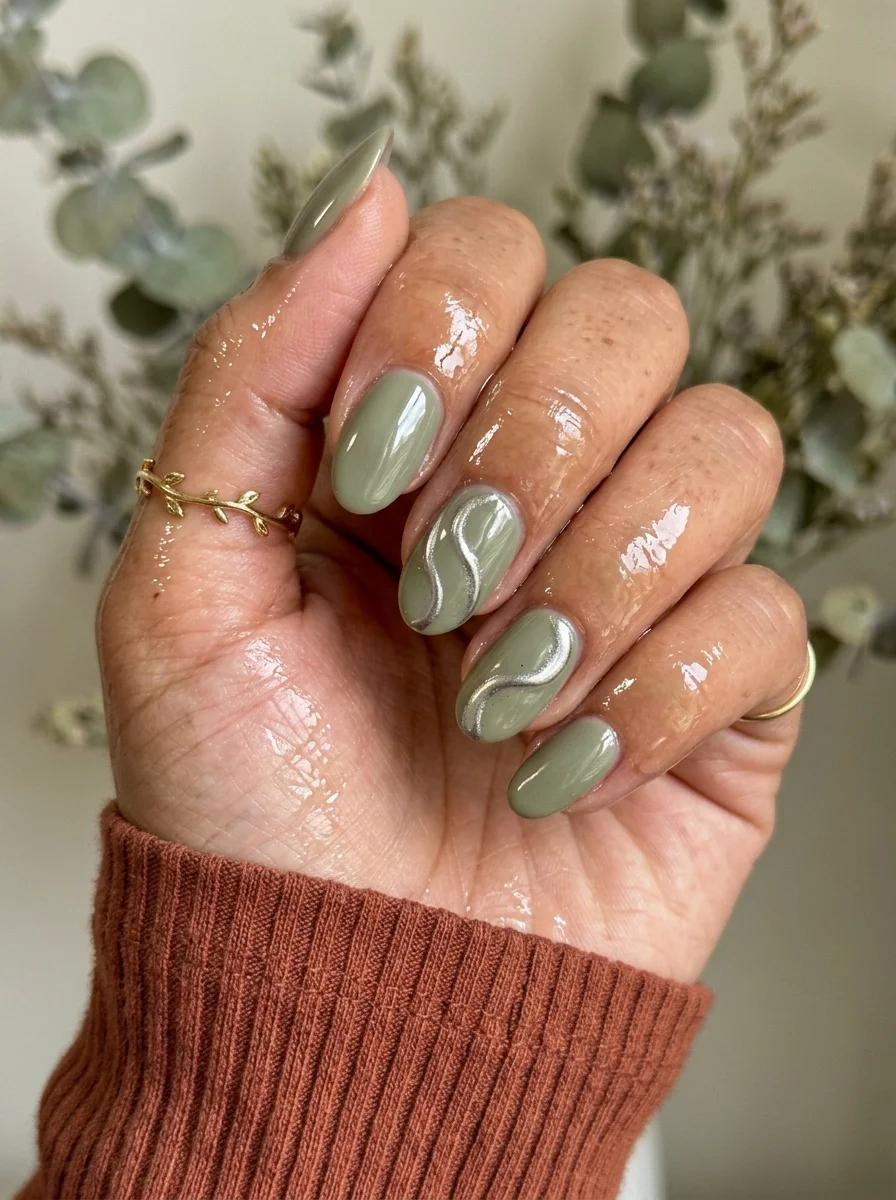
Muted sage meets cool metallic for a grounded, modern design.
Overview:
Sage green is the nail color that bridged the gap between "trendy" and "timeless." It's been popular for several years now, and it's not going anywhere because the color itself is genuinely versatile. On nails, it reads as earthy without being dull, muted without being boring.
The silver swirl lines on two accent nails add a cool-toned metallic element that contrasts with the warm, organic quality of the sage. Silver against sage creates a temperature tension that's subtle but noticeable. The lines don't cover every nail, which keeps the design from feeling overdone. Two accent nails is the right amount.
This is a design that works well for people who want something beyond solid color but find full nail art overwhelming. The sage base does most of the work; the silver swirls are the punctuation. It's the kind of manicure that gets compliments without demanding attention.
Design Breakdown:
Solid muted base with metallic accent art on select nails. The sage carries the design; the silver accents it.
Base Color: Creamy, opaque sage green. Not too grey, not too olive. The green should feel fresh but grounded.
Nail Shape: Medium almond. The curved shape complements the organic flow of the swirl lines.
Design Element: Solid sage on most nails. Two accent nails (middle and ring fingers) with thin silver metallic swirl lines.
Finish: High-gloss top coat. The shine makes the sage look richer and the silver look brighter.
Get The Look at Home:
The swirl art is easier than it looks. The lines don't need to be perfect, just flowing.
- Sage base: Two coats of sage green on all nails. Let each coat dry fully.
- Accent prep: On the middle and ring fingers, apply a thin coat of no-wipe gel top coat and cure. This gives the silver paint a smooth surface.
- Silver swirls: Using a thin liner brush and silver gel paint or metallic polish, draw flowing swirl lines on the accent nails. Two to three lines per nail, curving in different directions.
- Keep it loose: The lines should feel organic, not geometric. Let the brush wobble slightly.
- Seal: One coat of top coat over everything to protect the silver lines and unify the finish.
25.Pearl Chrome with Brown Stripes
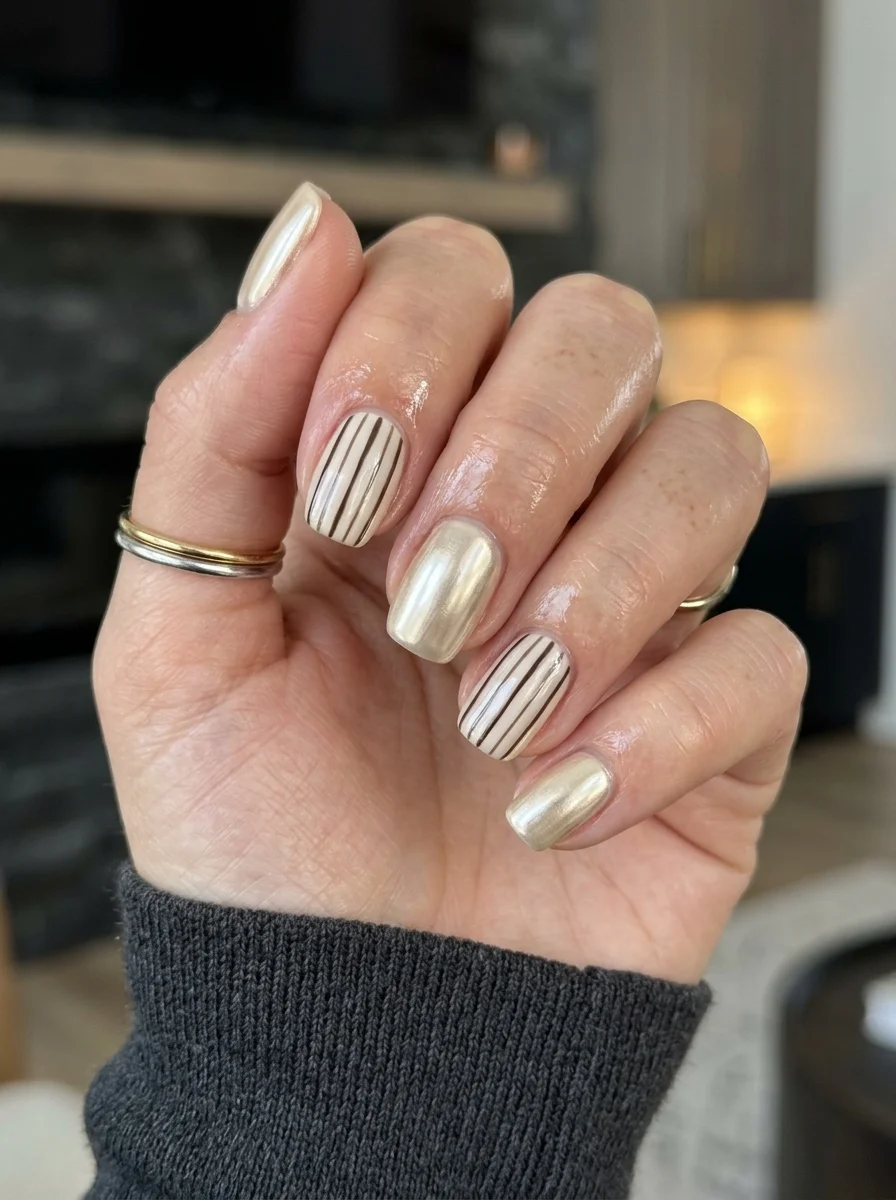
Soft pearl chrome sharpened by warm brown pinstripes.
Overview:
Pearl chrome is one of the softer metallics in the fall palette. It reads as champagne or ivory with a warm, iridescent shimmer rather than a hard mirror finish. On its own, it can look a bit washed out. Adding brown vertical stripes on accent nails gives it structure and a visual anchor.
The brown stripes are thin and evenly spaced, creating a pinstripe effect that reads as both classic and unexpected on nails. The warm brown harmonizes with the champagne tones of the pearl chrome, creating a tonal design that feels considered rather than random.
This is a good design for people who find full chrome too intense. The pearl finish is more forgiving than mirror chrome, it shows fewer fingerprints and scratches, and the brown stripes add enough detail to make it feel designed without going overboard.
Design Breakdown:
Soft metallic base with warm-toned stripe accents. The pinstripe detail adds structure to the ethereal chrome.
Base Color: Pearl or champagne chrome over a nude or cream gel base.
Nail Shape: Short oval. Clean and practical, matching the understated energy of the pearl finish.
Design Element: Pearl chrome on all nails. Two accent nails (index and ring fingers) with thin brown vertical stripes.
Finish: High-gloss top coat to protect the chrome and smooth the stripe texture.
Get The Look at Home:
The stripes are painted after the chrome is sealed. Use a striper brush for consistent line width.
- Pearl chrome base: Apply no-wipe gel top coat, cure, then rub pearl or champagne chrome powder. Buff until smooth.
- Seal chrome: Apply one coat of top coat and cure.
- Stripe prep: On the index and ring fingers, ensure the surface is smooth and sealed.
- Brown stripes: Using a striper brush and brown polish or gel paint, draw thin vertical lines spaced about 2mm apart. Let dry.
- Consistency check: The stripe spacing should be roughly even across both accent nails.
- Seal: One coat of top coat to smooth the raised stripe texture and unify the finish.
27 Stunning Beach Wedding Hairstyles for Brides & Family 2026 🌊💍
26.Tortoiseshell with Silver Chrome Accent
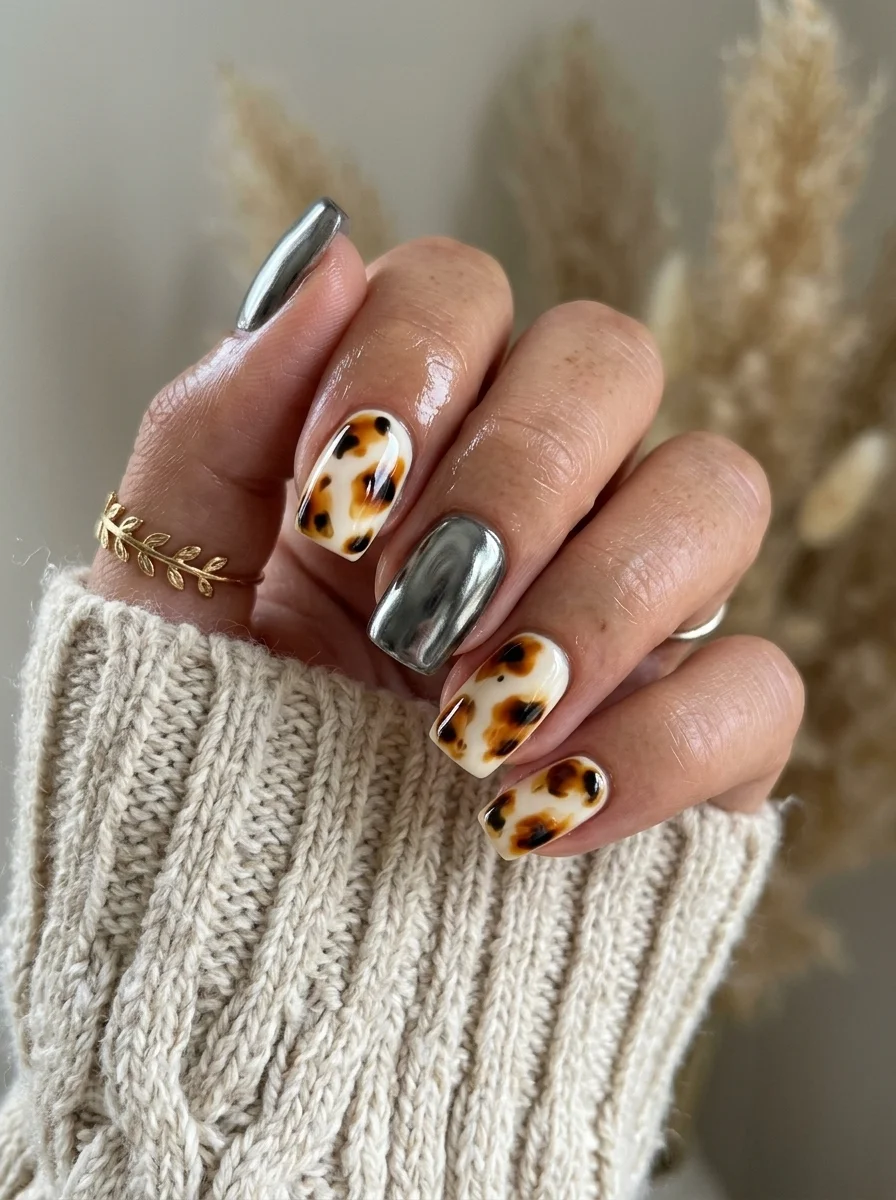
Warm tortoiseshell cooled down with a flash of silver chrome.
Overview:
The standard tortoiseshell pairing is warm on warm, amber, brown, gold. Swapping the gold accent for silver chrome changes the temperature of the entire design. The silver introduces a cool element that creates contrast with the warm tortoiseshell rather than harmonizing with it. The result feels more modern and less vintage.
The tortoiseshell technique here uses a cream base instead of the amber base seen in other versions. This makes the brown and black patches stand out more distinctly against the lighter background. Each spot has sharper edges, which gives the pattern a more graphic, less blended quality.
Silver chrome on short nails is a practical choice. On long nails, a full silver chrome accent can look like a mirror attached to your hand. On short nails, the same chrome reads as a polished metallic detail. The shorter the nail, the more restrained the chrome effect, which is usually what you want for everyday wear.
Design Breakdown:
Classic tortoiseshell with a cool-toned metallic accent. The silver breaks the warm palette.
Base Color: Cream or off-white on the tortoiseshell nails, silver chrome on the accent nail.
Nail Shape: Short oval. Practical and clean, letting the pattern speak for itself.
Design Element: Hand-painted tortoiseshell pattern (brown and black spots on cream) on three nails. Two solid silver chrome accent nail on the thumb and ring finger.
Finish: High-gloss top coat over everything. The shine unifies the tortoiseshell texture and the chrome surface.
Get The Look at Home:
The tortoiseshell spots are layered, not blended. Build them in stages for the cleanest result.
- Cream base: Two coats of opaque cream on three nails. Let dry fully.
- Silver accent: On the thumb and ring finger, apply no-wipe gel top coat, cure, then rub silver chrome powder. Buff until smooth.
- Brown spots: Using a dotting tool and dark brown polish, place irregular blobs on the cream nails. Three to four per nail, varying in size.
- Black accents: Add smaller black dots and streaks around and inside the brown spots. Some spots should have black edges, others should have black centers.
- Layering: Go back with a second layer of brown over some of the black to create depth. The layering is what makes tortoiseshell look dimensional.
- Seal: Two coats of top coat to smooth the raised texture of the layered spot work.
27.Amber and White Ombre with Shimmer
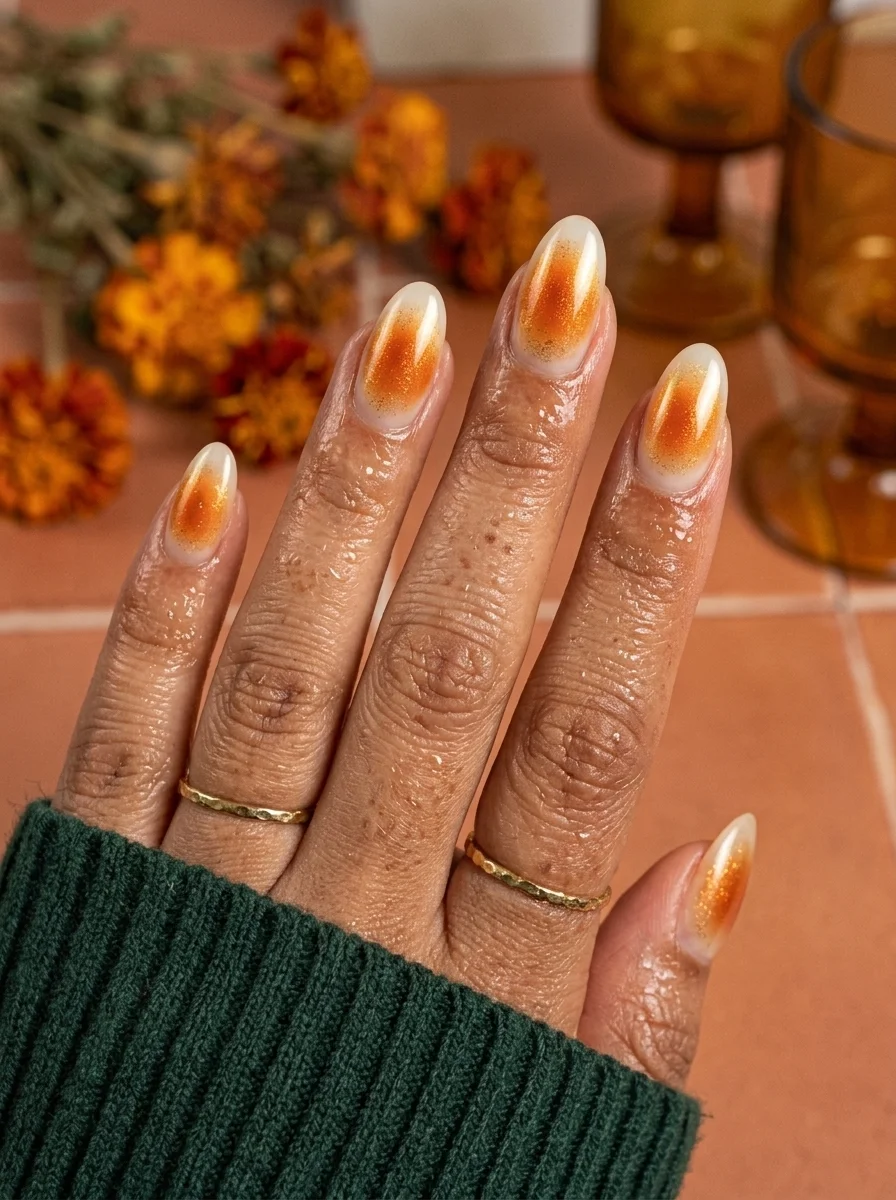
A sunset-inspired gradient with warm golden sparkle.
Overview:
An orange-to-white gradient captures the quality of late-afternoon autumn light, warm, golden, slightly hazy. The shimmer particles scattered throughout add a subtle sparkle that catches light without overwhelming the gradient. It's the difference between a flat sunset and one that actually glows.
The white at the cuticle area keeps the design from reading as too heavy. Without the white, an all-orange gradient can look like a pumpkin. The white lightens the overall effect and makes the orange feel like a deliberate color choice rather than a seasonal default.
The shimmer needs to be fine, not chunky. Large glitter particles fight against the smooth gradient and create a textured surface that distracts from the color transition. Fine shimmer integrates into the gradient and enhances it. Look for iridescent or gold micro- shimmer rather than craft-grade glitter.
Design Breakdown:
Warm gradient with integrated shimmer. The sparkle enhances the sunset effect.
Base Color: White at the cuticle fading to warm amber orange at the tip. Shimmer integrated into the gradient.
Nail Shape: Long almond. The extended tip gives the gradient room to develop.
Design Element: Sponge-applied ombre transitioning from white at the cuticle to warm amber at the tips, with fine gold shimmer throughout.
Finish: High-gloss top coat to blend the gradient and intensify the shimmer.
Get The Look at Home:
The shimmer is applied while the gradient is still slightly tacky, which helps the particles embed into the surface.
- White base: Apply opaque white to the lower third of each nail.
- Orange tips: Apply warm amber orange to the upper two- thirds. These can overlap slightly.
- Blend: Use a dry makeup sponge to tap where the two colors meet until the hard line disappears. Three to four passes.
- Shimmer: While the gradient is still slightly tacky, dab fine gold shimmer onto the surface. Concentrate at the tips and fade toward the cuticle.
- Dry completely: Wait at least ten minutes before top coating. The sponge leaves a textured surface that needs time to level.
- Seal: Two coats of thick top coat to smooth the gradient texture and encapsulate the shimmer.
28 Back to School Nail Art Designs for the New Semester (2026) 💅
28.Teal-Purple Color-Shifting Chrome
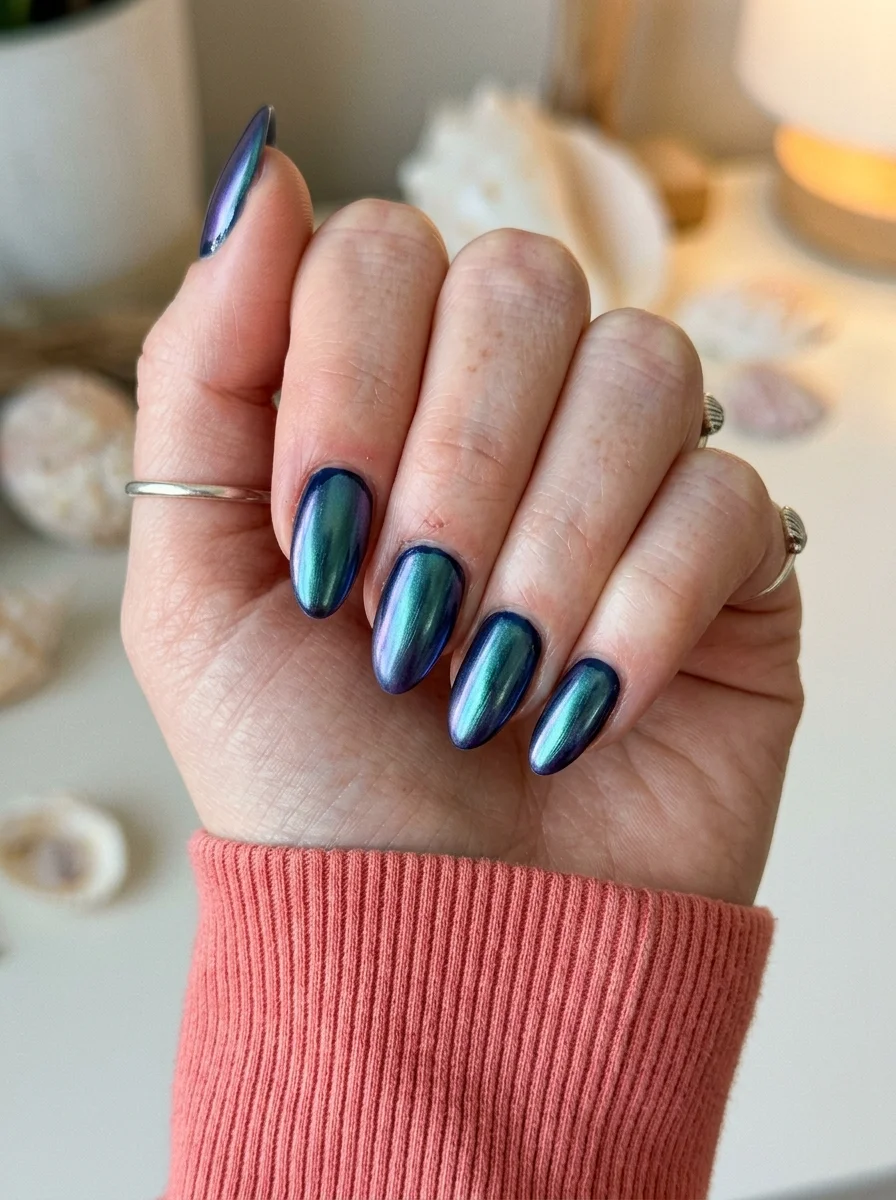
A duochrome that shifts between two jewel tones with every movement.
Overview:
Color-shifting chrome is one of those finishes that looks like magic until you understand the chemistry. The chrome powder contains interference pigments that reflect different wavelengths of light depending on the viewing angle. In this case, the nail reads as teal from one direction and purple from another, with a blue transition zone between them.
The effect is most dramatic on longer nails, where there's more surface area for the color shift to develop. On short nails, the shift happens too quickly for the eye to catch both colors simultaneously. Medium to long almond is the sweet spot where you can see both the teal and the purple at the same time.
The practical downside of color-shifting chrome is that it photographs differently depending on the lighting. You'll get teal in some photos, purple in others, and blue in a few. If you want consistent photos, this isn't the design for you. If you want a manicure that literally changes color throughout the day, this is exactly it.
Design Breakdown:
Multi-chrome finish that shifts between teal and purple. The color change IS the design.
Base Color: Black gel under duochrome or multi-chrome powder. The dark base is essential for the color shift to show.
Nail Shape: Medium to long almond. The extended surface area maximizes the visible color shift.
Design Element: Full color-shifting chrome on all nails. No additional art needed.
Finish: High-gloss top coat to intensify the chrome and protect the color-shifting pigments.
Get The Look at Home:
The black base is non-negotiable. Chrome over lighter bases won't show the full color shift.
- Black base: Two coats of opaque black gel on all nails. Cure between coats.
- No-wipe top: Apply a no-wipe gel top coat. Cure fully.
- Chrome powder: Using a silicone applicator, rub the duochrome powder over the entire nail. You'll see the color shift immediately as you buff.
- Buff to mirror: Continue buffing until the surface is smooth and the color shift is at its most dramatic.
- Dust off: Remove excess powder from around the cuticles.
- Seal: One coat of top coat, capping the free edge. The seal protects the interference pigments from wear.
29.Grey Cat-Eye Magnetic
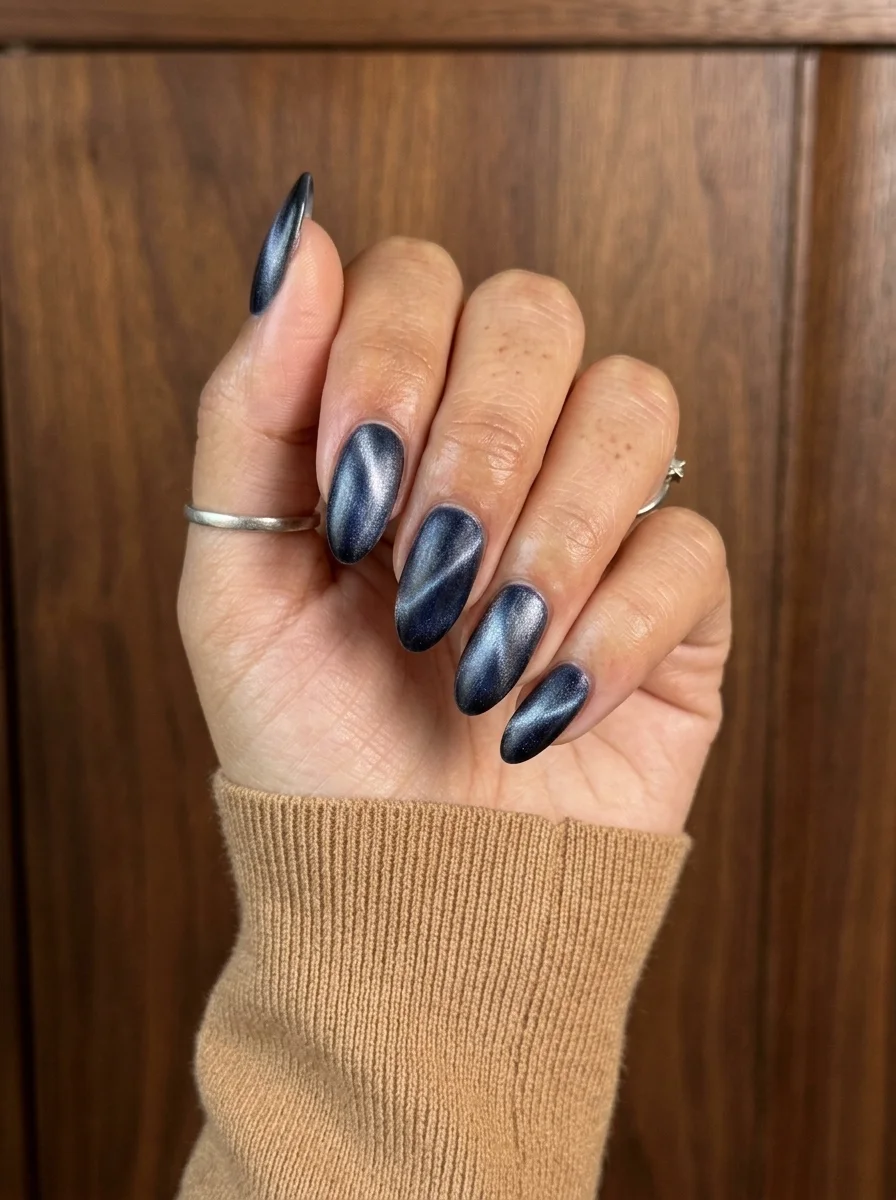
A magnetic polish that creates its own light source.
Overview:
Cat-eye magnetic polish is one of the few nail techniques where the design creates itself. You apply the polish, hold a magnet over the wet surface, and the magnetic particles align into a concentrated light stripe that looks like a cat's eye gemstone. The effect is dimensional and shifts as your hand moves, which gives the nails a quality that regular polish can't replicate.
Dark grey is one of the most wearable cat-eye colors. It reads as sophisticated and moody without being as heavy as black or as bright as jewel tones. The magnetic stripe in this shade looks like a beam of light caught under glass, which creates a subtle luxury that works for both everyday wear and special occasions.
The magnet needs to be held steadily for three to five seconds per nail. Moving the magnet too quickly or too far from the surface creates a diffused stripe rather than a sharp one. Practice on a practice tip first to find the right distance and timing.
Design Breakdown:
Magnetic polish that creates a dimensional light stripe. The effect is built into the formula.
Base Color: Dark grey cat-eye magnetic polish. The formula contains iron particles that respond to magnets.
Nail Shape: Medium almond. The curved surface helps the magnetic stripe catch light from multiple angles.
Design Element: Full cat-eye magnetic on all nails. The concentrated light stripe is the design.
Finish: High-gloss top coat to intensify the magnetic effect and create a glass-like surface.
Get The Look at Home:
The magnet must be held over wet polish. If the polish starts to dry, the particles won't move.
- Base coat: Apply a standard base coat and let it dry.
- First coat: Apply one coat of cat-eye magnetic polish. Don't use the magnet yet. Let it dry.
- Second coat: Apply a second, slightly thicker coat of magnetic polish. Work one nail at a time.
- Magnet: Immediately hold the magnet 3-5mm above the wet polish. Hold steady for three to five seconds. The magnetic particles will align into a bright stripe.
- Repeat: Move to the next nail and repeat the magnet step. Don't go back to previous nails once the polish starts to set.
- Seal: After all nails are magnetized and dry, apply two coats of top coat to smooth the surface and intensify the effect.

21 Hot Summer Buns Hairstyle Ideas for 2026 ☀️🔥
30.Green-Purple Color-Shifting Chrome
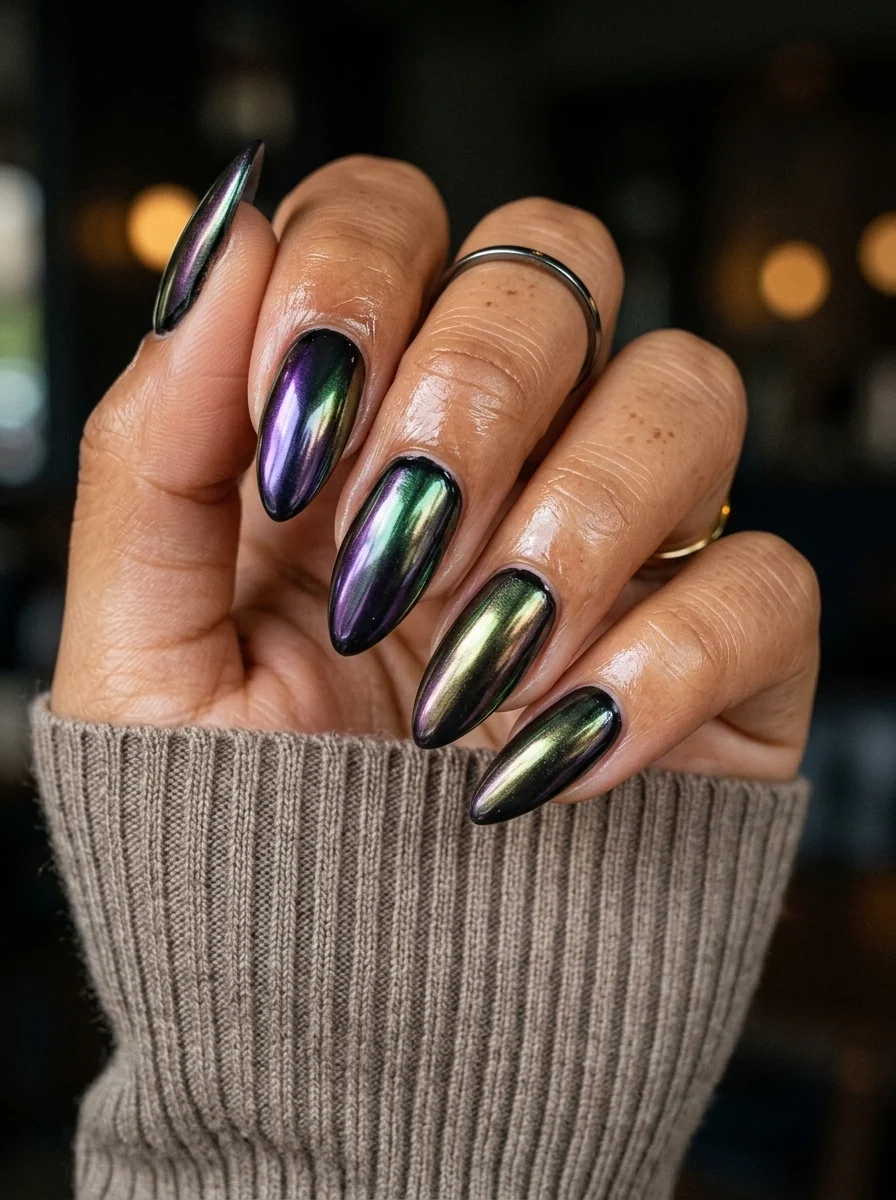
A dark duochrome that shifts from emerald to violet with gold in between.
Overview:
This color-shifting chrome takes a different approach than the teal- purple version. The shift here moves from deep emerald green to rich purple, with a gold transition zone that appears at certain angles. The three-color shift makes this feel more like an oil slick than a simple two-tone chrome.
The longer almond shape is essential for this particular chrome. The shift needs enough surface area to develop all three colors simultaneously. On shorter nails, you'd only see one color at a time, which defeats the purpose of a multi-chrome. The extended tip gives the green, gold, and purple room to coexist.
This is a high-impact design that doesn't need any additional art. The chrome itself is the statement. Adding patterns or accent nails would compete with the color shift rather than complementing it. Sometimes the most effective design choice is to let the finish do all the work.
Design Breakdown:
Multi-chrome with a three-color shift. The green-gold-purple transition is the entire design.
Base Color: Black gel under green-to-purple multi-chrome powder. The dark base is essential for the full shift to show.
Nail Shape: Long almond. The extended surface area maximizes the visible color range.
Design Element: Full color-shifting chrome on all nails. No additional art or accents.
Finish: High-gloss top coat to protect the chrome and intensify the color shift.
Get The Look at Home:
The chrome powder application is the same as any other chrome. The magic is in the pigment, not the technique.
- Black base: Two coats of opaque black gel. Cure between coats.
- No-wipe top: Apply a no-wipe gel top coat. Cure fully.
- Chrome powder: Rub the green-to-purple multi-chrome powder over the entire nail. You'll see the colors shift as you move the applicator.
- Buff to mirror: Continue buffing until the surface is smooth and the color shift is at its most dramatic.
- Dust off: Remove excess powder from around the cuticles.
- Seal: One coat of top coat, capping the free edge to prevent chipping.
31.Sage Green Plaid with Gold Stripes
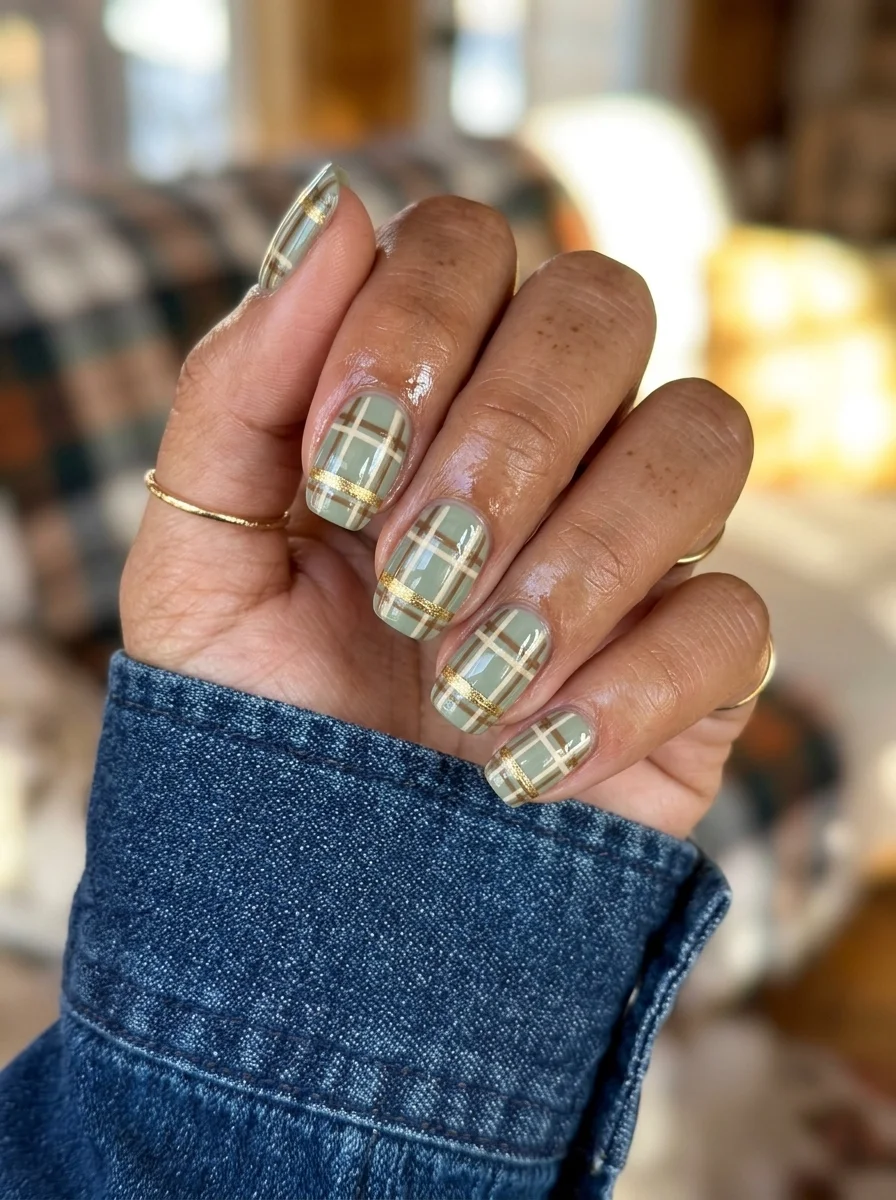
Classic autumn plaid in muted sage with warm gold accents.
Overview:
Plaid in sage green is a more subdued take on the teal plaid seen elsewhere in fall collections. The sage reads as earthy and muted rather than bold and jewel-toned, which makes the design feel more casual and everyday-appropriate. The gold stripes add warmth without shouting.
The plaid pattern here uses white and gold over the sage base, creating a grid where the intersections show all three colors layered together. The gold stripes catch light independently of the sage and white, which adds a dimensionality that flat plaid can't achieve. It's tartan with a metallic twist.
Short oval keeps the design proportional. The plaid pattern needs fewer grid intersections to read clearly on shorter nails, and the sage base is subtle enough that it doesn't overwhelm the hand. This is a design that works well for people who want pattern without drama.
Design Breakdown:
Muted green base with metallic plaid grid. The gold stripes add warmth and dimension.
Base Color: Creamy sage green on all nails.
Nail Shape: Short oval. Clean and practical, matching the understated palette.
Design Element: Sage green base with white and gold plaid grid lines on all nails.
Finish: High-gloss top coat to smooth the stripe texture and deepen the sage.
Get The Look at Home:
The gold stripes go on last. White and sage are easier to correct if needed.
- Sage base: Two coats of sage green on all nails. Let dry fully.
- White horizontal lines: Using a striper brush and white polish, draw thin horizontal lines spaced about 3mm apart. Let dry.
- White vertical lines: Draw vertical lines at the same spacing, creating a grid.
- Gold accent lines: Add thinner gold metallic lines alongside some of the white lines for warmth. Not every line needs gold, just enough to add dimension.
- Check consistency: The stripe spacing should be roughly even across all nails.
- Seal: One thick coat of top coat to smooth the raised stripe texture.
32 Bright & Fun Summer Toe Nail Designs (2026)
32.Deep Purple with Silver Swirl Art
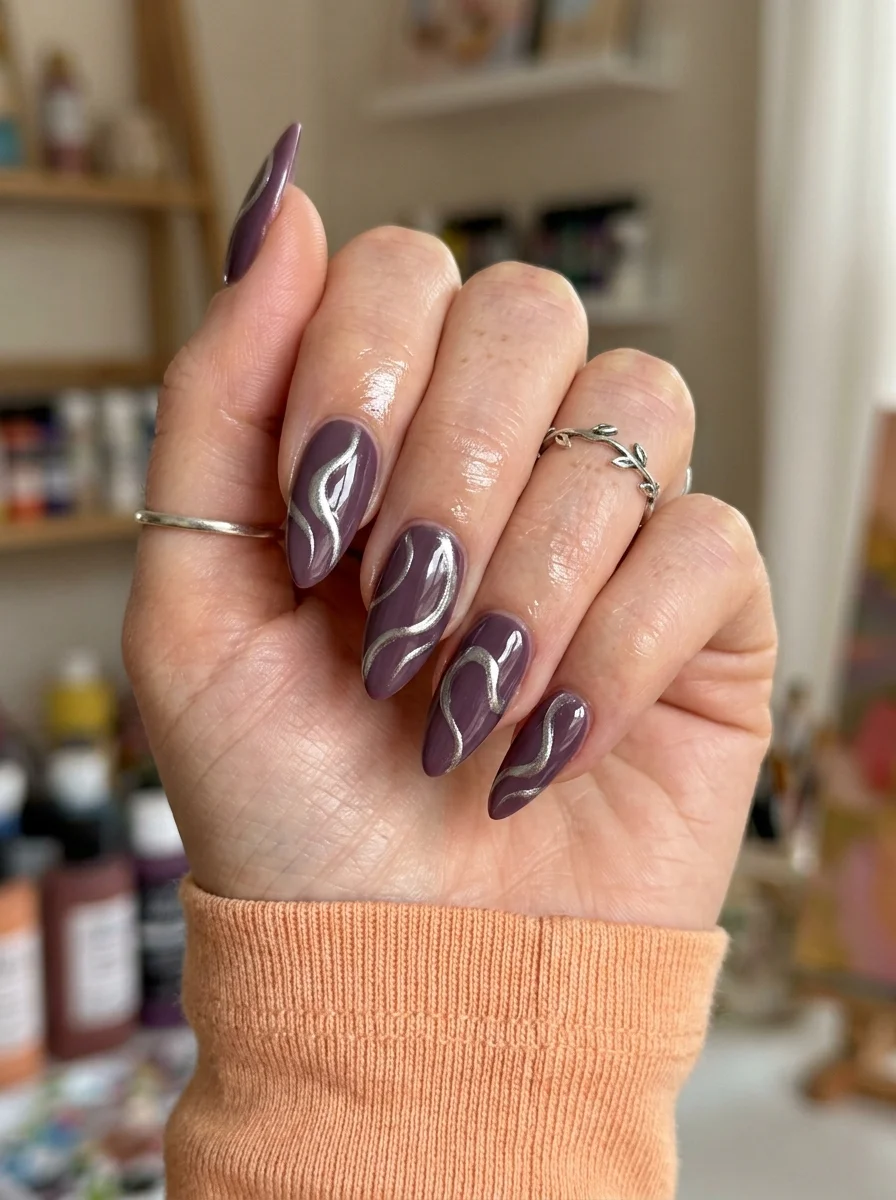
Moody purple with flowing metallic accents for a refined fall set.
Overview:
Dusty plum occupies a specific territory in the purple family: dark enough to feel moody, muted enough to avoid looking like a children's costume. The grey undertone in this particular shade is what keeps it sophisticated. It reads as a grown-up purple, the kind you'd pair with a wool coat and ankle boots.
The silver swirl lines flowing across the nails add movement and dimension to what would otherwise be a solid-color manicure. The metallic silver catches light independently of the plum base, which creates a layered shimmer that shifts as your hand moves. It's the difference between a static color and a living design.
These swirls are painted on every nail rather than just accent nails, which is a bolder choice. When the metallic art covers the full set, the design reads as more cohesive and intentional. The risk is that it can feel busy on shorter nails, so medium-length almond is the sweet spot.
Design Breakdown:
Muted jewel-tone base with metallic line art across all nails. The silver adds movement to the purple.
Base Color: Dusty plum or muted mauve-purple. Something with enough grey to keep it from reading as bright purple.
Nail Shape: Medium almond. The curved shape gives the swirl lines room to flow naturally.
Design Element: Full plum base on all nails with thin silver metallic swirl lines flowing across every nail in organic, wave-like patterns.
Finish: High-gloss top coat. The shine deepens the plum and makes the silver pop.
Get The Look at Home:
The swirls should feel like one continuous movement across the hand, not isolated designs on each nail.
- Plum base: Two coats of dusty plum on all nails. Let dry fully.
- Seal for paint: Apply a thin coat of top coat and cure. This gives the silver paint a smooth surface to grip.
- Silver swirls: Using a thin liner brush and silver gel paint, draw flowing, organic lines across each nail. Start at one edge and curve toward the other. Two to three lines per nail.
- Connect across nails: Try to have the lines on adjacent nails flow in complementary directions, as if one line continues from one nail to the next.
- Seal: One coat of top coat over everything to protect the silver lines and unify the finish.
33.Red Chrome with Polka Dot and Pink Accent
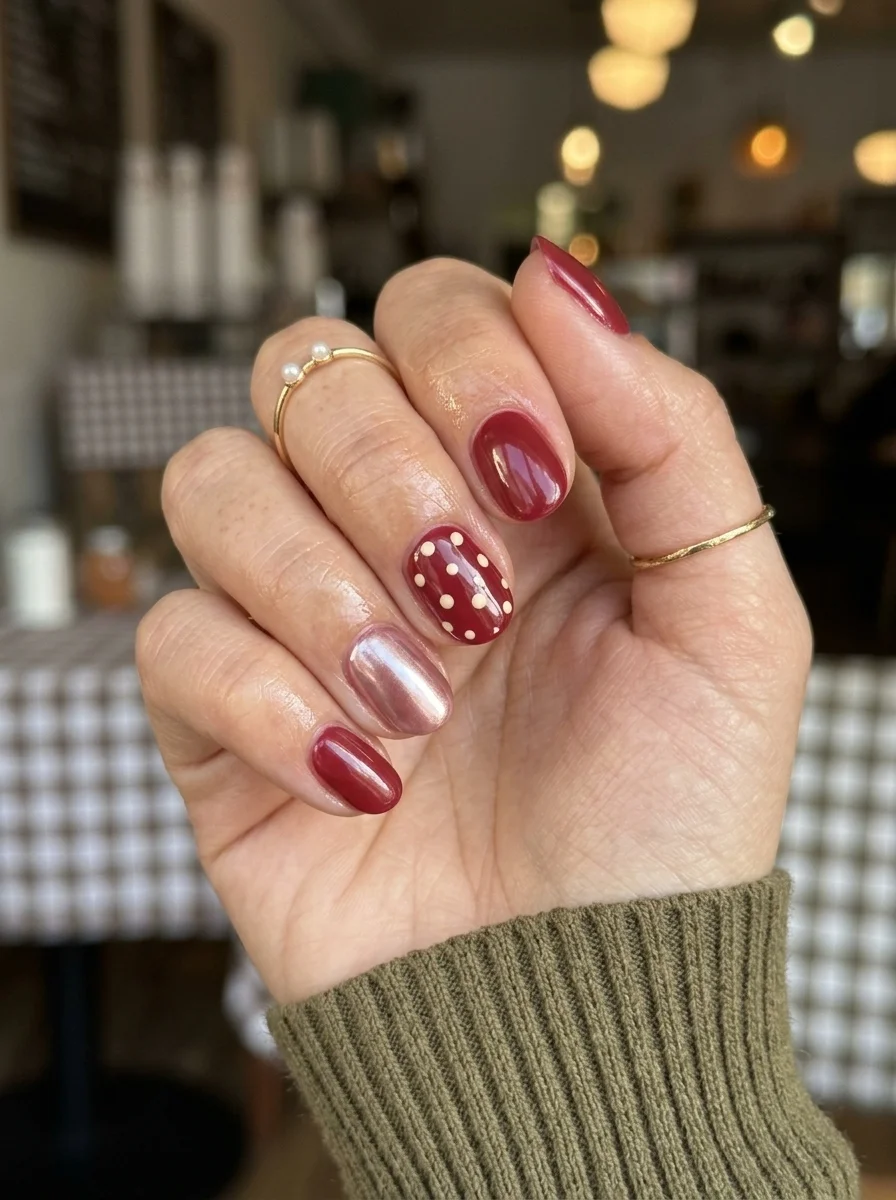
A playful trio of red, pink, and dots that breaks every matching rule.
Overview:
This design breaks the matching rule on purpose. Most nail sets try to create cohesion through repetition. Here, the cohesion comes from the shared warm undertone across three different elements: deep red chrome, bright pink chrome, and red with cream polka dots. Every color in the set belongs to the same warm family, which is what keeps the variety from feeling random.
The polka dot accent nail is the curveball. It introduces a pattern element that the other nails don't have, which creates a focal point that rewards closer inspection. From a distance, the dots read as texture. Up close, they reveal themselves as a deliberate design choice. That dual reading is what makes accent nails effective.
The pink chrome accent breaks the red dominance and adds a lighter, brighter note to the set. Without it, you'd have red nails with dots. With it, you have a three-part story where each nail type serves a different purpose. The red establishes the mood, the pink provides contrast, and the dots add personality.
Design Breakdown:
Three distinct nail types united by warm undertones. Each nail serves a different purpose in the set.
Base Color: Deep red chrome on most nails. Bright pink chrome on one accent nail. Red with cream polka dots on another.
Nail Shape: Short oval. Clean and practical, keeping the design casual and wearable.
Design Element: Red chrome on three nails. Pink chrome on the ring finger. Cream polka dots on the middle finger over the red chrome base.
Finish: High-gloss top coat over everything to unify the different finishes.
Get The Look at Home:
Do all the chrome nails first, then add the polka dots last. The dots go over sealed chrome.
- Red chrome nails: Apply no-wipe gel top coat, cure, then rub deep red chrome powder on three nails. Buff until smooth.
- Pink chrome accent: On the ring finger, apply no-wipe gel top coat, cure, then rub bright pink chrome powder. Buff until smooth.
- Seal all chrome: Apply one coat of top coat over every nail and cure.
- Polka dots: On the middle finger, use a small dotting tool and cream or off-white polish to place scattered dots across the red chrome surface.
- Dot spacing: Space the dots roughly 3mm apart in a staggered pattern. Five to seven dots per nail.
- Seal: One coat of top coat over everything to protect the dots and unify the finish.
32 Stunning Summer Wedding Hairstyles for Brides ☀️💍
34.Navy Chrome with Silver Half-Moon
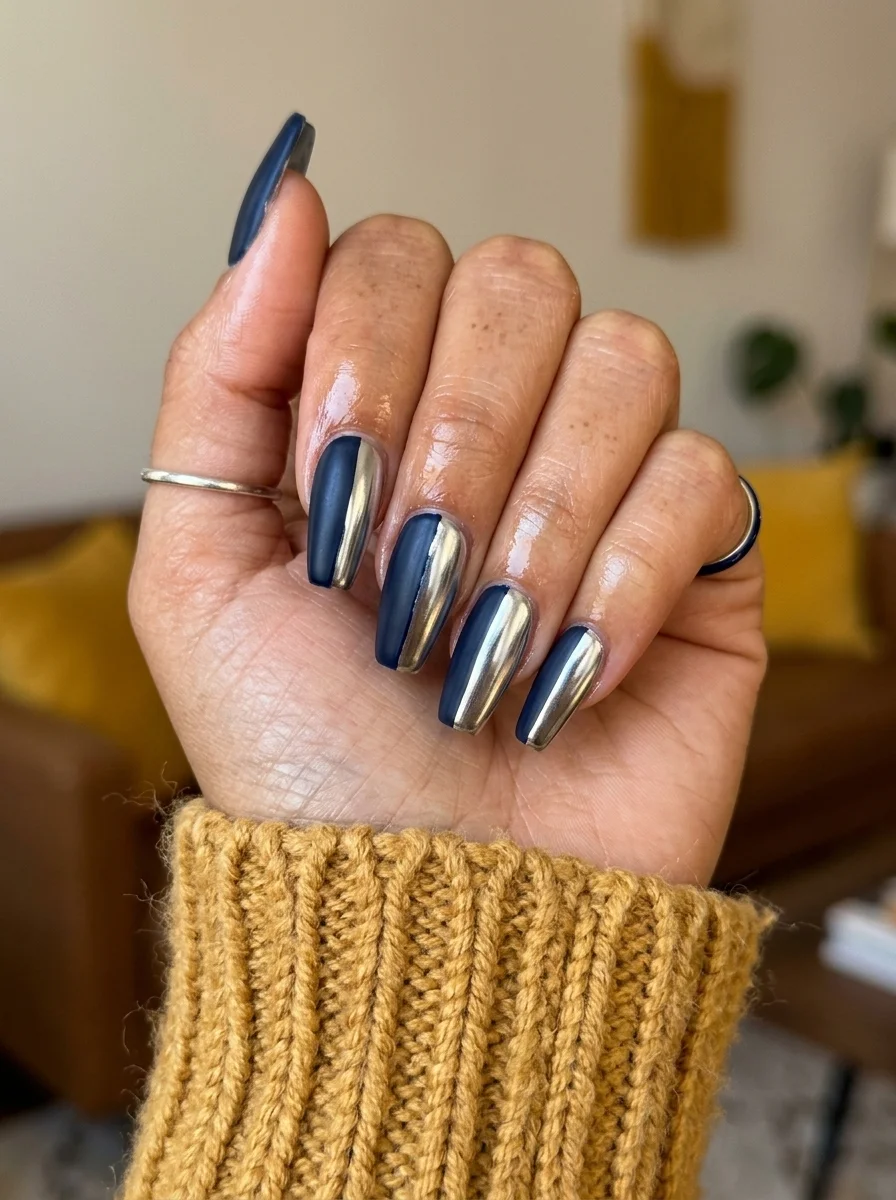
Midnight blue meets mirror chrome in a split-design statement.
Overview:
This design takes the French tip concept and inverts it. Instead of a thin line at the tip, the silver chrome covers the entire lower half of the nail, creating a bold two-tone split. The navy occupies the top half; the silver occupies the bottom. The line between them is sharp and deliberate, which is what makes the design read as modern rather than random.
The navy chrome has a depth that cream navy can't achieve. The metallic finish gives the dark blue a dimensional quality, like looking into deep water. The silver chrome on the lower half creates a bright counterpoint that keeps the dark blue from reading as too heavy.
Long coffin is the ideal shape for this design. The flat tip gives the navy section a clean geometric edge, and the long sides provide enough surface area for the two-tone split to register clearly. On short nails, the same design would feel cramped.
Design Breakdown:
Two-tone chrome split. The navy and silver each cover half the nail, divided by a clean horizontal line.
Base Color: Navy blue chrome on the upper half, silver chrome on the lower half. Both over their respective gel base colors.
Nail Shape: Long coffin. The flat tip and long sides give the two-tone design room to breathe.
Design Element: Split chrome design with navy on the tip half and silver on the cuticle half, separated by a clean horizontal line.
Finish: High-gloss top coat over everything. Both chrome sections should read as equally reflective.
Get The Look at Home:
The horizontal split line is the hardest part. Tape it off for the cleanest result.
- Silver chrome first: Apply no-wipe gel top coat over the lower half of each nail, cure, then rub silver chrome powder. Buff until smooth.
- Tape the line: Apply thin striping tape horizontally across the nail where you want the split. Press firmly.
- Navy chrome: Apply no-wipe gel top coat over the exposed upper half, cure, then rub navy or dark blue chrome powder. Buff.
- Remove tape: Peel carefully. The line between the two chromes should be sharp.
- Seal: One thick coat of top coat over everything to lock both chromes in place and smooth any texture at the split line.
35.Teal Plaid with Silver Stripes
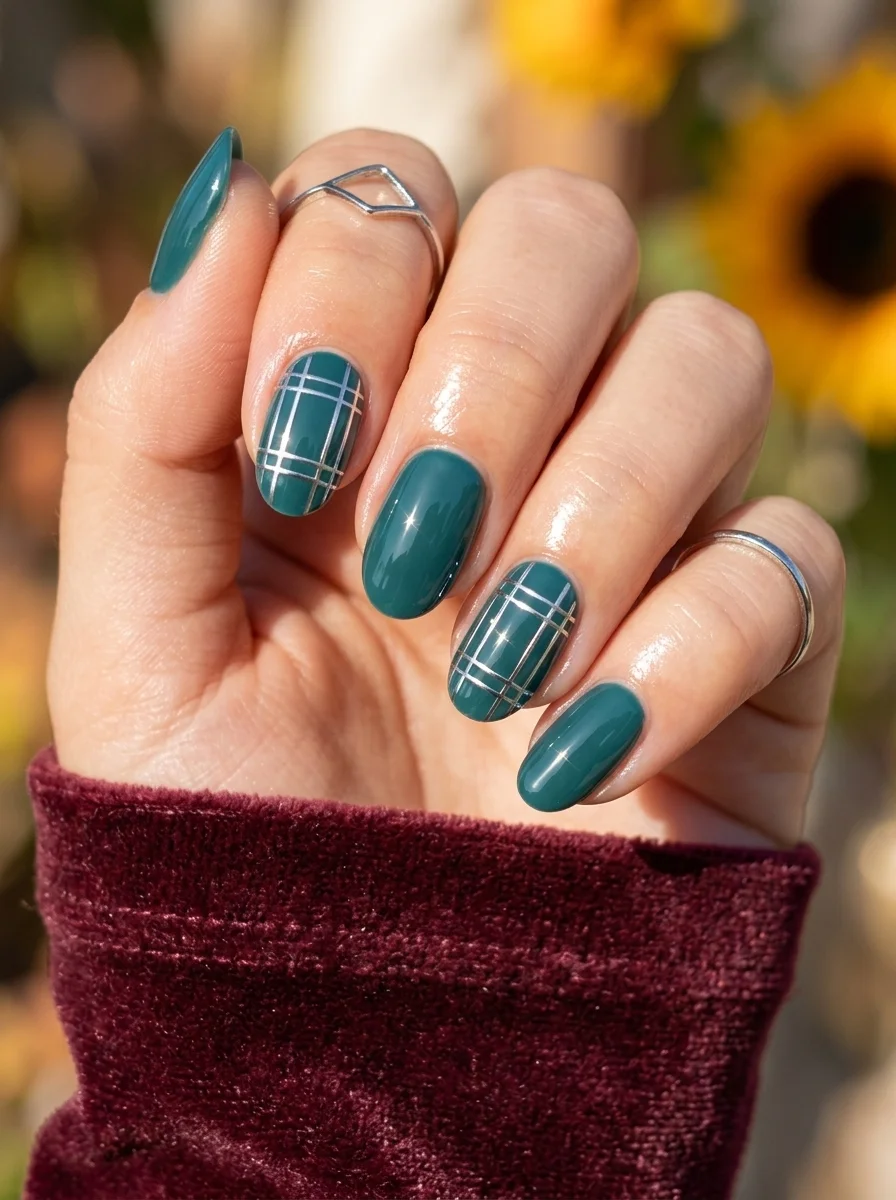
Classic plaid reinterpreted in jewel-tone teal and silver.
Overview:
Plaid is one of those patterns that automatically reads as fall. It's the association with flannel, scarves, and autumn textiles that does the heavy lifting. Translating that pattern onto nails in teal and silver shifts the reference from "cozy cabin" to something more polished. The teal grounds the design; the silver elevates it.
The plaid pattern uses thin silver stripes on a solid teal base, creating a grid where the intersections naturally look slightly brighter due to the doubled-up metallic. That layering effect is what makes plaid look like plaid rather than just a grid. The silver catches light at the crossings, which adds dimension to an otherwise flat pattern.
This design works on almond nails because the curved shape softens the geometric grid. On square nails, plaid can read as rigid and boxy. On almond, the lines curve slightly with the nail, which makes the pattern feel more organic and less like a printed textile.
Design Breakdown:
Jewel-tone base with metallic grid pattern. The silver intersections create the plaid effect.
Base Color: Deep teal or petroleum blue. Rich and opaque, not too bright, not too dark.
Nail Shape: Medium almond. The curved surface gives the plaid lines a subtle organic quality.
Design Element: Solid teal on some nails, teal with silver plaid pattern (horizontal and vertical silver stripes) on accent nails.
Finish: High-gloss top coat to smooth the stripe texture and deepen the teal.
Get The Look at Home:
Do the horizontal stripes first, let them dry, then the vertical. Wet stripes dragged across wet stripes smear.
- Teal base: Two coats of opaque teal on all nails. Let dry fully.
- Horizontal lines: Using a long striper brush and silver metallic polish, draw thin horizontal lines spaced about 3mm apart on the accent nails. Let dry completely.
- Vertical lines: Draw vertical lines at the same spacing. Where they cross the horizontal lines, the silver overlaps and creates brighter intersections.
- Check consistency: Hold both hands side by side. The stripe spacing should be roughly even across all plaid nails.
- Seal: One thick coat of top coat to smooth the raised stripe texture and unify the finish.
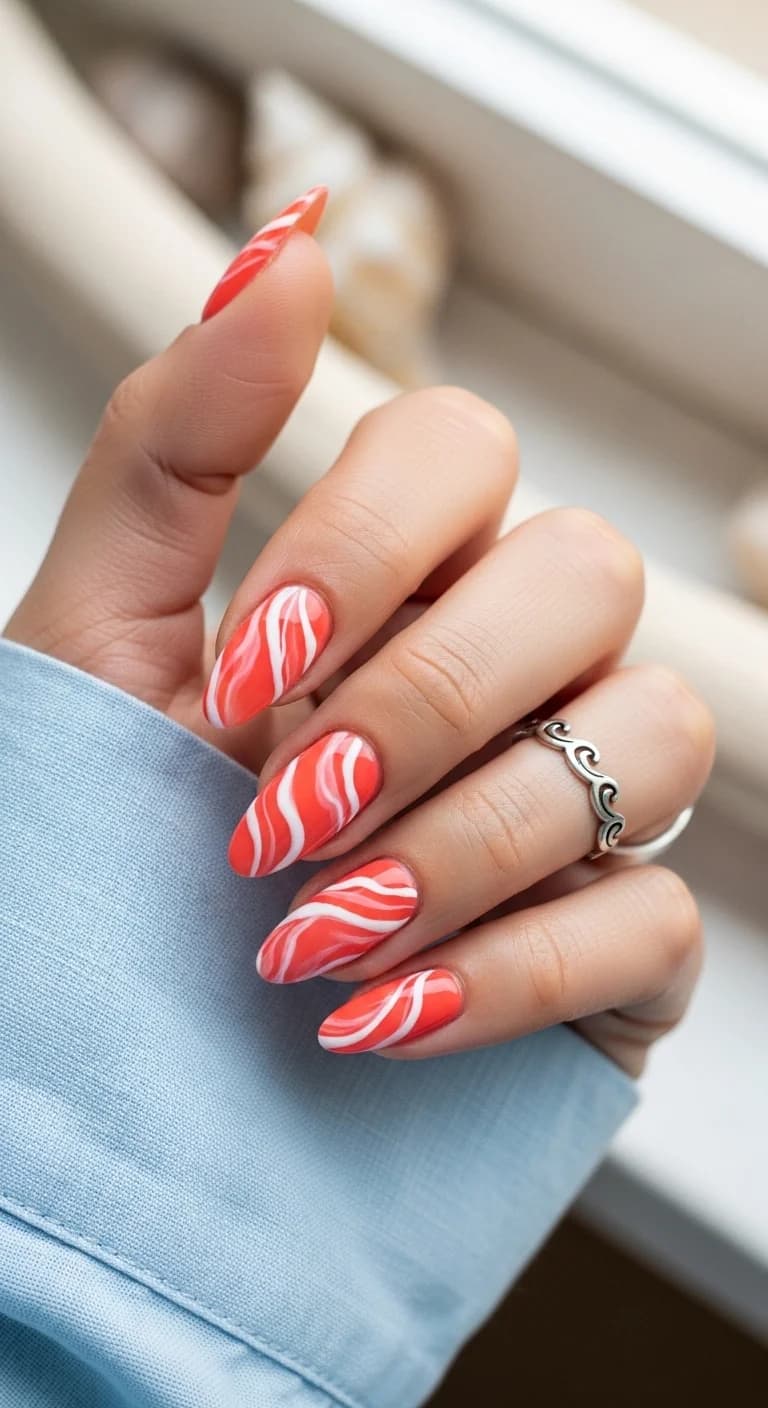
29 Stunning Summer Almond Nails for Women in 2026 💅
36.Terracotta with Rose Gold French Tips
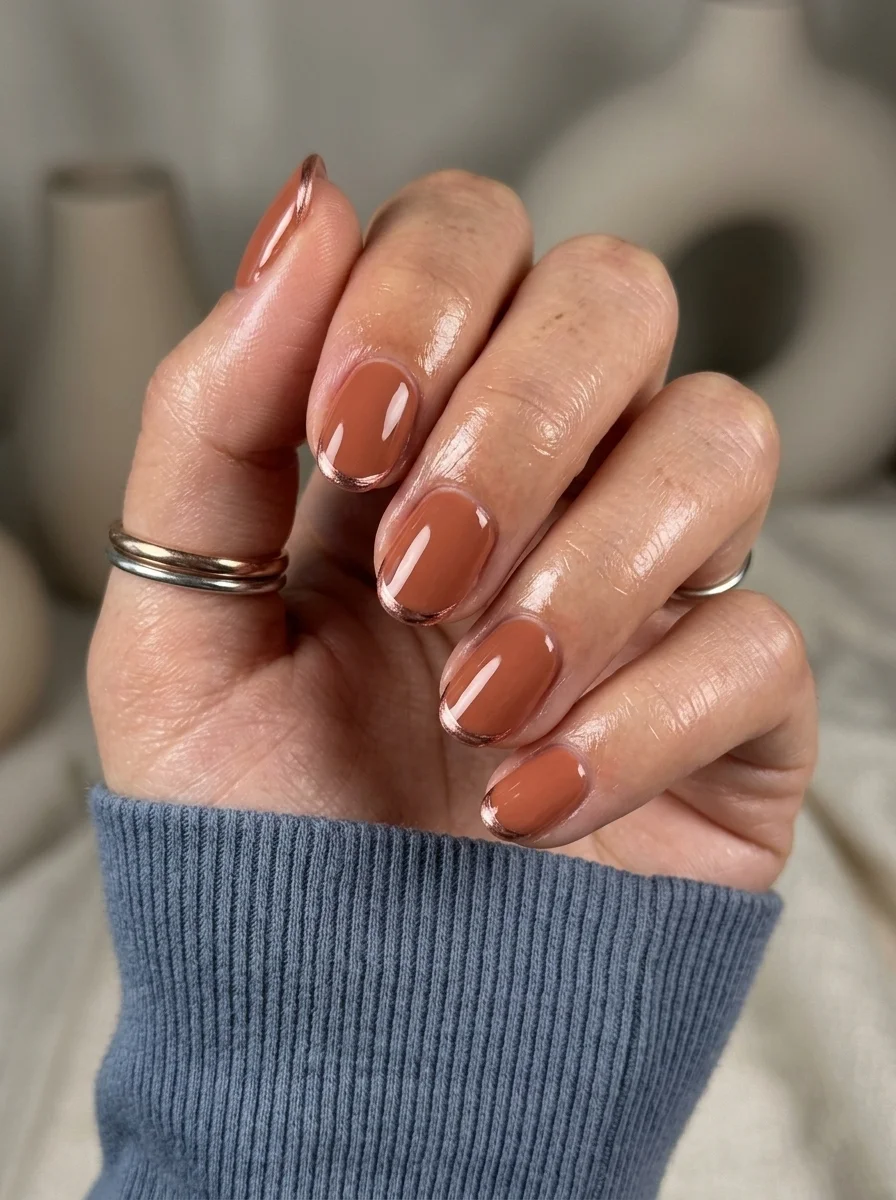
Warm clay tones finished with a gleaming metallic edge.
Overview:
Terracotta is the color that makes everyone's skin tone look warmer. It sits in that sweet spot between orange and brown that reads as autumn without being as obvious as pumpkin or burnt sienna. On nails, it has enough depth to feel intentional without being so dark that it loses its warmth.
The rose gold French tips are subtle, just a thin metallic line at the very edge of the nail. They catch light when your hand moves and add a polished detail that separates this from a plain terracotta manicure. The warm undertones of rose gold harmonize with the terracotta rather than contrasting against it, which is why the combination feels cohesive instead of busy.
Short oval keeps this design everyday-friendly. The terracotta color works on any nail length, but the short shape reinforces the "effortly polished" quality. Long terracotta nails can read as dramatic; short terracotta nails read as considered.
Design Breakdown:
Warm earth-tone base with a thin metallic French detail. The rose gold picks up the terracotta's warmth.
Base Color: Warm terracotta or burnt sienna. Not too orange, not too brown. The color of sun-dried clay.
Nail Shape: Short oval. Clean, practical, and modern. The short length keeps the design understated.
Design Element: Solid terracotta on all nails with thin rose gold chrome French tips on every nail.
Finish: High-gloss top coat to make the terracotta look saturated and the rose gold look reflective.
Get The Look at Home:
The French tips are thin. Use a striping brush or French liner for precision.
- Terracotta base: Two coats of warm terracotta on all nails. Let each coat dry fully.
- Tip masking: Apply thin striping tape along the smile line, leaving only the very tip exposed.
- No-wipe for chrome: Paint a thin no-wipe gel top coat over the exposed tips. Cure.
- Rose gold chrome: Rub rose gold chrome powder onto the tips. Buff gently with a silicone tool until smooth.
- Remove tape: Peel carefully at a low angle to keep the line clean.
- Seal: One coat of top coat over everything to lock both finishes in place.
Fall chrome nails prove that metallic finishes aren't just for holiday parties and New Year's Eve. The warm, moody tones that define autumn, from copper to burgundy to forest green, translate beautifully into chrome, creating nails that feel both seasonal and luxurious. The key is choosing the right chrome tone to complement the underlying color.
Save your favorite designs to your Pinterest board so you have them ready for your next salon visit or at-home manicure session. Your next autumn-ready chrome set is just one appointment away.